Page 142 of 215
140Vehicle careBonnetOpening
Pull the release lever and return it to
its original position.
Pull the safety catch, located slightly
left of centre, and open the bonnet.
Pull up the support rod from its holder,
then secure it in the right side hook on the underside of the bonnet.
If the bonnet is opened during an Autostop, the engine will be restarted
automatically for safety reasons.
Closing
Before closing the bonnet, press the
support into the holder.
Lower the bonnet and allow it to drop into the catch from a low height
(20-25 cm). Check that the bonnet is
engaged.
Engine oil
Check the engine oil level manually
on a regular basis to prevent damage
to the engine.
Ensure that the correct specification
of oil is used. Recommended fluids
and lubricants 3 179.
Check with the vehicle on a level
surface. The engine must be at
operating temperature and switched
off for at least 10 minutes.
Page 148 of 215

146Vehicle careDiesel fuel filter
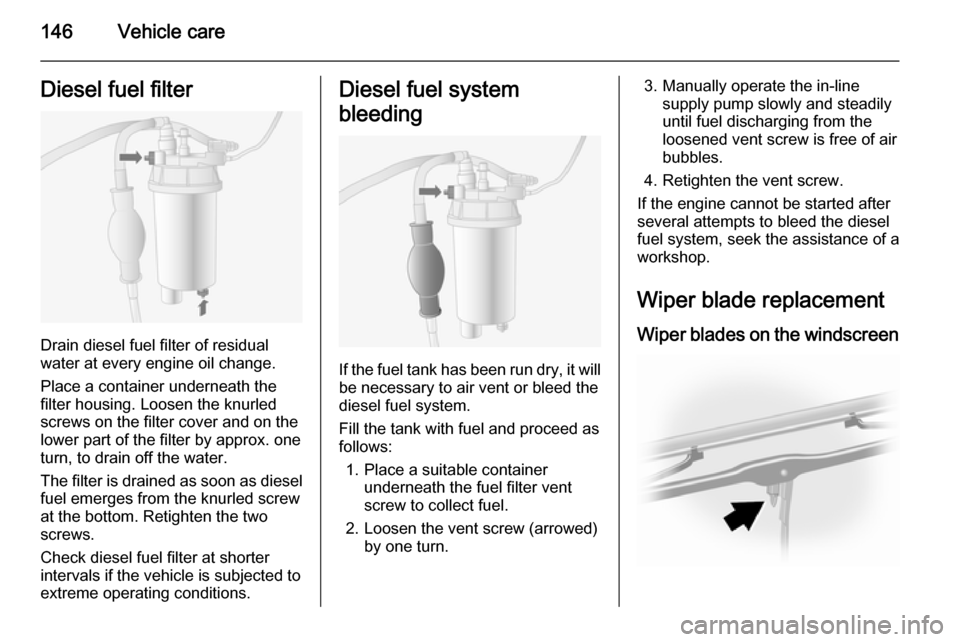
Drain diesel fuel filter of residual
water at every engine oil change.
Place a container underneath the
filter housing. Loosen the knurled
screws on the filter cover and on the
lower part of the filter by approx. one
turn, to drain off the water.
The filter is drained as soon as diesel fuel emerges from the knurled screw
at the bottom. Retighten the two
screws.
Check diesel fuel filter at shorter
intervals if the vehicle is subjected to
extreme operating conditions.
Diesel fuel system
bleeding
If the fuel tank has been run dry, it will be necessary to air vent or bleed the
diesel fuel system.
Fill the tank with fuel and proceed as
follows:
1. Place a suitable container underneath the fuel filter vent
screw to collect fuel.
2. Loosen the vent screw (arrowed) by one turn.
3. Manually operate the in-line supply pump slowly and steadily
until fuel discharging from the
loosened vent screw is free of air
bubbles.
4. Retighten the vent screw.
If the engine cannot be started after
several attempts to bleed the diesel
fuel system, seek the assistance of a
workshop.
Wiper blade replacement Wiper blades on the windscreen
Page 171 of 215

Vehicle care169
Position the adapter at the jacking
hole located nearest the wheel
concerned.
Ensure the jack is positioned
correctly. The jack head must be
level with the jacking hole. Pump
the jack by pressing the wheel
wrench, to position the base plate
correctly.
Raise the vehicle by pressing the
wheel wrench until the wheel is
clear of the ground.
4. Unscrew wheel bolts/nuts completely and wipe clean with a
cloth.
Put wheel bolts/nuts somewhere
where the threads will not be
soiled.
5. Change the wheel.
6. Screw in the wheel bolts/nuts. 7. Lower vehicle.
8. Install the wheel wrench ensuring that it locates securely and tighten
each wheel bolt/nut in a crosswise sequence. Tightening torque is:
172 Nm (Front-wheel drive),
235 Nm (Rear-wheel drive withtwin rear wheels), 264 Nm (Rear- wheel drive with single rear
wheels).
9. Refit wheel cover.
Notice
If applicable, fit anti-theft bolts
nearest the tyre valve (otherwise it
may not be possible to refit the wheel cover).
10. Stow the replaced wheel 3 169
and the vehicle tools 3 158.
11. Have the new wheel balanced on the vehicle. Check the tyre
pressure of the installed tyre
3 201 and also the wheel bolt/nut
torque as soon as possible.
Have the defective tyre renewed or
repaired.
Spare wheel
Some vehicles are equipped with a
tyre repair kit instead of a spare wheel 3 164.
If mounting a spare wheel which is
different from the other wheels, this
wheel might be classified as atemporary spare wheel and the
corresponding speed limits apply,
even though no label indicates this.
Seek the assistance of a workshop to
check the applicable speed limit.Caution
The use of a spare wheel that is smaller than the other wheels or in
combination with winter tyres
could affect driveability. Have the
defective tyre replaced as soon as
possible.
The spare wheel is held under the
vehicle frame using a winch and
secured by tightening a cable using
the wheel wrench and adapter.
It may be necessary to jack the
vehicle up to gain access to the spare
wheel on a fully loaded vehicle with a flat rear tyre.
Page 179 of 215

Vehicle care177
Bitumen/rubber materials could
damage the PVC coating. Have
underbody work carried out by a
workshop.
Before and after winter, wash the
underbody and have the protective
wax coating checked.
Towing equipment
Do not clean the coupling ball bar with
a steam-jet or high-pressure jet
cleaner.
Interior care Interior and upholsteryOnly clean the vehicle interior,
including the instrument panel fascia
and panelling, with a dry cloth or
interior cleaner.
Clean leather upholstery with clear
water and a soft cloth. In case of
heavy soiling, use leather care.
The instrument cluster and the
displays should only be cleaned using
a soft damp cloth. If necessary use a
weak soap solution.Clean fabric upholstery with a
vacuum cleaner and brush. Remove
stains with an upholstery cleaner.
Clothing fabrics may not be
colourfast. This could cause visible discolourations, especially on light-
coloured upholstery. Removable
stains and discolourations should be
cleaned as soon as possible.
Clean seat belts with lukewarm water or interior cleaner.Caution
Close Velcro fasteners as open
Velcro fasteners on clothing could
damage seat upholstery.
The same applies to clothing with
sharp-edged objects, like zips or
belts or studded jeans.
Plastic and rubber parts
Plastic and rubber parts can be
cleaned with the same cleaner as
used to clean the body. Use interior cleaner if necessary. Do not use any
other agent. Avoid solvents and petrol in particular. Do not use high-
pressure jet cleaners.