Page 61 of 247

Seats, restraints59
IL=suitable for particular ISOFIX restraint systems of the 'specific-vehicle', 'restricted' or 'semi-universal' categories. The
ISOFIX restraint system must be approved for the specific vehicle type.IUF=suitable for ISOFIX forward-facing child restraint systems of universal category approved for use in this weight class.X=no ISOFIX child restraint system approved in this weight class.1=only if outboard seats are in position 1 or 2, 3 41.2=only for Vauxhall child restraint system: If the seat is secured as recommended 3 54 , the outboard seats must be in
position 2 3 41.
ISOFIX size class and seat device
A – ISO/F3=forward-facing child restraint system for children of maximum size in the weight class 9 to 18 kg.B – ISO/F2=forward-facing child restraint system for smaller children in the weight class 9 to 18 kg.B1 – ISO/F2X=forward-facing child restraint system for smaller children in the weight class 9 to 18 kg.C – ISO/R3=rear-facing child restraint system for children of maximum size in the weight class up to 18 kg.D – ISO/R2=rear-facing child restraint system for smaller children in the weight class up to 18 kg.E – ISO/R1=rear-facing child restraint system for young children in the weight class up to 13 kg.
Page 66 of 247
64StorageRear carrier system
The rear carrier system (Flex-Fix
system) allows bicycles to be
attached to a pull-out carrier
integrated into the vehicle floor. The
transportation of other objects is not
permitted.
The maximum load of the rear carrier
system is 40 kg. The maximum load
per bicycle is 20 kg.
The wheelbase of a bicycle must not
exceed 1.2 metres. Otherwise the
secure fastening of a bicycle is not possible.
If not in use, the rear carrier system
can be slid back into the vehicle floor.
There must not be any objects on thebicycles that could become loose
during transportation.Caution
Do not attach bicycles with carbon pedal cranks to bicycle carriers.
The bicycles may get damaged.
Extending
Open the tailgate.
9 Warning
No-one should be in the extension
zone of the rear carrier system,
risk of injury.
Pull release lever up. The system
disengages and travels quickly out of
the bumper.
Page 68 of 247
66Storage
Push the clamping lever down and
push the lamp support into the
retainer until it engages.
Perform this procedure for both tail
lamps.
Check the cable and lamp position to
make sure these are correctly
installed and are securely located.
Lock the rear carrier system
Swivel the right clamping lever ( 1)
first, followed by the left clamping
lever ( 2), until a resistance is
noticeable.
The rear carrier system is locked
when the clamping levers are
swivelled by approx. 50°. Otherwise
safe functionality is not guaranteed.
Notice
Close the tailgate.
Page 73 of 247
Storage71
Tighten the attachment screw for the
pedal bearing mount to its maximum
point by hand.
Secure both bicycle wheels to wheel
recesses using strap retainers.
Check the bicycle to make sure it is
secure.
Caution
Ensure gap between bicycle and
vehicle is at least 5 cm. If
necessary, loosen handlebar and swivel sideways.
The settings for the wheel recesses
and on the rotary lever on the pedal
crank recess should be noted and saved for each bicycle. Correct
presetting will facilitate refitting of the
bicycle.
Notice
It is recommended to attach a
warning sign at the rearmost bicycle to increase visibility.
Removing a bicycle from the rear carrier system
Undo strap retainers on both bicycle
tyres.
Hold on to the bicycle, loosen the attachment screw for the pedal
bearing mount, then lift the pedal
bearing mount to remove it.
Retracting the rear carrier
system
Push the pedal crank mounts into the
pedal crank recess as shown in the
illustration.
Page 76 of 247
74StorageCaution
Do not fold the outer seatbacks
while the seats are in the inner
position. The seats could be
damaged.
Remove the load compartment cover if necessary 3 75.
Push head restraints down by
pressing both catches.
Take the seat belt out of the retaining clip on the backrest.
Pull the handle on the front side of the
backrest and fold down the backrest
onto the seat cushion. The seat is
lowered automatically.
The backrests can also be folded
from the load compartment.Pull the handle on the back side of the backrest and fold down the backrest.
To fold up, pull the handle and raise
the backrests into an upright position
until they engage audibly.
9 Warning
When folding up, ensure that
backrests are securely locked in
position before driving. Failure to
do so may result in personal injury or damage to load or vehicle in the event of heavy braking or collision.
Page 79 of 247
Storage77Lashing eyes
The lashing eyes are designed to
secure items against slippage, e.g.
using lashing straps or luggage net.
Safety net The safety net can be installed behind the front seats.
Passengers must not be transported
behind the safety net.
Installation
There are two installation openings in the roof frame: suspend rod of net at
one side, push to the front and
engage. Extend rod, suspend at other
side, push to the front and engage.
Suspend hooks of net tensioning
belts in lashing eyes in the floor
behind the front seats. Tension the
net by pulling the loose end of the belt.
Suspend and tighten on both sides.
Removal Tilt length adjuster of the net
tensioning belts upwards and detach
the belts on both sides. Disengage
the upper rod on one side, disengage
other side and remove from the
openings.
Page 82 of 247
80StorageLoading information
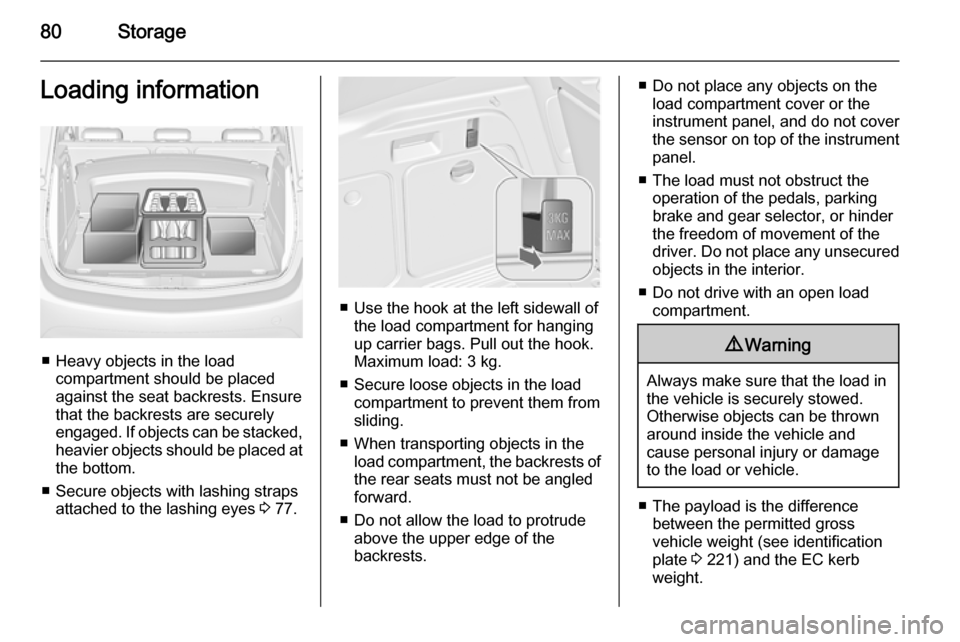
■ Heavy objects in the loadcompartment should be placedagainst the seat backrests. Ensure
that the backrests are securely
engaged. If objects can be stacked, heavier objects should be placed at
the bottom.
■ Secure objects with lashing straps attached to the lashing eyes 3 77.
■ Use the hook at the left sidewall of
the load compartment for hanging
up carrier bags. Pull out the hook.
Maximum load: 3 kg.
■ Secure loose objects in the load compartment to prevent them from
sliding.
■ When transporting objects in the load compartment, the backrests ofthe rear seats must not be angled
forward.
■ Do not allow the load to protrude above the upper edge of the
backrests.
■ Do not place any objects on the load compartment cover or the
instrument panel, and do not cover
the sensor on top of the instrument
panel.
■ The load must not obstruct the operation of the pedals, parking
brake and gear selector, or hinder the freedom of movement of thedriver. Do not place any unsecured objects in the interior.
■ Do not drive with an open load compartment.9 Warning
Always make sure that the load in
the vehicle is securely stowed.
Otherwise objects can be thrown
around inside the vehicle and
cause personal injury or damage
to the load or vehicle.
■ The payload is the difference between the permitted gross
vehicle weight (see identification
plate 3 221) and the EC kerb
weight.
Page 83 of 247
Storage81
To calculate the payload, enter the
data for your vehicle in the Weights
table at the front of this manual.
The EC kerb weight includes
weights for the driver (68 kg),
luggage (7 kg) and all fluids (tank
90 % full).
Optional equipment and
accessories increase the kerb
weight.
■ Driving with a roof load increases the sensitivity of the vehicle to
cross-winds and has a detrimental
effect on vehicle handling due to
the vehicle's higher centre of
gravity. Distribute the load evenly
and secure it properly with retaining
straps. Adjust the tyre pressure and vehicle speed according to the load
conditions. Check and retighten the straps frequently.
Do not drive faster than 75 mph.
The permissible roof load is 60 kg. The roof load is the combined
weight of the roof rack and the load.


