Page 147 of 276
145
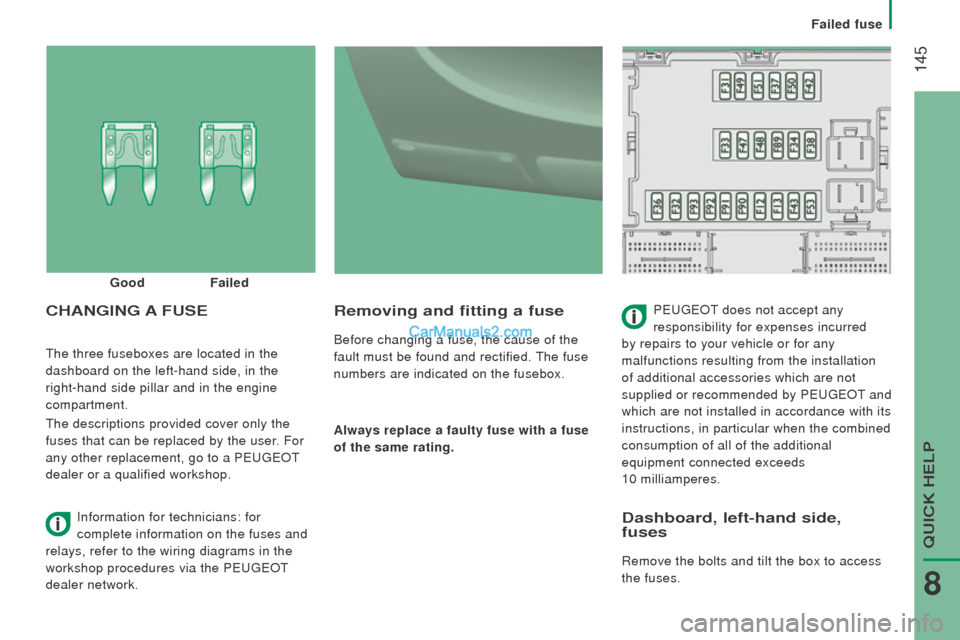
the three fuseboxes are located in the
dashboard on the left-hand side, in the
right-hand side pillar and in the engine
compartment.
the descriptions provided cover only the
fuses that can be replaced by the user. For
any other replacement, go to a P
eugeOt
dealer or a qualified workshop.
removing and fitting a fuse
Before changing a fuse, the cause of the
fault must be found and rectified.
the fuse
numbers are indicated on the fusebox.
Always replace a faulty fuse with a fuse
of the same rating.
cHAnGInG A FuSEPeugeOt does not accept any
responsibility for expenses incurred
by repairs to your vehicle or for any
malfunctions resulting from the installation
of additional accessories which are not
supplied or recommended by P
eugeOt and
which are not installed in accordance with its
instructions, in particular when the combined
consumption of all of the additional
equipment connected exceeds
10 milliamperes.
Good
Failed
Information for technicians: for
complete information on the fuses and
relays, refer to the wiring diagrams in the
workshop procedures via the P
eugeOt
dealer network.
dashboard, left-hand side,
fuses
Remove the bolts and tilt the box to access
the fuses.
QuICK HeLP
8
Failed fuse
Page 148 of 276
146FusesA (amps) Allocation
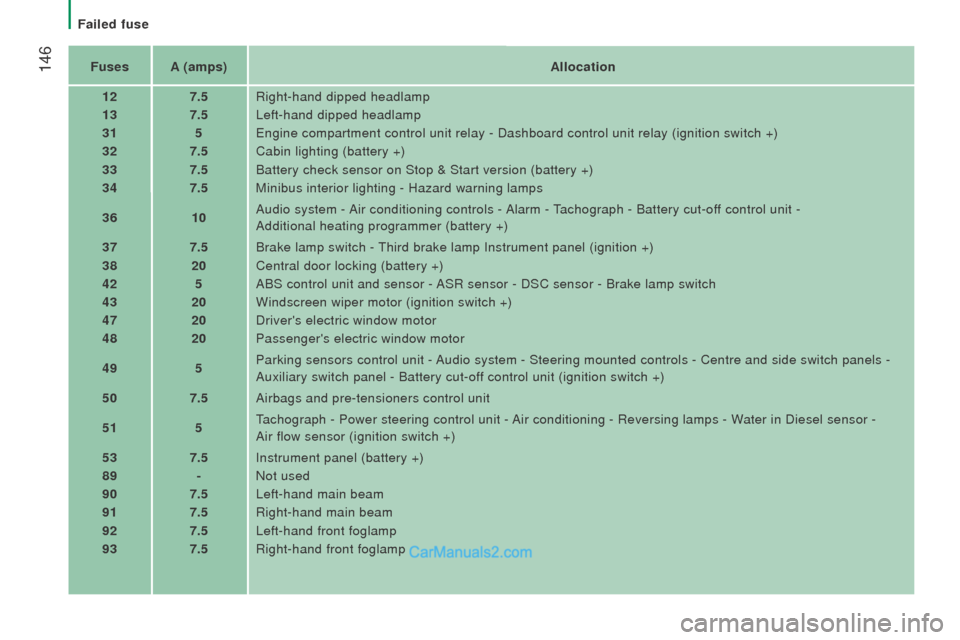
12 7.5Right-hand dipped headlamp
13 7.5Left-hand dipped headlamp
31 5
engine compartment control unit relay - Dashboard control unit relay (ig\
nition switch +)
32 7.5Cabin lighting (battery +)
33 7.5Battery check sensor on Stop & Start version (battery +)
34 7.5Minibus interior lighting - Hazard warning lamps
36 10Audio system -
Air conditioning controls - Alarm -
tachograph - Battery cut-off control unit -
Additional heating programmer (battery +)
37 7.5Brake lamp switch -
third brake lamp Instrument panel (ignition +)
38 20Central door locking (battery +)
42 5ABS control unit and sensor -
ASR sensor - DSC sensor - Brake lamp switch
43 20Windscreen wiper motor (ignition switch +)
47 20Driver's electric window motor
48 20Passenger's electric window motor
49 5Parking sensors control unit - Audio system - Steering mounted controls - Centre and side switch panels\
-
Auxiliary switch panel - Battery cut-off control unit (ignition switch +)
50 7.5Airbags and pre-tensioners control unit
51 5
tachograph - Power steering control unit - Air conditioning - Reversing lamps - W
ater in Diesel sensor -
Air flow sensor (ignition switch +)
53 7.5Instrument panel (battery +)
89 -Not used
90 7.5Left-hand main beam
91 7.5Right-hand main beam
92 7.5Left-hand front foglamp
93 7.5Right-hand front foglamp
Failed fuse
Page 150 of 276
148
Fuses in the engine compartment
Remove the nuts and tilt the box to access
the fuses.
refit the cover carefully after checking or
replacing fuses. Fuses
A (amps) Allocation
1 40ABS pump supply
2 50Diesel pre-heat unit
3 30Ignition switch - Starter motor
4 40Fuel heater
5 20/50Cabin ventilation with additional programmable heating
(battery +)
6 40/60Cabin fan maximum speed (battery +)
7 40/50/60 Cabin fan minimum speed (battery +)
8 40Cabin fan assembly (ignition switch +)
9 15Rear 12 V socket (battery +)
10 15Horn
11 -Not used
14 15Front 12 V socket (battery +)
15 15Cigarette lighter (battery +)
16 -Not used
17 -Not used
18 7.5
engine management control unit (battery +)
19 7.5Air conditioning compressor
20 30Screenwash/headlamp wash pump
21 15Fuel pump supply
22 -Not used
23 30ABS electrovalves
24 7.5Auxiliary switch panel - Door mirror controls and folding
(ignition switch +)
30 15Door mirror heating
Failed fuse
Page 163 of 276
161
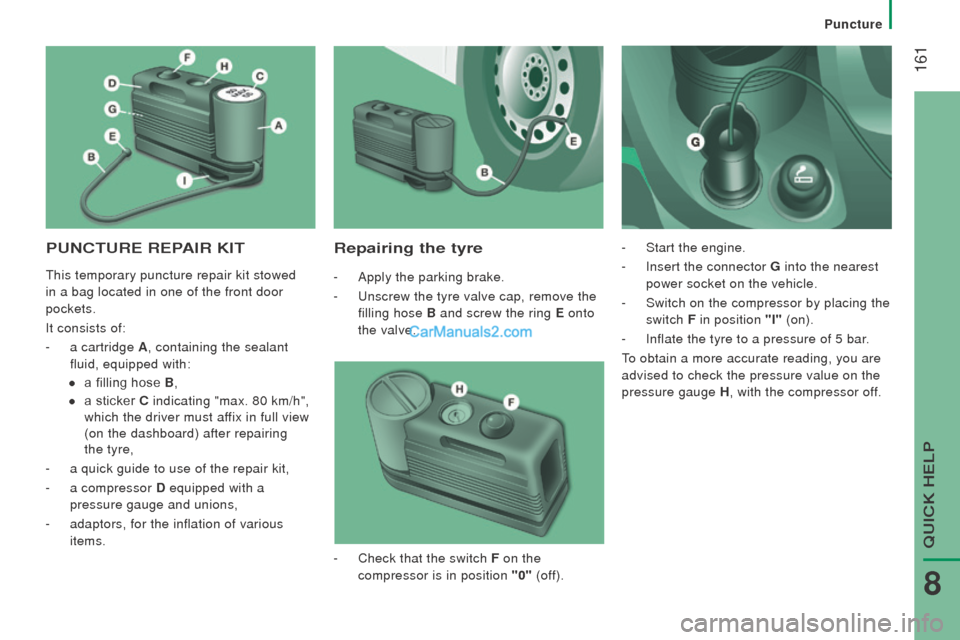
PuncturE rEPAIr KItrepairing the tyre
- Apply the parking brake.
-
u
nscrew the tyre valve cap, remove the
filling hose B and screw the ring E onto
the valve. -
Start the engine.
-
Insert the connector G into the nearest
power socket on the vehicle.
-
Switch on the compressor by placing the
switch F in position
"I" (on).
-
Inflate the tyre to a pressure of 5 bar.
to obtain a more accurate reading, you are
advised to check the pressure value on the
pressure gauge H , with the compressor off.
-
Check that the switch F on the
compressor is in position "0" (off).this temporary puncture repair kit stowed
in a bag located in one of the front door
pockets.
It consists of:
-
a cartridge A , containing the sealant
fluid, equipped with:
●
a filling hose B ,
●
a sticker c indicating "max. 80 km/h",
which the driver must af
fix in full view
(on the dashboard) after repairing
the
tyre,
-
a quick guide to use of the repair kit,
-
a compressor d equipped with a
pressure gauge and unions,
-
adaptors, for the inflation of various
items.
QuICK HeLP
8
Puncture
Page 165 of 276
163
toWInG
t
owing the vehicle
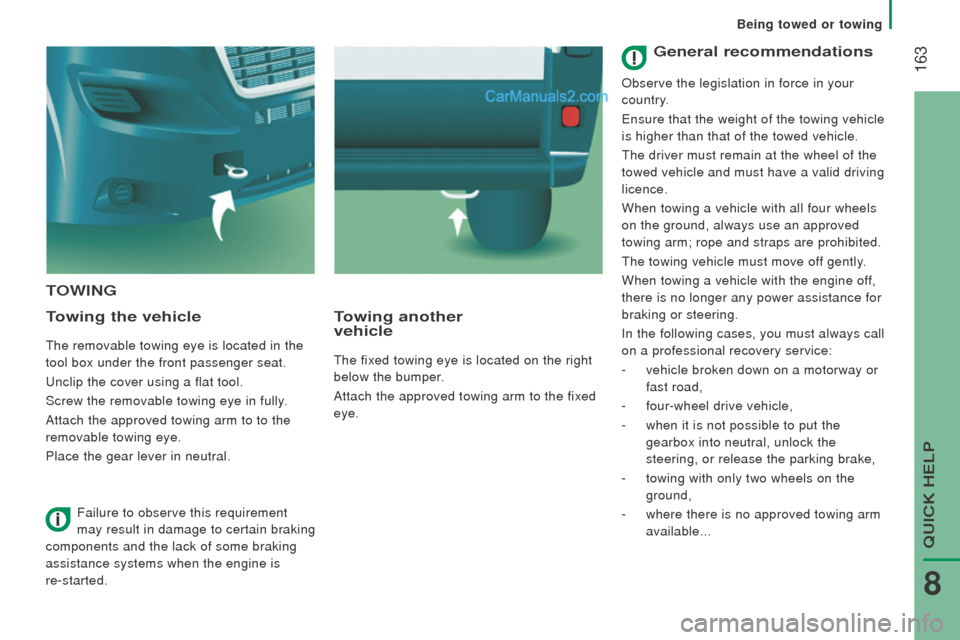
the removable towing eye is located in the
tool box under the front passenger seat.
unclip the cover using a flat tool.
Screw the removable towing eye in fully
.
Attach the approved towing arm to to the
removable towing eye.
Place the gear lever in neutral.
towing another
vehicle
the fixed towing eye is located on the right
below the bumper.
Attach the approved towing arm to the fixed
eye.
Failure to observe this requirement
may result in damage to certain braking
components and the lack of some braking
assistance systems when the engine is
re-started.
General recommendations
Observe the legislation in force in your
country.
ensure that the weight of the towing vehicle
is higher than that of the towed vehicle.
the driver must remain at the wheel of the
towed vehicle and must have a valid driving
licence.
When towing a vehicle with all four wheels
on the ground, always use an approved
towing arm; rope and straps are prohibited.
the towing vehicle must move of
f gently.
When towing a vehicle with the engine off,
there is no longer any power assistance for
braking or steering.
In the following cases, you must always call
on a professional recovery service:
-
vehicle broken down on a motorway or
fast road,
-
four-wheel drive vehicle,
-
when it is not possible to put the
gearbox into neutral, unlock the
steering, or release the parking brake,
-
towing with only two wheels on the
ground,
-
where there is no approved towing arm
available...
QuICK HeLP
8
Being towed or towing
Page 170 of 276
168
GLoSSArY oF LABELS
this section groups together all of the texts that appear on labels prese\
nt on the vehicle.under the bonnet
A
Original painting
Colour
Code
R e
FINISHINg CODe
B
AIR CONDI
tIONeD VeHICLe - R134A
-
"CFC" FR
ee
QtY
R134A (kg)
c
ONLY
FOR J
uMP
S
tARt
d
DANgeR
A
utOMAtIC eNgINe ReStARt. eXtRACt
tHe KeY
FROM DASHBOARD WH
eN
HOOD IS OP
eNeD
For the vehicle identification labels, refer to the "
technical data" section.
Precautions...
Page 171 of 276
169
E
1 - CA
utION
ORIgINAL LuBRICANtS AND FLuIDS
engine oiltransmission
Radiater Brake system
Windscreen Washer Power steering
R
eFeR tO OWNeR HANDBOOK WeAR eYe PROteCtION
2 - SAF
etY
the use of original parts, fluids and original lubrificants and respectin\
g scheduled
maintenance guarantees your cars reliability and safety overtime.
3 - DAN
geR
KeeP Out
OF CHILDR
eN'S ReACH K
eeP
AWAY FROM
FLAM
eS DO
NOt tOuCH
DO NO
t OPeN CAP
WI
tH
eNgINe W
ARM
eXPLOSION CORROSIVe LIQuID
MA
Y S
tARt AutOMAtICALL
Y
eVeN WItH eNgINe OFFHIgH PReSSuRe gAS DO
NO
t OPeN
A
utOMAtIC eNgINe ReStARt. eXtRACt tHe KeY
FROM DASHBOARD WH
eN BONNet HOOD IS OPeNeD HIgH VOLtAge
QuICK HeLP
8
Precautions...
Page 179 of 276
177
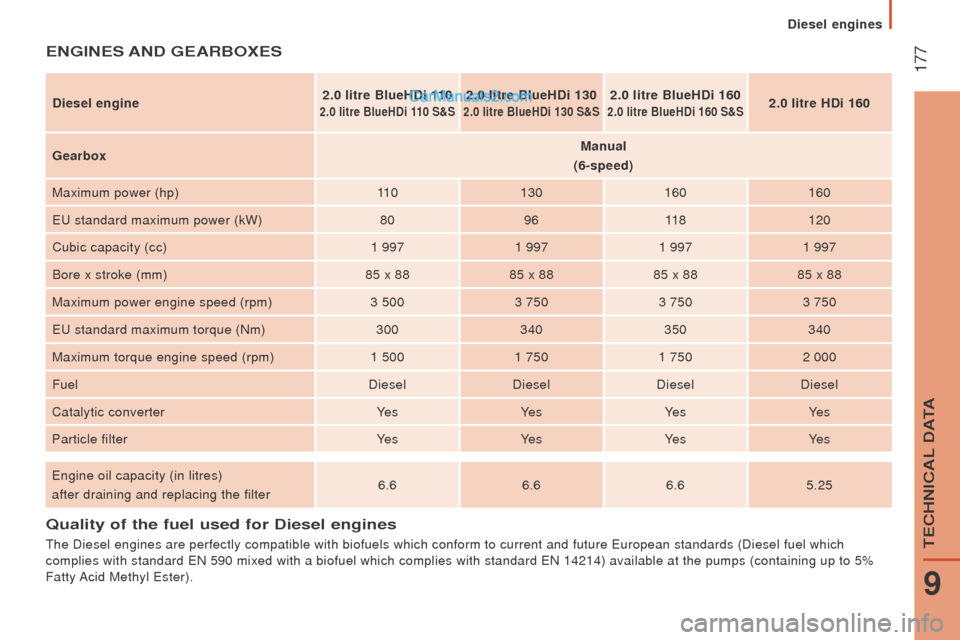
Quality of the fuel used for diesel engines
the Diesel engines are perfectly compatible with biofuels which conform t\
o current and future european standards (Diesel fuel which
complies with standard eN 590 mixed with a biofuel which complies with standard eN 14214) available at the pumps (containing up to 5%
Fatty Acid Methyl
ester).
EnGInES And GEArBoxES
diesel engine 2.0 litre BlueHdi 1 102.0 litre BlueHdi 110 S&S
2.0 litre BlueHdi 130
2.0 litre BlueHdi 130 S&S
2.0 litre BlueHdi 160
2.0 litre BlueHdi 160 S&S2.0 litre Hdi 160
Gearbox Manual
(6-speed)
Maximum power (hp) 11 0130 160160
eu standard maximum power (kW) 809611
8 120
Cubic capacity (cc) 1 9971 9971 9971 997
Bore x stroke (mm) 85 x 8885 x 8885 x 8885 x 88
Maximum power engine speed (rpm) 3 5003 7503 7503 750
eu standard maximum torque (Nm) 300340350340
Maximum torque engine speed (rpm) 1 5001 7501 7502 000
Fuel DieselDieselDieselDiesel
Catalytic converter Ye
s Ye s Ye sYe s
Particle filter Ye sYe sYe sYe s
engine oil capacity (in litres)
after draining and replacing the filter 6.6
6.66.65.25
9
teCHNICAL DAtA
Diesel engines