2015.5 Peugeot 308 low beam
[x] Cancel search: low beamPage 16 of 396
14
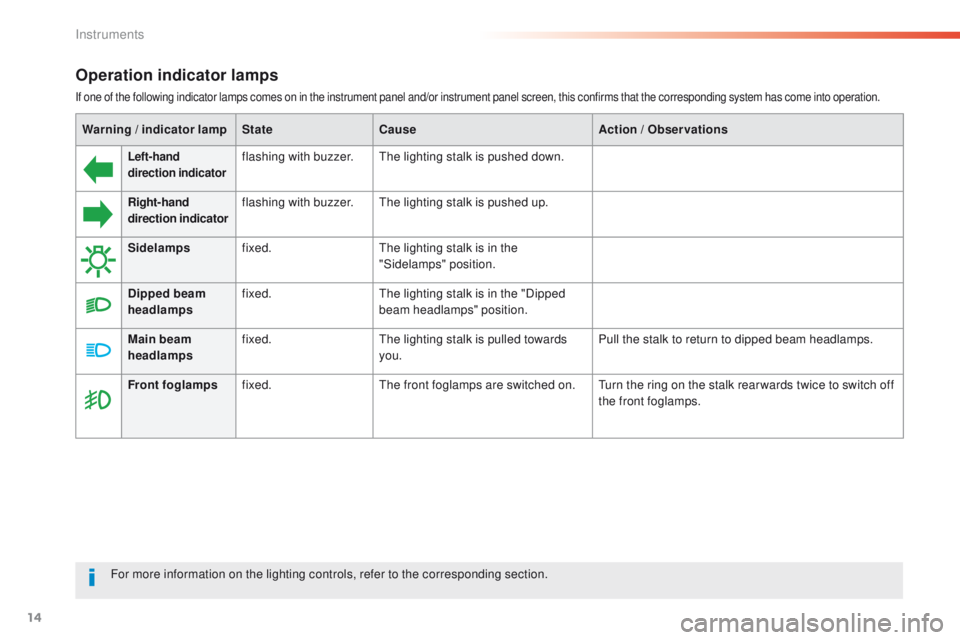
Operation indicator lamps
If one of the following indicator lamps comes on in the instrument panel and/or instrument panel screen, this confirms that the corresponding system has come into operation.
Warning / indicator lamp State Cause Action / Observations
Left-hand
direction indicatorflashing with buzzer.th e lighting stalk is pushed down.
Right-hand
direction indicatorflashing with buzzer.the lighting stalk is pushed up.
Sidelamps fixed.
th
e lighting stalk is in the
"Sidelamps" position.
Dipped beam
headlamps fixed.
th
e lighting stalk is in the "Dipped
beam headlamps" position.
Main beam
headlamps fixed.
th
e lighting stalk is pulled towards
you. Pull the stalk to return to dipped beam headlamps.
Front foglamps fixed.
th
e front foglamps are switched on.
tu
rn the ring on the stalk rear wards twice to switch off
the front foglamps.
For more information on the lighting controls, refer to the corresponding section.
Instruments
Page 53 of 396
51
Electronic engine immobiliser
the key contains an electronic chip which has
a special code. When the ignition is switched
on, this code must be recognised in order for
starting to be possible.
th
is electronic engine immobiliser locks the
engine management system a few moments
after the ignition is switched off and prevents
starting of the engine by anyone who does not
have the key.
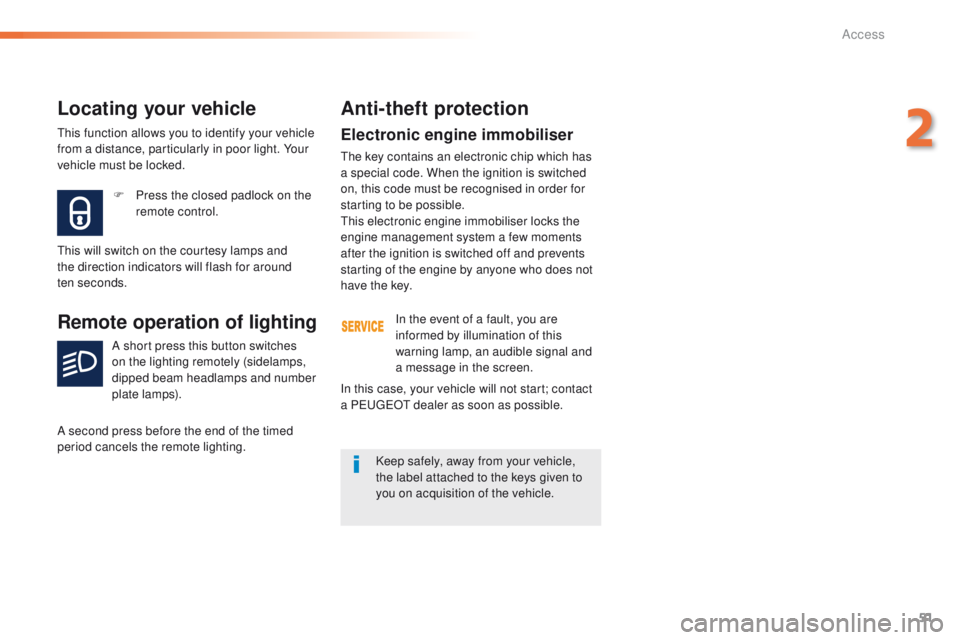
F
P
ress the closed padlock on the
remote control.
Locating your vehicle
this will switch on the courtesy lamps and
the direction indicators will flash for around
ten
seconds.
Remote operation of lighting
A short press this button switches
on the lighting remotely (sidelamps,
dipped beam headlamps and number
plate lamps).
A second press before the end of the timed
period cancels the remote lighting.
Anti-theft protection
In the event of a fault, you are
informed by illumination of this
warning lamp, an audible signal and
a message in the screen.
Keep safely, away from your vehicle,
the label attached to the keys given to
you on acquisition of the vehicle.
In this case, your vehicle will not start; contact
a P
e
uge
Ot
dealer as soon as possible.
th
is function allows you to identify your vehicle
from a distance, particularly in poor light. Your
vehicle must be locked.
2
Access
Page 110 of 396
108
Lighting control stalk
Main lightingAdditional lightingAutomatic lighting functions
In some weather conditions (e.g. low
temperature or humidity), the presence
of misting on the internal sur face of the
glass of the headlamps and rear lamps
is normal; it disappears after the lamps
have been on for a few minutes.
Selection and control of the various front and rear lamps providing the vehicle's lighting and signalling.
th
ere are various lamps on the vehicle:
-
s
idelamps, to be seen,
-
d
ipped beam headlamps to see without
dazzling other drivers,
-
m
ain beam headlamps to see clearly when
the road is clear. Other lamps are installed to fulfil the
requirements of particular driving conditions:
-
r
ear foglamps, to better signal the
presence of the vehicle in foggy conditions,
-
f
ront foglamps, for better visibility in foggy
conditions and to improve lighting at
intersections and when parking,
-
d
aytime running lamps at the front, to be
seen during the day. Various automatic lighting functions are also
available depending on options:
-
g
uide-me-home lighting (from a distance),
-
w
elcome lighting,
-
d
aytime running lamps,
-
a
utomatic illumination of headlamps.
Programming
You can adjust the settings of certain functions:
- gu
ide-me-home lighting (remotely),
-
w
elcome lighting.
Travelling abroad
If using your vehicle in a country that
drives on the other side of the road, the
headlamps must be adjusted to avoid
dazzling on-coming drivers.
Contact a P
e
uge
Ot
dealer or a
qualified workshop.
Lighting and visibility
Page 113 of 396
111
In good or rainy weather, both day
and night, the front foglamps and the
rear foglamps are prohibited. In these
situations, the power of their beams
may dazzle other drivers. t
he
y should
only be used in fog or snow.
In these weather conditions, it is your
responsibility to switch on the foglamps
and dipped headlamps manually as the
sunshine sensor may detect sufficient
light.
Do not forget to switch off the front
foglamps and the rear foglamps when
they are no longer needed.Lighting left on audible signal
An audible signal when a front door
is opened warns the driver that the
vehicle's exterior lighting is on, with the
ignition off and in manual lighting mode.
In this case, switching off the lighting
stops the audible signal.
With the ignition off, if the dipped
headlamps remain on, the vehicle goes
into "
eC
O" mode to avoid discharging
the battery.
th
e lighting goes off when you switch
off the ignition, but you can always
switch it on again using the lighting
control stalk.
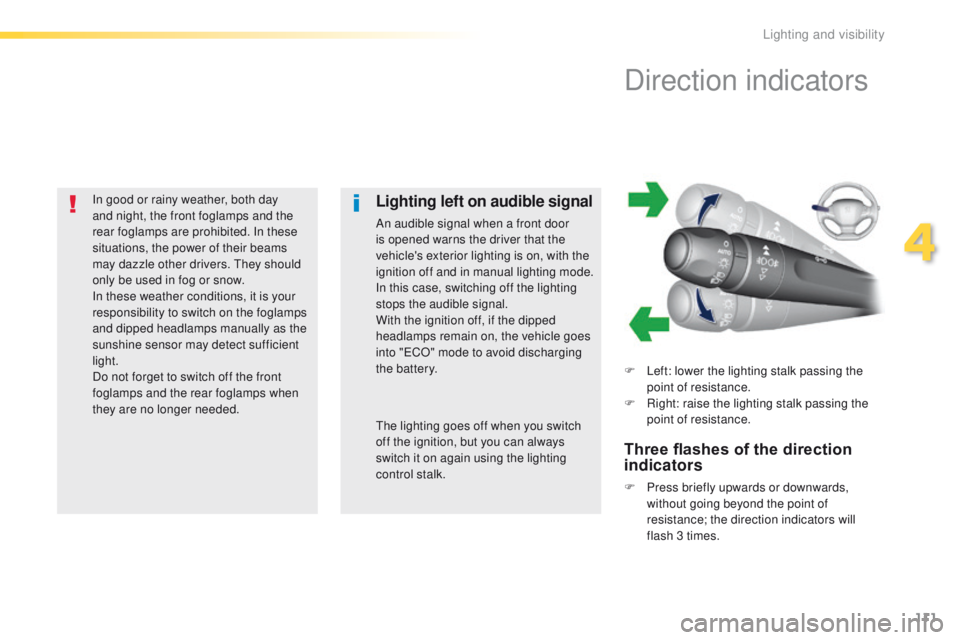
Direction indicators
F Left: lower the lighting stalk passing the point of resistance.
F
R
ight: raise the lighting stalk passing the
point of resistance.
Three flashes of the direction
indicators
F Press briefly upwards or downwards, without going beyond the point of
resistance; the direction indicators will
flash 3 times.
4
Lighting and visibility
Page 114 of 396
112
Front daytime running
lamps
(light-emitting diodes)
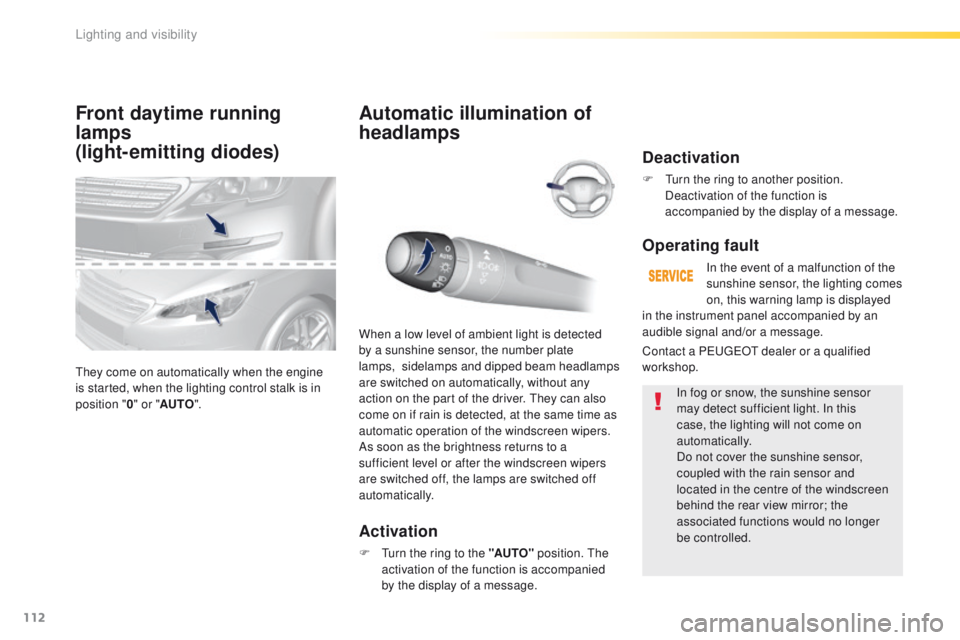
they come on automatically when the engine
is started, when the lighting control stalk is in
position "0" or " AUTO ".
Automatic illumination of
headlamps
Activation
F turn the ring to the "AUTO" position. th e
activation of the function is accompanied
by the display of a message.
When a low level of ambient light is detected
by a sunshine sensor, the number plate
lamps,
s
idelamps and dipped beam headlamps
are switched on automatically, without any
action on the part of the driver. t
h
ey can also
come on if rain is detected, at the same time as
automatic operation of the windscreen wipers.
As soon as the brightness returns to a
sufficient level or after the windscreen wipers
are switched off, the lamps are switched off
automatically.
Deactivation
F turn the ring to another position. Deactivation of the function is
accompanied by the display of a message.
Operating fault
In the event of a malfunction of the
sunshine sensor, the lighting comes
on, this warning lamp is displayed
In fog or snow, the sunshine sensor
may detect sufficient light. In this
case, the lighting will not come on
automatically.
Do not cover the sunshine sensor,
coupled with the rain sensor and
located in the centre of the windscreen
behind the rear view mirror; the
associated functions would no longer
be controlled.
Contact a P
e
uge
Ot
dealer or a qualified
workshop. in the instrument panel accompanied by an
audible signal and/or a message.
Lighting and visibility
Page 115 of 396
113
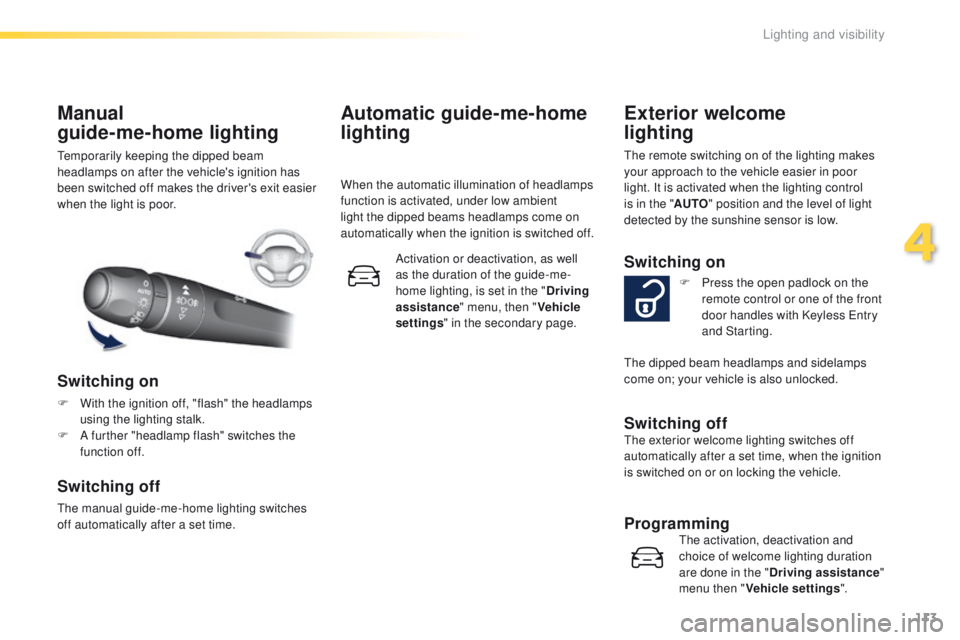
temporarily keeping the dipped beam
headlamps on after the vehicle's ignition has
been switched off makes the driver's exit easier
when the light is poor.
Manual
guide-me-home lighting
Switching on
F With the ignition off, "flash" the headlamps using the lighting stalk.
F
A f
urther "headlamp flash" switches the
function off.
Switching off
the manual guide-me-home lighting switches
off automatically after a set time.
Automatic guide-me-home
lighting
When the automatic illumination of headlamps
function is activated, under low ambient
light the dipped beams headlamps come on
automatically when the ignition is switched off.
Activation or deactivation, as well
as the duration of the guide-me-
home lighting, is set in the " Driving
assistance " menu, then " Vehicle
settings " in the secondary page.
Exterior welcome
lighting
the remote switching on of the lighting makes
your approach to the vehicle easier in poor
light. It is activated when the lighting control
is in the " AUTO" position and the level of light
detected by the sunshine sensor is low.
Switching on
F Press the open padlock on the remote control or one of the front
door handles with Keyless
e
n
try
and Starting.
Switching offthe exterior welcome lighting switches off
automatically after a set time, when the ignition
is switched on or on locking the vehicle.
Programmingthe activation, deactivation and
choice of welcome lighting duration
are done in the " Driving assistance "
menu then " Vehicle settings ".
th
e dipped beam headlamps and sidelamps
come on; your vehicle is also unlocked.
4
Lighting and visibility
Page 116 of 396
114
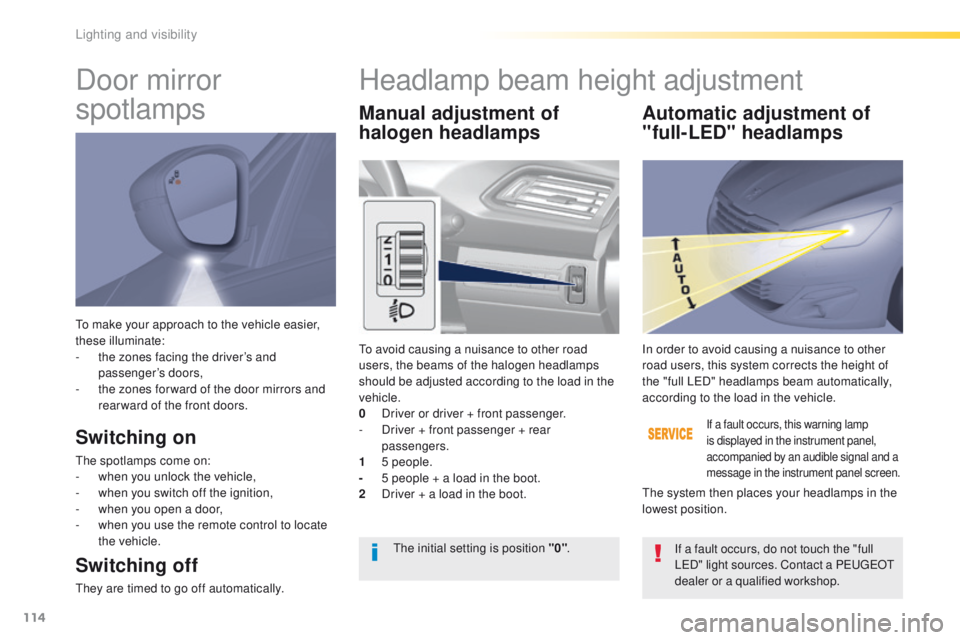
to make your approach to the vehicle easier,
these illuminate:
-
t
he zones facing the driver’s and
passenger’s doors,
-
t
he zones for ward of the door mirrors and
rear ward of the front doors.
Door mirror
spotlamps
Switching on
the spotlamps come on:
- w hen you unlock the vehicle,
-
w
hen you switch off the ignition,
-
w
hen you open a door,
-
w
hen you use the remote control to locate
the vehicle.
Switching off
they are timed to go off automatically.
Manual adjustment of
halogen headlamps Automatic adjustment of
"full-LED" headlamps
to avoid causing a nuisance to other road
users, the beams of the halogen headlamps
should be adjusted according to the load in the
vehicle.
0
D
river or driver + front passenger.
-
D
river + front passenger + rear
passengers.
1
5
people.
-
5 p
eople + a load in the boot.
2
D
river + a load in the boot.
If a fault occurs, this warning lamp
is displayed in the instrument panel,
accompanied by an audible signal and a
message in the instrument panel screen.
In order to avoid causing a nuisance to other
road users, this system corrects the height of
the "full L e
D
" headlamps beam automatically,
according to the load in the vehicle.
th
e system then places your headlamps in the
lowest position.
th
e initial setting is position "0" .
If a fault occurs, do not touch the "full
L
eD
" light sources. Contact a P
e
uge
Ot
d
ealer or a qualified workshop.
Headlamp beam height adjustment
Lighting and visibility
Page 260 of 396
258
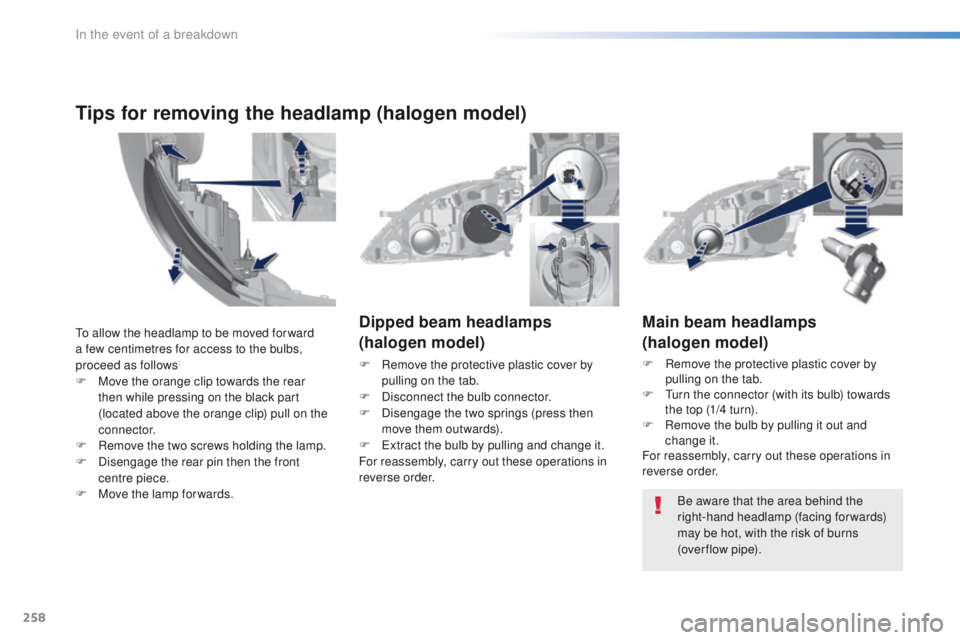
Main beam headlamps
(halogen model)
F Remove the protective plastic cover by pulling on the tab.
F
t
u
rn the connector (with its bulb) towards
the top (1/4 turn).
F
R
emove the bulb by pulling it out and
change it.
For reassembly, carry out these operations in
reverse order.
Dipped beam headlamps
(halogen model)
F Remove the protective plastic cover by
pulling on the tab.
F
D
isconnect the bulb connector.
F
D
isengage the two springs (press then
move them outwards).
F
e
x
tract the bulb by pulling and change it.
For reassembly, carry out these operations in
reverse order.
Be aware that the area behind the
right-hand headlamp (facing forwards)
may be hot, with the risk of burns
(over flow
pipe).
to a
llow the headlamp to be moved for ward
a few centimetres for access to the bulbs,
proceed as follows:
F Move the orange clip towards the rear then while pressing on the black part
(located above the orange clip) pull on the
connector.
F
R
emove the two screws holding the lamp.
F
D
isengage the rear pin then the front
centre piece.
F
M
ove the lamp for wards.
Tips for removing the headlamp (halogen model)
In the event of a breakdown