Page 237 of 396

235
AdBlue® additive and SCR system
for BlueHDi Diesel engines
to assure respect for the environment and
conformity with the new
eu ro 6 emissions
standard, without adversely affecting the
per formance or fuel consumption of Diesel
engines, P
e
uge
Ot
has taken the decision to
equip its vehicles with an effective system that
associates SCR (Selective Catalytic Reduction)
with a particle filter (FAP) for the treatment of
exhaust gases.
Presentation of the SCR system
using an additive called AdBlue® containing urea,
a catalytic converter turns up to 85% of nitrous
oxides (NOx) into nitrogen and water, which are
harmless to health and the environment.
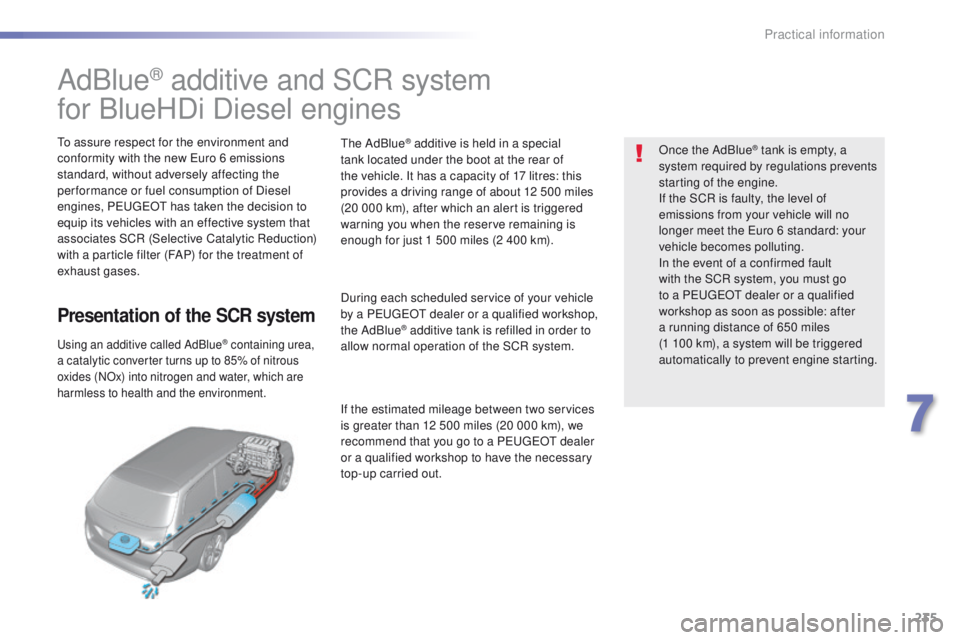
the AdBlue® additive is held in a special
tank located under the boot at the rear of
the vehicle. It has a capacity of 17 litres: this
provides a driving range of about 12 500 miles
(20 000 km), after which an alert is triggered
warning you when the reserve remaining is
enough for just 1 500 miles (2 400 km).
During each scheduled service of your vehicle
by a P
e
uge
Ot
dealer or a qualified workshop,
the AdBlue
® additive tank is refilled in order to
allow normal operation of the SCR system.
If the estimated mileage between two services
is greater than 12 500 miles (20 000 km), we
recommend that you go to a P
e
uge
Ot
dealer
or a qualified workshop to have the necessary
top-up carried out. Once the AdBlue
® tank is empty, a
s
ystem required by regulations prevents
starting of the engine.
If the SCR is faulty, the level of
emissions from your vehicle will no
longer meet the
e
u
ro 6 standard: your
vehicle becomes polluting.
In the event of a confirmed fault
with the SCR system, you must go
to a P
e
uge
Ot
dealer or a qualified
workshop as soon as possible: after
a running distance of 650 miles
(1
100 km), a system will be triggered
automatically to prevent engine starting.
7
Practical information
Page 242 of 396

240
Recommendations on storage
Never store bottles of AdBlue® in your
vehicle.
AdBlue
® freezes at about -11°C and
deteriorates above 25°C. It is recommended
that bottles be stored in a cool area and
protected from direct sunlight.
und
er these conditions, the additive can be
kept for at least a year.
If the additive has frozen, it can be used once it
has completely thawed out.
Procedure
Before topping-up, ensure that the vehicle is
parked on a flat and level sur face.
In wintry conditions, ensure that the
temperature of the vehicle is above -11°C.
Otherwise the AdBlue
® may be frozen and
so cannot be poured into its tank. Park your
vehicle in a warmer area for a few hours to
allow the top-up to be carried out.
F
S
witch off the ignition and remove the
key, or if your vehicle has one, press
the S
tA
R
t/
S
tO
P button to switch off
the
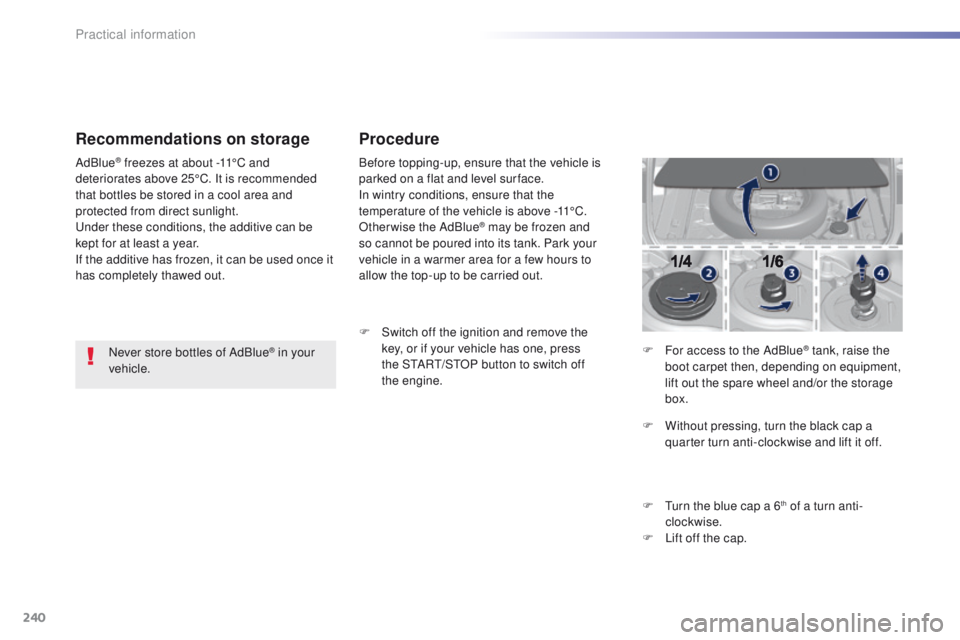
engine. F
F
or access to the AdBlue
® tank, raise the
boot carpet then, depending on equipment,
lift out the spare wheel and/or the storage
box.
F
W
ithout pressing, turn the black cap a
quarter turn anti-clockwise and lift it off.
F
t
u
rn the blue cap a 6
th of a turn anti-
clockwise.
F
L
ift off the cap.
Practical information
Page 243 of 396

241
Never dispose of AdBlue® additive
bottles in the household waste. Place
them in a special container provided
this purpose or take them to your dealer.
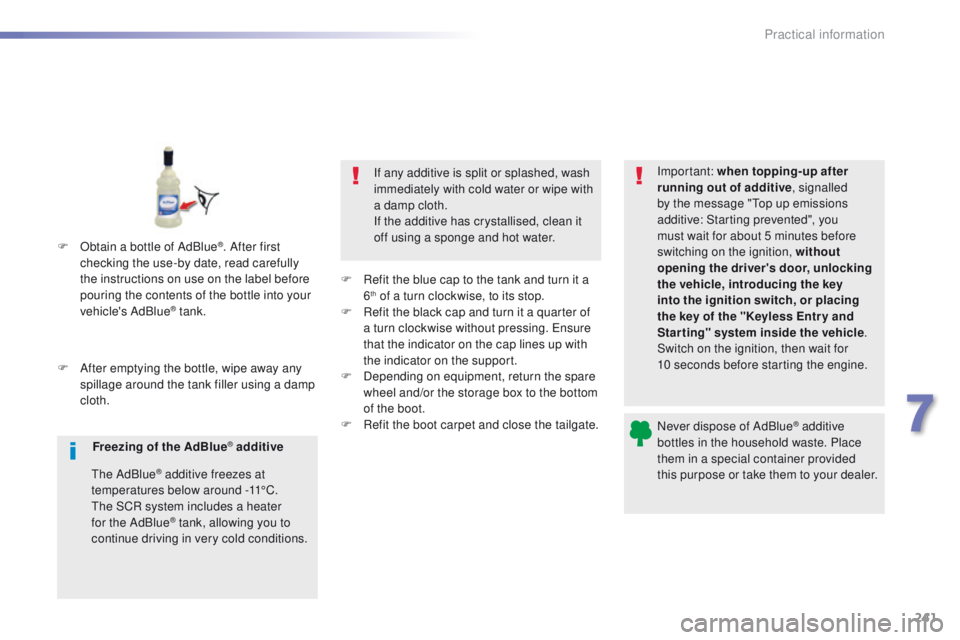
F
A
fter emptying the bottle, wipe away any
spillage around the tank filler using a damp
cloth. If any additive is split or splashed, wash
immediately with cold water or wipe with
a damp cloth.
If the additive has crystallised, clean it
off using a sponge and hot water.
F
R
efit the blue cap to the tank and turn it a
6
th of a turn clockwise, to its stop.
F
R
efit the black cap and turn it a quarter of
a turn clockwise without pressing.
e
n
sure
that the indicator on the cap lines up with
the indicator on the support.
F
D
epending on equipment, return the spare
wheel and/or the storage box to the bottom
of the boot.
F
R
efit the boot carpet and close the tailgate. Important: when topping
-up after
running out of additive , signalled
by the message "
to
p up emissions
additive: Starting prevented", you
must wait for about 5 minutes before
switching on the ignition, without
opening the driver's door, unlocking
the vehicle, introducing the key
into the ignition switch, or placing
the key of the "Keyless Entr y and
Star ting" system inside the vehicle .
Switch on the ignition, then wait for
10
seconds before starting the engine.
F
O
btain a bottle of AdBlue
®. After first
checking the use-by date, read carefully
the instructions on use on the label before
pouring the contents of the bottle into your
vehicle's AdBlue
® tank.
Freezing of the AdBlue
® additive
th
e AdBlue
® additive freezes at
temperatures below around -11°C.
th
e SCR system includes a heater
for the AdBlue
® tank, allowing you to
continue driving in very cold conditions.
7
Practical information
Page 244 of 396
242
Version with bass woofer unit
- Carefully disengage the wiring harness from its housing to give a little more free
length.
-
R
emove the yellow screw retaining the
woofer unit. F
R emove or raise the storage well.
F
P lace the bass woofer unit to the side of
the boot.
For reassembly, first slacken the yellow screw
a few turns.
Practical information
Page 245 of 396
243
Warning triangle (stowing)
Before leaving your vehicle to set up
and install the triangle, switch on the
hazard warning lamps and put on your
high visibility vest.
th
is safety equipment should be used in
addition to the hazard warning lamps.
Its presence in the vehicle is mandatory.
Placing the triangle in the
road
Refer to the manufacturer's instructions on
unfolding and installing supplied with the
triangle. F
P
lace the triangle behind the vehicle, as
required by the legislation in force in your
c o unt r y.
th
e triangle is available as an
accessory; contact a P
e
uge
Ot
dealer
or a qualified workshop.
th
e storage location for a folded triangle or its
box is under the boot floor.
8
In the event of a breakdown
Page 246 of 396

244
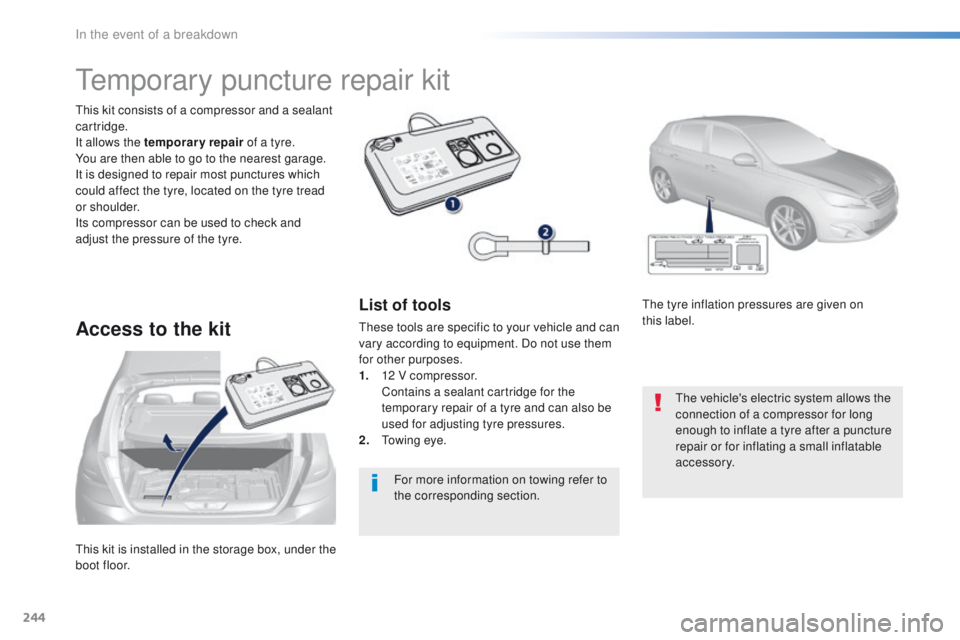
this kit is installed in the storage box, under the
boot floor.
th
is kit consists of a compressor and a sealant
cartridge.
It allows the temporary repair of a tyre.
You are then able to go to the nearest garage.
It is designed to repair most punctures which
could affect the tyre, located on the tyre tread
or shoulder.
Its compressor can be used to check and
adjust the pressure of the tyre.
temporary puncture repair kit
Access to the kit
List of tools
these tools are specific to your vehicle and can
vary according to equipment. Do not use them
for other purposes.
1.
1
2 V compressor.
C
ontains a sealant cartridge for the
temporary repair of a tyre and can also be
used for adjusting tyre pressures.
2.
t
o
wing eye.
th
e tyre inflation pressures are given on
this label.
th
e vehicle's electric system allows the
connection of a compressor for long
enough to inflate a tyre after a puncture
repair or for inflating a small inflatable
accessory.
For more information on towing refer to
the corresponding section.
In the event of a breakdown
Page 252 of 396
250
Changing a wheel
the tools are installed in the boot under the
f l o o r.
Access to the tooling
List of tools
these tools are specific to your vehicle and can
vary according to the level of equipment. Do
not use them for other purposes.
1.
Wheelbrace.
F
or removing the wheel trim and removing
the wheel bolts.
2.
J
ack with integral handle.
F
or raising the vehicle. 3.
"
Bolt cover" tool.
F
or removing the bolt protectors (covers)
on alloy wheels.
4.
S
ocket for the security bolts (located in the
glove box).
F
or adapting the wheelbrace to the special
"security" bolts.
5.
t
o
wing eye.
Procedure for changing a wheel with a damaged or punctured tyre for the spare wheel using the tools provided with the vehicle.
For more information on towing, refer to
the corresponding section.
Wheel with trim
When refitting the wheel, refit the trim
starting by placing its notch facing the
valve and press around its edge with
the palm of your hand.
In the event of a breakdown
Page 253 of 396
251
Taking out the wheel
F unscrew the (coloured) central bolt.
F R aise the spare wheel towards you from
the rear.
F
t
a
ke the wheel out of the boot.
Access to the spare wheel
the spare wheel is located in the boot under
t h e f l o o r.
Depending on the country of sale, the spare
wheel may be steel, alloy or of the "space-
saver" type.
Putting the wheel back in place
F Put the wheel back in its housing.
F un screw the (coloured) central bolt by a
few turns then put it in place in the centre
of the wheel.
F
t
i
ghten fully until the central bolt clicks to
retain the wheel correctly. F
P ut the box back in place in the centre of
the wheel and clip it.
F
P
ut the polystyrene storage box back in
place.
8
In the event of a breakdown