2015.5 Peugeot 308 warning light
[x] Cancel search: warning lightPage 114 of 396
112
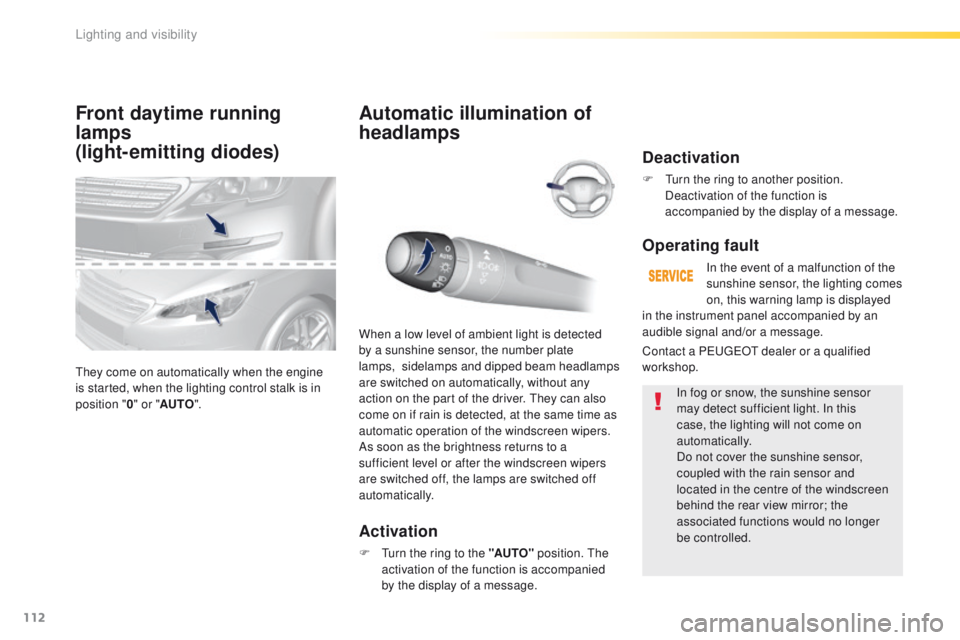
Front daytime running
lamps
(light-emitting diodes)
they come on automatically when the engine
is started, when the lighting control stalk is in
position "0" or " AUTO ".
Automatic illumination of
headlamps
Activation
F turn the ring to the "AUTO" position. th e
activation of the function is accompanied
by the display of a message.
When a low level of ambient light is detected
by a sunshine sensor, the number plate
lamps,
s
idelamps and dipped beam headlamps
are switched on automatically, without any
action on the part of the driver. t
h
ey can also
come on if rain is detected, at the same time as
automatic operation of the windscreen wipers.
As soon as the brightness returns to a
sufficient level or after the windscreen wipers
are switched off, the lamps are switched off
automatically.
Deactivation
F turn the ring to another position. Deactivation of the function is
accompanied by the display of a message.
Operating fault
In the event of a malfunction of the
sunshine sensor, the lighting comes
on, this warning lamp is displayed
In fog or snow, the sunshine sensor
may detect sufficient light. In this
case, the lighting will not come on
automatically.
Do not cover the sunshine sensor,
coupled with the rain sensor and
located in the centre of the windscreen
behind the rear view mirror; the
associated functions would no longer
be controlled.
Contact a P
e
uge
Ot
dealer or a qualified
workshop. in the instrument panel accompanied by an
audible signal and/or a message.
Lighting and visibility
Page 116 of 396
114
to make your approach to the vehicle easier,
these illuminate:
-
t
he zones facing the driver’s and
passenger’s doors,
-
t
he zones for ward of the door mirrors and
rear ward of the front doors.
Door mirror
spotlamps
Switching on
the spotlamps come on:
- w hen you unlock the vehicle,
-
w
hen you switch off the ignition,
-
w
hen you open a door,
-
w
hen you use the remote control to locate
the vehicle.
Switching off
they are timed to go off automatically.
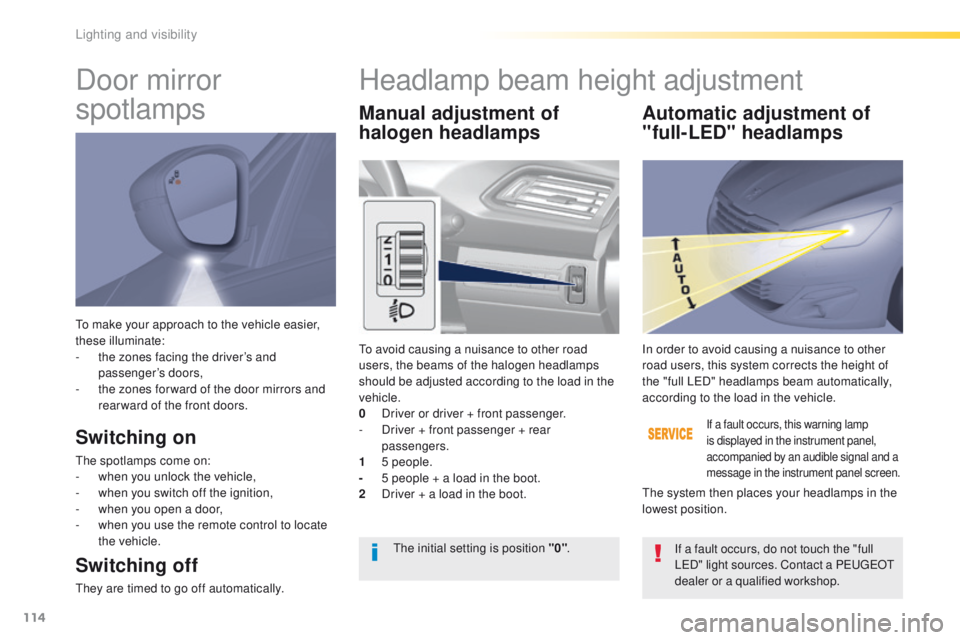
Manual adjustment of
halogen headlamps Automatic adjustment of
"full-LED" headlamps
to avoid causing a nuisance to other road
users, the beams of the halogen headlamps
should be adjusted according to the load in the
vehicle.
0
D
river or driver + front passenger.
-
D
river + front passenger + rear
passengers.
1
5
people.
-
5 p
eople + a load in the boot.
2
D
river + a load in the boot.
If a fault occurs, this warning lamp
is displayed in the instrument panel,
accompanied by an audible signal and a
message in the instrument panel screen.
In order to avoid causing a nuisance to other
road users, this system corrects the height of
the "full L e
D
" headlamps beam automatically,
according to the load in the vehicle.
th
e system then places your headlamps in the
lowest position.
th
e initial setting is position "0" .
If a fault occurs, do not touch the "full
L
eD
" light sources. Contact a P
e
uge
Ot
d
ealer or a qualified workshop.
Headlamp beam height adjustment
Lighting and visibility
Page 119 of 396
117
Screenwash/headlamp wash
level low
In the case of vehicles fitted with headlamp
washers, when the fluid reservoir low level
is reached this warning lamp comes on in
the instrument panel, accompanied by an
audible signal and a message.
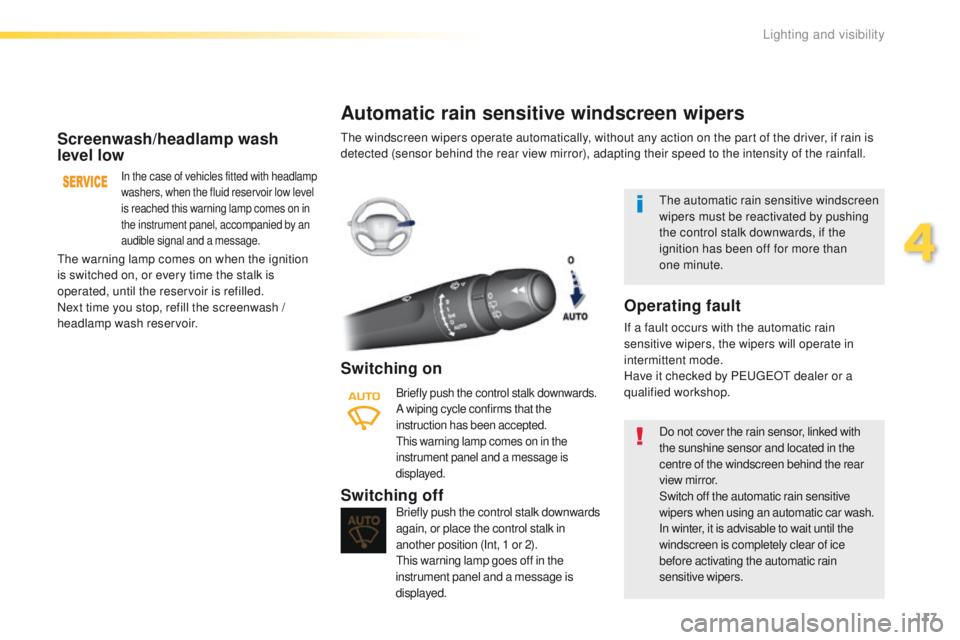
Automatic rain sensitive windscreen wipers
Switching on
Briefly push the control stalk downwards.
A wiping cycle confirms that the
instruction has been accepted.
th
is warning lamp comes on in the
instrument panel and a message is
displayed.
Briefly push the control stalk downwards
again, or place the control stalk in
another position (Int, 1 or 2).
th
is warning lamp goes off in the
instrument panel and a message is
displayed.Switching off
the automatic rain sensitive windscreen
wipers must be reactivated by pushing
the control stalk downwards, if the
ignition has been off for more than
one
minute.
th
e warning lamp comes on when the ignition
is switched on, or every time the stalk is
operated, until the reservoir is refilled.
Next time you stop, refill the screenwash /
headlamp wash reservoir.
th
e windscreen wipers operate automatically, without any action on the part of the driver, if rain is
detected (sensor behind the rear view mirror), adapting their speed to the intensity of the rainfall.
Do not cover the rain sensor, linked with
the sunshine sensor and located in the
centre of the windscreen behind the rear
view mirror.
Switch off the automatic rain sensitive
wipers when using an automatic car wash.
In winter, it is advisable to wait until the
windscreen is completely clear of ice
before activating the automatic rain
sensitive wipers.
Operating fault
If a fault occurs with the automatic rain
sensitive wipers, the wipers will operate in
intermittent mode.
Have it checked by P
e
uge
Ot
dealer or a
qualified workshop.
4
Lighting and visibility
Page 123 of 396
121
Operation
Anti-lock braking system (ABS)
and electronic brake force
distribution (EBFD)
In emergency braking, press
very firmly without releasing the
pressure. When changing wheels (tyres and rims),
make sure that these are approved for
your vehicle.
Normal operation of the ABS may make
itself felt by slight vibrations of the brake
pedal.
When this warning lamp comes on,
accompanied by an audible signal
and a message, it indicates that there
is a fault with the ABS, which could
cause loss of control of the vehicle
when braking.
When this warning lamp comes on,
coupled with the STOP
warning
lamp, accompanied by an audible
signal and a message, it indicates
Intelligent traction control
system
the use of snow tyres is strongly recommended
on sur faces offering low levels of adhesion.
that there is a fault with the electronic brake
force distribution (
eB
FD), which could cause
loss of control of the vehicle when braking.
You must stop as soon as it is safe to do so.
In both cases, contact a P
e
uge
Ot
dealer or a
qualified workshop.
Depending on version, your vehicle has a
system to help driving on snow: intelligent
traction control
.
th
is system detects situations of difficult
sur face adhesion that could make it difficult to
move off or make progress on deep fresh snow
or compacted snow.
In these situations, the intelligent traction
control limits the amount of wheel slip to
provide the best traction and trajectory control
for your vehicle.
5
Safety
Page 127 of 396
125
Advice
Recommendations for children
use a suitable child seat if the passenger is
less than 12 years old or shorter than one
and a half metres.
Never use the same seat belt to secure more
than one person.
Never allow a child to travel on your lap.
For more information on child seats, refer to
the corresponding section.
In order to be effective, a seat belt must:
-
b
e tightened as close to the body as
possible,
-
b
e pulled in front of you with a smooth
movement, checking that it does not
twist,
-
b
e used to restrain only one person,
-
n
ot bear any trace of cuts or fraying,
-
n
ot be converted or modified to avoid
affecting its performance.
In accordance with current safety
regulations, for all repairs on your vehicle's
seat belts, go to a qualified workshop with
the skills and equipment needed, which a
P
e
uge
Ot d
ealer is able to provide.
Have your seat belts checked regularly by a
P
e
uge
Ot
dealer or a qualified workshop,
particularly if the straps show signs of
damage.
Clean the seat belt straps with soapy
water or a textile cleaning product, sold by
P
e
uge
Ot d
ealers.
After folding or moving a seat or rear bench
seat, ensure that the seat belt is positioned
and reeled in correctly.
In the event of an impact
Depending on the nature and
seriousness of the impact , the
pretensioning device may be deployed
before and independently of the airbags.
Deployment of the pretensioners is
accompanied by a slight discharge of
harmless smoke and a noise, due to the
activation of the pyrotechnic cartridge
incorporated in the system.
In all cases, the airbag warning lamp
comes
on.
Following an impact, have the seat belts
system checked, and if necessary replaced,
by a P
e
uge
Ot
dealer or a qualified
workshop.
the
driver must ensure that passengers use
the seat belts correctly and that they are all
fastened before setting off.
Wherever you are seated in the vehicle,
always fasten your seat belt, even for short
journeys.
Do not interchange the seat belt buckles as
they will not fulfil their role fully.
th
e seat belts are fitted with an inertia reel
permitting automatic adjustment of the
length of the strap to your size.
t
h
e seat belt
is stowed automatically when not in use.
Before and after use, ensure that the seat
belt is reeled in correctly.
th
e lower part of the strap must be
positioned as low as possible on the pelvis.th
e upper part must be positioned in the
hollow of the shoulder.
th
e inertia reels are fitted with an automatic
locking device which comes into operation in
the event of a collision, emergency braking
or if the vehicle rolls over. You can release
the device by pulling the strap firmly and
then releasing it so that it reels in slightly.
5
Safety
Page 149 of 396
147
When towing
Distribution of loads
F Distribute the load in the trailer so that the heaviest items are as close as possible to
the axle and the nose weight approaches
the maximum permitted without
exceeding
it.
Air density decreases with altitude, thus
reducing engine performance. Above
1
000 metres, the maximum towed load must
be reduced by 10
% for every 1 000 metres of
altitude.
Side wind
F take into account the increased sensitivity to side wind.
Cooling
towing a trailer on a slope increases the
temperature of the coolant.
As the fan is electrically controlled, its cooling
capacity is not dependent on the engine speed.
F
t
o l
ower the engine speed, reduce your
speed.
th
e maximum towed load on a long incline
depends on the gradient and the ambient
temperature.
In all cases, keep a check on the coolant
temperature.
F
I
f the warning lamp and the
STOP warning lamp come on,
stop the vehicle and switch off
the engine as soon as possible.
Braking
towing a trailer increases the braking distance.to a void overheating of the brakes, the use of
engine braking is recommended.
Ty r e s
F Check the tyre pressures of the towing vehicle and of the trailer, observing the
recommended pressures.
Lighting
F Check the electrical lighting and signalling on the trailer and the hadlamp beam height
of your vehicle.
For more information on adjusting the
headlamp beam height, refer to the
corresponding section.
For more information on weights (and
the towed loads which apply to your
vehicle) refer to the corresponding
section.
th
e rear parking sensors will be
deactivated automatically if a genuine
P
e
uge
Ot
towbar is used.
6
Driving
Page 153 of 396
151
For Diesel vehicles, in sub-
zero temperatures the engine
will not start until the pre-heater
warning lamp has gone off.
If this warning lamp comes on
after pressing the "S
tA
R
t/
StO
P" button, press down on
the brake or clutch pedal until
the warning lamp goes off,
without pressing the "S
tA
R
t/
StO
P" button again, until the
engine starts and runs.
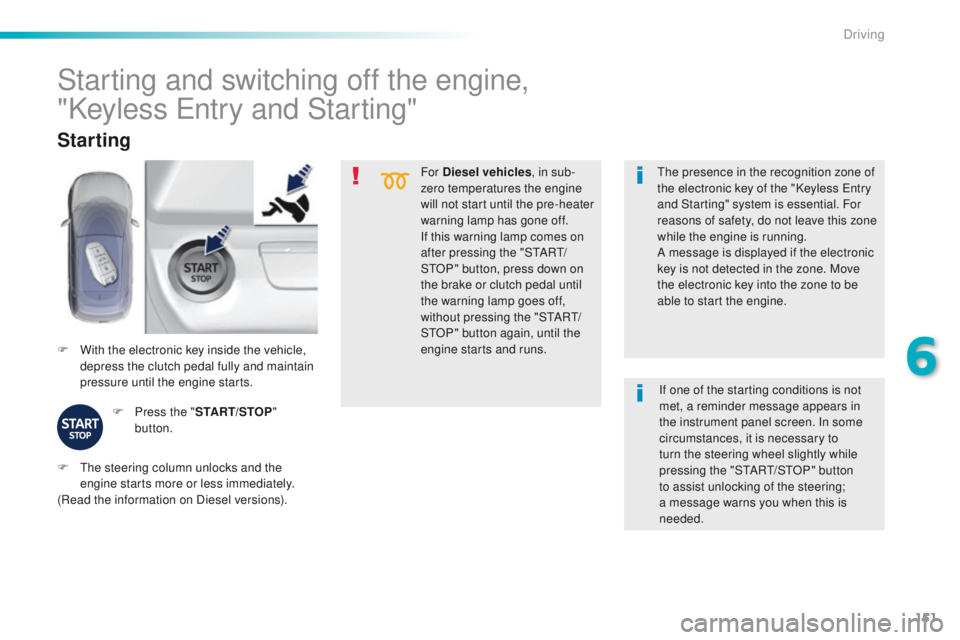
F
W
ith the electronic key inside the vehicle,
depress the clutch pedal fully and maintain
pressure until the engine starts.
Starting
F Press the " START/STOP"
button.
th
e presence in the recognition zone of
the electronic key of the "Keyless e
n
try
and Starting" system is essential. For
reasons of safety, do not leave this zone
while the engine is running.
A message is displayed if the electronic
key is not detected in the zone. Move
the electronic key into the zone to be
able to start the engine.
Starting and switching off the engine,
"Keyless e
n
try and Starting"
F the steering column unlocks and the
engine starts more or less immediately.
(Read the information on Diesel versions). If one of the starting conditions is not
met, a reminder message appears in
the instrument panel screen. In some
circumstances, it is necessary to
turn the steering wheel slightly while
pressing the "StA
Rt/ StO P" button
to assist unlocking of the steering;
a message warns you when this is
needed.
6
Driving
Page 172 of 396
170
Stop & Start
Operation
Going into engine STOP mode
the "ECO" warning lamp comes on
in the instrument panel and the engine
goes into standby automatically:
-
W
ith a manual gearbox , at speeds below
12 mph (20 km/h) or vehicle stationary
(depending on the engine), when you place
the gear lever in neutral, and you release
the clutch pedal.
Never refuel with the engine in S
tO
P
mode; you must switch off the ignition
with the button. For your comfort, during parking
manoeuvres, S
tO
P mode is not
available for a few seconds after
coming out of reverse gear.
S
tO
P mode does not affect the
functionality of the vehicle, such as for
example, braking, power steering...
A slight delay between the vehicle
stopping and the engine cutting out may
be noticed.
Special cases: STOP mode not
available
StOP mode is not invoked principally when:
- t he vehicle is on a steep slope (up or down),
-
t
he driver's door is open,
-
t
he driver's seat belt is not fastened,
-
t
he vehicle has not exceeded 6 mph
(10
km/h) since the last engine start by the
driver,
-
t
he electric parking brake is applied or
being applied,
-
t
he engine is needed to maintain a
comfortable temperature in the passenger
compartment,
-
d
emisting is active,
-
s
ome special conditions (battery charge,
engine temperature, braking assistance,
ambient temperature...) where the engine is
needed to assure control of a system.
If your vehicle is fitted with Stop & Start,
a time counter calculates the time spent
in S
tO
P mode during a journey.In this case, the "ECO" warning
lamp flashes for a few seconds then
goes
off.
This operation is perfectly normal.
th
e Stop & Start
system puts the engine temporarily into standby - S
tO
P mode - during stops in the traffic (red lights, traffic jams, or other...).
th
e engine restarts automatically - S
tA
R
t
mode - as soon as you want to move off.
t
h
e restart takes place instantly, quickly and
silently.
Per fect for urban use, the Stop & Start system reduces fuel consumption and exhaust emissions as well as the noise level when stationary.
Stop & Start time
counter
(minutes / seconds or hours / minutes) -
W
ith an automatic gearbox
, vehicle
stationary, when you press the brake
pedal or place the gear selector lever in
position
N
.
It resets to zero every time the ignition is
switched on.
Driving