2015.5. PEUGEOT 3008 phone
[x] Cancel search: phonePage 37 of 344
35
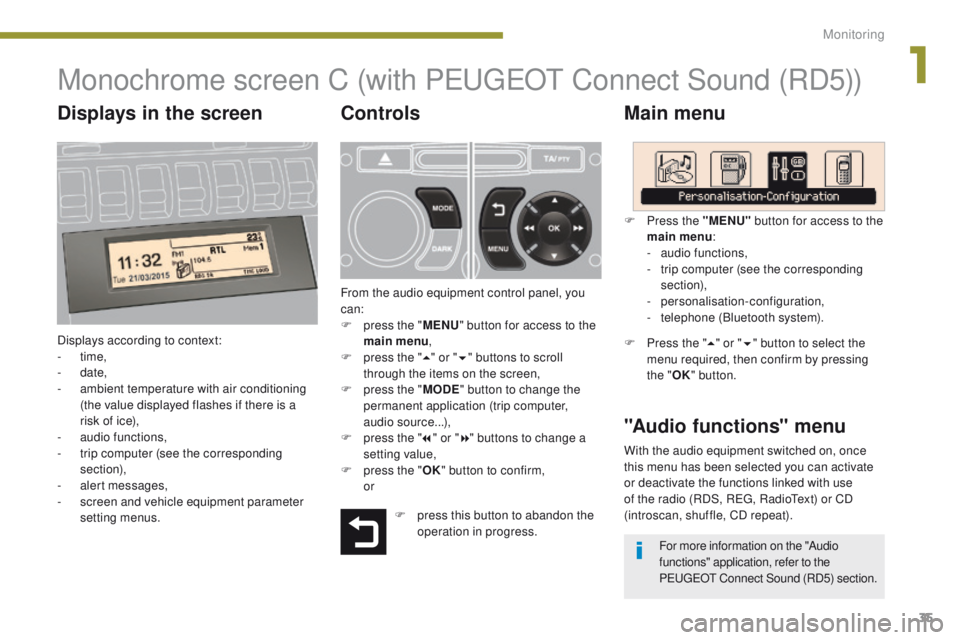
Monochrome screen C (with PEUGEOT Connect Sound (RD5))
Main menu
Displays according to context:
- time,
-
date,
-
a
mbient temperature with air conditioning
(the value displayed flashes if there is a
risk of ice),
-
a
udio functions,
-
t
rip computer (see the corresponding
section),
-
a
lert messages,
-
s
creen and vehicle equipment parameter
setting menus.
"Audio functions" menu
Controls
From the audio equipment control panel, you
can:
F
p
ress the " MENU" button for access to the
main menu ,
F
p
ress the " 5" or " 6" buttons to scroll
through the items on the screen,
F
p
ress the " MODE" button to change the
permanent application (trip computer,
audio source...),
F
p
ress the " 7" or " 8" buttons to change a
setting value,
F
p
ress the " OK" button to confirm,
or F
P
ress the "MENU"
button for access to the
main menu :
-
a
udio functions,
-
t
rip computer (see the corresponding
section),
- personalisation-configuration,
-
t
elephone (Bluetooth system).
F Press the "5" or " 6" button to select the
menu required, then confirm by pressing
the " OK" button.
With the audio equipment switched on, once
this menu has been selected you can activate
or deactivate the functions linked with use
of the radio (RDS, REG, RadioText) or CD
(introscan, shuffle, CD repeat).
F
p
ress this button to abandon the
operation in progress. For more information on the "Audio
functions" application, refer to the
PEUGEOT Connect Sound (RD5) section.
Displays in the screen
1
Monitoring
Page 39 of 344
37
Display configuration
Once this menu has been selected, you have
access to the following settings:
-
b
rightness-video setting,
-
d
ate and time setting,
-
s
election of the units.
Adjusting the date and time
F
P
ress the " 7" or " 8" button to select the
"Display configuration" menu, then the
"OK" button.
F
P
ress the " 5" or " 6" button, to select the
"Adjust date and time" line, then on the
"OK" button.
F
P
ress the " 7" or " 8" button to select the
setting to modify. Confirm by pressing the
"OK"
button then adjust the setting and
confirm again to save the modification.
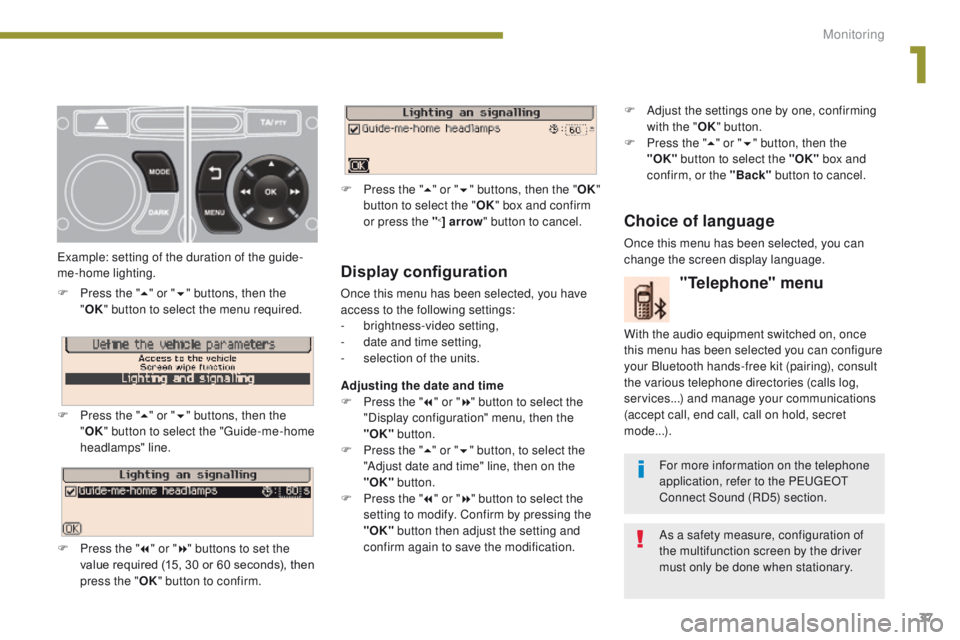
Example: setting of the duration of the guide-
me-home lighting.
F
P
ress the "
5" or " 6" buttons, then the
" OK "
button to select the menu required.
F
P
ress the " 5" or " 6" buttons, then the
" OK " button to select the "Guide-me-home
headlamps" line.
F
P
ress the " 7" or " 8" buttons to set the
value required (15, 30 or 60 seconds), then
press the " OK" button to confirm. F
P
ress the "
5" or " 6" buttons, then the " OK"
button to select the " OK" box and confirm
or press the "
<] arrow " button to cancel.
"Telephone" menu
With the audio equipment switched on, once
this menu has been selected you can configure
your Bluetooth hands-free kit (pairing), consult
the various telephone directories (calls log,
services...) and manage your communications
(accept call, end call, call on hold, secret
mode...).
For more information on the telephone
application, refer to the PEUGEOT
Connect Sound (RD5) section.
As a safety measure, configuration of
the multifunction screen by the driver
must only be done when stationary.
Choice of language
Once this menu has been selected, you can
change the screen display language. F
A
djust the settings one by one, confirming
with the " OK" button.
F
P
ress the "
5" or " 6" button, then the
"OK"
button to select the "OK"
box and
confirm, or the "Back" button to cancel.
1
Monitoring
Page 40 of 344
38
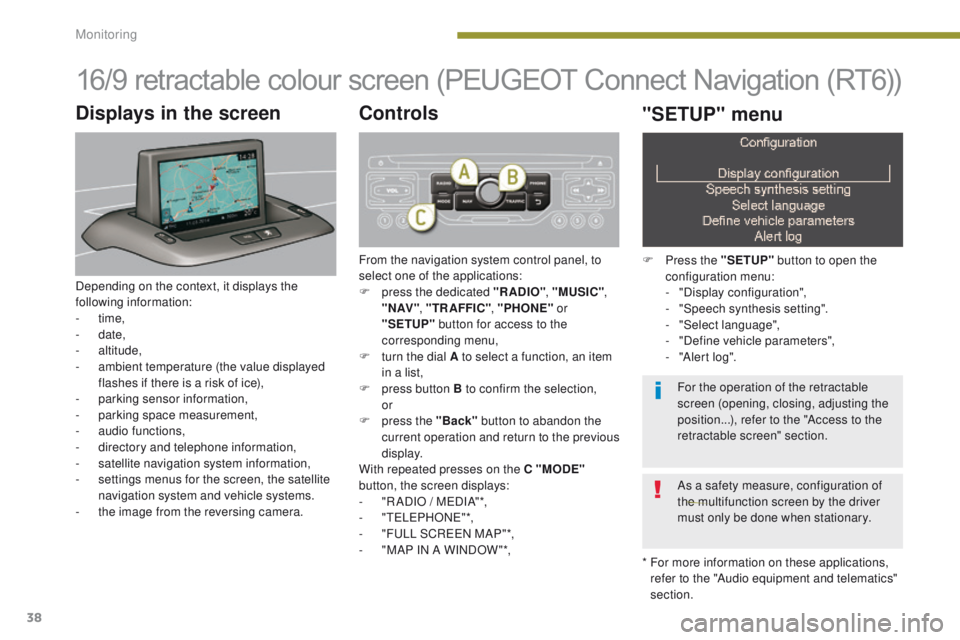
16/9 retractable colour screen (PEUGEOT Connect Navigation (RT6))
* For more information on these applications, refer to the "Audio equipment and telematics"
section.
Displays in the screen
Depending on the context, it displays the
following information:
-
time,
-
date,
-
altitude,
-
a
mbient temperature (the value displayed
flashes if there is a risk of ice),
-
par
king sensor information,
-
par
king space measurement,
-
a
udio functions,
-
d
irectory and telephone information,
-
sa
tellite navigation system information,
-
s
ettings menus for the screen, the satellite
navigation system and vehicle systems.
-
t
he image from the reversing camera.
Controls
From the navigation system control panel, to
select one of the applications:
F
p
ress the dedicated "RADIO" , "MUSIC",
" N AV " , "TR AFFIC" , "PHONE" or
"SETUP" button for access to the
corresponding menu,
F
t
urn the dial A to select a function, an item
in a list,
F
p
ress button B to confirm the selection,
or
F
p
ress the "Back" button to abandon the
current operation and return to the previous
display.
With repeated presses on the C "MODE"
button, the screen displays:
-
"
R ADIO / MEDIA"*,
-
"TELEPHONE"*,
-
"
FULL SCREEN MAP"*,
-
"
MAP IN A WINDOW "*,
"SETUP" menu
F Press the "SETUP" button to open the
configuration menu:
-
"
Display configuration",
-
"
Speech synthesis setting".
-
"
Select language",
-
"
Define vehicle parameters",
-
"
Alert log".
For the operation of the retractable
screen (opening, closing, adjusting the
position...), refer to the "Access to the
retractable screen" section.
As a safety measure, configuration of
the multifunction screen by the driver
must only be done when stationary.
Monitoring
Page 42 of 344
40
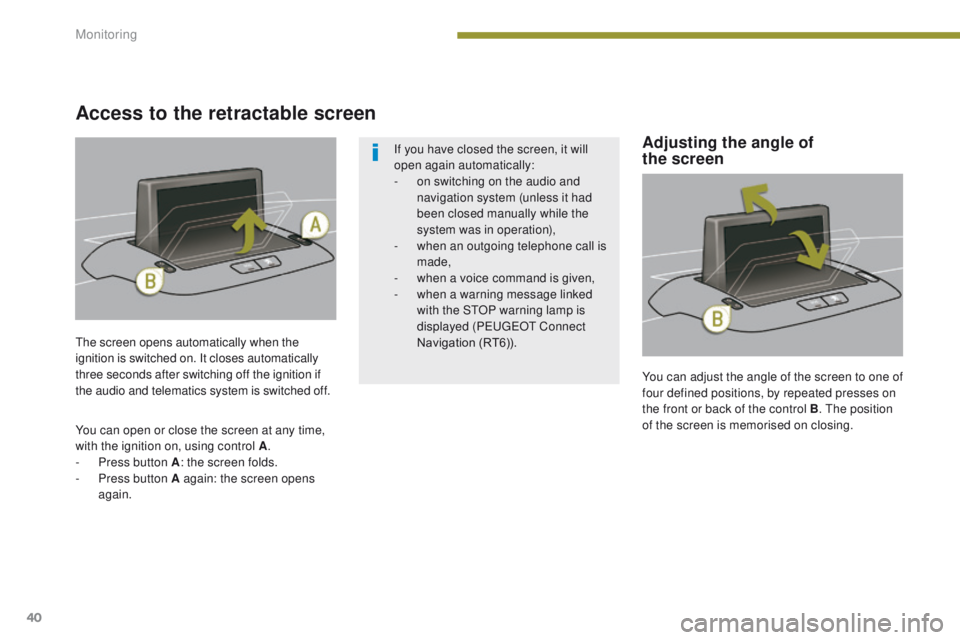
You can adjust the angle of the screen to one of
four defined positions, by repeated presses on
the front or back of the control B. The position
of the screen is memorised on closing.
The screen opens automatically when the
ignition is switched on. It closes automatically
three seconds after switching off the ignition if
the audio and telematics system is switched off.
You can open or close the screen at any time,
with the ignition on, using control A
.
-
P
ress button A : the screen folds.
-
P
ress button A again: the screen opens
again. If you have closed the screen, it will
open again automatically:
-
o
n switching on the audio and
navigation system (unless it had
been closed manually while the
system was in operation),
-
w
hen an outgoing telephone call is
made,
-
w
hen a voice command is given,
-
w
hen a warning message linked
with the STOP warning lamp is
displayed (PEUGEOT Connect
Navigation (RT6)).
Access to the retractable screen
Adjusting the angle of
the screen
Monitoring
Page 99 of 344
97
Mats
Refitting
To refit the mat on the driver's side:
F p osition the mat correctly,
F
r
efit the fixings by pressing,
F
c
heck that the mat is secured correctly.
Fitting
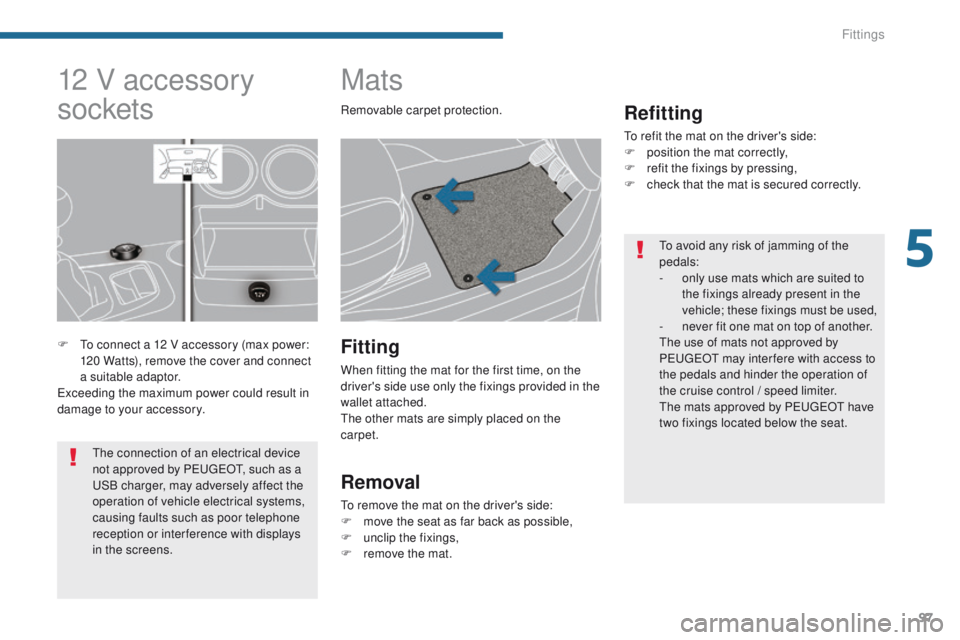
When fitting the mat for the first time, on the
driver's side use only the fixings provided in the
wallet attached.
The other mats are simply placed on the
carpet.
Removal
To remove the mat on the driver's side:
F m ove the seat as far back as possible,
F
un
clip the fixings,
F
r
emove the mat.
12 V accessory
sockets
F To connect a 12 V accessory (max power: 120 Watts), remove the cover and connect
a suitable adaptor.
Exceeding the maximum power could result in
damage to your accessory. Removable carpet protection.
To avoid any risk of jamming of the
pedals:
-
o
nly use mats which are suited to
the fixings already present in the
vehicle; these fixings must be used,
-
n
ever fit one mat on top of another.
The use of mats not approved by
PEUGEOT may inter fere with access to
the pedals and hinder the operation of
the cruise control
/ speed limiter.
The mats approved by PEUGEOT have
two fixings located below the seat.
The connection of an electrical device
not approved by PEUGEOT, such as a
USB charger, may adversely affect the
operation of vehicle electrical systems,
causing faults such as poor telephone
reception or inter ference with displays
in the screens.
5
Fittings
Page 100 of 344
98
Rear multimedia
This multimedia system allows rear passengers
to connect one or two external portable
systems (audio or video player, games
consoles, DVD player...). The sound is played
through two Bluetooth
® wireless headphone
sets, while the video content is displayed in
two
7-inch screens built into the backs of the
front seat head restraints.
Description
This system operates only with the
engine running. The pack includes:
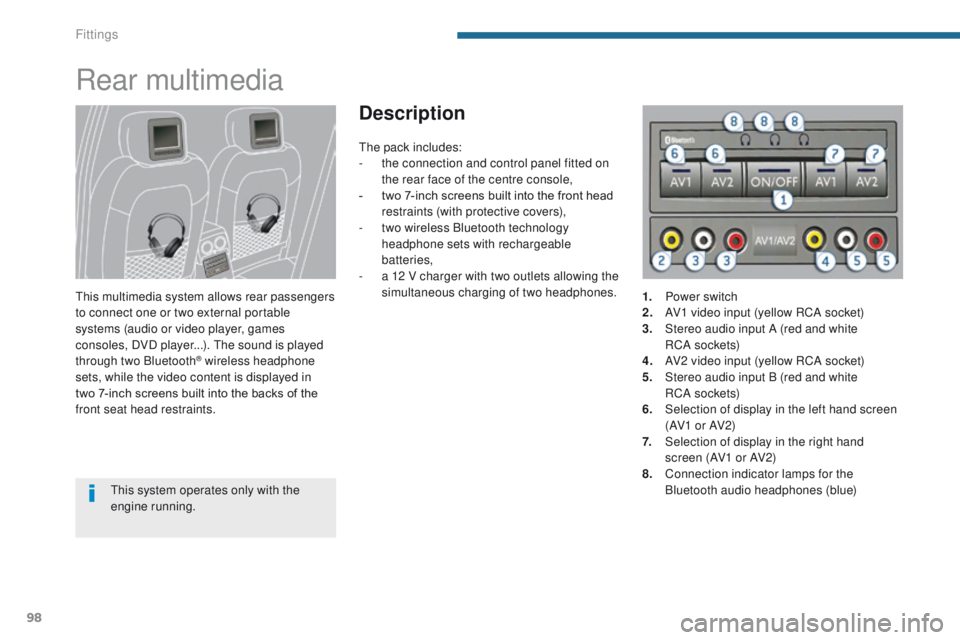
-
t
he connection and control panel fitted on
the rear face of the centre console,
-
t
wo 7-inch screens built into the front head
restraints (with protective covers),
-
t
wo wireless Bluetooth technology
headphone sets with rechargeable
batteries,
-
a 1
2 V charger with two outlets allowing the
simultaneous charging of two
headphones.
1.
P
ower switch
2.
A
V1 video input (yellow RCA socket)
3.
S
tereo audio input A (red and white
RC A s o c ket s)
4.
A
V2 video input (yellow RCA socket)
5.
S
tereo audio input B (red and white
RC A s o c ket s)
6.
S
election of display in the left hand screen
(AV1 o r AV2)
7.
S
election of display in the right hand
screen (AV1 or AV2)
8.
C
onnection indicator lamps for the
Bluetooth audio headphones (blue)
Fittings
Page 101 of 344
99
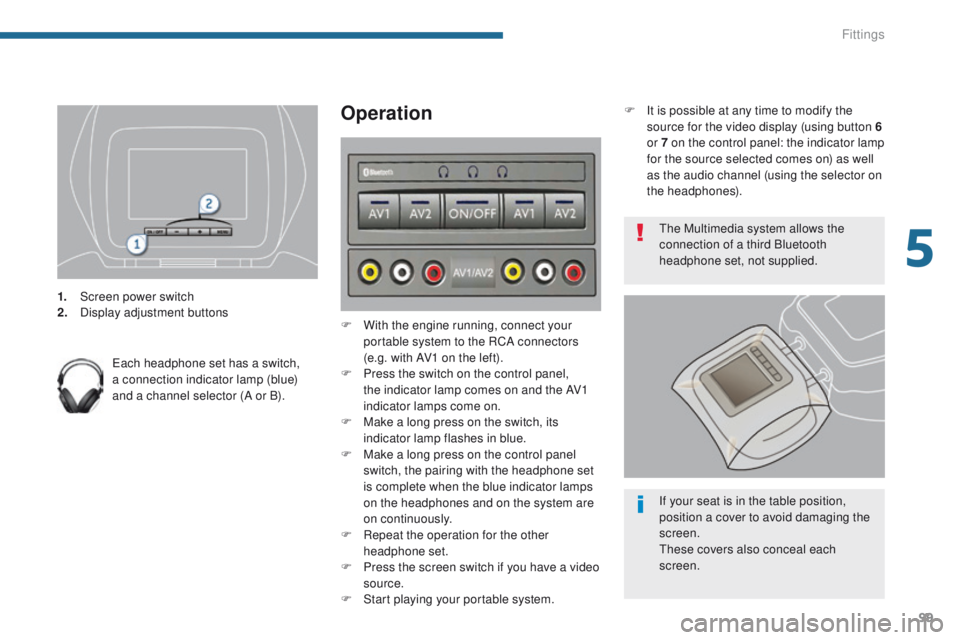
1. Screen power switch
2. Display adjustment buttons
Each headphone set has a switch,
a connection indicator lamp (blue)
and a channel selector (A or B).
Operation
F With the engine running, connect your portable system to the RCA connectors
(e.g. with AV1 on the left).
F
P
ress the switch on the control panel,
the indicator lamp comes on and the AV1
indicator lamps come on.
F
M
ake a long press on the switch, its
indicator lamp flashes in blue.
F
M
ake a long press on the control panel
switch, the pairing with the headphone set
is complete when the blue indicator lamps
on the headphones and on the system are
on continuously.
F
R
epeat the operation for the other
headphone set.
F
P
ress the screen switch if you have a video
source.
F
S
tart playing your portable system. The Multimedia system allows the
connection of a third Bluetooth
headphone set, not supplied.
If your seat is in the table position,
position a cover to avoid damaging the
screen.
These covers also conceal each
screen.
F
I
t is possible at any time to modify the
source for the video display (using button 6
or 7 on the control panel: the indicator lamp
for the source selected comes on) as well
as the audio channel (using the selector on
the headphones).
5
Fittings
Page 142 of 344
140
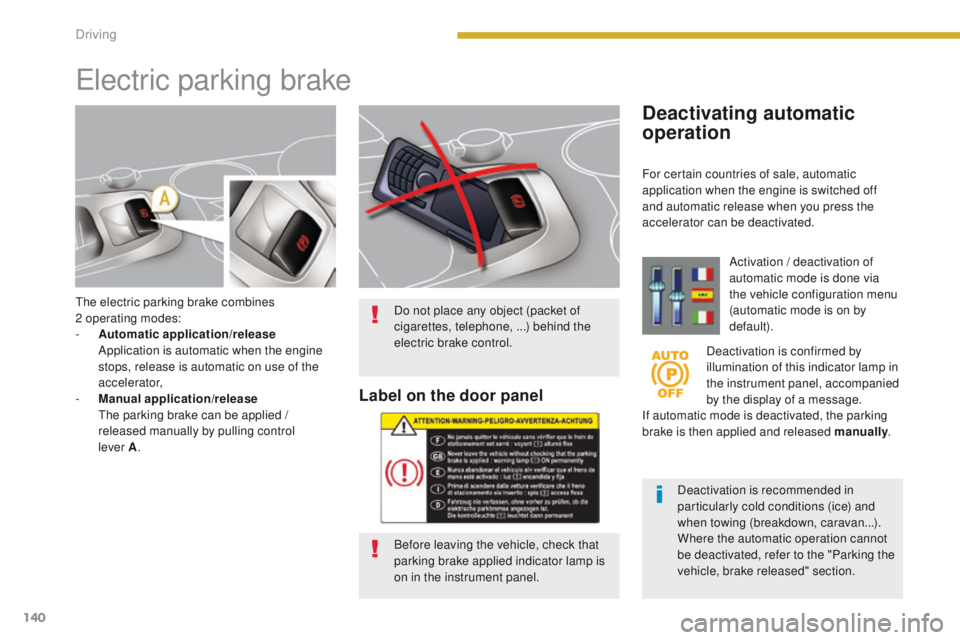
The electric parking brake combines
2 operating modes:
-
A
utomatic application/release
A
pplication is automatic when the engine
stops, release is automatic on use of the
accelerator,
-
M
anual application/release
T
he parking brake can be applied /
released manually by pulling control
lever
A.
Electric parking brake
Deactivating automatic
operation
Activation / deactivation of
automatic mode is done via
the vehicle configuration menu
(automatic mode is on by
default).
Deactivation is confirmed by
illumination of this indicator lamp in
the instrument panel, accompanied
by the display of a message.
If automatic mode is deactivated, the parking
brake is then applied and released manually .
Deactivation is recommended in
particularly cold conditions (ice) and
when towing (breakdown, caravan...).
Where the automatic operation cannot
be deactivated, refer to the "Parking the
vehicle, brake released" section.
Do not place any object (packet of
cigarettes, telephone, ...) behind the
electric brake control.
Label on the door panel
Before leaving the vehicle, check that
parking brake applied indicator lamp is
on in the instrument panel. For certain countries of sale, automatic
application when the engine is switched off
and automatic release when you press the
accelerator can be deactivated.
Driving