2015.5 Citroen DS5 RHD clock
[x] Cancel search: clockPage 12 of 400

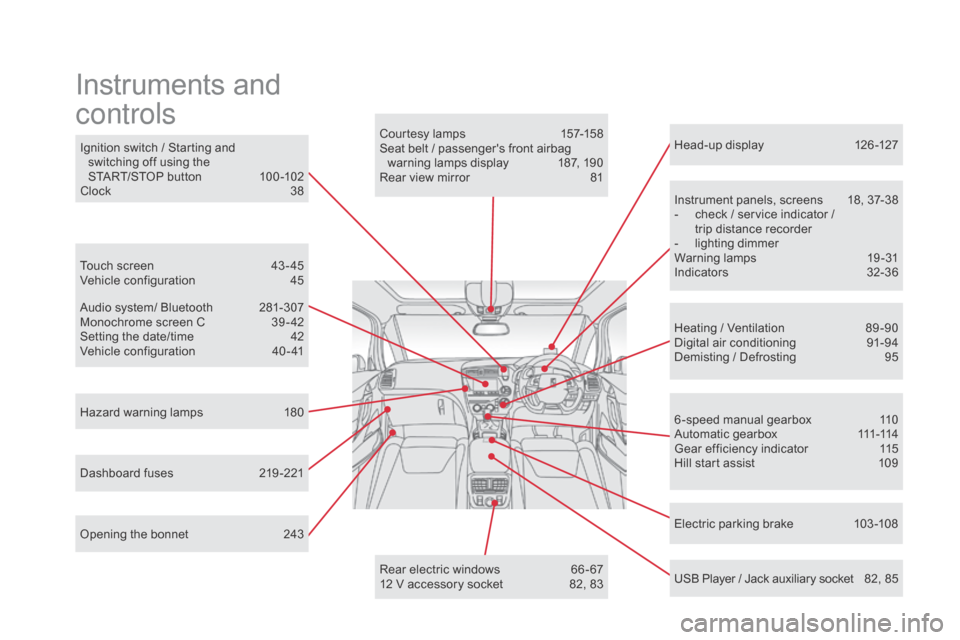
Head-up display 126 -127
Instrument panels, screens
1
8, 37-38
-
c
heck / service indicator /
trip distance recorder
-
l
ighting dimmer
Warning lamps
1
9-31
Indicators
32
-36
Electric parking brake
1
03 -108
Ignition switch / Starting and
switching off using the
START/STOP button
1
00 -102
Clock
3
8
Hazard warning lamps
1
80
Instruments and
controls
Courtesy lamps 1 57-158
Seat belt / passenger's front airbag warning lamps display
1
87, 190
Rear view mirror
8
1
Heating / Ventilation
8
9 -90
Digital air conditioning
9
1-94
Demisting / Defrosting
9
5
USB Player / Jack auxiliary socket
8
2, 85
Dashboard fuses
2
19 -221 6 -speed manual gearbox
1
10
A u t o m a t i c g e a r b o x
111
-114
Gear efficiency indicator
1
15
Hill start assist
1
09
Audio system/ Bluetooth
2
81-307
Monochrome screen C
3
9 - 42
Setting the date/time
4
2
Vehicle configuration
4
0 - 41
Touch screen
4
3 - 45
Vehicle configuration
4
5
Opening the bonnet
2
43 Rear electric windows
6
6 - 67
12 V accessory socket
8
2, 83
Page 40 of 400

This allows some of the instrument panel
displays, as well as the touch screen, to be
switched off when driving at night, so as to
reduce visual fatigue for the driver.
The essential driving information, such as
the vehicle speed, warning lamps, the gear
engaged for an automatic gearbox, cruise
control or speed limiter, remains displayed in
the instrument panel.
Black panel (comfortable
night display) with the
touch screen
Clock
The analogue clock does not have an
adjustment button.
To set the time, refer to the section relating to
the screen (audio system) configuration menu.
The clock is synchronised with the screen time;
once the the setting has been confirmed in the
screen, the hands will turn to synchronise with
the screen, as well as every time the ignition is
switched on.
F
W
ith the exterior lighting on,
press this button to activate the
function.
Touch screen
You can return to the current display
at any time by by pressing the blank
screen or one of the menu buttons.
In automatic illumination of headlamps
mode, the "Black panel" function is
automatically deactivated once the
ambient light reaches an adequate
level.
F
P
ress this button again or press the
instrument panel lighting dimmer button to
deactivate the function.
Page 44 of 400

choice of language
Once this menu has been selected, you can
choose the language used by the display from
a pre-defined list.
Display configuration
This menu gives access to the following
settings:
-
"
Choice of units",
-
"
Date and time adjustment",
-
"
Display parameters",
-
"
Brightness".
As a safety measure, configuration of
the multifunction screen by the driver
must only be done when stationary.
Adjusting the date and time
F
P
ress the "
7" or " 8" button to display
the "Display configuration" menu, then
press "OK"
.
F
P
ress the "
5" or " 6" button to select the
"Date and time adjustment" button, then
press "OK" .
F
P
ress the "
7" or " 8" button to select
the setting to modify. Confirm by
pressing "O K"
, then modify the setting and
confirm again to save the modification.
F
A
djust the settings one by one, confirming
with the "OK" button.
F
P
ress the "5" or " 6" button, then the "OK"
button to select the "OK" box and confirm
or the "Back" button to cancel. The analogue clock, located in the
dashboard, is synchronised with the
time in the screen. It is set after the
time is adjusted using the configuration
menu and every time the ignition is
switched on.
Page 206 of 400

Taking out the spare wheel
F Raise the floor to reveal the spare wheel carrier drive nut.
F
T
urn this drive nut fully clockwise, using
the wheelbrace 1 and the extension 7 , to
unwind the winch cable, until the spare
wheel is flat on the ground. Unwind the
length needed for access to the wheel. F
D etach the assembly of wheel and box
from the rear of the vehicle.
F
S
traighten the spare wheel for access to
the spare wheel.
F
D
etach the link piece from the tool box lid.
F
P
ass the link piece through the middle of
the wheel to free it. When the spare wheel is fitted in place
of a punctures wheel, you must refit the
winch carrier and tool box under the
vehicle before setting off.
Refer to the "Putting the winch carrier
and spare wheel back in place" section.
Page 207 of 400

205
Putting the winch carrier and
spare wheel back in place
This procedure is to be carried out whether
the spare wheel is present or not. Without the
spare wheel, skip steps A and d
.
O
nly a "space-saver" type spare wheel can
be secured under the vehicle using the winch
c a r r i e r.
F
S
tow the jack in the box and refit the lid.
F
P
lace the closed box flat on the ground,
close to the rear of the vehicle.
F
S
traighten the spare wheel and pass the
link piece through the middle of the wheel.
F
I
nsert the link piece in the tool box
aperture. F
C entre the spare wheel on the tool box.
F
P
lace the assembly of wheel and tool box
under the rear of the vehicle.
F
R
aise the assembly of wheel and tool box
under the vehicle by turning the winch drive
nut anticlockwise using the wheelbrace 1
and the extension 7 . F
T ighten fully and check that the wheel is
horizontally flush against the floor.
Practical information
Page 262 of 400

F Unclip the black plastic blanking plug using a lever. F
I nsert your fingers into the aperture and
turn the blue cap a 6th of a turn anti-
clockwise.
F
C
arefully lift off the cap, without dropping it. F
O btain a bottle of AdBlue
®. After first
checking the use-by date, read carefully
the instructions on use on the label before
pouring the contents of the bottle into your
vehicle's AdBlue
® tank.
Page 263 of 400

261
F After emptying the bottle, wipe away any spillage around the tank filler using a damp
cloth.
F
R
efit the blue cap to the tank and turn it a
6
th of a turn clockwise, to its stop.
F
R
efit the black plastic blanking plug,
clipping it in place.
F
L
ower the boot floor and close the tailgate.
Important: if your vehicle's
AdBlue
® tank is completely empty -
w
hich is confirmed by the alert
messages and the impossibility of
starting the engine - you must add at
least 3.8 litres, so two 1.89 litre bottles. If any additive is split or splashed, wash
immediately with cold water or wipe
with a damp cloth.
If the additive has crystallised, clean it
off using a sponge and hot water.Important:
when topping up after
running out of additive , signalled
by the message "Top up emissions
additive: Starting prevented", you must
wait for approximately 5 minutes before
switching on the ignition, without
opening the driver's door, unlocking
the vehicle, placing the key of the
"Keyless Entr y and Star ting" system
inside the vehicle or inser ting the
electronic key in the reader.
Switch on the ignition, wait for
10
seconds, then start the engine.
Never dispose of AdBlue
® additive
bottles in the household waste. Place
them in a special container provided
this purpose or take them to your
dealer.
checks
Page 312 of 400

A
Accessories ................................................. 234
Accessory position ....................................... 10
1
Additive, AdBlue
.............................. 2
9, 253 -261
Additive, Diesel
...............................
...... 250, 251
Adjusting headlamps
.................................... 15
0
Adjusting head restraints
.......................... 7
2, 75
Adjusting seats
.......................................... 7
2, 73
Adjusting the date
..................................... 3
9, 42
Adjusting the height and reach of the steering wheel
.................................... 81
A
djusting the seat belt height
.......................18
7
Adjusting the time
............................... 3
8, 39, 42
Advice on care and maintenance
............................................... 23
3
Advice on driving
..............................
........ 98, 99
Airbags
...............
..................................... 31, 189
Airbags, curtain
..................................... 19
1, 192
Airbags, front......................................... 189, 192
Airbags, lateral
...................................... 19
1, 192
Air conditioning, automatic
....................... 9
0, 91
Air vents
..............................
............................89
Alarm
............................................................... 63
A
nti-lock braking system (ABS)
....................18
2
Anti-pinch
........................................................ 68
A
nti-theft
..............................
.........................101
Armrest, front
............................................ 8
2, 85
Armrest, rear
............................................. 8
2, 86
Ashtray
...............
............................................. 82
Assistance call
...............................
....... 181, 278
Assistance, emergency braking
..................................... 18
2
Audible warning
............................................ 18
1
Audio streaming (Bluetooth)
................. 2
91, 293
Audio system
...............................
............ 39, 281
Automatic headlamps
............................. 2
0, 147Battery ...............................
............. 223 -227, 251
Battery, charging ...............................
............225
Battery, remote control
............................. 5
9, 60
Black panel ...................................................... 38
Blind spot sensors
........................................12
3
BlueHDi
...............................
.......... 246, 253 -261
Bluetooth (hands-free)
..................................2
92
Boot
........
.........................................................62
Boot (opening)
...............................
..................53
Brake discs
....................................................2
52
Brake lamps
...............................
...................216
Brake warning lamp
........................................2
7
Braking assistance system
...........................18
2
Braking, dynamic emergency
............... 10
3, 107
Bulbs (changing)
...............................
.....211-218
Capacity, fuel tank
..............................
..........239
Cap, fuel filler
................................................23
9
CD
..............................
................................... 287
CD, MP3
................................................ 2
88, 289
Central locking
.......................................... 5
3, 55
Changing a bulb
..................................... 21
1-218
Changing a fuse
..................................... 2
19-222
Changing a wheel
...............................
...202-209
Changing a wiper blade
........................ 1
56, 228
Changing the remote control battery
..............59
C
hecking the engine oil level
.................. 3
6, 247
Checking the levels
................................2
47-25 0
Checking tyre pressures (using the kit)
........2
01
Checks
...............
................... 244, 245, 251, 252Date (setting)
...............................
.............. 39, 42
Daytime running lamps
..................1
45, 211, 212
Deactivating ESC
..........................................18
4
Deactivating the passenger airbag
............... 19
0
Deadlocking
...............................
.....................56
Demisting, defrosting
...................................... 95
D
emisting, defrosting the mirrors
...................80
c
B
d
Checks, routine ..................................... 2 51, 252
Child lock ............................... ................ 169, 176
Children
...............................
...160 -176, 188, 190
Child seats
..............................
..............16 2-18 8
Child seats, conventional
......................16
8, 169
Child seats, ISOFIX
...............................17
0 -173
Cigarette lighter............................................... 83
C
ITROËN
L
ocalised Emergency Call........... 278
Cleaning (advice)
.......................................... 23
3
Clock
...............
................................................ 38
Closing the boot
...............................
...............62
Closing the doors
...............................
....... 53, 55
Configuration, vehicle
............................... 3
9, 45
Control, emergency boot release
...................62
C
ontrol, emergency door
................................ 57
C
ontrol, heated seats
...................................... 76
C
ontrol stalk, lighting
............................14
2, 148
Control stalk, wipers
..............................15
3 -155
Courtesy lamps
............................................. 15
7
Cruise control
........................................ 1
28, 133
Cup holder
...............................
........................82