2014 VOLVO V60 sensor
[x] Cancel search: sensorPage 259 of 442

07 Driver support
07
* Option/accessory, for more information, see Introduction.257
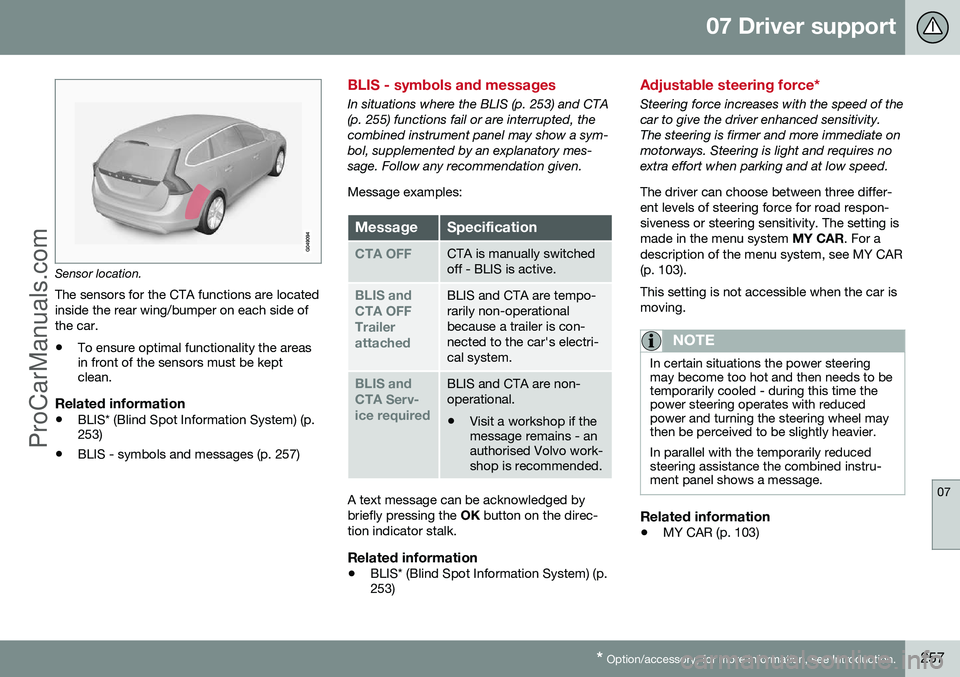
Sensor location.
The sensors for the CTA functions are located inside the rear wing/bumper on each side ofthe car.
• To ensure optimal functionality the areas in front of the sensors must be keptclean.
Related information
•BLIS* (Blind Spot Information System) (p.253)
• BLIS - symbols and messages (p. 257)
BLIS - symbols and messages
In situations where the BLIS (p. 253) and CTA (p. 255) functions fail or are interrupted, thecombined instrument panel may show a sym-bol, supplemented by an explanatory mes-sage. Follow any recommendation given. Message examples:
MessageSpecification
CTA OFFCTA is manually switched off - BLIS is active.
BLIS and CTA OFFTrailerattachedBLIS and CTA are tempo- rarily non-operationalbecause a trailer is con-nected to the car's electri-cal system.
BLIS and CTA Serv-ice requiredBLIS and CTA are non- operational.
• Visit a workshop if the message remains - anauthorised Volvo work-shop is recommended.
A text message can be acknowledged by briefly pressing the
OK button on the direc-
tion indicator stalk.
Related information
• BLIS* (Blind Spot Information System) (p. 253)
Adjustable steering force*
Steering force increases with the speed of the car to give the driver enhanced sensitivity.The steering is firmer and more immediate onmotorways. Steering is light and requires noextra effort when parking and at low speed. The driver can choose between three differ- ent levels of steering force for road respon-siveness or steering sensitivity. The setting ismade in the menu system
MY CAR. For a
description of the menu system, see MY CAR(p. 103). This setting is not accessible when the car is moving.
NOTE
In certain situations the power steering may become too hot and then needs to betemporarily cooled - during this time thepower steering operates with reducedpower and turning the steering wheel maythen be perceived to be slightly heavier. In parallel with the temporarily reduced steering assistance the combined instru-ment panel shows a message.
Related information
• MY CAR (p. 103)
ProCarManuals.co’
Page 305 of 442

08 Starting and driving
08
303
tion, see Key positions (p. 70) for more information.
2. Press the START button without
depressing the brake and/or clutch pedal.
3. Wait approx. 1 minute.
4. To start the engine: Depress the brake and/or clutch pedal and then press the START button again.
NOTE
Before filling with fuel in the event of fuel shortage:
• Stop the car on as flat/level ground as possible - if the car is tilting there is arisk of air pockets in the fuel supply.
Draining condensation from the fuel filter
The fuel filter separates condensation from the fuel. Condensation can disrupt engineoperation. The fuel filter must be drained at the intervals specified in the Service and Warranty Bookletor if you suspect that the car has been filledwith contaminated fuel. For more information,see Volvo service programme (p. 340).
IMPORTANT
Certain special additives remove the water separation in the fuel filter.
Related information
•
Fuel - handling (p. 301)
• Diesel particle filter (DPF) (p. 305)
• Fuel consumption and CO2 emissions (p. 403)
Catalytic converters
The purpose of the catalytic converters is to purify exhaust gases. They are located closeto the engine so that operating temperature isreached quickly. The catalytic converters consist of a monolith (ceramic or metal) with channels. The channelwalls are lined with a thin layer of platinum/rhodium/palladium. These metals act as cata-lysts, i.e. they participate in and accelerate achemical reaction without being used upthemselves.
Lambda-sond TM
oxygen sensorThe Lambda-sond is part of a control systemintended to reduce emissions and improvefuel economy (see Fuel consumption andCO2 emissions (p. 403)). An oxygen sensor monitors the oxygen con- tent of the exhaust gases leaving the engine.This value is fed into an electronic systemthat continuously controls the injectors. Theratio of fuel to air directed to the engine iscontinuously adjusted. These adjustmentscreate optimal conditions for efficient com-bustion, and together with the three-way cat-alytic converter reduce harmful emissions(hydrocarbons, carbon monoxide and nitrousoxides).
ProCarManuals.co’
Page 332 of 442

09 Wheels and tyres
09
330* Option/accessory, for more information, see Introduction.
Tyre pressure monitoring*
Tyre pressure monitoring (TPMS) (Tyre Pressure Monitoring System) 3
warns the
driver when the pressure is too low in one or more of the car's tyres. Tyre pressure monitoring uses sensors located inside the air valve in each wheel.When the car is driven at about 40 km/h thesystem detects the tyre pressure. If the pres- sure is too low then a warning lamp
in the
combined instrument panel illuminates and a message is shown in the information display. Both factory-fitted and optional wheels can be equipped with TPMS sensors in thevalves. If wheels without TPMS sensors are used or if a sensor has failed then
Tyre press. syst
Service required will be shown.
Always check the system after changing a wheel in order to ensure that replacementwheels work with the system. For information on the correct tyre pressure, see Tyres - air pressure (p. 328). The system does not replace normal tyre maintenance.
IMPORTANT
If a fault should arise in the tyre pressure system a warning lamp
in the com-
bined instrument panel will illuminate and a message will be shown. This can be forvarious reasons, e.g. fitting a wheel notequipped with a sensor adapted for Vol-vo's tyre pressure monitoring system.
Related information
• Tyre pressure monitoring* - adjust (recali- bration) (p. 330)
• Tyre pressure monitoring* - rectifying lowtyre pressure (p. 331)
• Tyre pressure monitoring* - activate/deactivate (p. 331)
• Tyre pressure monitoring* - recommenda-tions (p. 332)
• Tyre pressure monitoring - driveablepunctured tyres* (p. 332)
Tyre pressure monitoring* - adjust (recalibration)
Tyre pressure monitoring (TPMS) (Tyre Pressure Monitoring System) 4
warns the
driver when the pressure is too low in one or more of the car's tyres. TPMS can be adjusted in order to follow Vol- vo's tyre pressure recommendations (p. 328),when driving with a heavy load for example.
NOTE
The engine must not be running when the tyres are calibrated.
The settings are made with the control in the centre console, see MY CAR (p. 103).
1. Inflate the tyres to the required pressure and select key position I or II.
2. Select the menu system MY CAR to open
the menus for tyre pressure.
3. Select
Calibrate tyre pressure.
4. Press OK.
5. Start the car and drive at least at 40 km/h for a total of at least 1 minute and check that the message disappears.
> Then the TPMS is recalibrated to thenew tyre pressure.
3Option only in certain markets.
4 Option only in certain markets.
ProCarManuals.co’
Page 334 of 442

09 Wheels and tyres
09
332* Option/accessory, for more information, see Introduction.
Tyre pressure monitoring* - recommendations
Tyre pressure monitoring TPMS (Tyre Pressure Monitoring System) 7
warns the
driver when the pressure is too low in one or more of the car's tyres.
• Volvo recommends that TPMS sensors are fitted to all wheels on the car.
• Volvo recommends that sensors are notmoved between different wheels.
WARNING
When inflating a tyre equipped with TPMS, hold the nozzle of the pump directlyagainst the valve to avoid damaging thevalve.
Related information
• Tyre pressure monitoring* (p. 330)
Tyre pressure monitoring - driveable punctured tyres*
If SST (Self Supporting run flat Tires)* is selected, the car is also equipped with TPMS(p. 330). This type of tyre has a specially reinforced side wall that makes continued driving possi-ble to a limited extent despite the tyre losingall or some of its pressure. These tyres are fit-ted on a special rim. (Normal tyres can alsobe fitted to this rim.) If an SST tyre loses tyre pressure then the yellow TPMS lamp in the combined instru-ment panel illuminates and a message isshown in the information display. If thisoccurs, reduce speed to max. 80 km/h. Thetyre must be replaced as soon as possible. Drive carefully, in some cases it can be diffi- cult to see which tyre is faulty. In order toestablish which tyre needs attention, checkall four tyres.
WARNING
Only people with knowledge of SST tyres should fit them. SST tyres must only be fitted together with TPMS. After an error message about low tyre pressure has been shown, do not drivefaster than 80 km/h. Maximum mileage before tyre replacement is 80 km. Avoid hard driving such as sudden braking or turning. SST tyres must be replaced if they are damaged or punctured.
Related information
•Tyre pressure monitoring* (p. 330)
7
Option only in certain markets.
ProCarManuals.co’
Page 346 of 442

||
10 Maintenance and service
10
344
WARNING
The ignition system has very high voltage and output. The voltage in the ignition sys-tem is highly dangerous. The car's electri-cal system must always be in key position0 when work is being performed in the
engine compartment; see Key positions -functions at different levels (p. 70). Do not touch the spark plugs or ignition coil when the car's electrical system is inkey position II or when the engine is hot.
Engine compartment except 4 cyl. 2.0 l 2
The appearance of the engine compartment may differ depending on engine variant.
Coolant expansion tank
Power steering fluid reservoir
Engine oil dipstick
3
Radiator
Filling engine oil
Reservoir for brake and clutch fluid (located on the driver's side)
Battery
Relay and fuse box
Filling washer fluid
Air filter
WARNING
The ignition system has very high voltage and output. The voltage in the ignition sys-tem is highly dangerous. The car's electri-cal system must always be in key position0
when work is being performed in the
engine compartment; see Key positions -functions at different levels (p. 70). Do not touch the spark plugs or ignition coil when the car's electrical system is inkey position II or when the engine is hot.
Related information
• Bonnet - opening and closing (p. 343)
• Engine compartment - checking (p. 344)
Engine compartment - checking
Some oils and fluids should be checked at regular intervals.
Regular checkingCheck the following oils and fluids at regularintervals, e.g. when refuelling:
• Coolant
• Engine oil
• Power steering fluid (not cars with 4-cyl. 2.0 litre engine 4
)
• Washer fluid
WARNING
Remember that the radiator fan (located at the front of the engine compartment,behind the radiator) may start automati-cally some after the engine has beenswitched off. Always have the engine cleaned by a workshop. There is a risk of fire if theengine is hot.
Related information
• Bonnet - opening and closing (p. 343)
• Engine compartment - overview (p. 343)
• Coolant - level (p. 349)
• Engine oil - checking and filling (p. 346)
2
Also applies to the B4204T7 engine.3 Engines with electronic oil level sensor do not have a dipstick (5-cyl. diesel).
4 However, does apply to the B4204T7 engine.
ProCarManuals.co’
Page 347 of 442

10 Maintenance and service
10
345
•
Power steering fluid - level (p. 351)
• Washer fluid - filling (p. 361)
Engine oil - general
An approved engine oil must be used in order that the recommended service intervals canbe applied.
Volvo recommends:
When driving under adverse conditions, see Engine oil - adverse driving conditions (p.395).
IMPORTANT
In order to fulfil the requirements for the engine's service intervals all engines arefilled with a specially adapted syntheticengine oil at the factory. The choice of oilhas been made very carefully with regardto service life, starting characteristics, fuelconsumption and environmental impact. An approved engine oil must be used in order that the recommended service inter-vals can be applied. Only use a prescribedgrade of oil for both filling and oil change,otherwise you will risk affecting service life,starting characteristics, fuel consumptionand environmental impact. Volvo Car Corporation disclaims all war- ranty liability if engine oil of the prescribedgrade and viscosity is not used. Volvo recommends that oil changes are carried out at an authorised Volvo work-shop.
Volvo uses different systems for warning of low/high oil level or low/high oil pressure.Certain engine variants have an oil pressuresensor, and then the combined instrumentpanel's warning symbol for low oil pressure isused. Other variants have an oil level sensor,when the driver is informed via the instru- ment's warning symbol
and display
ProCarManuals.co’
Page 348 of 442

||
10 Maintenance and service
10
346
texts. Certain variants have both systems. Contact a Volvo dealer for more information. Change the engine oil and oil filter in accord- ance with the intervals specified in the Serv-ice and Warranty Booklet. Using oil of a higher than specified grade is permitted. If the car is driven in adverse con-ditions, Volvo recommends using an oil of ahigher grade; see Engine oil - adverse drivingconditions (p. 395). For filling capacities, see Engine oil - grade and volume (p. 396).
Related information
•Engine oil - checking and filling (p. 346)
Engine oil - checking and filling
The oil level is checked on certain engine vari- ants with the electronic oil level sensor, onother engine variants with the oil dipstick.
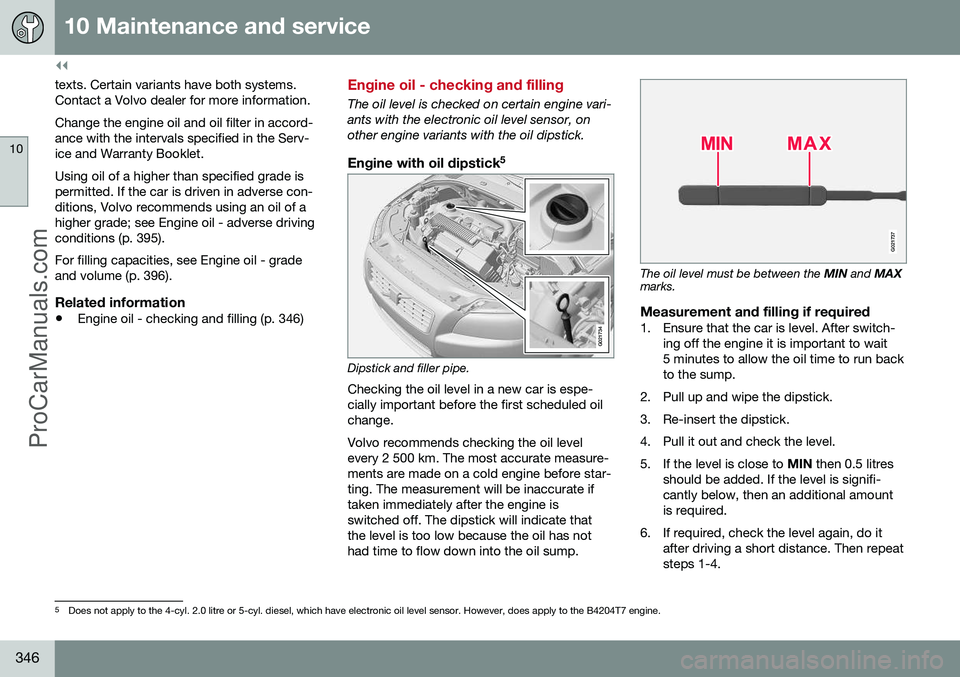
Engine with oil dipstick 5
G021734
Dipstick and filler pipe. Checking the oil level in a new car is espe- cially important before the first scheduled oilchange. Volvo recommends checking the oil level every 2 500 km. The most accurate measure-ments are made on a cold engine before star-ting. The measurement will be inaccurate iftaken immediately after the engine isswitched off. The dipstick will indicate thatthe level is too low because the oil has nothad time to flow down into the oil sump.
G021737
The oil level must be between the
MIN and MAX
marks.
Measurement and filling if required1. Ensure that the car is level. After switch-
ing off the engine it is important to wait 5 minutes to allow the oil time to run backto the sump.
2. Pull up and wipe the dipstick.
3. Re-insert the dipstick.
4. Pull it out and check the level.
5. If the level is close to MIN then 0.5 litres
should be added. If the level is signifi- cantly below, then an additional amountis required.
6. If required, check the level again, do it after driving a short distance. Then repeatsteps 1-4.
5Does not apply to the 4-cyl. 2.0 litre or 5-cyl. diesel, which have electronic oil level sensor. However, does apply to the B4204T7 engine.
ProCarManuals.co’
Page 349 of 442

10 Maintenance and service
10
}}
347
WARNING
Never fill above the MAX mark. The level
should never be above MAX or below MIN
as this could lead to engine damage.
WARNING
Do not spill oil onto the hot exhaust mani- fold due to the risk of fire.
Engine with electronic oil level sensor, 4-cyl. 2.0 l 6
Filler pipe.
7
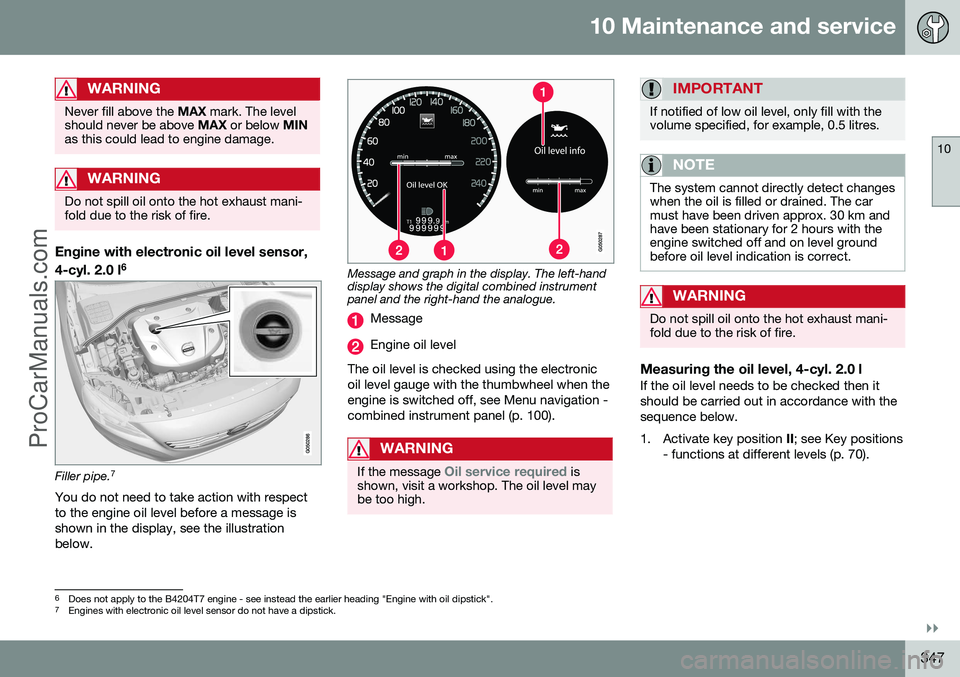
You do not need to take action with respect to the engine oil level before a message isshown in the display, see the illustrationbelow.
Message and graph in the display. The left-hand display shows the digital combined instrumentpanel and the right-hand the analogue.
Message
Engine oil level
The oil level is checked using the electronic oil level gauge with the thumbwheel when theengine is switched off, see Menu navigation -combined instrument panel (p. 100).
WARNING
If the message Oil service required is
shown, visit a workshop. The oil level may be too high.
IMPORTANT
If notified of low oil level, only fill with the volume specified, for example, 0.5 litres.
NOTE
The system cannot directly detect changes when the oil is filled or drained. The carmust have been driven approx. 30 km andhave been stationary for 2 hours with theengine switched off and on level groundbefore oil level indication is correct.
WARNING
Do not spill oil onto the hot exhaust mani- fold due to the risk of fire.
Measuring the oil level, 4-cyl. 2.0 lIf the oil level needs to be checked then it should be carried out in accordance with thesequence below.
1. Activate key position II; see Key positions
- functions at different levels (p. 70).
6 Does not apply to the B4204T7 engine - see instead the earlier heading "Engine with oil dipstick".7
Engines with electronic oil level sensor do not have a dipstick.
ProCarManuals.co’