2014 VOLKSWAGEN JETTA GLI towing
[x] Cancel search: towingPage 135 of 357

These dimensions are important because they help determine the way that the forces that arise during towing are applied to the receiver and its attachments to the vehicle. If you buy a ball mount and ball, make sure that they meet the following specifications.
Ball mount dimensions
x The drop height (A) from the center of the ball to the center of the hole for the securing pin on the ball mount must be at least 1 inch (25.4 mm) and at most 27/8 inches (73 mm).
x The pin-to-ball distance (B) from the center of the ball to the center of the hole for the securing pin on the ball mount must be no more than 7 inches (178 mm).
x The ball diameter must be no more than 11/4 inches (32 mm).
A ball mount and ball combination that does not meet these specifications can damage your vehicle
and may even fail in use ⇒ .
Never install a “weight distributing” or “load equalizing” trailer hitch on your vehicle. The vehicle is not
designed for this kind of trailer hitch ⇒ .
WARNING
An improperly installed or unsuitable trailer hitch can cause the trailer to separate from the towing vehicle and result in a major accident with serious personal injuries.
x Have any trailer hitch retrofit or other work on a trailer hitch done by a qualified workshop.
CAUTION
The ball mount sticks out behind the rear bumper and can cause injury to pedestrians and cyclists.
x To reduce the risk of injury in rear-end collisions, and the risk to pedestrians and cyclists when the vehicle is parked, always remove the ball carrier when you are not towing a trailer.
NOTICE
x Never use a ball larger than 11/4 inches (32 mm) on your vehicle. The vehicle was not designed to tow heavier trailers with a receiver larger than the specified ball. The increased loads can damage the attachment points for the trailer hitch.
x Never use an adapter to increase the size of the trailer hitch receiver from 11/4 inches (32 mm) to 2 inches (50.8 mm) or more to tow a trailer that is heavier than the maximum permissible trailer weight that your vehicle can tow.
x You can use an adapter if required for the proper installation of a bicycle rack or other similar carrier as long as the maximum weight limits are observed. When using bicycle racks or similar carriers, make sure that the rear lights are not blocked.
x Only use trailer hitches that are approved by the hitch manufacturer for your vehicle and model.
Page 137 of 357

(F) 26.1 inches (663 mm)
(G) 40.9 inches (1040 mm)
WARNING
Improper or incorrect connections to the vehicle electrical system can cause malfunctions that affect the entire vehicle electrical system and cause accidents and serious personal injury.
x Never connect the electrical system of the trailer directly to the electrical connections of the rear lights or other unsuitable power sources. Use only a suitable connector to provide power to the trailer.
x Have any trailer hitch retrofit or other work on a trailer hitch done by a qualified workshop.
WARNING
An improperly installed or unsuitable trailer hitch can cause the trailer to separate from the towing vehicle and result in a major accident with serious personal injuries.
Maximum permissible trailer weight
Page 148 of 357

Stowing the replaced wheel
x Hook the floor covering on the upper edge of the luggage compartment.
x Put the wheel you took off the vehicle into the spare wheel well so that the center hole of the rim is aligned with the threaded pin.
x Turn the handwheel clockwise until the wheel is securely in place.
x If necessary, return the vehicle tool kit to its location in the luggage compartment.
x Unhook the floor covering and fold it back down onto the floor of the luggage compartment.
x Close the luggage compartment lid.
If the spare wheel is different from the road wheels
If the spare is different from the road wheels, a compact spare wheel, for example, or if the road wheels are winter tires, the spare wheel must be used only in the event of a flat tire, only for a brief
time, and only when driving with extra caution ⇒ .
Replace it with a tire matching the others on your vehicle as soon as possible.
Please heed the following:
x Do not drive faster than 50 mph (80 km/h)!
x Avoid full-throttle acceleration, hard braking and fast cornering!
x Do not use snow chains on the compact spare wheel, Compact spare wheel.
x After installing the spare wheel or compact spare wheel, check the tire pressure as soon as
possible ⇒ page 205, Tire inflation pressure.
Check the tire inflation pressure of the spare or compact spare whenever you check the tire pressure of the road wheels, at least once a month. Inflate a spare wheel to the cold tire pressure specified for the vehicle's road wheels on the tire pressure label; inflate a compact spare wheel to the cold tire pressure specified for the compact spare on the tire pressure label or on a separate label for the compact spare, if there is one.
Page 187 of 357

WARNING
Never leave the vehicle unattended while the engine is running. The vehicle could move suddenly, especially when the vehicle is in gear, resulting in accidents and personal injury.
WARNING
“Starting fluids” can explode and can cause a “run-away” vehicle condition.
x Never use starting assist fluids.
NOTICE
x You can damage the starter or the engine if you try to start the engine when the vehicle is still moving, or if you try to restart the engine right after switching it off.
x Avoid high engine speeds, full throttle acceleration, and heavy engine loads when the engine is cold.
x Do not try to start the engine by pushing or towing the vehicle. Unburned fuel can get into the catalytic converter and damage it. The steering column may also be locked.
Do not let your vehicle warm up while standing; instead, start driving right away after making sure that you have good visibility through all windows. This will help the engine reach operating temperature faster and keep down emissions.
Major consumers of electricity are temporarily switched off when the engine is being started.
After starting a cold engine, there may be increased operating noises for a few seconds. This is normal and harmless.
Stopping the engine
Page 218 of 357
Calm and smooth driving
Consistency is more important than speed. The more smoothly you drive, the less fuel the vehicle consumes.
When driving on the highway or freeway, a constant, moderate speed is more efficient and economical than constantly accelerating and braking. Usually you can reach your destination just as quickly by driving at a moderate, but steady speed.
The cruise control system can assist in maintaining a uniform driving style.
Moderate use of extra electrical loads
Comfort inside the vehicle is nice and important, but it is important to use them in an environmentally conscious manner.
Some devices can increase fuel consumption when activated (examples):
x Climate control system (air conditioner): If the air conditioner has to produce starkly contrasting temperatures, it requires a large amount of energy, which is generated by the engine. The temperature in the vehicle should therefore not be extremely different from that of the outside temperature. It may be helpful to ventilate the vehicle before driving and then to drive a short distance with the windows open. After that, switch on the air conditioner with the windows closed. Keep the windows closed when driving at high speeds. Open windows increase fuel consumption.
x Switch off seat heating once it has served its purpose.
x Switch off the rear window defroster as soon as the windows are free of fog and ice.
Additional factors that increase fuel consumption (examples):
x Malfunctioning engine control.
x Driving in the mountains.
x Towing a trailer.
NOTICE
Never let the vehicle coast or roll down a hill in Neutral (N), especially when the engine is not running. The transmission will not be lubricated and will be damaged.
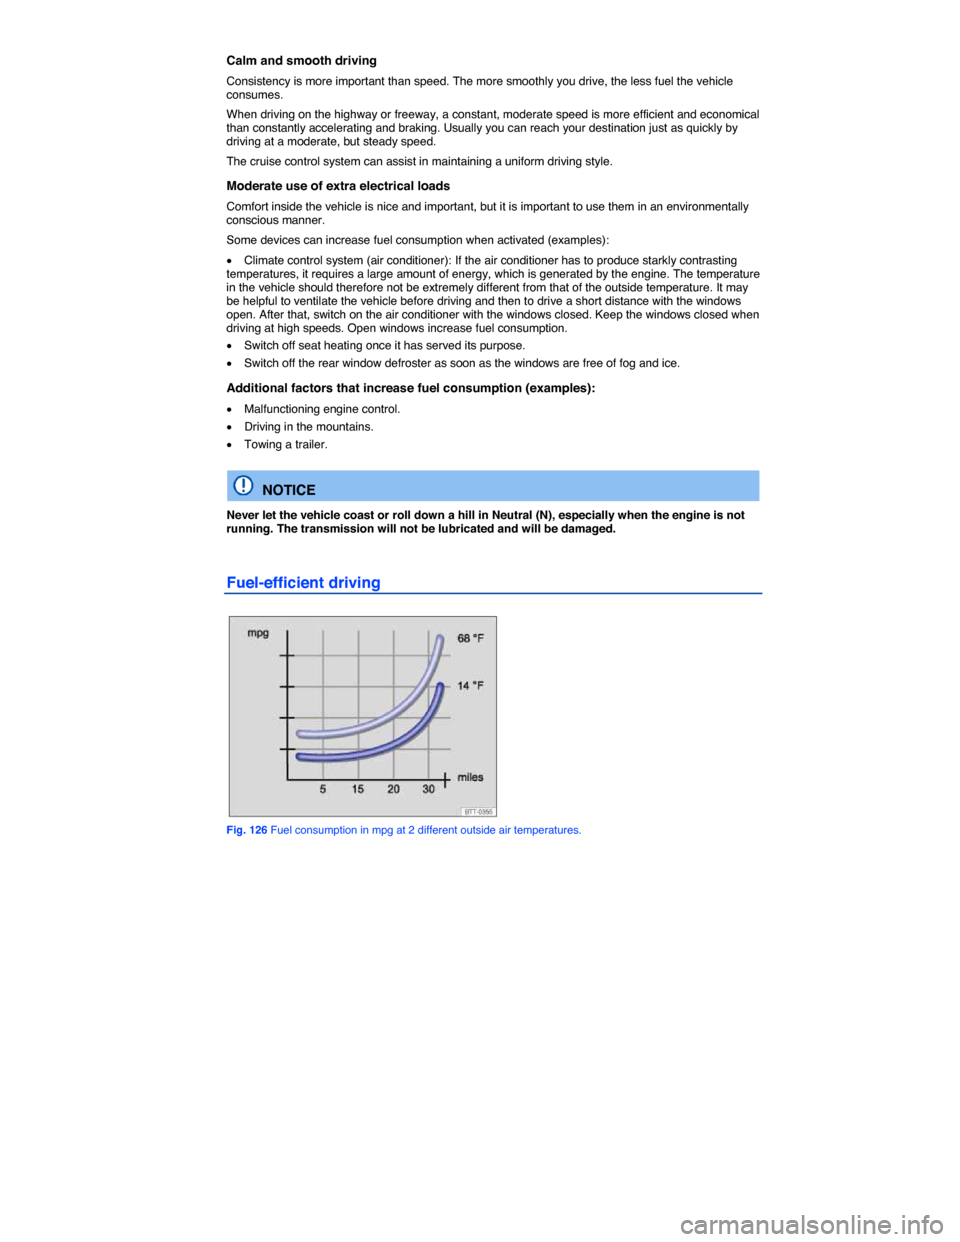
Fuel-efficient driving
Fig. 126 Fuel consumption in mpg at 2 different outside air temperatures.
Page 322 of 357

WARNING
Changing a wheel, especially on the side of the road, can be dangerous. To help reduce the risk of serious personal injury:
x Always stop the vehicle as soon as it is safe to do so. Move the vehicle a safe distance off the road where it is safe to change the wheel.
x Always make sure that all passengers, especially children, are in a safe place outside the vehicle and away from the vehicle and traffic (such as behind a guard rail).
x Turn on the emergency flashers and set up another warning device about 25 yards (25 meters) behind the vehicle to warn approaching traffic.
x Change a wheel by yourself only if you are familiar with the necessary steps. Otherwise, get expert assistance.
x Always switch the engine off, firmly apply the parking brake, and shift the transmission into Park (P) (automatic transmission) or any gear (manual only) to help prevent the vehicle from moving suddenly and slipping off the jack.
x Always make sure that the ground is level and firm. If necessary, place the jack on a large and sturdy board or on a similar ground support.
x Always block the wheel diagonally opposite the wheel being changed with chocks or other similar things.
x If you are towing a trailer, always unhitch it from your vehicle before starting to change the wheel. Always apply the trailer brakes firmly and make sure the trailer cannot move unintentionally.
x Always use proper and undamaged tools when changing a wheel.
x Once a wheel is lifted off the ground, having the transmission in Park (P) or in gear will not prevent sudden vehicle movement.
x Always use a jack that has been approved by the manufacturer for your vehicle. Never use other jacks, even if they have been approved for use on other Volkswagen models.
x To reduce the risk of losing control, crashes, and serious personal injuries, never loosen the screws on rims with threaded rim rings.
x After changing a wheel, have the wheel bolt tightening torque checked with an accurate torque wrench.
x After changing a wheel or tire, reset the Tire Pressure Monitoring System, Tire Pressure Monitoring System (TPMS).
Preparations for changing a wheel
Page 323 of 357
8. If towing a trailer: Unhitch the trailer from the vehicle and park the trailer properly.
9. If the luggage compartment is loaded: Remove the luggage.
10. Take the spare or compact spare wheel and the vehicle tool kit out of the luggage compartment.
11. Take off the wheel covers, Wheel trim.
WARNING
Disregarding the safety-related checklist may lead to accidents and serious personal injuries.
x Always review and follow the checklist. Follow accepted safety practices and use common sense.
Wheel bolts
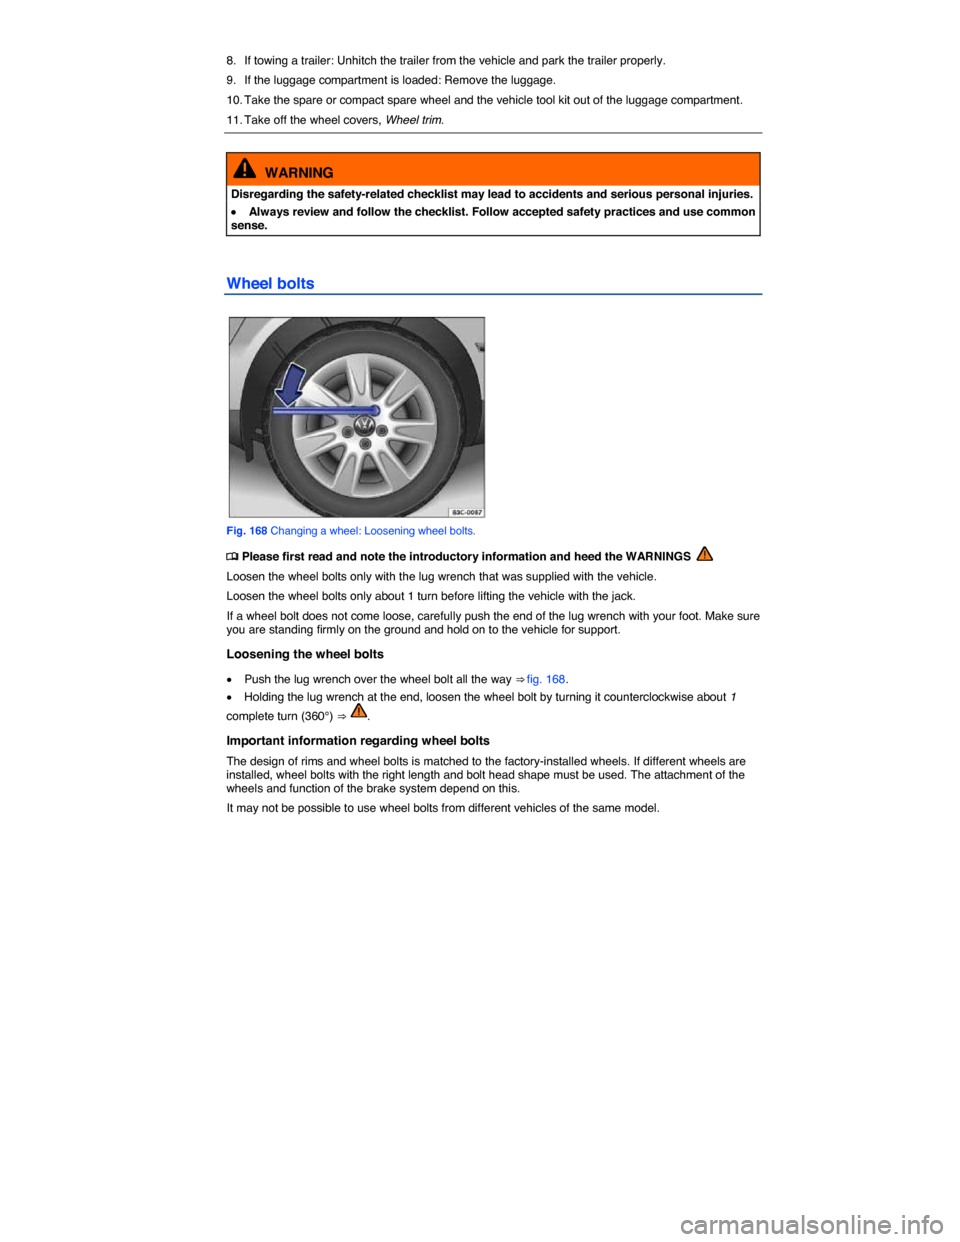
Fig. 168 Changing a wheel: Loosening wheel bolts.
Page 347 of 357
Using jumper cables
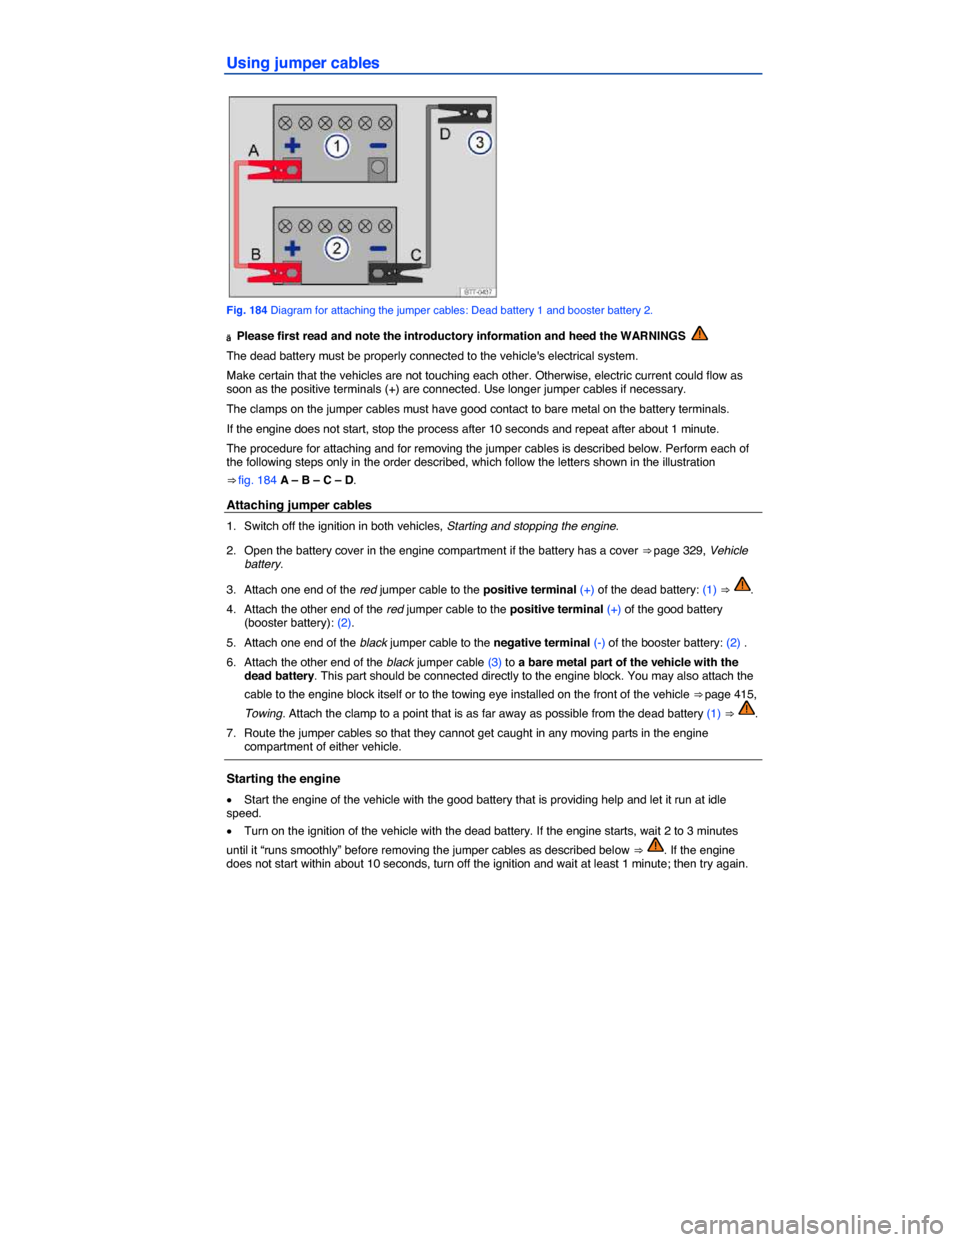
Fig. 184 Diagram for attaching the jumper cables: Dead battery 1 and booster battery 2.
ä Please first read and note the introductory information and heed the WARNINGS
The dead battery must be properly connected to the vehicle's electrical system.
Make certain that the vehicles are not touching each other. Otherwise, electric current could flow as soon as the positive terminals (+) are connected. Use longer jumper cables if necessary.
The clamps on the jumper cables must have good contact to bare metal on the battery terminals.
If the engine does not start, stop the process after 10 seconds and repeat after about 1 minute.
The procedure for attaching and for removing the jumper cables is described below. Perform each of the following steps only in the order described, which follow the letters shown in the illustration
⇒ fig. 184 A – B – C – D.
Attaching jumper cables
1. Switch off the ignition in both vehicles, Starting and stopping the engine.
2. Open the battery cover in the engine compartment if the battery has a cover ⇒ page 329, Vehicle battery.
3. Attach one end of the red jumper cable to the positive terminal (+) of the dead battery: (1) ⇒ .
4. Attach the other end of the red jumper cable to the positive terminal (+) of the good battery (booster battery): (2).
5. Attach one end of the black jumper cable to the negative terminal (-) of the booster battery: (2) .
6. Attach the other end of the black jumper cable (3) to a bare metal part of the vehicle with the dead battery. This part should be connected directly to the engine block. You may also attach the
cable to the engine block itself or to the towing eye installed on the front of the vehicle ⇒ page 415,
Towing. Attach the clamp to a point that is as far away as possible from the dead battery (1) ⇒ .
7. Route the jumper cables so that they cannot get caught in any moving parts in the engine compartment of either vehicle.
Starting the engine
x Start the engine of the vehicle with the good battery that is providing help and let it run at idle speed.
x Turn on the ignition of the vehicle with the dead battery. If the engine starts, wait 2 to 3 minutes
until it “runs smoothly” before removing the jumper cables as described below ⇒ . If the engine does not start within about 10 seconds, turn off the ignition and wait at least 1 minute; then try again.