Page 31 of 143

Basic operation31
Example: Telephone number
Press the ; button to display the
Home screen and then select the
PHONE icon.
Select the KEYPAD tab and enter the
number you wish to call 3 89.
To store this number as a favourite,
reveal the favourites list and scroll to
the respective favourites page.
Tap and hold the respective favourite
screen button. The number is stored
as a favourite.
Retrieving favourites
Display a favourites page (see above)
and scroll to the respective favourites
page (if necessary).
Notice
Unavailable favourites are greyed
out.
Select the desired favourite screen
button. Depending on the kind of
favourite selected, a radio station or
track is played, a phone call is
initiated, a route is calculated or an
application is started.Notice
The active favourite is highlighted.
Using the right-hand steering wheel
remote control
Repeatedly press the k or l buttons
to select the desired audio favourite.
Alternatively, using the five-way
controller: Press the i button to
display the cluster menu for
application selection. Select the
Audio list item and then Favourites.
Select the desired favourite.
Editing favourites Select the SETTINGS icon on the
Home screen, the Radio list item and
then Manage Favourites . A three-row
view of the favourites list is displayed with the editing options shown in the
interaction selector bar.
Renaming favourites
If necessary, scroll to the respective
favourites page.
Select the favourite you wish to edit. Select the RENAME screen button.
A keyboard opens up with the current
favourite label text displayed in the
entry field as well as in the label
preview area.
Enter the new label text and select the
Label screen button. You are
returned to the favourites page.
Page 33 of 143

Basic operation33
Selecting the contacts source
The contacts list first displayed upon
access differs depending on the
application currently active and the
devices connected.
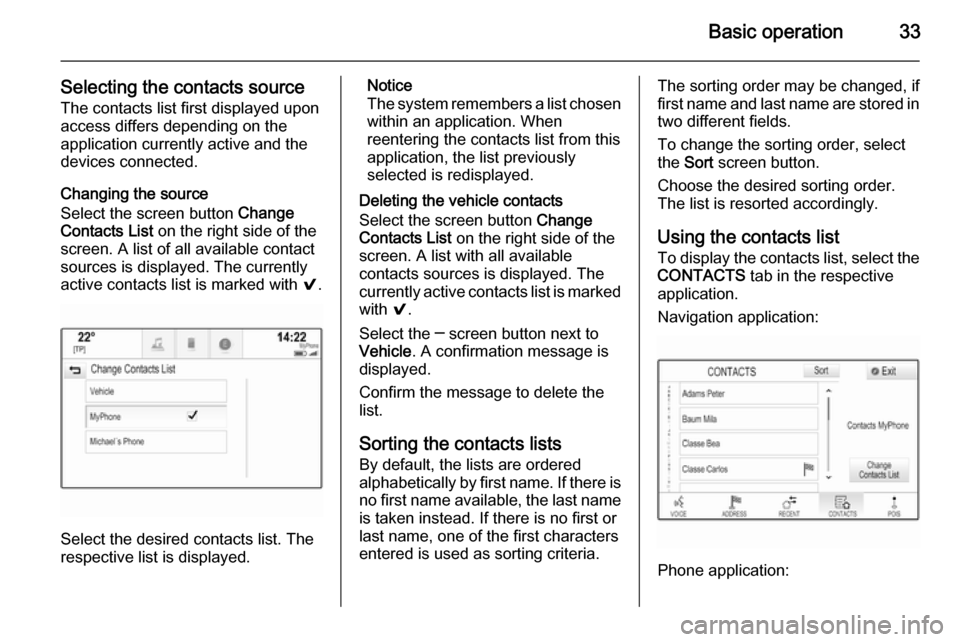
Changing the source
Select the screen button Change
Contacts List on the right side of the
screen. A list of all available contact
sources is displayed. The currently
active contacts list is marked with 9.
Select the desired contacts list. The
respective list is displayed.
Notice
The system remembers a list chosen within an application. When
reentering the contacts list from this
application, the list previously
selected is redisplayed.
Deleting the vehicle contacts
Select the screen button Change
Contacts List on the right side of the
screen. A list with all available
contacts sources is displayed. The
currently active contacts list is marked with 9.
Select the ─ screen button next to
Vehicle . A confirmation message is
displayed.
Confirm the message to delete the
list.
Sorting the contacts lists By default, the lists are ordered
alphabetically by first name. If there is
no first name available, the last name
is taken instead. If there is no first or
last name, one of the first characters
entered is used as sorting criteria.The sorting order may be changed, if
first name and last name are stored in two different fields.
To change the sorting order, select
the Sort screen button.
Choose the desired sorting order.
The list is resorted accordingly.
Using the contacts list
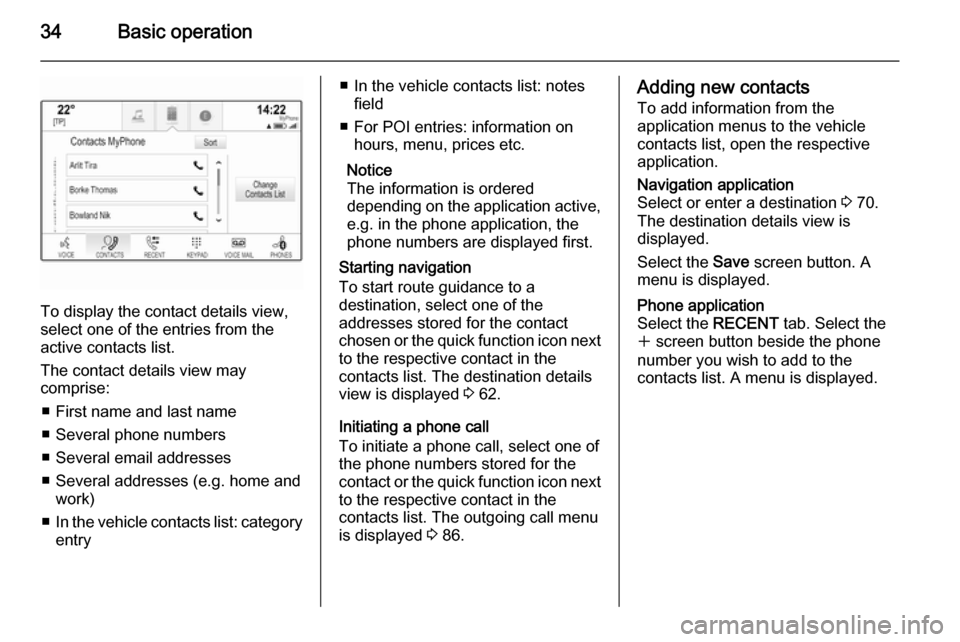
To display the contacts list, select the
CONTACTS tab in the respective
application.
Navigation application:
Phone application:
Page 34 of 143

34Basic operation
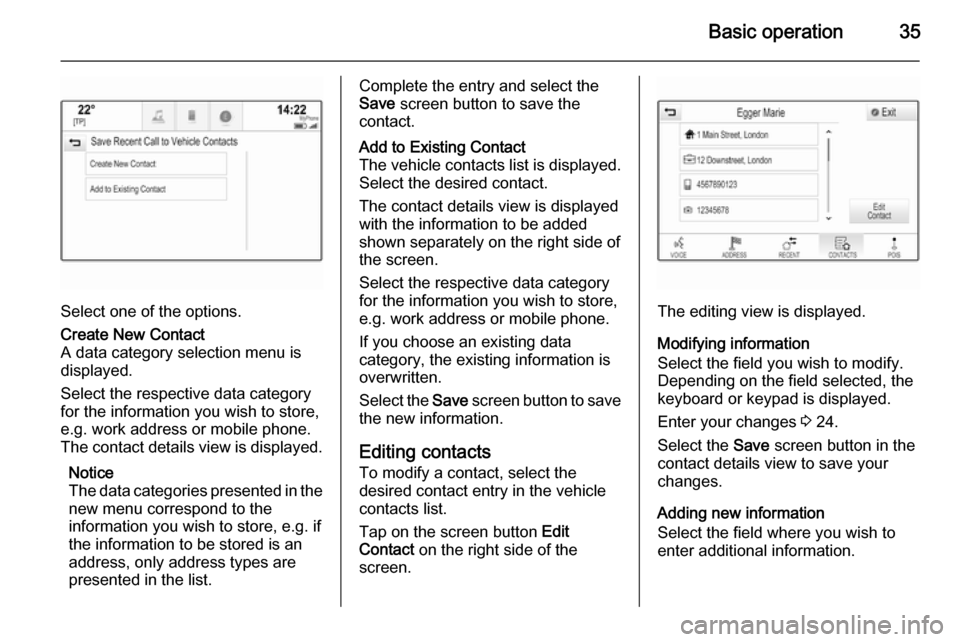
To display the contact details view,
select one of the entries from the
active contacts list.
The contact details view may
comprise:
■ First name and last name
■ Several phone numbers
■ Several email addresses
■ Several addresses (e.g. home and work)
■ In the vehicle contacts list: category
entry
■ In the vehicle contacts list: notes
field
■ For POI entries: information on hours, menu, prices etc.
Notice
The information is ordered
depending on the application active,
e.g. in the phone application, the
phone numbers are displayed first.
Starting navigation
To start route guidance to a
destination, select one of the
addresses stored for the contact
chosen or the quick function icon next to the respective contact in the
contacts list. The destination details
view is displayed 3 62.
Initiating a phone call
To initiate a phone call, select one of
the phone numbers stored for the contact or the quick function icon next
to the respective contact in the
contacts list. The outgoing call menu
is displayed 3 86.Adding new contacts
To add information from the
application menus to the vehicle
contacts list, open the respective
application.Navigation application
Select or enter a destination 3 70.
The destination details view is
displayed.
Select the Save screen button. A
menu is displayed.Phone application
Select the RECENT tab. Select the
w screen button beside the phone
number you wish to add to the
contacts list. A menu is displayed.
Page 35 of 143

Basic operation35
Select one of the options.
Create New Contact
A data category selection menu is displayed.
Select the respective data category
for the information you wish to store,
e.g. work address or mobile phone.
The contact details view is displayed.
Notice
The data categories presented in the
new menu correspond to the
information you wish to store, e.g. if
the information to be stored is an
address, only address types are
presented in the list.Complete the entry and select the
Save screen button to save the
contact.Add to Existing Contact
The vehicle contacts list is displayed. Select the desired contact.
The contact details view is displayed with the information to be added
shown separately on the right side of
the screen.
Select the respective data category
for the information you wish to store,
e.g. work address or mobile phone.
If you choose an existing data
category, the existing information is
overwritten.
Select the Save screen button to save
the new information.
Editing contacts
To modify a contact, select the
desired contact entry in the vehicle
contacts list.
Tap on the screen button Edit
Contact on the right side of the
screen.
The editing view is displayed.
Modifying information
Select the field you wish to modify.
Depending on the field selected, the
keyboard or keypad is displayed.
Enter your changes 3 24.
Select the Save screen button in the
contact details view to save your
changes.
Adding new information
Select the field where you wish to
enter additional information.
Page 36 of 143
36Basic operation
If you wish to create a new field for analready existing data category, e.g. a
second mobile phone number, select
the w screen button in the respective
data field.
Notice
The w screen button is only
displayed if it is possible to add more information for that data category.
Depending on the field selected, the
keyboard or keypad is displayed
3 24.
Enter the new data and select the
screen button in front of the entry field
indicating the selected field.
Select the Save screen button in the
contact details view to save your
changes.
Deleting the contact
To delete the contact entry and all
associated information, select the
Delete screen button. A confirmation
message is displayed.
Confirm the message. The entry is
deleted.
Page 40 of 143
40Basic operation
MenuActionTouch screenTouch padNavigation menuSending current audio
information to the Driver
Information Centre1 finger, move in the direction of the Driver
Information CentrePanning map1 finger, move across the screen2 fingers, move up, down,
left or rightCentring map1 finger, tap on a location on the map you wish it to centre aroundZoom in on the mapw screen button2 fingers, move apart
(spread)Zoom out on the map─ screen button2 fingers, move together
(pinch)Phone menuSending current audio
information to the Driver
Information Centre1 finger, move in the direction of the Driver
Information CentreCharacter
recognition
functionDraw character1 finger, move across the screen1 finger, move across the
padStart destination search2 fingers, press and hold on
the padClosing function2 fingers, press on the pad
Page 45 of 143

Basic operation45
Mode
Select the Mode menu item to enter
the respective submenu.
Depending on the external lighting
conditions, select Day or Night .
If you select Auto, the system
automatically adjusts the display.
Calibrate Touchscreen
Select the Calibrate Touchscreen
menu item to enter the respective
submenu.Follow the instructions on the screen,
tapping on the respective points
indicated. The touch screen is
calibrated.
Turn Display Off
Select the Turn Display Off menu item
to turn off the display.
To turn the display back on, touch the touch screen or press a button on the
instrument panel.
Return to Factory Settings
Press the ; button and then select
the SETTINGS icon.
Scroll through the list and select the
Return to Factory Settings menu item.
Restore Vehicle Settings
Select Restore Vehicle Settings to
restore all vehicle personalisation
settings. A warning message is
displayed.
Select the Restore screen button.
The settings are reset.
Clear All Private Data
Select Clear All Private Data to delete
the following data:
■ Paired Bluetooth devices■ Stored phone books
■ Vehicle contacts list
■ Destination lists
■ Favourites
A warning message is displayed.
Select the Delete screen button. The
data is deleted.
Page 55 of 143

External devices55External devicesGeneral information.....................55
Playing audio ............................... 57
Playing movies ............................. 59
Using apps ................................... 60General information
An AUX, USB and SD card socket for
the connection of external devices is
located underneath the armrest in the centre console. Find a detailed
description on lifting the armrest in the
Owner's manual.
Notice
The sockets must always be kept
clean and dry.
AUX input It is possible to connect e.g. an iPod
or another auxiliary device to the AUX
input.
When connected to the AUX input,
the audio signal of the auxiliary device is transmitted via the speakers of the
Infotainment system.
The volume and the tone settings can
be adjusted via the Infotainment
system. All other control functions
need to be operated via the auxiliary
device.
Connecting a device
To connect the auxiliary device to the AUX input socket of the Infotainment
system, use the following cable:
3-pole for audio source.
To disconnect the AUX device, select
another function and then remove the
AUX device.
AUX audio function
The Infotainment system can play
music files contained in auxiliary
devices, e.g. iPod or Smartphone.
USB port An MP3 player, USB drive, iPod or
Smartphone can be connected to the USB port.