Page 250 of 400
250 4-3. Do-it-yourself maintenance
BatteryCheck the battery as follows:
■ Battery exterior
Make sure that the battery terminals are not corroded and that
there are no loose connections, cracks, or loose clamps.
Te r m i n a l s
Hold-down clamp
■ Checking battery fluid
Check that the level is between
the “UPPER LEVEL” and
“LOWER LEVEL” lines.
“UPPER LEVEL” line
“LOWER LEVEL” line
If the fluid level is at or below the
“LOWER LEVEL” line, add dis-
tilled water.
NOTICE
■If the fluid level is low or high
It is normal for the brake fluid level to go down slightly as the brake pads
wear out or when the fluid level in the accumulator is high.
If the reservoir needs frequent refilling, there may be a serious proble\
m.
Page 251 of 400
251
4-3. Do-it-yourself maintenance
4
Maintenance and care
■
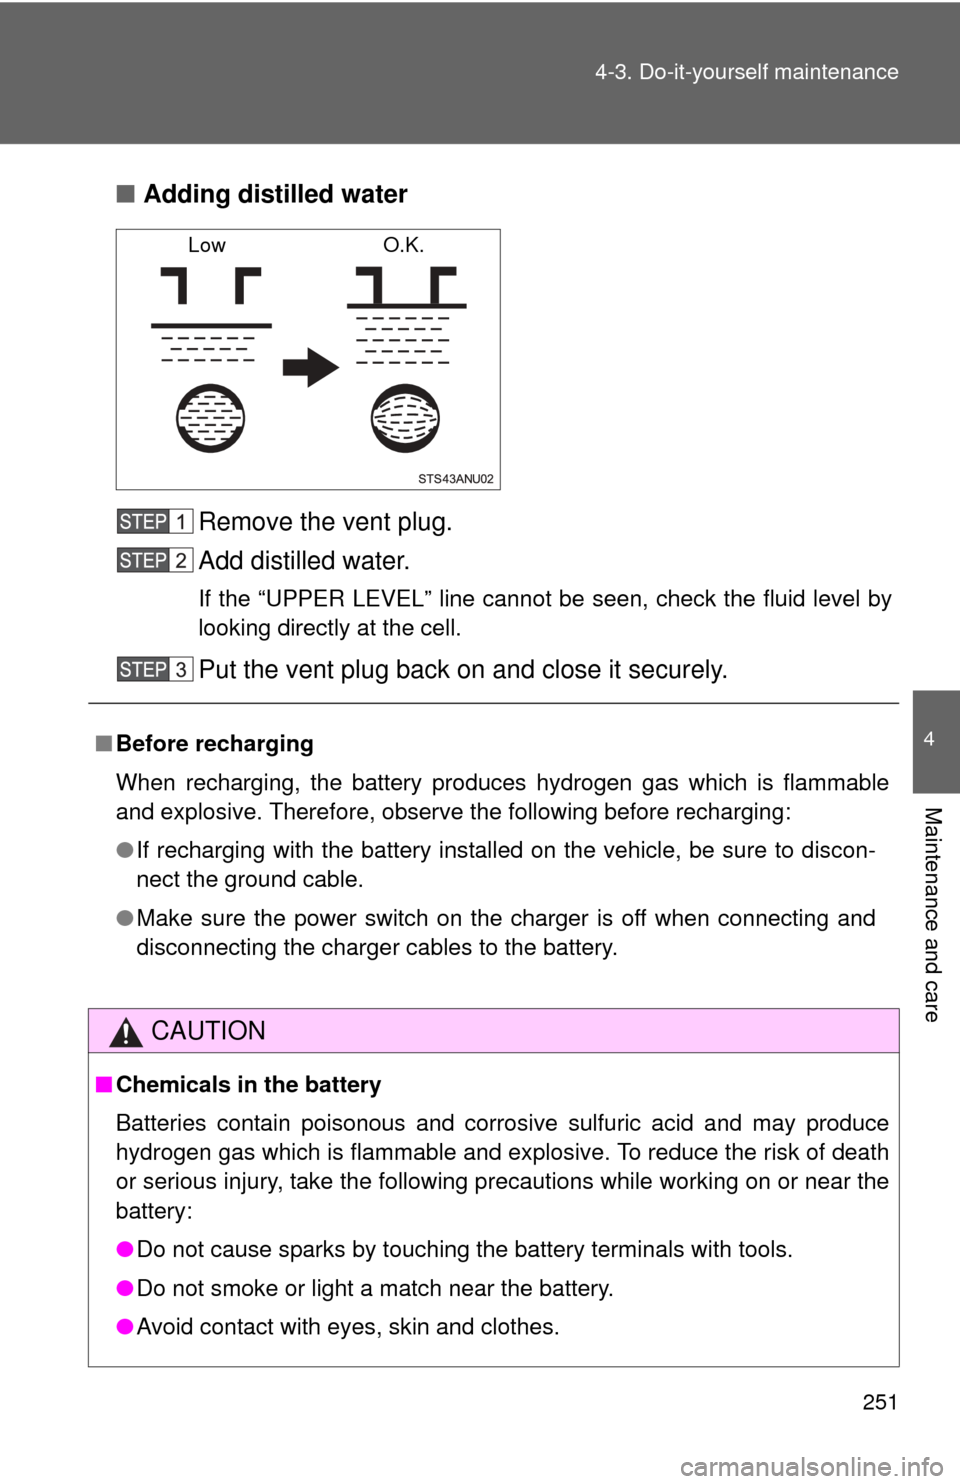
Adding distilled water
Remove the vent plug.
Add distilled water.
If the “UPPER LEVEL” line cannot be seen, check the fluid level by
looking directly at the cell.
Put the vent plug back on and close it securely.
LowO.K.
■Before recharging
When recharging, the battery produces hydrogen gas which is flammable
and explosive. Therefore, observe the following before recharging:
●If recharging with the battery installed on the vehicle, be sure to discon-
nect the ground cable.
● Make sure the power switch on the charger is off when connecting and
disconnecting the charger cables to the battery.
CAUTION
■Chemicals in the battery
Batteries contain poisonous and corrosive sulfuric acid and may produce
hydrogen gas which is flammable and explosive. To reduce the risk of death
or serious injury, take the following precautions while working on or near the
battery:
●Do not cause sparks by touching the battery terminals with tools.
● Do not smoke or light a match near the battery.
● Avoid contact with eyes, skin and clothes.
Page 253 of 400
253
4-3. Do-it-yourself maintenance
4
Maintenance and care
Washer fluid
If neither washer does not work
or the low windshield washer
fluid warning light comes on (if
equipped), the washer tank may
be empty. Add washer fluid to
“FULL” line.
CAUTION
■When adding washer fluid
Do not add washer fluid when the engine is hot or running as washer fluid
contains alcohol and may catch fire if spilled on the engine etc.
NOTICE
■Do not use any fluid other than washer fluid
Do not use soapy water or engine antifreeze instead of washer fluid.
Doing so may cause streaking on the vehicle’s painted surfaces.
■ Diluting washer fluid
Dilute washer fluid with water as necessary.
Refer to the freezing temperatures listed on the label of the washer fluid bot-
tle.
Page 256 of 400
256 4-3. Do-it-yourself maintenance
Adjust the tire pressure to the specified cold tire inflation pres-
sure level. (P. 351)
Make sure to adjust the tire pressure to the specified cold tire
inflation pressure level. The ti re pressure warning system will
operate based on this pressure level.
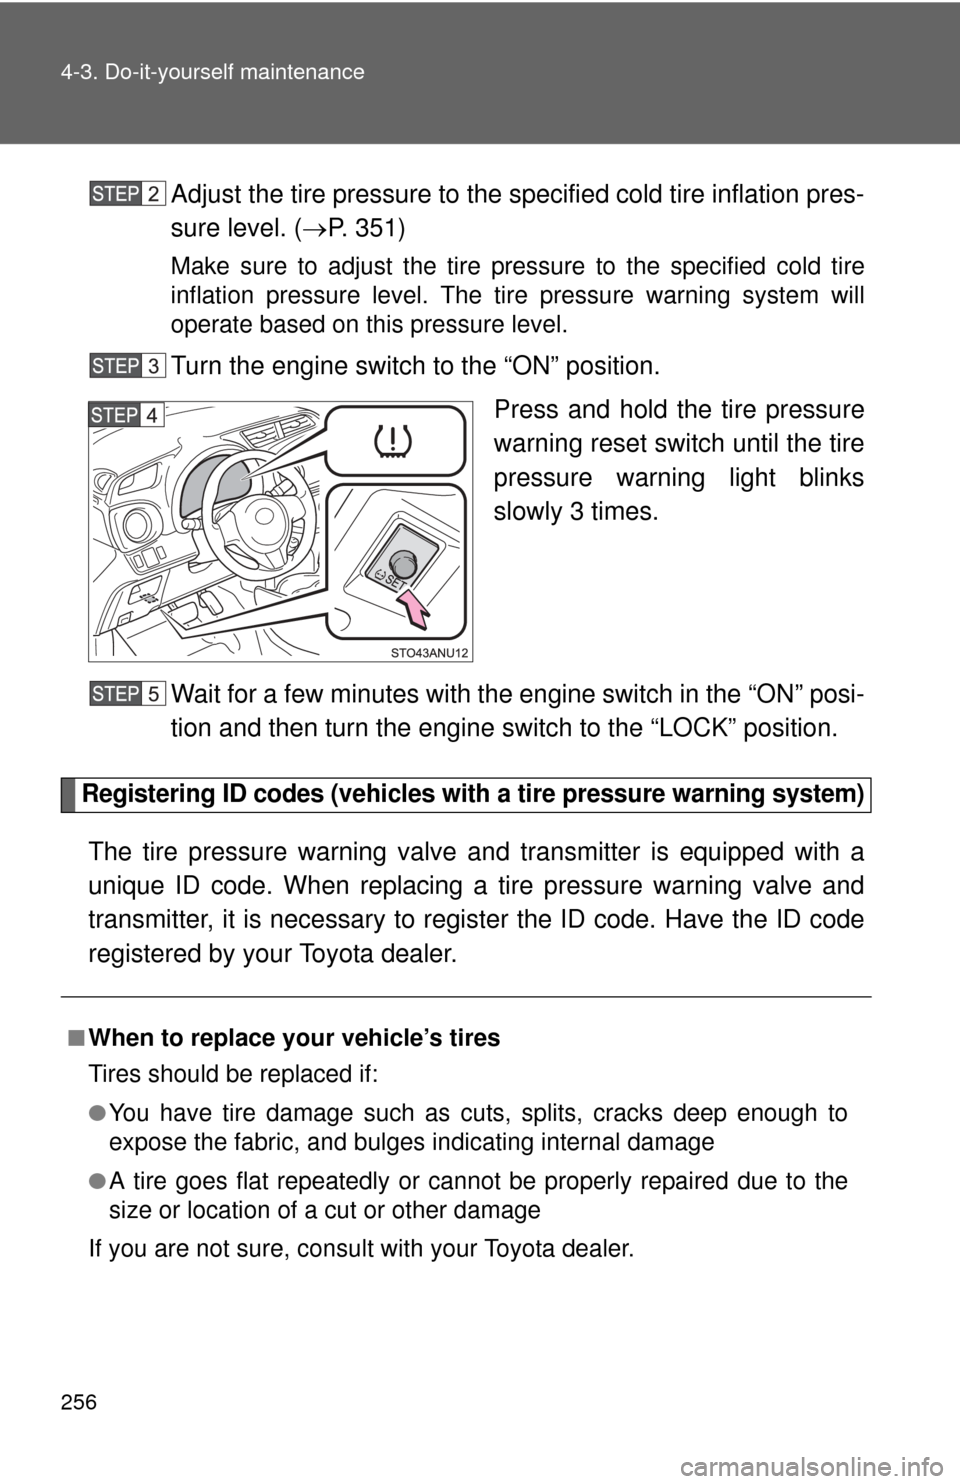
Turn the engine switch to the “ON” position.
Press and hold the tire pressure
warning reset switch until the tire
pressure warning light blinks
slowly 3 times.
Wait for a few minutes with the engine switch in the “ON” posi-
tion and then turn the engine switch to the “LOCK” position.
Registering ID codes (vehicles with a tire pressure warning system)
The tire pressure warning valve and transmitter is equipped with a
unique ID code. When replacing a tire pressure warning valve and
transmitter, it is necessary to regi ster the ID code. Have the ID code
registered by your Toyota dealer.
■When to replace your vehicle’s tires
Tires should be replaced if:
●You have tire damage such as cuts, splits, cracks deep enough to
expose the fabric, and bulges indicating internal damage
●A tire goes flat repeatedly or c annot be properly repaired due to the
size or location of a cut or other damage
If you are not sure, consult with your Toyota dealer.
Page 257 of 400
257
4-3. Do-it-yourself maintenance
4
Maintenance and care
■Replacing tires and wheels (vehicles with a tire pressure warning
system)
If the ID code of the tire pressure warning valve and transmitter is not
registered, the tire pre
ssure warning system will not work properly. After
driving for about 20 minutes, the tire pressure warning light blinks for 1
minute and stays on to indicate a system malfunction.
■Tire life
Any tire over 6 years old must be checked by a qualified technician even
if it has seldom or never been used or damage is not obvious.
■Routine tire inflation pressure checks (vehicles with a tire pressure
warning system)
The tire pressure warning system doe s not replace routine tire inflation
pressure checks. Make su re to check tire inflation pressure as part of
your routine of daily vehicle checks.
■Low profile tires (vehicles with P195/50R16 tires)
Generally, low profile tire s will wear more rapidly and tire grip perfor-
mance will be reduced on snowy and/or icy roads when compared to
standard tires. Be sure to use snow tires or tire chains on snowy and/or
icy roads and drive carefully at a speed appropriate for road and weather
conditions.
■Maximum load of tire
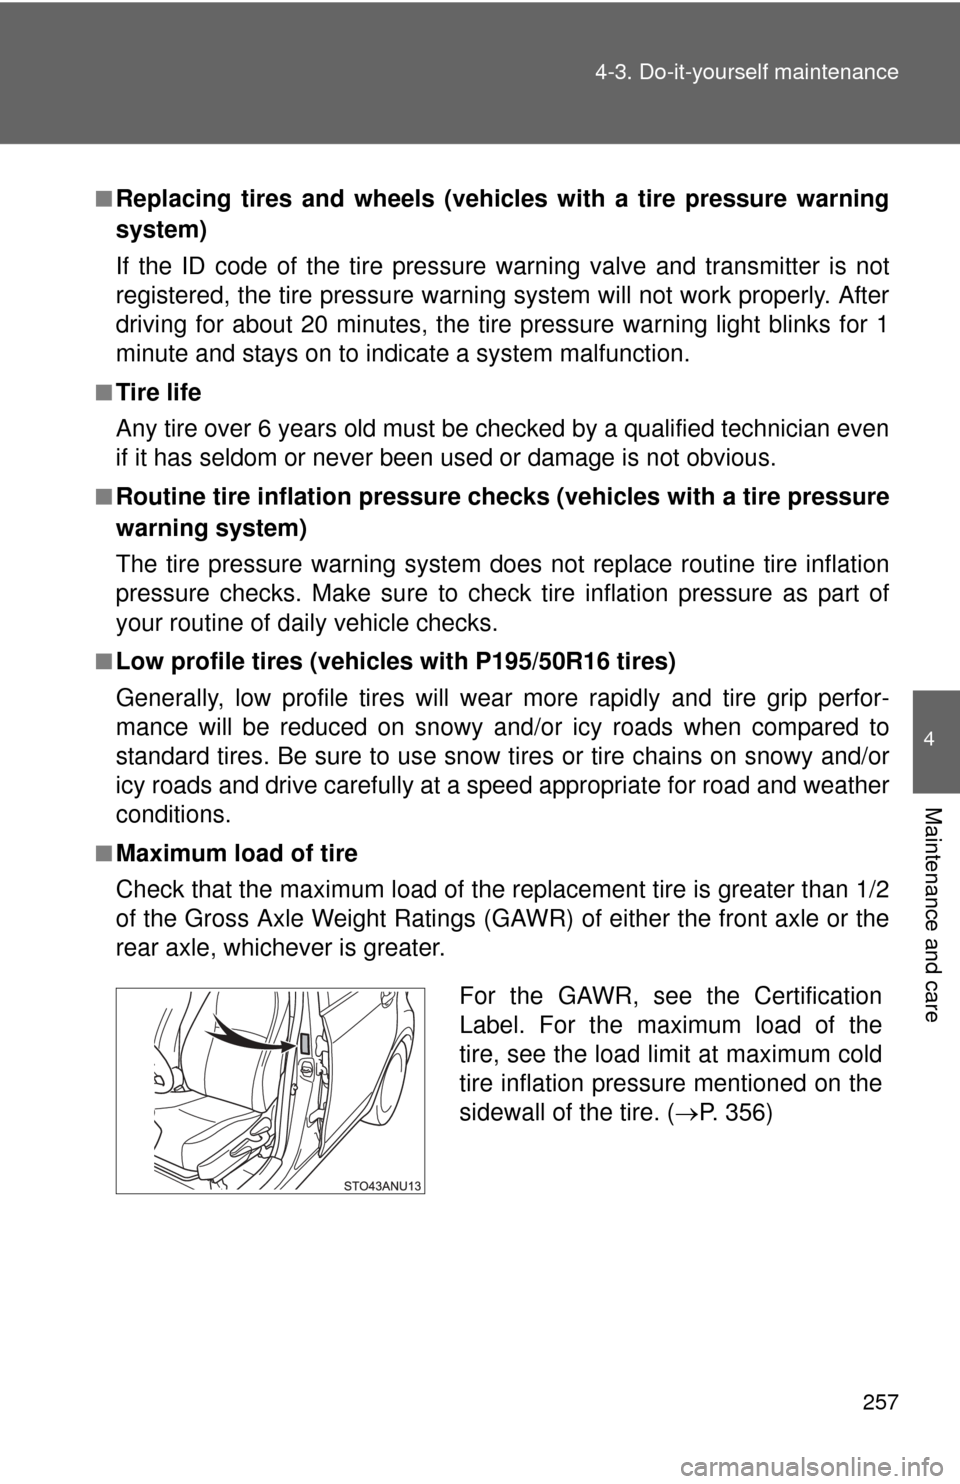
Check that the maximum load of the replacement tire is greater than 1/2
of the Gross Axle Weight Ratings (GAW R) of either the front axle or the
rear axle, whichever is greater.
For the GAWR, see the Certification
Label. For the maximum load of the
tire, see the load limit at maximum cold
tire inflation pressure mentioned on the
sidewall of the tire. ( P. 356)
Page 259 of 400
259
4-3. Do-it-yourself maintenance
4
Maintenance and care
■When the initialization of the tire pressure warning system has
failed (vehicles with a ti
re pressure warning system)
Initialization can be completed in a few minutes. However, in the follow-
ing cases, the settings has not bee n recorded and the system will not
operate properly. If repeated attempts to record tire inflation pressure
settings are unsuccessful, have the vehicle inspected by your Toyota
dealer.
●When operating the tire pressure warning reset switch, the tire pres-
sure warning light doe s not blink 3 times.
●After driving for a certain period of time since the initialization has
been completed, the warning light comes on after blinks for 1 minute.
■Tire pressure warning system certification
FCC ID: PAXPMVC010
FCC ID: HYQ23AAD
For vehicles sold in U.S.A.
NOTE:
This device complies with part 15 of the FCC Rules. Operation is subject
to the following two conditions: (1) This device may not cause harmful
interference, and (2) this device must accept any interference received,
including interference that may cause undesired operation.
FCC WARNING:
Changes or modifications not expre ssly approved by the party responsi-
ble for compliance could void the user’s authority to operate the equip-
ment.
Page 260 of 400
260 4-3. Do-it-yourself maintenance
CAUTION
■When inspecting or replacing tires
Observe the following precautions to prevent accidents.
Failure to do so may cause damage to parts of the drive train as well as
dangerous handling characteristics, which may lead to an accident
resulting in death or serious injury.
●Do not mix tires of different makes, models or tread patterns.
Also, do not mix tires of remarkably different treadwear.
●Do not use tire sizes other than those recommended by Toyota.
●Do not mix differently constructed ti res (radial, bias-belted or bias-ply
tires).
●Do not mix summer, all season and snow tires.
●Do not use tires that have been used on another vehicle.
Do not use tires if you do not know how they were used previously.
●Do not tow if your vehicle has a compact spare tire installed.
■When initializing the tire pressure warning system (vehicles with a
tire pressure warning system)
Do not operate the tire pressure wa rning reset switch without first adjust-
ing the tire inflation pr essure to the specified level. Otherwise, the tire
pressure warning light may not come on even if the tire inflation pressure
is low, or it may come on when the tire inflation pressure is actually nor-
mal.
Page 279 of 400
279
4-3. Do-it-yourself maintenance
4
Maintenance and care
Fuse layout and amperage ratings
Engine compartment (type A fuse box)
FuseAmpereCircuit
1 ID/UP 7.5 A Multiport fuel injection system/
sequential multiport fuel injection
system
2 EFI MAIN 20 A Multiport fuel injection system/
sequential multiport fuel injection
system
3 EFI NO.3 7.5 A Multiport fuel injection system/
sequential multiport fuel injection
system
4 HORN 10 A Horn
5 EFI NO.2 10 A Multiport fuel injection system/
sequential multiport fuel injection
system
6 IG2 10 A Multiport fuel injection system/
sequential multiport fuel injection
system, airbag system, stop lights,
front passenger occupant classifi-
cation system