Page 6 of 650
6
Headlights (low beam)2
Headlights (low and high beam)
3
P. 251
P. 251
Pictorial indexExterior
Front fog lights P. 258
Side turn signal lights P. 224
Hood P. 416
Windshield wipers P. 259
Outside rear view
mirrors
P. 109
Headlight cleaners1 P. 262
Headlights (high beam)2
P. 251
Front position lights/
daytime running lights
1
P. 251, 254
Front turn signal lights P. 224
Roof rails1 P. 295
VERSO_WE.book Page 6 Thursday, June 19, 2014 11:31 AM
Page 252 of 650
252 2-3. Operating the lights and wipers
Turning on the high beam headlights
With the headlights on, push
the lever forward to turn on the
high beams.
Pull the lever back to the center
position to turn the high beams
off.
Pull the lever toward you to
turn on the high beams.
Release the lever to turn them off.
You can flash the high beams
with the headlights on or off.
Manual headlight leveling dial (vehicles with halogen headlights)
The level of the headlights can be adjusted according to the number
of passengers and the loading condition of the vehicle.
Raises the level of the head-
lights
Lowers the level of the head-
lights
VERSO_WE.book Page 252 Thursday, June 19, 2014 11:31 AM
Page 257 of 650

257 2-3. Operating the lights and wipers
2
When driving
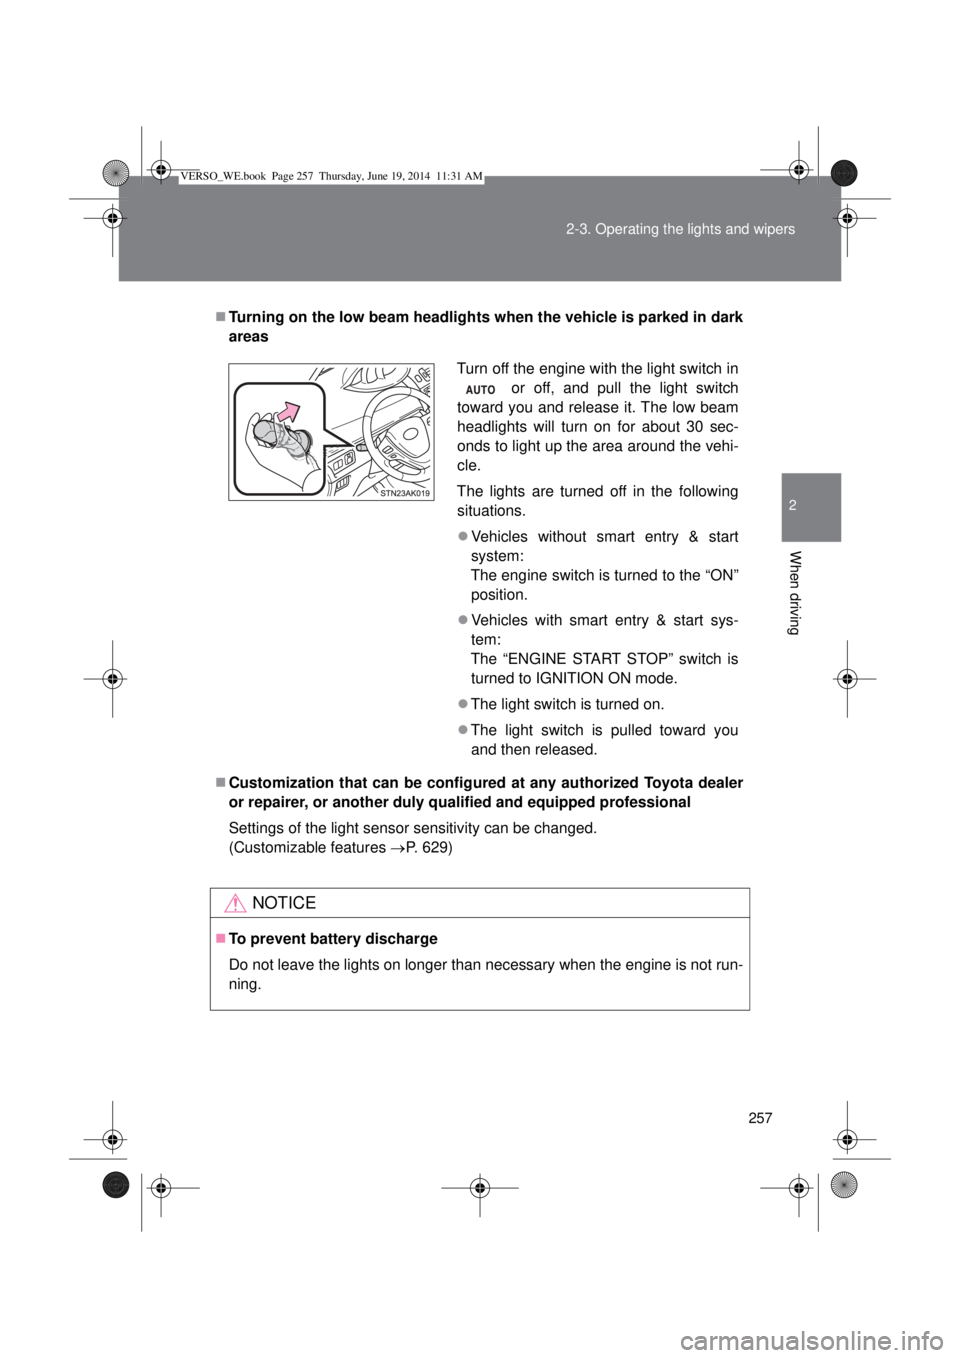
Turning on the low beam headlights when the vehicle is parked in dark
areas
Customization that can be configured at any authorized Toyota dealer
or repairer, or another duly qualified and equipped professional
Settings of the light sensor sensitivity can be changed.
(Customizable features P. 629)
NOTICE
To prevent battery discharge
Do not leave the lights on longer than necessary when the engine is not run-
ning.
Turn off the engine with the light switch in
or off, and pull the light switch
toward you and release it. The low beam
headlights will turn on for about 30 sec-
onds to light up the area around the vehi-
cle.
The lights are turned off in the following
situations.
Vehicles without smart entry & start
system:
The engine switch is turned to the “ON”
position.
Vehicles with smart entry & start sys-
tem:
The “ENGINE START STOP” switch is
turned to IGNITION ON mode.
The light switch is turned on.
The light switch is pulled toward you
and then released.
VERSO_WE.book Page 257 Thursday, June 19, 2014 11:31 AM
Page 477 of 650

477 4-3. Do-it-yourself maintenance
4
Maintenance and care
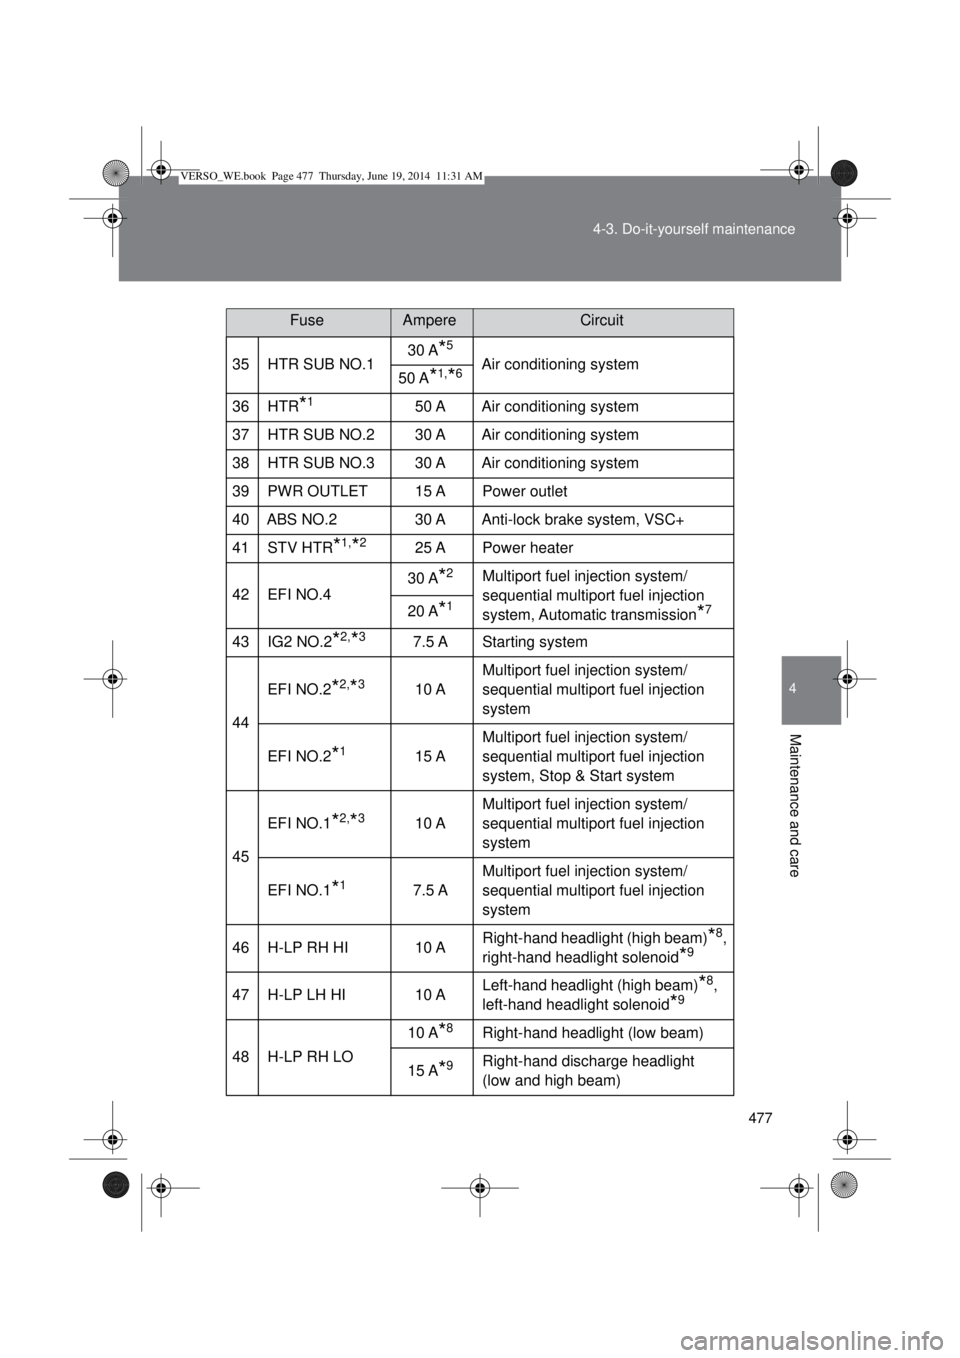
35 HTR SUB NO.130 A*5
Air conditioning system
50 A*1,*6
36 HTR*150 A Air conditioning system
37 HTR SUB NO.2 30 A Air conditioning system
38 HTR SUB NO.3 30 A Air conditioning system
39PWR OUTLET15 APower outlet
40 ABS NO.2 30 A Anti-lock brake system, VSC+
41 STV HTR
*1,*225 A Power heater
42 EFI NO.430 A
*2Multiport fuel injection system/
sequential multiport fuel injection
system, Automatic transmission
*720 A*1
43 IG2 NO.2*2,*37.5 A Starting system
44EFI NO.2
*2,*310 AMultiport fuel injection system/
sequential multiport fuel injection
system
EFI NO.2
*115 AMultiport fuel injection system/
sequential multiport fuel injection
system, Stop & Start system
45EFI NO.1
*2,*310 AMultiport fuel injection system/
sequential multiport fuel injection
system
EFI NO.1
*17.5 AMultiport fuel injection system/
sequential multiport fuel injection
system
46 H-LP RH HI 10 ARight-hand headlight (high beam)
*8,
right-hand headlight solenoid
*9
47 H-LP LH HI 10 ALeft-hand headlight (high beam)*8,
left-hand headlight solenoid
*9
48 H-LP RH LO10 A
*8Right-hand headlight (low beam)
15 A
*9Right-hand discharge headlight
(low and high beam)
FuseAmpereCircuit
VERSO_WE.book Page 477 Thursday, June 19, 2014 11:31 AM
Page 478 of 650
478 4-3. Do-it-yourself maintenance
*1: Vehicles with diesel engine (1WW-FHV engine)
*2: Vehicles with diesel engine (1AD-FTV and 2AD-FHV engines)
*3: Vehicles with gasoline engine (1ZR-FAE and 2ZR-FAE engines)
*4: Vehicles without smart entry & start system
*5: Vehicles without 1AD-FTV engine and DPF catalytic converter
*6: Vehicles with 1AD-FTV engine and DPF catalytic converter
*7: Vehicles with automatic transmission
*8: Vehicles with halogen headlights
*9: Vehicles with discharge headlights49 H-LP LH LO10 A
*8Left-hand headlight (low beam)
15 A
*9Left-hand discharge headlight (low
and high beam)
50 RDI EFI
*15 ARDI FAN MTR, FAN NO.1, FAN
NO.2
51 CDS EFI
*15 ACDS FAN MTR, FAN NO.1, FAN
NO.2
52 EFI NO.3
*27.5 A Automatic transmission*7
FuseAmpereCircuit
VERSO_WE.book Page 478 Thursday, June 19, 2014 11:31 AM
Page 484 of 650

484
4-3. Do-it-yourself maintenance
Light bulbs
You may replace the following bulbs yourself. The difficulty level of
replacement varies depending on the bulb. If necessary bulb
replacement seems difficult to perform, contact any authorized
Toyota dealer or repairer, or another duly qualified and equipped
professional.
For more information about replacing other light bulbs, contact any
authorized Toyota dealer or repairer, or another duly qualified and
equipped professional.
Prepare a replacement light bulb
Check the wattage of the light bulb being replaced. (P. 624)
Remove the engine compartment cover
P. 423)
Front bulb locations
*1: Halogen headlights without daytime running light system
*2: Halogen headlights with daytime running light system
Headlight high beam
(halogen headlights)
Headlight low beam
(halogen headlights)
Front turn
signal light
Front fog light Front position light
*1
Front position light/
daytime running light
*2
VERSO_WE.book Page 484 Thursday, June 19, 2014 11:31 AM
Page 487 of 650
487 4-3. Do-it-yourself maintenance
4
Maintenance and care
Right side
Move the washer fluid filler open-
ing.
Remove the securing clip.
Move the washer fluid filler
opening.
After replacing the bulbs, make
sure to firmly install the washer
fluid filler opening and secure it
with the clip.
Headlight low beam (halogen headlights)
Turn the cover to the open posi-
tion and remove it.
Open position
VERSO_WE.book Page 487 Thursday, June 19, 2014 11:31 AM
Page 488 of 650
488 4-3. Do-it-yourself maintenance
Turn the bulb base counterclock-
wise.
Unplug the connector while pull-
ing the lock release.
Replace the light bulb, and install
the bulb base.
Align the 3 tabs on the light bulb
with the mounting, and insert.
Turn and secure the bulb base.
Shake the bulb base gently to
check that it is not loose, turn the
headlight low beam on once and
visually confirm that no light is
leaking through the mounting.
VERSO_WE.book Page 488 Thursday, June 19, 2014 11:31 AM