2014 TOYOTA TUNDRA change time
[x] Cancel search: change timePage 8 of 576
8
For your infor mation
Please note that this manual applies to all models and all equipment, includ-
ing options. Therefore, you may find some explanations for equipment not
installed on your vehicle.
All specifications provided in this manual are current at the time of printing.
However, because of the Toyota policy of continual product improvement, we
reserve the right to make changes at any time without notice.
Depending on specifications, the vehicle shown in the illustrations may differ
from your vehicle in terms of equipment.
Approximately five hours after the engine is turned off, you may hear sound
coming from under the vehicle for several minutes. This is the sound of a fuel
evaporation leakage check and, it does not indicate a malfunction.
A wide variety of non-genuine spare parts and accessories for Toyota vehi-
cles are currently available in the market. You should know that Toyota does
not warrant these products and is not responsible for their performance,
repair, or replacement, or for any damage they may cause to, or adverse
effect they may have on, your Toyota vehicle.
This vehicle should not be modified with non-genuine Toyota products. Modi-
fication with non-genuine Toyota products could affect its performance, safety
or durability, and may even violate governmental regulations. In addition,
damage or performance problems resulting from the modification may not be
covered under warranty.
Main Owner’s Manual
Noise from under vehicle after turning off the engine
Accessories, spare parts and modification of your Toyota
Page 95 of 576
952. Instrument cluster
2
Instrument cluster
■Elapsed time
Displays the elapsed time since the engine was started
■Average vehicle speed
Displays the average vehicle speed since the engine was started
■Outside temperature
P. 3 7 6
■Settings display
P. 9 5
■Display off
A blank screen is displayed
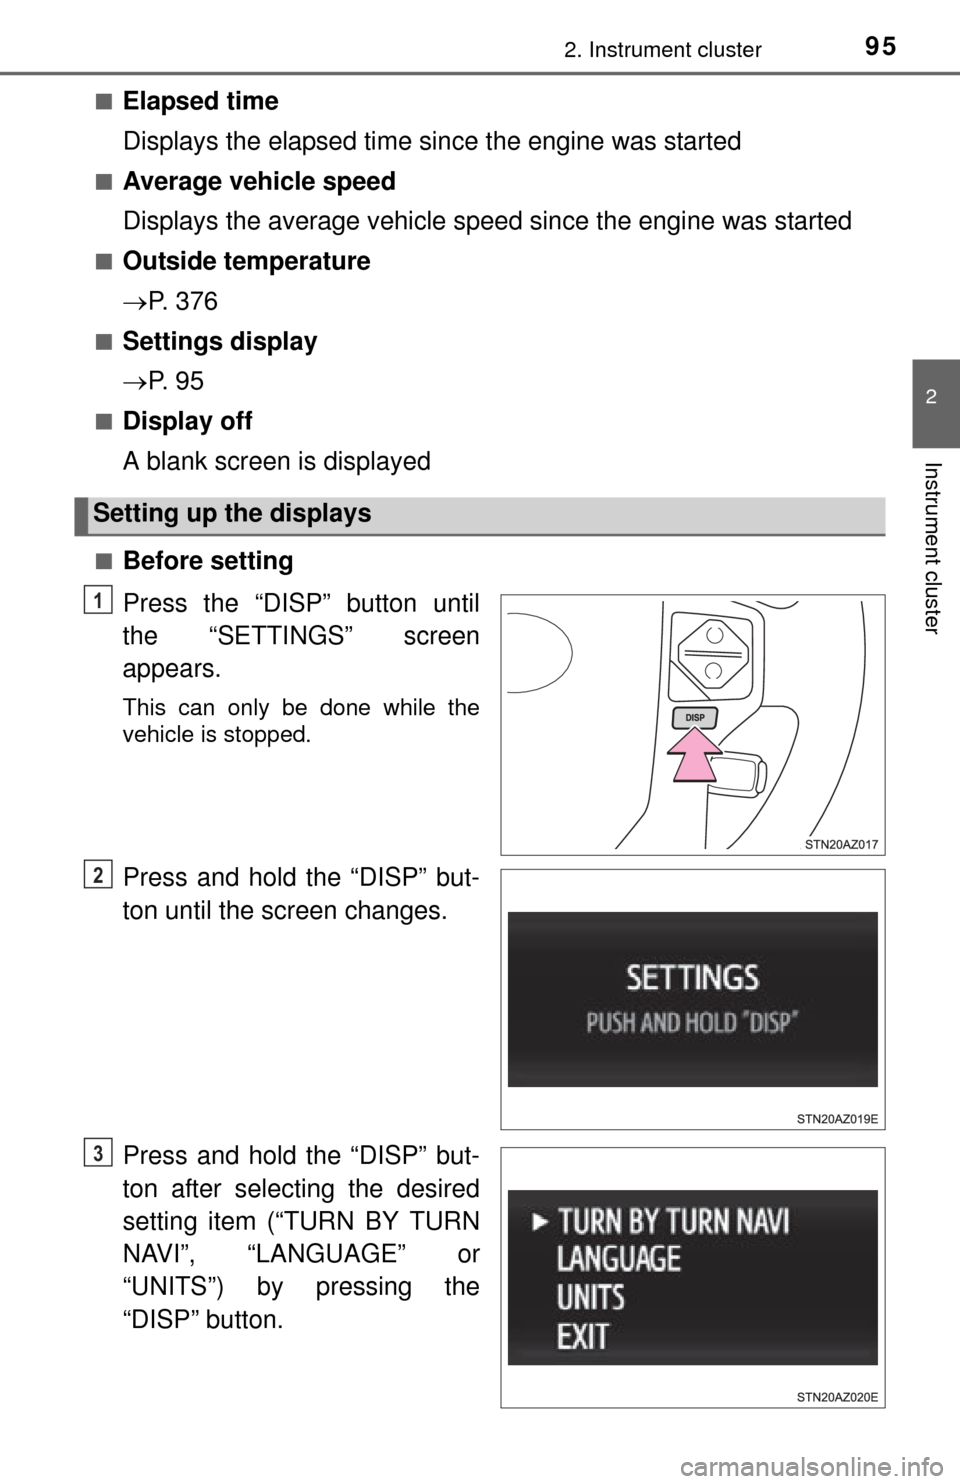
■Before setting
Press the “DISP” button until
the “SETTINGS” screen
appears.
This can only be done while the
vehicle is stopped.
Press and hold the “DISP” but-
ton until the screen changes.
Press and hold the “DISP” but-
ton after selecting the desired
setting item (“TURN BY TURN
NAVI”, “LANGUAGE” or
“UNITS”) by pressing the
“DISP” button.
Setting up the displays
1
2
3
Page 97 of 576
972. Instrument cluster
2
Instrument cluster
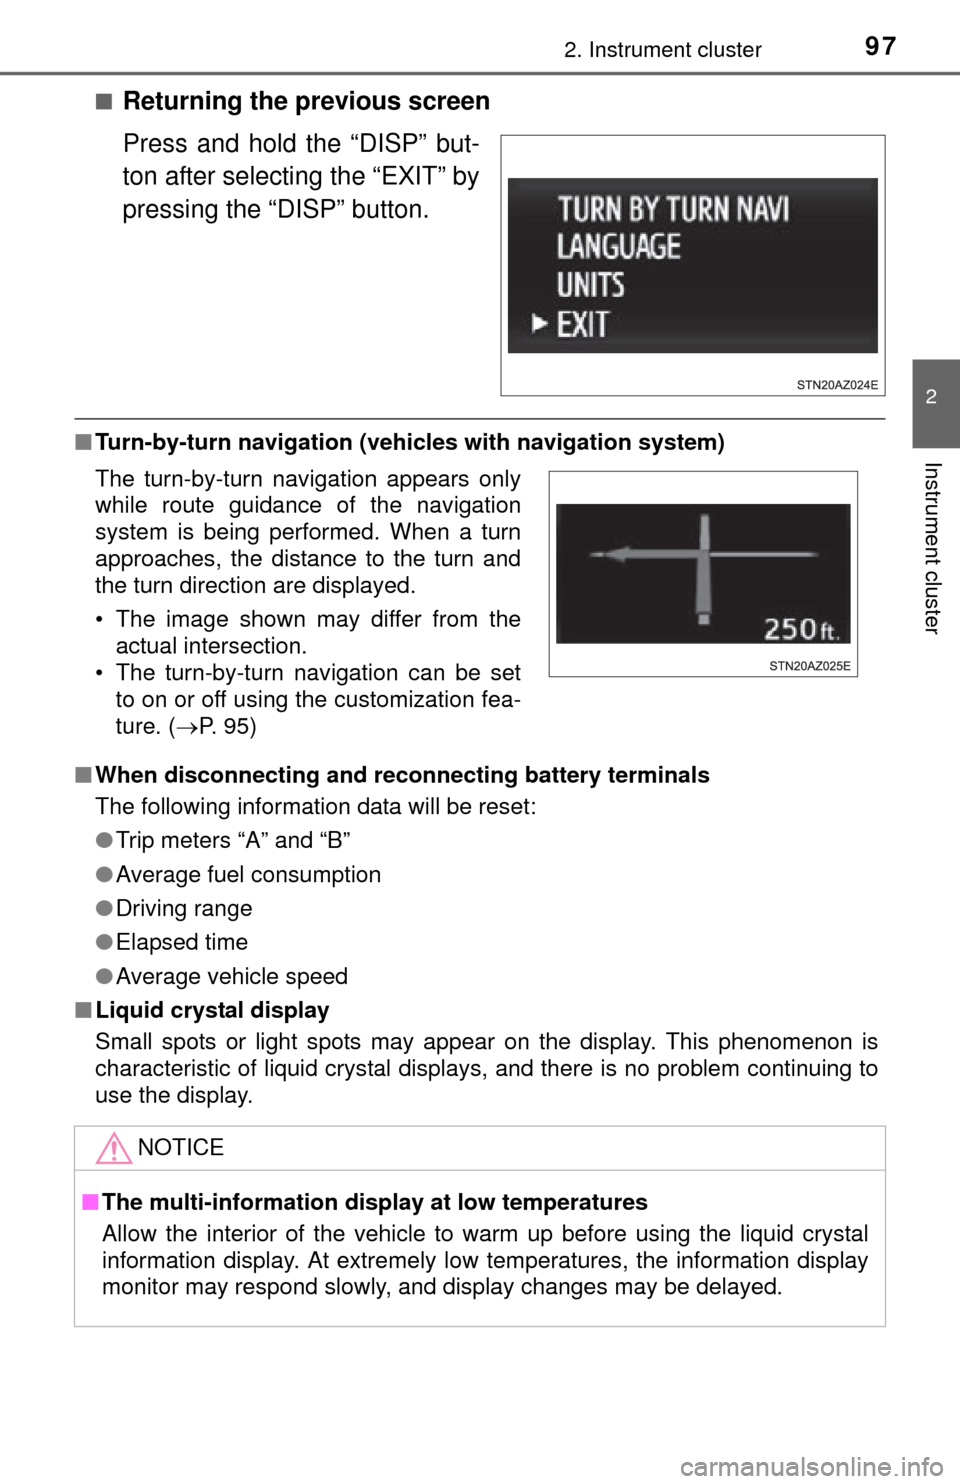
■Returning the previous screen
Press and hold the “DISP” but-
ton after selecting the “EXIT” by
pressing the “DISP” button.
■Turn-by-turn navigation (veh icles with navigation system)
■ When disconnecting and reco nnecting battery terminals
The following information data will be reset:
● Trip meters “A” and “B”
● Average fuel consumption
● Driving range
● Elapsed time
● Average vehicle speed
■ Liquid crystal display
Small spots or light spots may appear on the display. This phenomenon is
characteristic of liquid crystal displays, and there is no problem continuing to
use the display.
The turn-by-turn navigation appears only
while route guidance of the navigation
system is being performed. When a turn
approaches, the distance to the turn and
the turn direction are displayed.
• The image shown may differ from the
actual intersection.
• The turn-by-turn navigation can be set to on or off using the customization fea-
ture. ( P. 95)
NOTICE
■The multi-information disp lay at low temperatures
Allow the interior of the vehicle to warm up before using the liquid crystal
information display. At extremely low temperatures, the information display
monitor may respond slowly, and display changes may be delayed.
Page 152 of 576
1524-1. Before driving
NOTICE
■When driving the vehicle
● Do not depress the accelerator and brake pedals at the same time during
driving, as this may restrain driving torque.
● Do not use the accelerator pedal or depress the accelerator and brake
pedals at the same time to hold the vehicle on a hill.
■ When parking the vehicle
Always shift the shift lever to P. Failure to do so may cause the vehicle to
move or the vehicle may accelerate suddenly if the accelerator pedal is
accidentally depressed.
■ Avoiding damage to vehicle parts
● Do not turn the steering wheel fully in either direction and hold it there for
an extended period of time.
Doing so may damage the power steering pump.
● When driving over bumps in the road, drive as slowly as possible to avoid
damaging the wheels, underside of the vehicle, etc.
■ If you get a flat tire while driving
A flat or damaged tire may cause the following situations. Hold the steering
wheel firmly and gradually depress the brake pedal to slow down the vehi-
cle.
● It may be difficult to control your vehicle.
● The vehicle will make abnormal sounds or vibrations.
● The vehicle will lean abnormally.
Information on what to do in case of a flat tire ( P. 475)
■ When encounterin g flooded roads
Do not drive on a road that has flooded after heavy rain, etc. Doing so may
cause the following serious damage to the vehicle:
● Engine stalling
● Short in electrical components
● Engine damage caused by water immersion
In the event that you drive on a flooded road and the vehicle is flooded, be
sure to have your Toyota dealer check the following:
● Brake function
● Changes in quantity and quality of oil and fluid used for the engine, trans-
mission, transfer (4WD models) differentials, etc.
● Lubricant condition for the propeller shaft, bearings and suspension joints
(where possible), and the function of all joints, bearings, etc.
Page 185 of 576
1854-2. Driving procedures
4
Driving
■AI-SHIFT
AI-SHIFT automatically selects the suitable gear according to the driver per-
formance and driving conditions.
AI-SHIFT automatically operates when the shift lever is in the D position.
(Shifting the shift lever to the S position cancels the function.)
■ When driving with cruise cont rol activated (if equipped)
Even when performing the following actions with the intent of enabling engine
braking, engine braking will not activate while driving in S mode and down-
shifting to 5 or 4 (6-speed models) or 4 (5-speed models) because cruise
control will not be canceled. ( P. 200)
■ If the shift lever cannot be shift from P
P. 491
■ If the “S” indicator does not come on even after shifting the shift lever to
S
This may indicate a malfunction in the automatic transmission system. Have
the vehicle inspected by your Toyota dealer, immediately.
(In this situation, the transmission will operate in the same manner as when
the shift lever is in D.)
■ Downshifting restrictions warning buzzer (S mode)
To help ensure safety and driving performance, downshifting operation may
sometimes be restricted. In some circumstances, downshifting may not be
possible even when the shift lever is operated. (A buzzer will sound twice.)
CAUTION
■When driving on slippery road surfaces
Do not accelerate or shift gears suddenly.
Sudden changes in engine braking may cause the vehicle to spin or skid,
resulting in an accident.
Page 191 of 576
1914-3. Operating the lights and wipers
4
Driving
■Daytime running light system (if equipped)
●To make your vehicle more visible to other drivers, the daytime running
lights turn on automatically whenever the engine is started and the parking
brake is released. Daytime running lights are not designed for use at night.
● Compared to turning on the headlights, the daytime running light system
offers greater durability and consumes less electricity, so it can help improve
fuel economy.
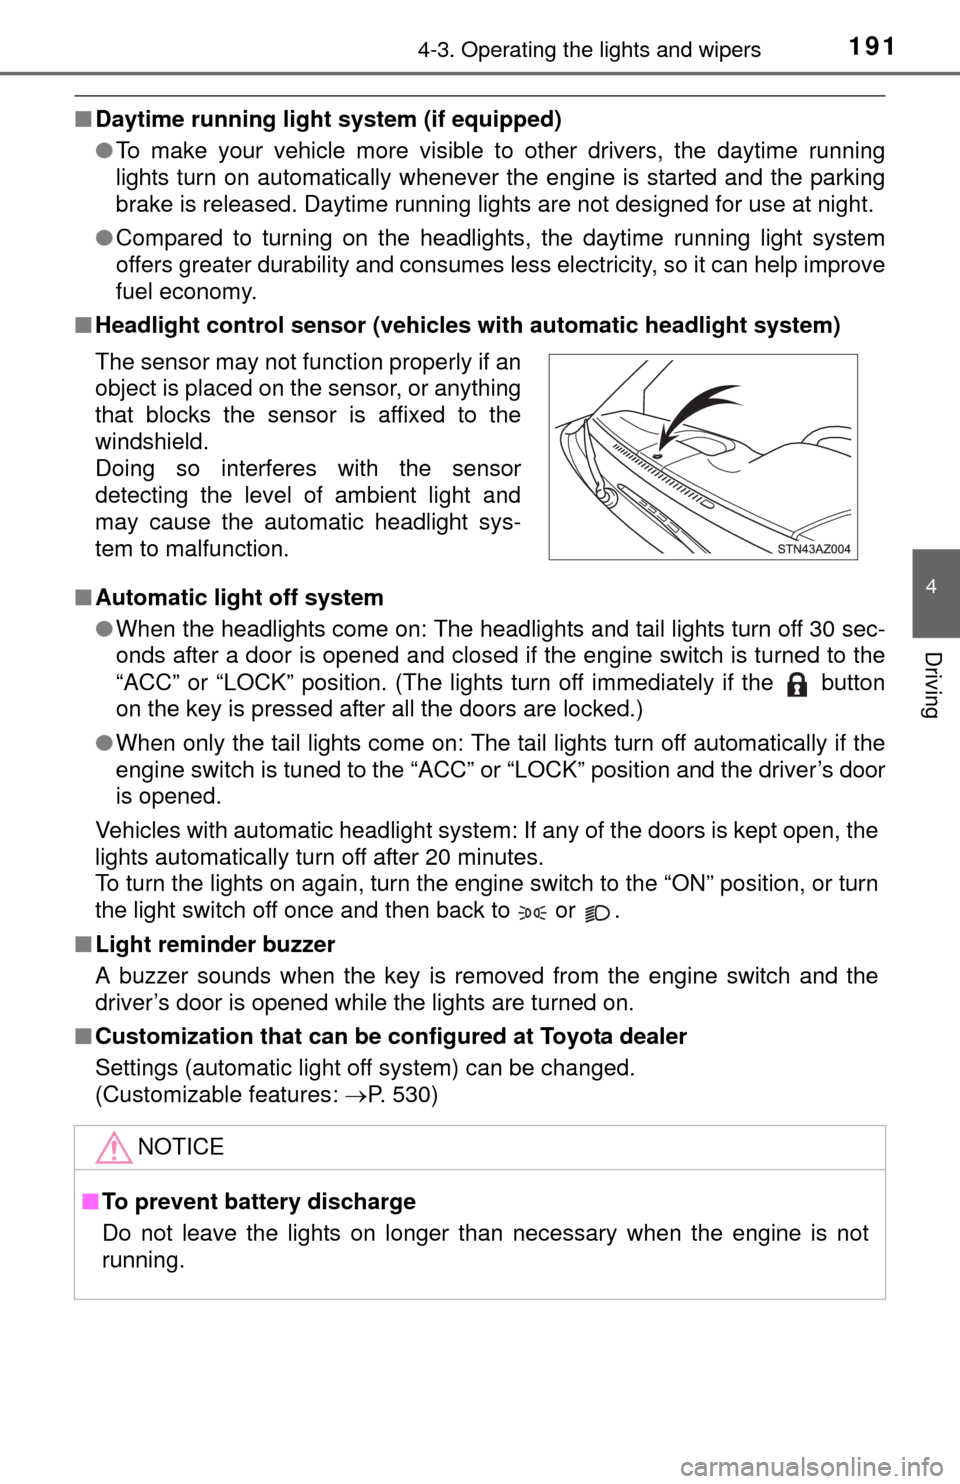
■ Headlight control sensor (vehicl es with automatic headlight system)
■ Automatic light off system
●When the headlights come on: The headlights and tail lights turn off 30 sec-
onds after a door is opened and closed if the engine switch is turned to the
“ACC” or “LOCK” position. (The lights turn off immediately if the button
on the key is pressed after all the doors are locked.)
● When only the tail lights come on: The tail lights turn off automatically if the
engine switch is tuned to the “ACC” or “LOCK” position and the driver’s door
is opened.
Vehicles with automatic headlight system: If any of the doors is kept open, the
lights automatically turn off after 20 minutes.
To turn the lights on again, turn the engine switch to the “ON” position, or turn
the light switch off once and then back to or .
■ Light reminder buzzer
A buzzer sounds when the key is removed from the engine switch and the
driver’s door is opened while the lights are turned on.
■ Customization that can be co nfigured at Toyota dealer
Settings (automatic light off system) can be changed.
(Customizable features: P. 530)
The sensor may not function properly if an
object is placed on the sensor, or anything
that blocks the sensor is affixed to the
windshield.
Doing so interferes with the sensor
detecting the level of ambient light and
may cause the automatic headlight sys-
tem to malfunction.
NOTICE
■
To prevent battery discharge
Do not leave the lights on longer than necessary when the engine is not
running.
Page 201 of 576
2014-5. Using the driving support systems
4
Driving
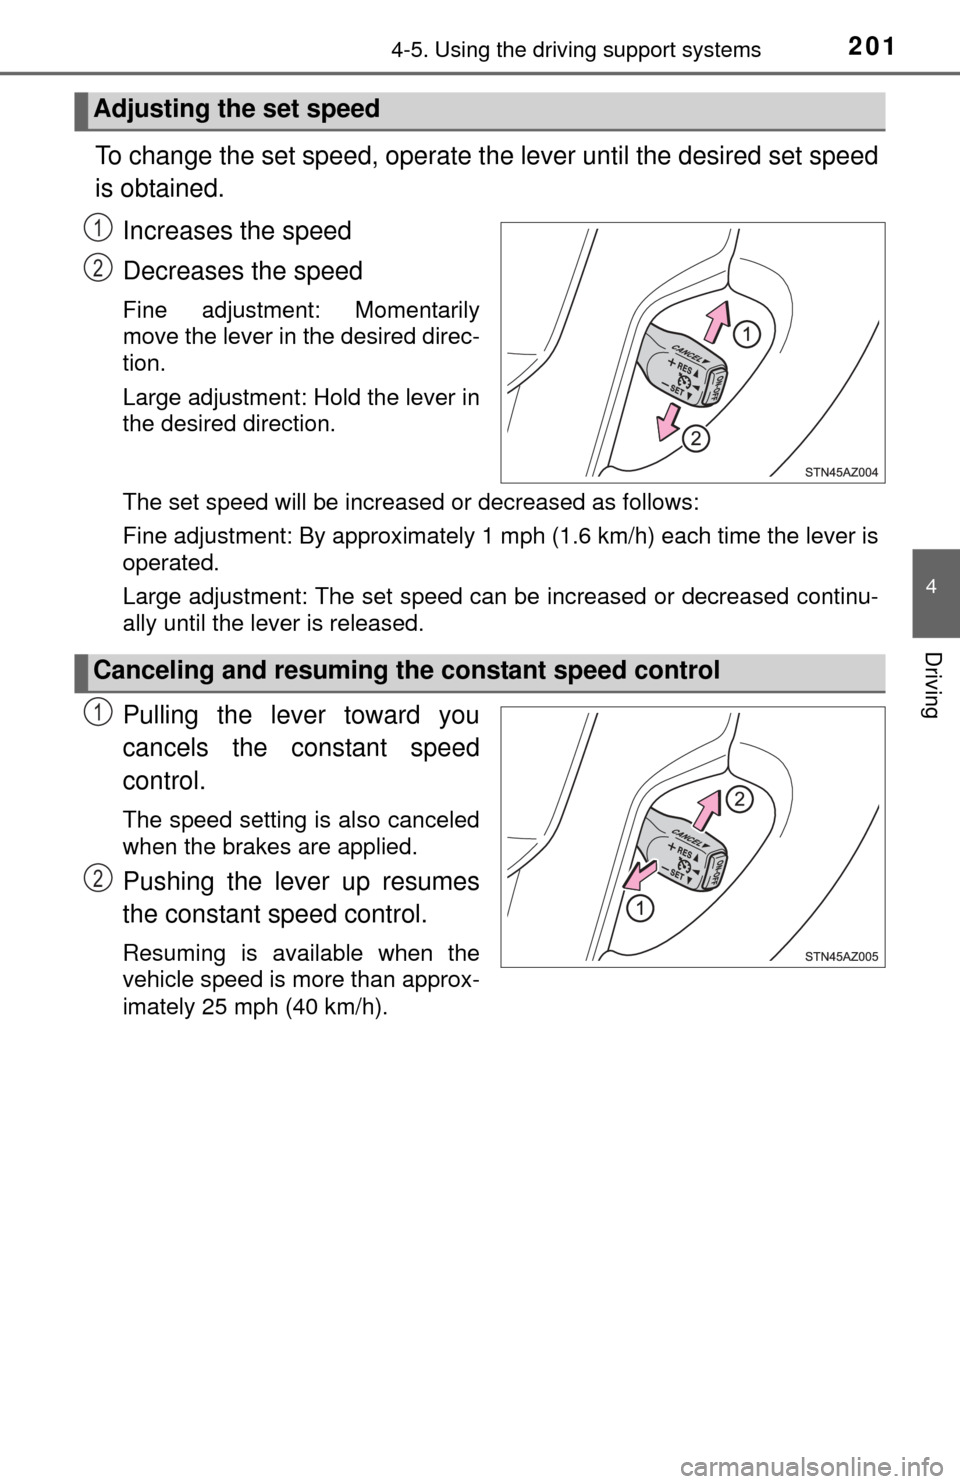
To change the set speed, operate the lever until the desired set speed
is obtained.Increases the speed
Decreases the speed
Fine adjustment: Momentarily
move the lever in the desired direc-
tion.
Large adjustment: Hold the lever in
the desired direction.
The set speed will be increased or decreased as follows:
Fine adjustment: By approximately 1 mph (1.6 km/h) each time the lever is
operated.
Large adjustment: The set speed can be increased or decreased continu-
ally until the lever is released.
Pulling the lever toward you
cancels the constant speed
control.
The speed setting is also canceled
when the brakes are applied.
Pushing the lever up resumes
the constant speed control.
Resuming is available when the
vehicle speed is more than approx-
imately 25 mph (40 km/h).
Adjusting the set speed
1
2
Canceling and resuming the constant speed control
1
2
Page 205 of 576
2054-5. Using the driving support systems
4
Driving
Rear center sensor
■When multiple obstacles are detected in front and behind the
vehicle at the same time
The buzzer will change in the following manner.
● If an obstacle has been detected within 1.5 ft. (45 cm) of the front
or 2.8 ft. (85 cm) in rear of the vehicle (a continuous buzzer is
sounding), and a new obstacle is de tected at the other end of the
vehicle, the buzzer will sound 7 times then 1 continuous buzzer.
● If an obstacle has been detected within 1.5 ft. (45 cm) of the front
or 2.8 ft. (85 cm) in rear of the vehicle (a continuous buzzer is
sounding), and a new obstacle is detected in the same way at the
other end of t he vehicle, the buzzer will sound 3 times then 1
continuous buzzer.
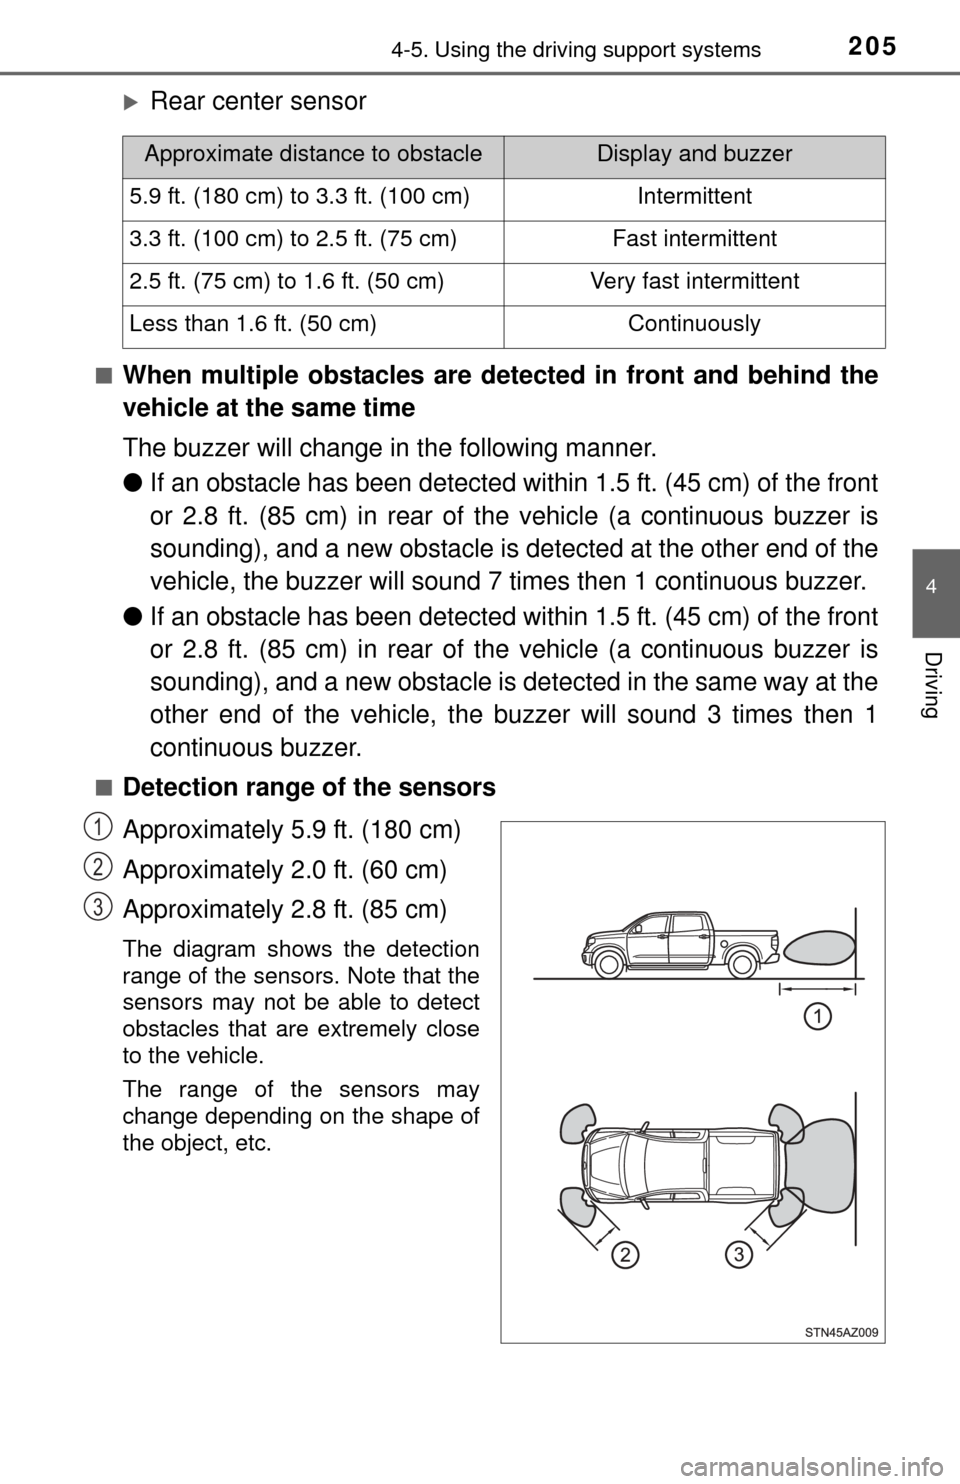
■Detection range of the sensors
Approximately 5.9 ft. (180 cm)
Approximately 2.0 ft. (60 cm)
Approximately 2.8 ft. (85 cm)
The diagram shows the detection
range of the sensors. Note that the
sensors may not be able to detect
obstacles that are extremely close
to the vehicle.
The range of the sensors may
change depending on the shape of
the object, etc.
Approximate distance to obstacleDisplay and buzzer
5.9 ft. (180 cm) to 3.3 ft. (100 cm)Intermittent
3.3 ft. (100 cm) to 2.5 ft. (75 cm)Fast intermittent
2.5 ft. (75 cm) to 1.6 ft. (50 cm)Very fast intermittent
Less than 1.6 ft. (50 cm)Continuously
1
2
3