Page 265 of 316
265
8
NAVIGATION SYSTEM
4. MEMORY POINTS
1. MEMORY POINTS SETTINGS
1Press the “APPS” button.
2Select “Setup”.
3Select “Navigation”.
4Select the desired item to be set.Home, preset destinations, address
book entries, areas to avoid can be set
as memory points. The registered
points can be used as the destinations.
(P.238)
Registered areas to avoid, will be
avoided when the system searches for
a route.
No.FunctionPage
Select to set home.266
Select to set preset desti-
nations.267
Select to set the address
book.269
Select to set areas to
avoid.271
Select to delete previous
destinations.273
Select to set detailed navi-
gation settings.274
Page 266 of 316
266
4. MEMORY POINTS
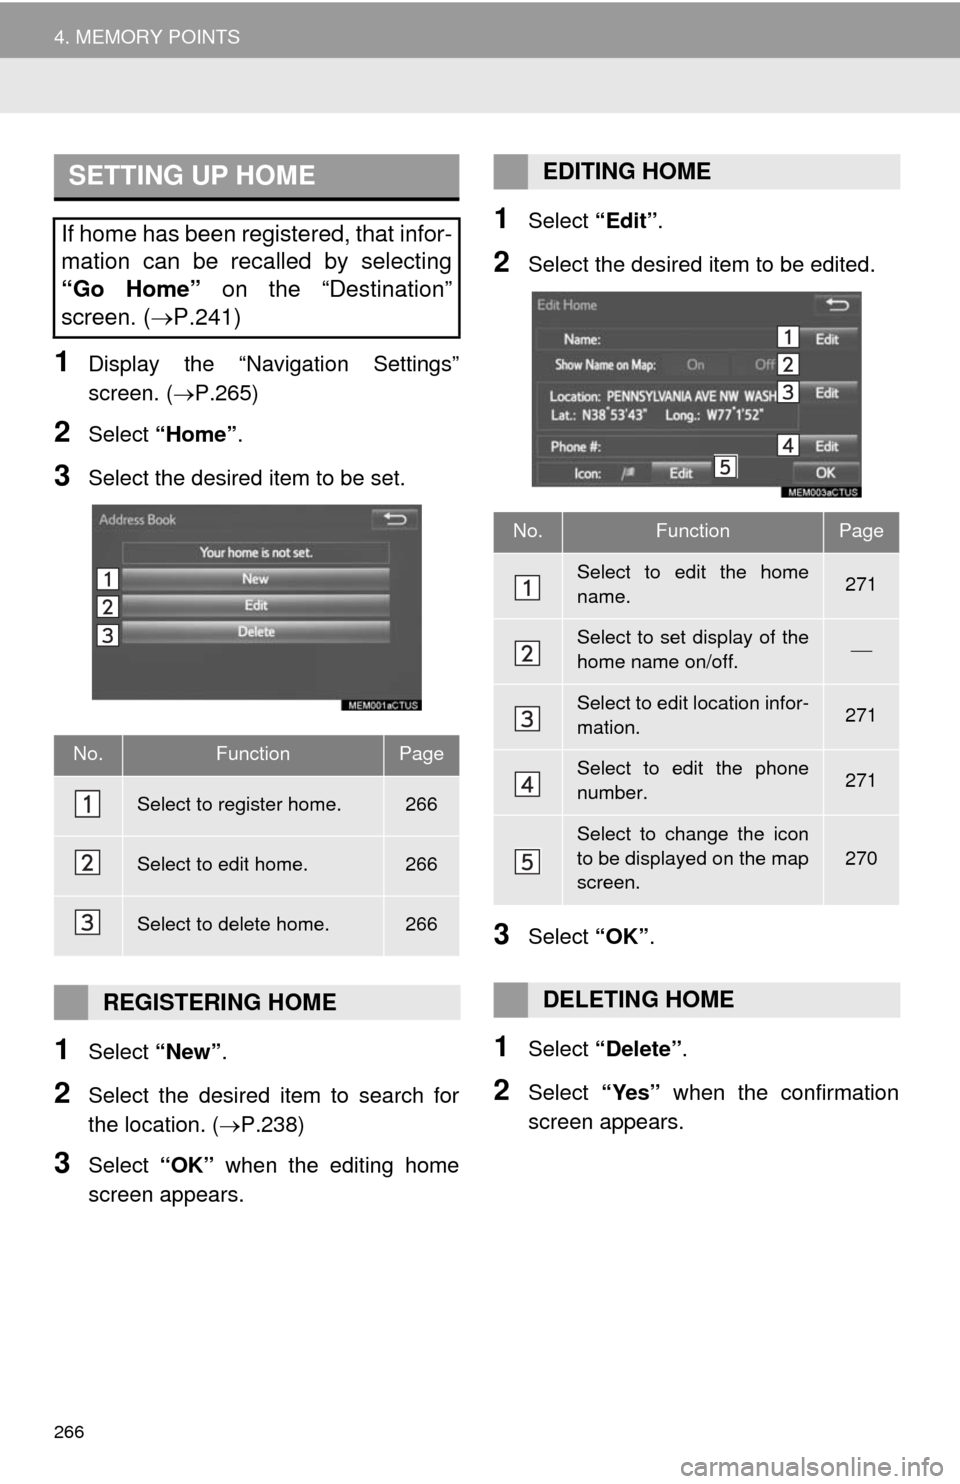
1Display the “Navigation Settings”
screen. (P.265)
2Select “Home”.
3Select the desired item to be set.
1Select “New”.
2Select the desired item to search for
the location. (P.238)
3Select “OK” when the editing home
screen appears.
1Select “Edit”.
2Select the desired item to be edited.
3Select “OK”.
1Select “Delete”.
2Select “Yes” when the confirmation
screen appears.
SETTING UP HOME
If home has been registered, that infor-
mation can be recalled by selecting
“Go Home” on the “Destination”
screen. (P.241)
No.FunctionPage
Select to register home.266
Select to edit home.266
Select to delete home.266
REGISTERING HOME
EDITING HOME
No.FunctionPage
Select to edit the home
name.271
Select to set display of the
home name on/off.
Select to edit location infor-
mation.271
Select to edit the phone
number.271
Select to change the icon
to be displayed on the map
screen.
270
DELETING HOME
Page 267 of 316
267
4. MEMORY POINTS
8
NAVIGATION SYSTEM
1Display the “Navigation Settings”
screen. (P.265)
2Select “Preset Destinations”.
3Select the desired item.
1Select “Set”.
2Select the desired item to search for
the location. (P.238)
3Select a position for this preset desti-
nation.
4Select “OK” when the editing preset
destination screen appears. (P.268)
SETTING UP PRESET
DESTINATIONS
If a preset destination has been regis-
tered, that information can be recalled
by using preset destinations on the
“Destination” screen. (P.241)
No.FunctionPage
Select to register a preset
destination.267
Select to edit a preset des-
tination.268
Select to delete a preset
destination.268
REGISTERING PRESET
DESTINATIONS
INFORMATION
●Up to 5 preset destinations can be regis-
tered.
Page 268 of 316
268
4. MEMORY POINTS
1Select “Edit”.
2Select the desired preset destination.
3Select the item to be edited.
4Select “OK”.
1Select “Delete”.
2Select the preset destination to be de-
leted and select “Delete”.
3Select “Yes” when the confirmation
screen appears.
EDITING PRESET
DESTINATIONS
No.FunctionPage
Select to edit the preset
destination name.271
Select to set display of the
preset destination name
on/off.
Select to edit location infor-
mation.271
Select to edit the phone
number.271
Select to change the icon
to be displayed on the map
screen.270
DELETING PRESET
DESTINATIONS
Page 269 of 316

269
4. MEMORY POINTS
8
NAVIGATION SYSTEM
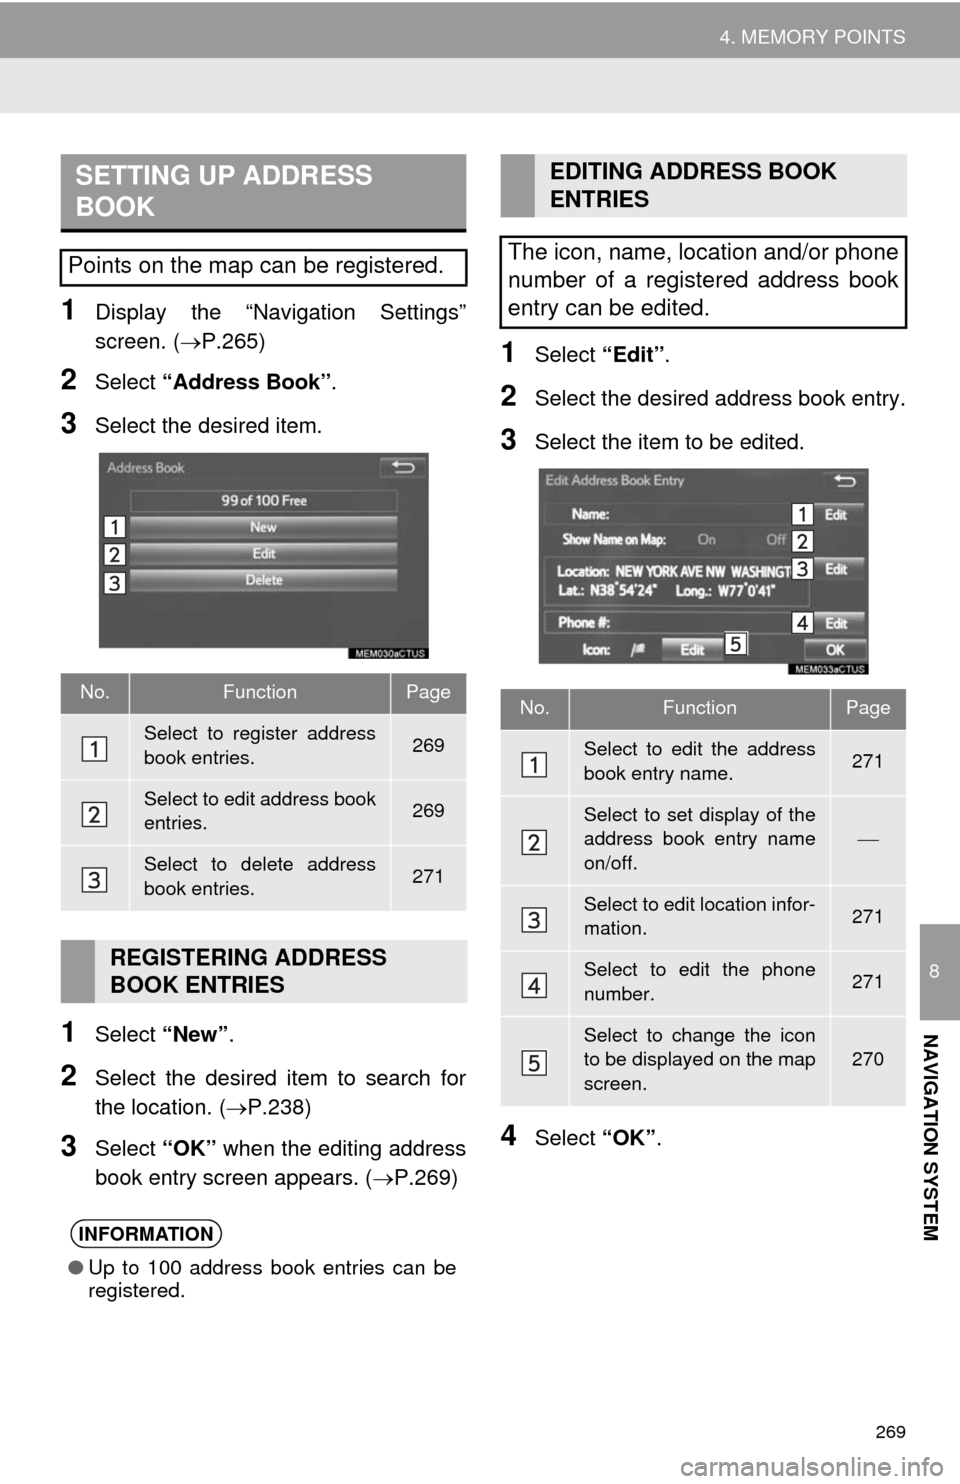
1Display the “Navigation Settings”
screen. (P.265)
2Select “Address Book”.
3Select the desired item.
1Select “New”.
2Select the desired item to search for
the location. (P.238)
3Select “OK” when the editing address
book entry screen appears. (P.269)
1Select “Edit”.
2Select the desired address book entry.
3Select the item to be edited.
4Select “OK”.
SETTING UP ADDRESS
BOOK
Points on the map can be registered.
No.FunctionPage
Select to register address
book entries.269
Select to edit address book
entries.269
Select to delete address
book entries.271
REGISTERING ADDRESS
BOOK ENTRIES
INFORMATION
●Up to 100 address book entries can be
registered.
EDITING ADDRESS BOOK
ENTRIES
The icon, name, location and/or phone
number of a registered address book
entry can be edited.
No.FunctionPage
Select to edit the address
book entry name.271
Select to set display of the
address book entry name
on/off.
Select to edit location infor-
mation.271
Select to edit the phone
number.271
Select to change the icon
to be displayed on the map
screen.270
Page 270 of 316
270
4. MEMORY POINTS
■CHANGING THE ICON
1Select “Edit” next to the “Icon”.
2Select the desired icon.
Change pages by selecting the “Page 1”,
“Page 2” or “With Sound” tab.
“With Sound”: Select the memory points
with a soundWhen the “With Sound” tab is selected
1Select the “With Sound” tab.
2Select the desired sound icon.
: Select to play the sound.
When “Bell (with Direction)” is selected,
select an arrow to adjust the direction and
select “OK”.
A sound for some address book entries
can be set. When the vehicle ap-
proaches the location of the address
book entry, the selected sound will be
heard.
INFORMATION
●The bell sounds only when the vehicle
approaches this point in the direction
that has been set.
Page 271 of 316
271
4. MEMORY POINTS
8
NAVIGATION SYSTEM
■CHANGING THE NAME
1Select “Edit” next to “Name”.
2Enter a name and select “OK”.
■CHANGING THE LOCATION
1Select “Edit” next to “Location”.
2Scroll the map to the desired point
(P.230) and select “OK”.
■CHANGING PHONE NUMBER
1Select “Edit” next to “Phone #”.
2Enter the phone number and select
“OK”.
1Select “Delete”.
2Select the item to be deleted and select
“Delete”.
3Select “Yes” when the confirmation
screen appears.
1Display the “Navigation Settings”
screen. (P.265)
2Select “Areas to Avoid”.
3Select the desired item.
DELETING ADDRESS BOOK
ENTRIES
SETTING UP AREAS TO
AVOID
Areas to be avoided because of traffic
jams, construction work or other rea-
sons can be registered as “Areas to
Avoid”.
No.FunctionPage
Select to register areas to
avoid.272
Select to edit areas to
avoid.272
Select to delete areas to
avoid.273
Page 272 of 316
272
4. MEMORY POINTS
1Select “New”.
2Select the desired item to search for
the location. (P.238)
3Select either or to
change the size of the area to be avoid-
ed and select “OK”.
4Select “OK” when the editing area to
avoid screen appears.
1Select “Edit”.
2Select the area and select “OK”.
3Select the item to be edited.
4Select “OK”.
REGISTERING AREAS TO
AVOID
INFORMATION
●If a destination is entered in the area to
avoid or the route calculation cannot be
made without running through the area
to avoid, a route passing through the
area to be avoided may be shown.
●Up to 10 locations can be registered as
points/areas to avoid.
EDITING AREAS TO AVOID
The name, location and/or area size of
a registered area can be edited.
No.FunctionPage
Select to edit the name of
the area to avoid.273
Select to set display of the
area to avoid name on/off.
Select to edit area location.273
Select to edit area size.273
Select to set the area to
avoid function on/off.