Page 9 of 40
7
Smart Key System
Start function
Accessories such as the radio will operate.
Power ON; Hybrid System is not engaged.
All systems OFF.
ACCESSORY
ON
OFF
Push
Depress
brake pedal
Carrying Green indicator ON
Without depressing the brake pedal, pressing the “POWER” switch will change the
operation mode in succession from:
Power (without starting Hybrid System)
* Driver door unlocking function can be programmed to unlock driver door only, or
all doors. Grasping passenger door handle or pushing unlock button on rear hatch
will unlock all doors. (If equipped)
NOTE: Doors may also be locked/unlocked using remote.
LockingUnlocking
Carry remote to lock Carry remote to unlock
All-door lockDriver door unlock*
Back door lock/unlock
Carry remote to
lock/unlock
Touch
Grasp
Push
Lock
Push
Unlock
OVERVIEWELECTRIC VEHICLE SYSTEM FEATURES/OPERATIONS
SAFETY AND EMERGENCY FEATURES
Page 10 of 40
8
OVERVIEW
Fuel tank door release and cap
NOTE: Tighten until one click is
heard. If the cap is not tightened
enough, Check Engine “
”
indicator may illuminate.
Push
Turn to open
Store
Charge port
Push
Open
Refer to the Owner’s Manual for more details.
Page 11 of 40
9
Hood release
Pull up latch and
raise hood
Light control-Instrument panel
Brightness
control
-
+
Engage support rod
Pull
OVERVIEWELECTRIC VEHICLE SYSTEM FEATURES/OPERATIONS
SAFETY AND EMERGENCY FEATURES
Page 12 of 40
10
Engine coolant reservoir
Engine oil level dipstick
Engine oil filler cap
Windshield washer fluid tank
NOTE: Regularly scheduled maintenance, including oil changes, will help extend the life of your vehicle and maintain performance. Please refer
to the “Warranty & Maintenance Guide.”
Engine maintenance
OVERVIEW
Page 13 of 40

11
ELECTRIC VEHICLE SYSTEM
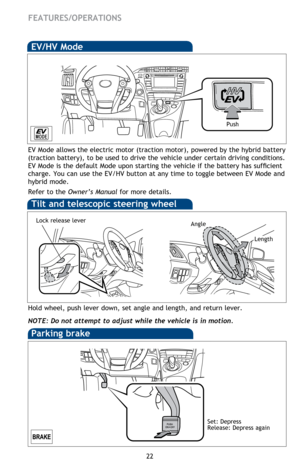
The Prius Plug-in Hybrid system has features of both electric and hybrid vehicles.
Electricity received by charging from an external power source can be used to
supplement hybrid energy, and the vehicle can also be driven as an electric
vehicle using only the electric motor. The EV driving range can be extended by
using regenerative braking to store electricity in the traction battery.
Electric Vehicle System
Charging indicator
Charging inlet
Charge port lid
Charge port
Charge cable
Charging equipment
Charging connector
Latch release button
CCID (Charging Circuit Interrupting Device)
Plug
Power indicator
Error warning indicator
Test button
Reset button
The charge cable included with the vehicle is designed to be connected only to
an AC 120V power source.
NOTE:Toyota
recommends
installing a heavier-
duty 15-amp wall
receptacle with
GFCI (Ground-Fault
Circuit-Interrupter).
OVERVIEWELECTRIC VEHICLE SYSTEM FEATURES/OPERATIONS
SAFETY AND EMERGENCY FEATURES
Page 14 of 40

12
ELECTRIC VEHICLE SYSTEM
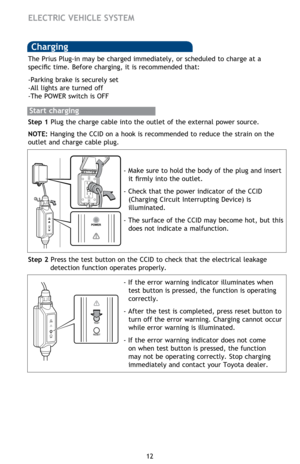
Charging
Step 1 Plug the charge cable into the outlet of the external power source.
NOTE: Hanging the CCID on a hook is recommended to reduce the strain on the
outlet and charge cable plug.
- Make sure to hold the body of the plug and insert it firmly into the outlet.
- Check that the power indicator of the CCID (Charging Circuit Interrupting Device) is
illuminated.
- The surface of the CCID may become hot, but this does not indicate a malfunction.
Step 2 Press the test button on the CCID to check that the electrical leakage detection function operates properly.
- If the error warning indicator illuminates when test button is pressed, the function is operating
correctly.
- After the test is completed, press reset button to turn off the error warning. Charging cannot occur
while error warning is illuminated.
- If the error warning indicator does not come on when test button is pressed, the function
may not be operating correctly. Stop charging
immediately and contact your Toyota dealer.
The Prius Plug-in may be charged immediately, or scheduled to charge at a
specific time. Before charging, it is recommended that:
-Parking brake is securely set
-All lights are turned off
-The POWER switch is OFF
Start charging
Page 15 of 40

13
Step 3 Press the charge port lid to open.
Step 4 Remove the charge connector cap. Affix the cap to the cable.
The charge inlet
light will illuminate.
Step 5 Insert the charge cable connector into the charge inlet.
- Do not press the latch release button when inserting the connector.
- Align with the guide position shown on underside of the charge
connector, and push it in until it
clicks.
Step 6 Confirm that the charging indicator is illuminated. (When the charge timer function is in use, the light will turn off several seconds after illuminating.)
- Charging will not start if the charging indicator does not illuminate when
the charging connector is inserted.
- The amount of time until charging is completed can be checked on
the energy monitor by turning the
POWER switch to ON mode.
- The charging indicator will turn off when charging is completed.
Refer to the Owner’s Manual for more details.
OVERVIEWELECTRIC VEHICLE SYSTEM FEATURES/OPERATIONS
SAFETY AND EMERGENCY FEATURES
Page 16 of 40
14
ELECTRIC VEHICLE SYSTEM
Use of the charging timer can help reduce electricity costs by making it easy to
charge during off-peak hours.
Set the charging timer
Step 1 Stop the vehicle and press the charging timer switch.
The timing display will change from
solid to flashing.
Charging timer
The Multi-Information Display will
switch to the charging timer display.
Step 2 Press and hold the charging timer switch.
Step 3 Press the charging timer switch to select the setting mode. Start time setting mode
Finish time setting mode
The mode will switch with each
press of the charging timer switch.