Page 1 of 724
TABLE OF CONTENTS
1
LC200_OM_OM60L09U_(U)
1Before drivingAdjusting and operating features such as door locks,
mirrors, and steering column
2When drivingDriving, stopping and safe-driving information
3Interior
featuresAir conditioning and audio systems, as well as other in-
terior features for a comfortable driving experience
4Maintenance
and careCleaning and protecting your vehicle, performing do-it-
yourself maintenance, and maintenance information
5When trouble
arisesWhat to do if the vehicle needs to be towed, gets a flat
tire, or is involved in an accident
6Vehicle
specificationsDetailed vehicle information
7For U.S.
ownersReporting safety defects for U.S. owners
IndexAlphabetical listing of information contained in this
manual
Page 5 of 724

1
2
3
4
5
6
7
5
LC200_OM_OM60L09U_(U)
3-6. Using the storage featuresList of storage features ....... 466
• Glove box.......................... 467
• Console box ...................... 468
• Overhead console............. 469
• Cup holders ...................... 470
• Bottle holders .................... 472
• Card holders ..................... 474
• Auxiliary boxes.................. 474
3-7. Other interior features Cool box .............................. 475
Sun visors ........................... 477
Vanity mirror........................ 478
Clock ................................... 479
Outside temperature display............................... 480
Ashtrays .............................. 482
Cigarette lighter................... 484
Power outlets ...................... 485
Heated steering wheel ........ 487
Seat heaters and ventilators ......................... 489
Armrest ............................... 491
Assist grips.......................... 492
Floor mats ........................... 493
Luggage compartment features ............................. 495
Garage door opener............ 497
Safety Connect ................... 504 4-1. Maintenance and care
Cleaning and protecting the vehicle exterior ........... 512
Cleaning and protecting the vehicle interior ............ 515
4-2. Maintenance Maintenance requirements .................... 518
General maintenance ......... 521
Emission inspection and maintenance (I/M)
programs .......................... 524
4-3. Do-it-yourself maintenance Do-it-yourself service precautions....................... 525
Hood ................................... 528
Engine compartment .......... 529
Tires ................................... 544
Tire inflation pressure ......... 553
Wheels ............................... 557
Air conditioning filter ........... 560
Electronic key battery ......... 563
Checking and replacing fuses................................. 566
Headlight aim ..................... 580
Light bulbs .......................... 582
4Maintenance and care
Page 6 of 724

TABLE OF CONTENTSIndex
6
LC200_OM_OM60L09U_(U)
5-1. Essential informationEmergency flashers ........... 600
If your vehicle needs to be towed .......................... 601
If you think something is wrong ............................ 606
Fuel pump shut off system .............................. 607
5-2. Steps to take in an emergency
If a warning light turns on or a warning buzzer
sounds... ......................... 608
If a warning message is displayed ...................... 619
If you have a flat tire ........... 635
If the engine will not start ... 649
If the shift lever cannot be shifted from P ................... 651
If you lose your keys .......... 652
If the electronic key does not operate properly ......... 653
If the battery is discharged ....................... 656
If your vehicle overheats .... 659
If the vehicle becomes stuck................................. 662
If your vehicle has to be stopped in an
emergency ....................... 664 6-1. Specifications
Maintenance data (fuel, oil level, etc.) ........... 668
Fuel information .................. 678
Tire information................... 682
6-2. Customization Customizable features ........ 694
6-3. Initialization Items to initialize ................. 703
Reporting safety defects for U.S. owners ................. 706
Abbreviation list ............... 708
Alphabetical index ............ 710
What to do if... .................. 720
5When trouble arises6Vehicle specifications
7For U.S. owners
Index
Page 9 of 724
9
LC200_OM_OM60L09U_(U)
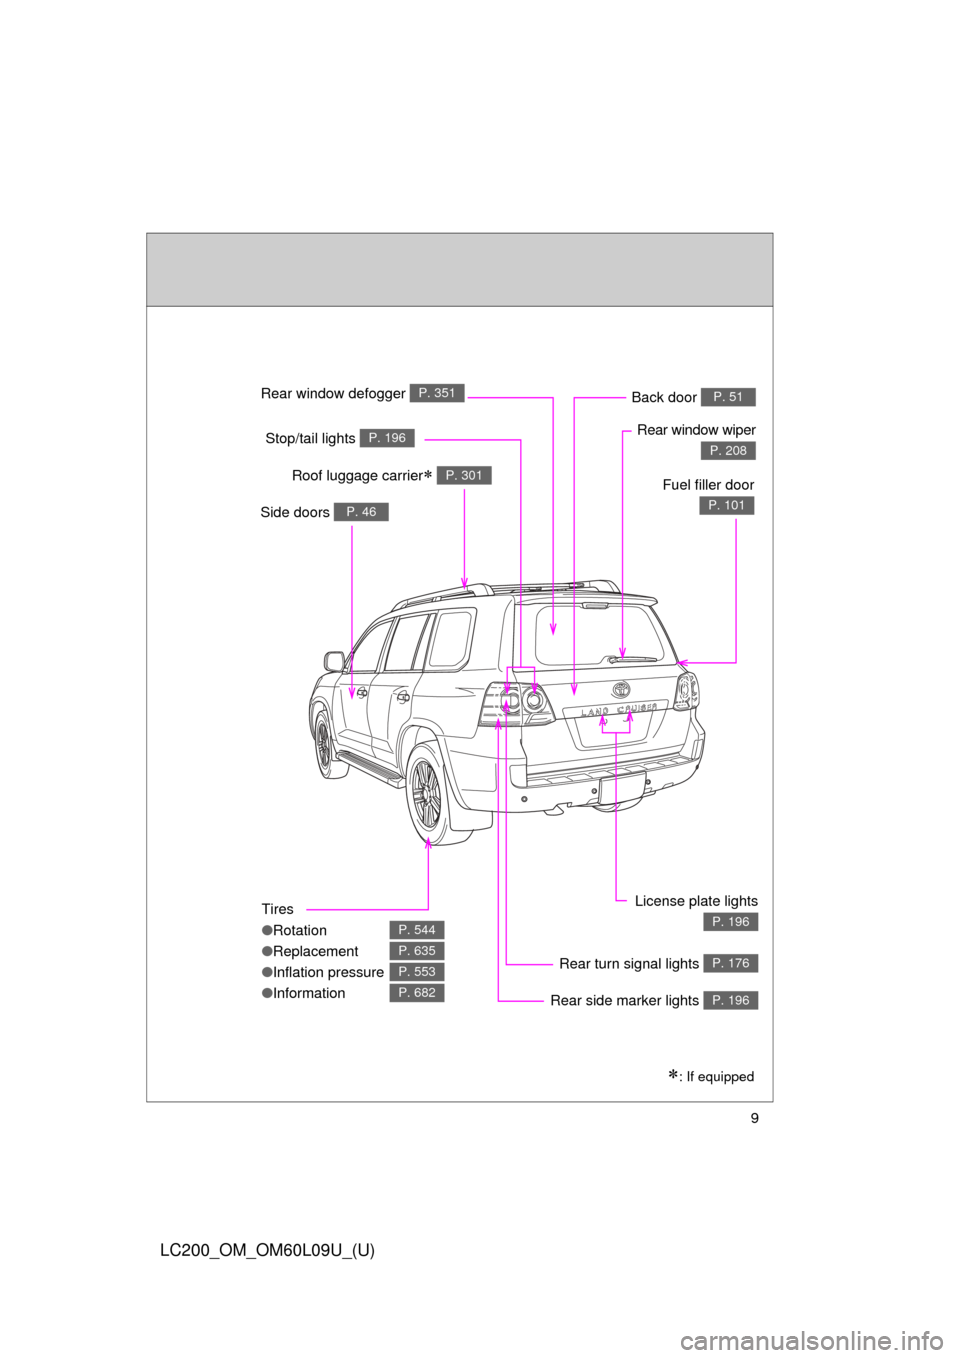
Tires
●Rotation
● Replacement
● Inflation pressure
● Information
P. 544
P. 635
P. 553
P. 682
Rear window defogger P. 351
Rear window wiper
P. 208Stop/tail lights P. 196
Side doors P. 46
Rear turn signal lights P. 176
License plate lights
P. 196
Roof luggage carrier P. 301
Back door P. 51
: If equipped
Fuel filler door
P. 101
Rear side marker lights P. 196
Page 74 of 724
74 1-3. Adjustable components (seats, mirrors, steering wheel)
LC200_OM_OM60L09U_(U)
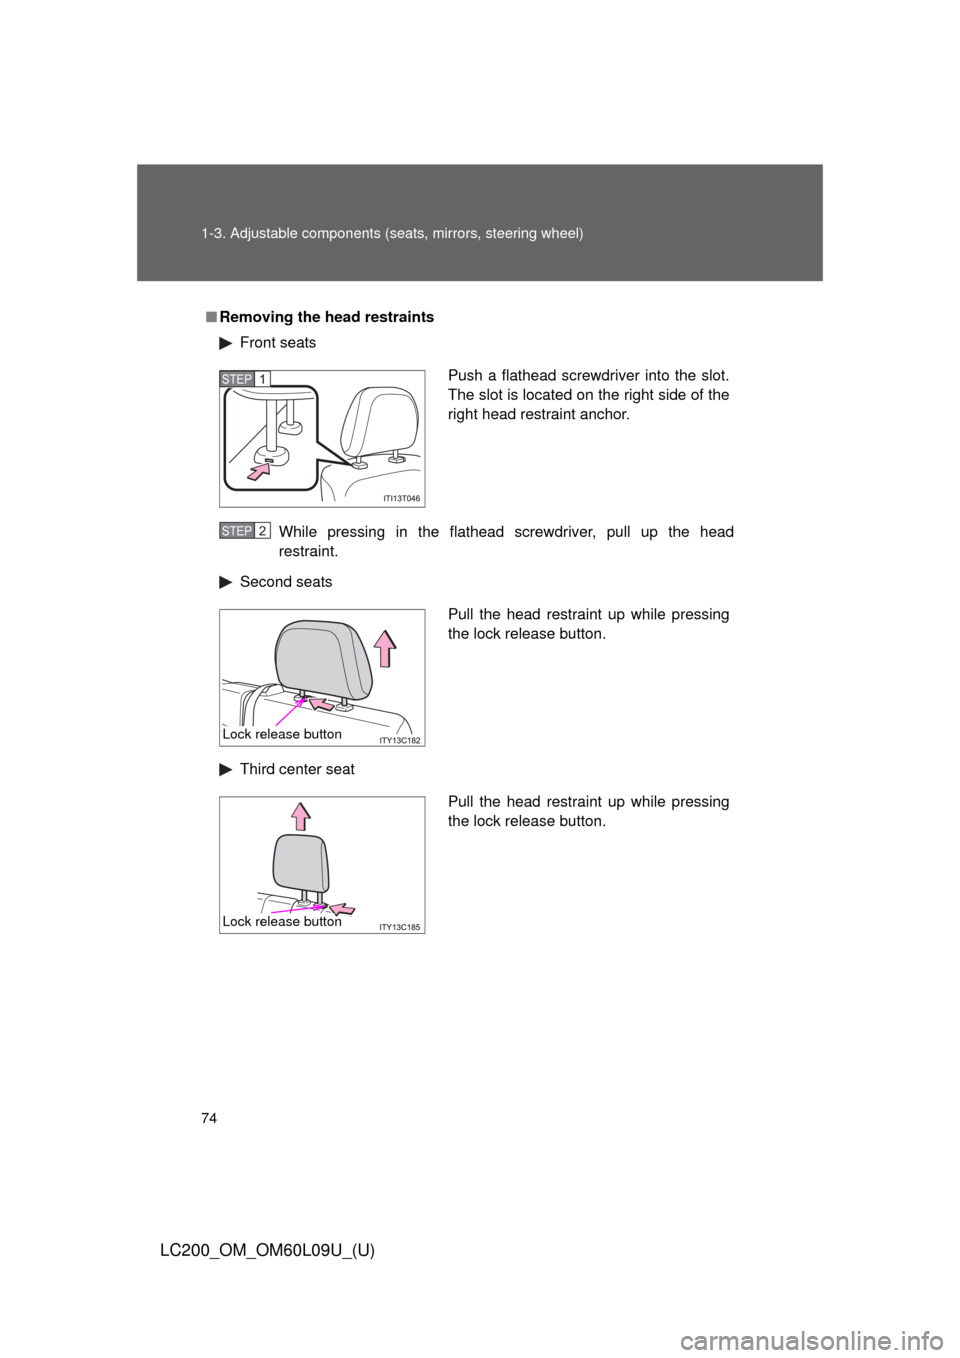
■Removing the head restraints
Front seats
While pressing in the flathead screwdriver, pull up the head
restraint.
Second seats
Third center seat
Push a flathead screwdriver into the slot.
The slot is located on the right side of the
right head restraint anchor.STEP1
STEP2
Pull the head restraint up while pressing
the lock release button.
Lock release button
Pull the head restraint up while pressing
the lock release button.
Lock release button
Page 75 of 724
75
1-3. Adjustable components (s
eats, mirrors, steering wheel)
1
Before driving
LC200_OM_OM60L09U_(U)
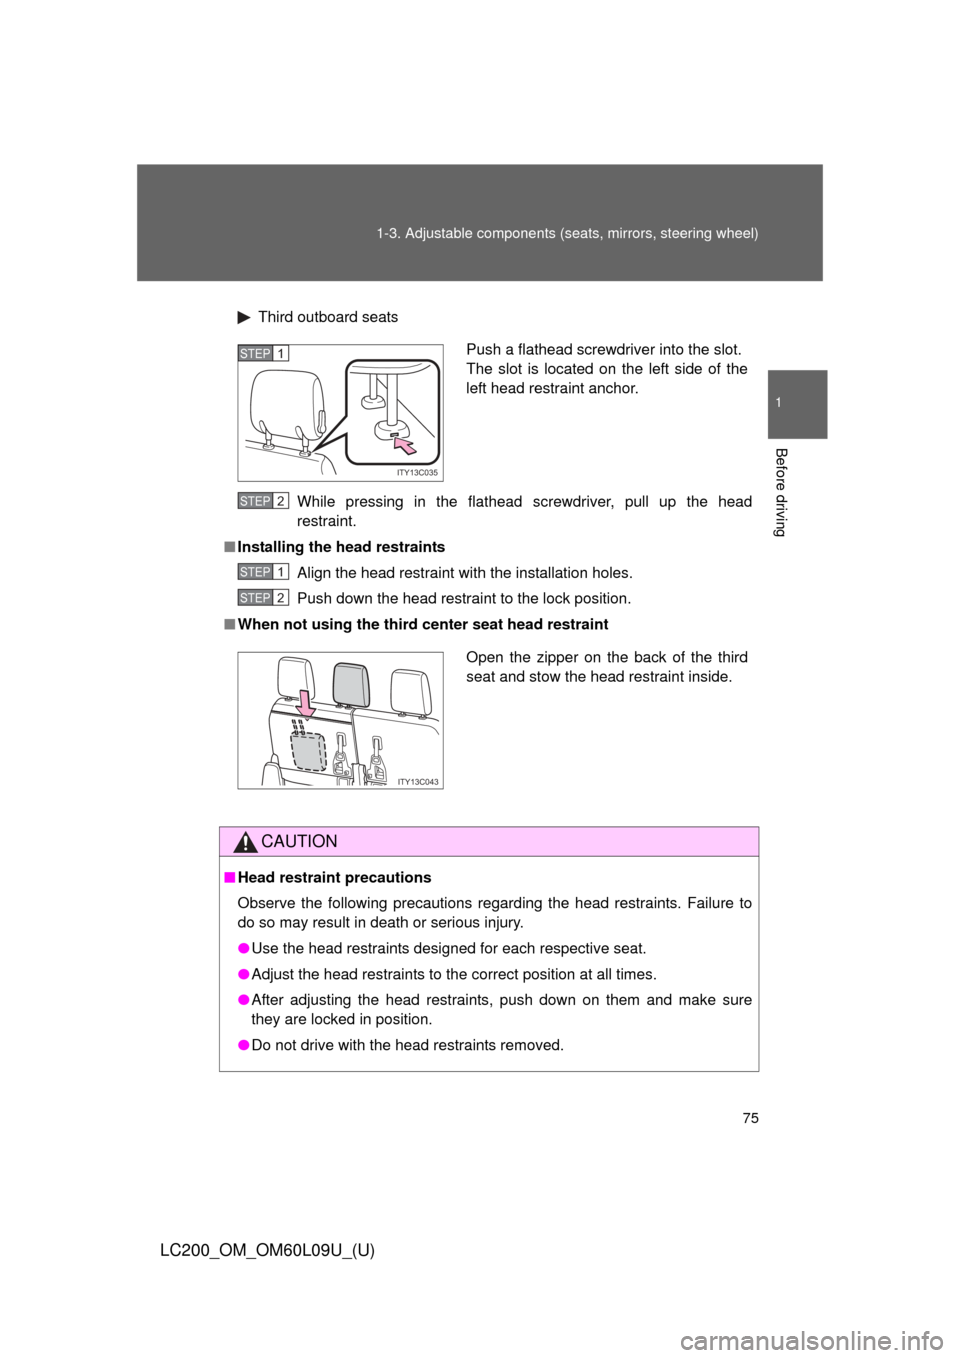
Third outboard seats
While pressing in the flathead screwdriver, pull up the head
restraint.
■ Installing the head restraints
Align the head restraint with the installation holes.
Push down the head restraint to the lock position.
■ When not using the third center seat head restraint
CAUTION
■Head restraint precautions
Observe the following precautions regarding the head restraints. Failure to
do so may result in death or serious injury.
●Use the head restraints designed for each respective seat.
● Adjust the head restraints to the correct position at all times.
● After adjusting the head restraints, push down on them and make sure
they are locked in position.
● Do not drive with the head restraints removed.
Push a flathead screwdriver into the slot.
The slot is located on the left side of the
left head restraint anchor.
ITY13C035
STEP1
STEP2
STEP1
STEP2
Open the zipper on the back of the third
seat and stow the head restraint inside.
ITY13C043
Page 113 of 724
113
1
1-7. Safety information
Before driving
LC200_OM_OM60L09U_(U)
SRS airbags
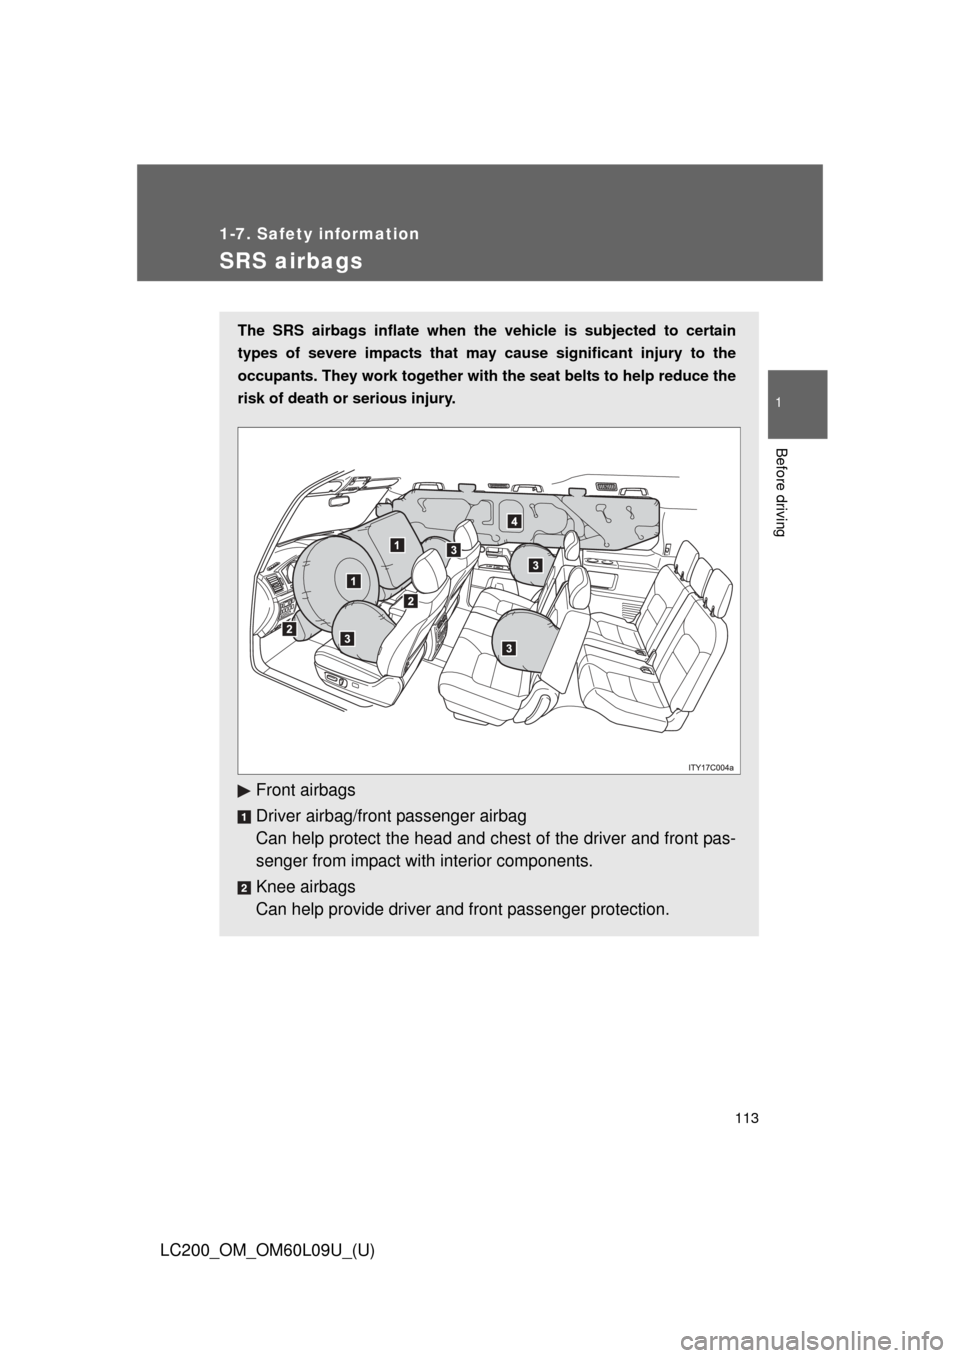
The SRS airbags inflate when the vehicle is subjected to certain
types of severe impacts that may cause significant injury to the
occupants. They work together with the seat belts to help reduce the
risk of death or serious injury.
Front airbags
Driver airbag/front passenger airbag
Can help protect the head and ches t of the driver and front pas-
senger from impact with interior components.
Knee airbags
Can help provide driver and front passenger protection.
Page 116 of 724

116 1-7. Safety information
LC200_OM_OM60L09U_(U)Your vehicle is equipped with
ADVANCED AIRBAGS designed based
on the US motor vehicle safety standards (FMVSS208). The airbag
sensor assembly (ECU) controls ai rbag deployment based on infor-
mation obtained from the sensors etc. shown in the system compo-
nents diagram above. This inform ation includes crash severity and
occupant information. As the air bags deploy, a chemical reaction in
the inflators quickly fills the airbags with nontoxic gas to help restrain
the motion of the occupants.
■ If the SRS airbags deploy (inflate)
●Bruising and slight abrasions may result from contact with a deploying
(inflating) SRS airbag.
● A loud noise and white powder will be emitted.
● Parts of the airbag module (steering wheel hub, airbag cover and inflator)
as well as the front seats, second seats, and parts of the front, side and
rear pillars, and roof side rail, may be hot for several minutes. The airbag
itself may also be hot.
● The windshield may crack.
● For Safety Connect subscribers, if the SRS airbags deploy or in the event
of a severe rear-end collision, the system is designed to send an emer-
gency call to the response center, notifying them of the vehicle’s location
(without needing to push the “SOS” button) and an agent will attempt to
speak with the occupants to ascertain the level of emergency and assis-
tance required. If the occupants are unable to communicate, the agent
automatically treats the call as an emergency and helps to dispatch the
necessary emergency services. ( P. 504)