Page 587 of 724
587
4-3. Do-it-yourself maintenance
4
Maintenance and care
LC200_OM_OM60L09U_(U)
Replace the light bulb.
Align the 3 tabs on the light bulb
with the mounting, and insert.
Turn and secure the light bulb.
Install the bulb base.
Shake the bulb base gently to
check that it is not loose, turn the
fog lights on once and visually
confirm that no light is leaking
through the mounting.
When installing the fender liner, conduct in reverse.
STEP4
STEP5
STEP6
STEP7STEP1
Page 588 of 724
588 4-3. Do-it-yourself maintenance
LC200_OM_OM60L09U_(U)■
Front turn signal light
For the left side only: Remove
the securing bolt and move the
washer fluid filler opening.
Turn the bulb base counterclock-
wise.
Remove the light bulb.
When installing, reverse the steps listed.
ITY43C012
STEP1
STEP2
STEP3
STEP4
Page 589 of 724
589
4-3. Do-it-yourself maintenance
4
Maintenance and care
LC200_OM_OM60L09U_(U)
■
Front side marker light
For the left side only: Remove
the securing bolt and move the
washer fluid filler opening.
Turn the bulb base counterclock-
wise.
Remove the light bulb.
When installing, reverse the steps listed.
ITY43C012
STEP1
ITY43C050
STEP2
ITY43C051
STEP3
STEP4
Page 596 of 724

596 4-3. Do-it-yourself maintenance
LC200_OM_OM60L09U_(U)
CAUTION
■Replacing light bulbs
●Turn off the headlights. Do not attempt to replace the bulb immediately
after turning off the headlights.
The bulbs become very hot and may cause burns.
● Do not touch the glass portion of the light bulb with bare hands. When i\
t is
unavoidable to hold the glass portion, use and hold with a clean dry cloth
to avoid getting moisture and oils on the bulb.
Also, if the bulb is scratched or dropped, it may blow out or crack.
● Fully install light bulbs and any parts used to secure them. Failing to do so
may result in heat damage, fire, or water entering the headlight unit. This
may damage the headlights or cause condensation to build up on the lens.
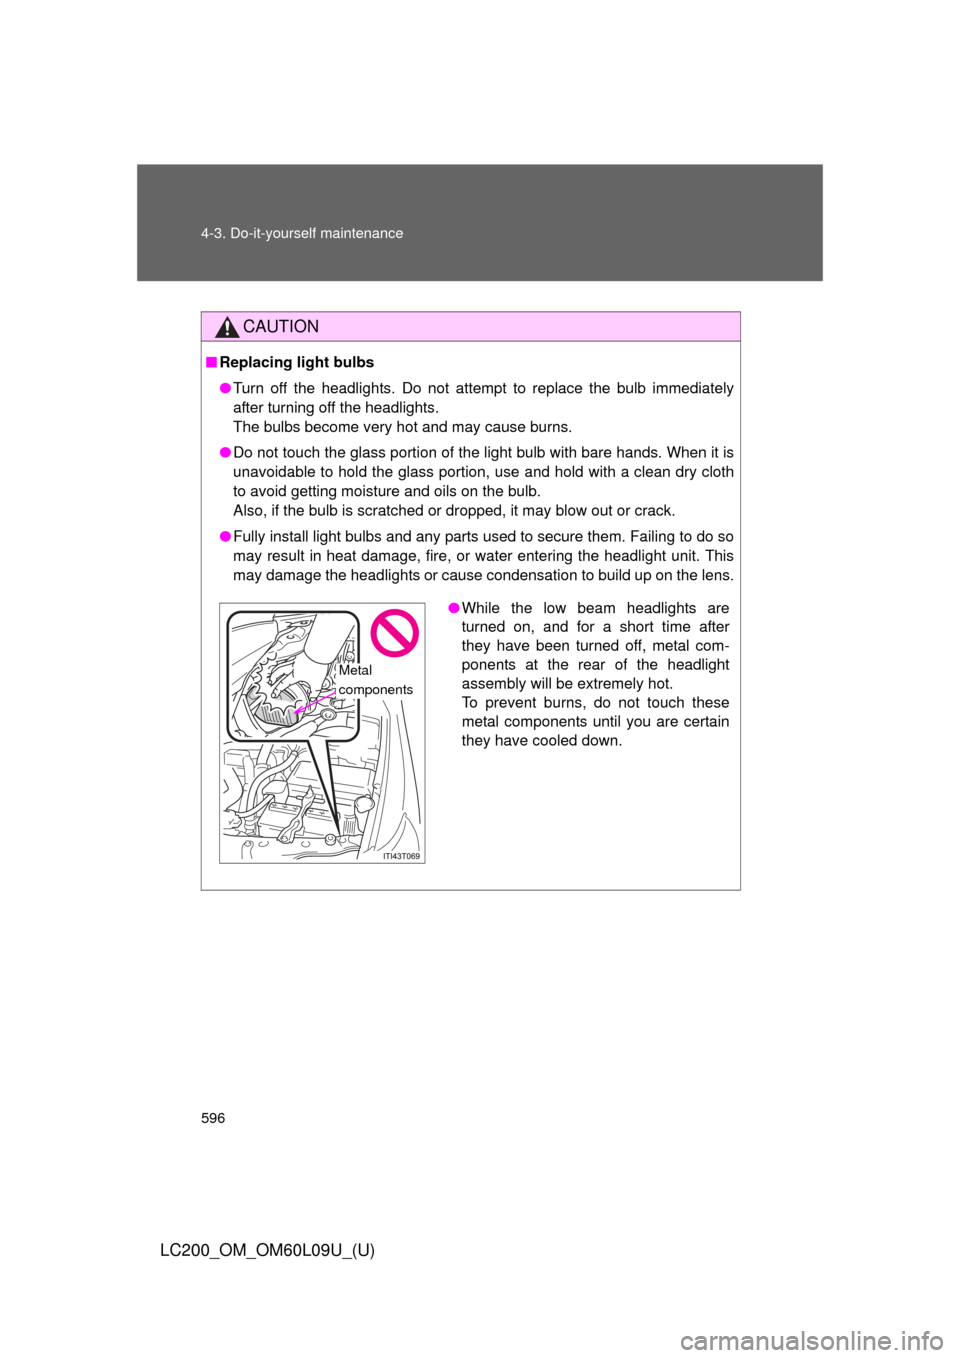
●While the low beam headlights are
turned on, and for a short time after
they have been turned off, metal com-
ponents at the rear of the headlight
assembly will be extremely hot.
To prevent burns, do not touch these
metal components until you are certain
they have cooled down.
Metal
components
Page 601 of 724

5
When trouble arises
601
5-1. Essential information
LC200_OM_OM60L09U_(U)
If your vehicle needs to be towed
Before towingThe following may indicate a problem with your transmission. Contact
your Toyota dealer before towing.
● The engine is running, but the vehicle will not move.
● The vehicle makes an abnormal sound.
Emergency towing
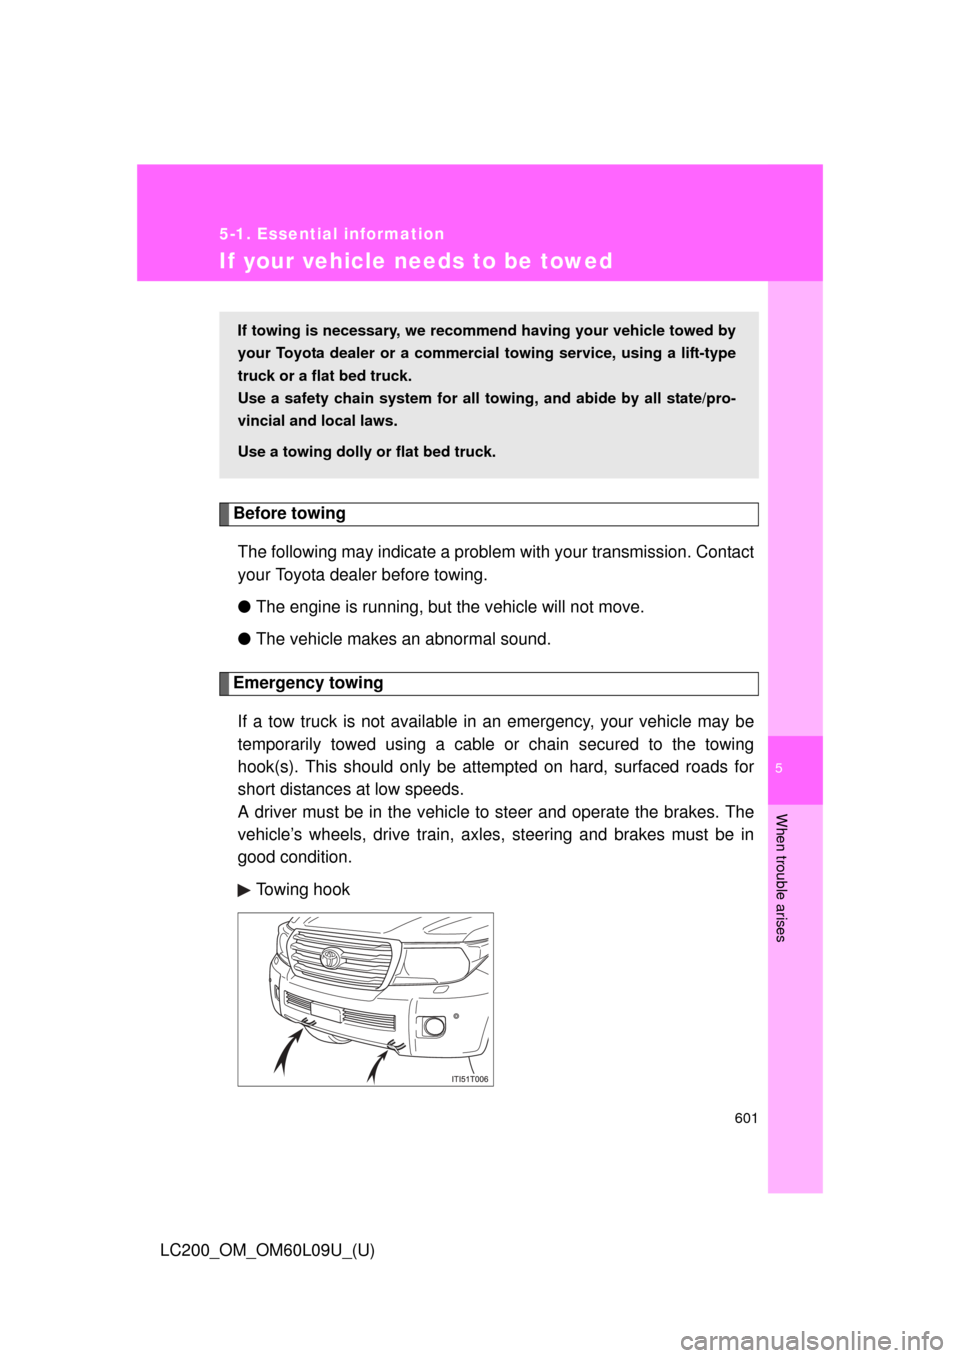
If a tow truck is not available in an emergency, your vehicle may be
temporarily towed using a cable or chain secured to the towing
hook(s). This should only be attempted on hard, surfaced roads for
short distances at low speeds.
A driver must be in the vehicle to steer and operate the brakes. The
vehicle’s wheels, drive train, axles, steering and brakes must be in
good condition.
Towing hook
If towing is necessary, we recommend having your vehicle towed by
your Toyota dealer or a commerci al towing service, using a lift-type
truck or a flat bed truck.
Use a safety chain system for all to wing, and abide by all state/pro-
vincial and local laws.
Use a towing dolly or flat bed truck.
Page 613 of 724

5
When trouble arises
613
5-2. Steps to take in an emergency
LC200_OM_OM60L09U_(U)
■
If the malfunction indicator lamp comes on while driving
First check the following:
● Is the fuel empty?
If it is, fill the fuel tank immediately.
● Is the fuel tank cap loose?
If it is, tighten it securely.
The malfunction indicator lamp will go off after taking several driving trips. If
the malfunction indicator lamp does not go off even after several trips, con-
tact your Toyota dealer as soon as possible.
■ If the low speed four-wheel drive in dicator light or the center differen-
tial lock indicator light blinks
Take the specified steps. ( P. 243)
If the brake system warning light or the malfunction indicator light also
comes on, or the low speed four-wheel drive indicator light or the center dif-
ferential lock indicator light continues to blink after taking the specified steps,
there may be a malfunction in the engine, the brake system or the four-
wheel drive system. In this case, you may not be able to transfer between
“H4” and “L4” modes, and the center differential lock may not be able to be
locked or unlocked. Have the vehicle inspected by your Toyota dealer imme-
diately.
■ Front passenger detection sensor and passenger seat belt reminder
● If luggage is placed on the front passenger seat, the front passenger
detection sensor may cause the warning light to flash, even if a passen-
ger is not sitting in the seat.
● If a cushion is placed on the seat, the sensor may not detect a passen-
ger, and the warning light may not operate properly.
Page 631 of 724
5
When trouble arises
631
5-2. Steps to take in an emergency
LC200_OM_OM60L09U_(U)
Once
(Flashes) • When the doors
were unlocked with
the mechanical
key and then the
“ENGINE START
STOP” switch was
pressed, the elec-
tronic key could
not be detected in
the vehicle.
• The electronic key could not be
detected in the
vehicle even after
the “ENGINE
START STOP”
switch was
pressed two con-
secutive times. Touch the
electronic
key to the
“ENGINE
START
STOP”
switch
while
depressing
the brake
pedal.
Once
The electronic key
has a low battery.Replace
the elec-
tronic key
battery.
(
P. 563)
Interior
buzzerExterior buzzerWarning messageDetailsCorrection procedure
Page 645 of 724
5
When trouble arises
645
5-2. Steps to take in an emergency
LC200_OM_OM60L09U_(U)
Firmly tighten each nut two or
three times in the order shown in
the illustration.
Tightening torque:
97 ft•lbf (131 N•m, 13.4 kgf•m)
Reinstall the wheel ornament.
Stowing the flat/spare tire, jack and tools
Lay down the tire with the outer
side facing up, and install the
holding bracket.
Raise the tire.
Pull the tire towards the rear of the vehicle when raising. After
raising, visually check that tire is not interfering with compo-
nents.
Stow the tools and jack securely, and replace all covers.
STEP4
STEP5
STEP1
STEP2
STEP3