Page 49 of 292
49
2. Bluetooth® SETTINGS
2
BASIC FUNCTION1Display the “Bluetooth* Setup” screen.
(P.46)
2Select the device to be connected.
Supported profile icons will be displayed.
: Phone
: Audio player
: Phone/Entune service
Supported profile icons for currently con-
nected devices will illuminate.
Dimmed icons can be selected to connect
to the phone/audio function directly.
*: Bluetooth is a registered trademark of
Bluetooth SIG, Inc.
CONNECTING A Bluetooth®
DEVICE
Up to 5 Bluetooth® devices (Phones
(HFP) and audio players (AVP)) can be
registered.
If more than 1 Bluetooth
® device has
been registered, select which device to
connect to.
If the desired Bluetooth® device is not
on the list, select “Add” to register the
device. (P.47)
INFORMATION
●It may take time if the device connection
is carried out during Bluetooth® audio
playback.
●Depending on the type of Bluetooth
®
device being connected, it may be nec-
essary to perform additional steps on
the device.
Page 50 of 292

50
2. Bluetooth® SETTINGS
■AUTO CONNECTION MODE
When the engine switch is in ACCES-
SORY or ON mode, the
system searches for a nearby registered
device.
The system will connect with the regis-
tered device that was last connected, if it
is nearby.
■CONNECTING MANUALLY
1Follow the steps in “CONNECTING A
Bluetooth
® DEVICE” from “STEP 2”.
(P.49)
*: Bluetooth is a registered trademark of
Bluetooth SIG, Inc.
■RECONNECTING THE Bluetooth®
PHONE
If a Bluetooth® phone is disconnected on
purpose, such as turning it off, this does
not happen. Reconnect the Bluetooth
®
phone manually.
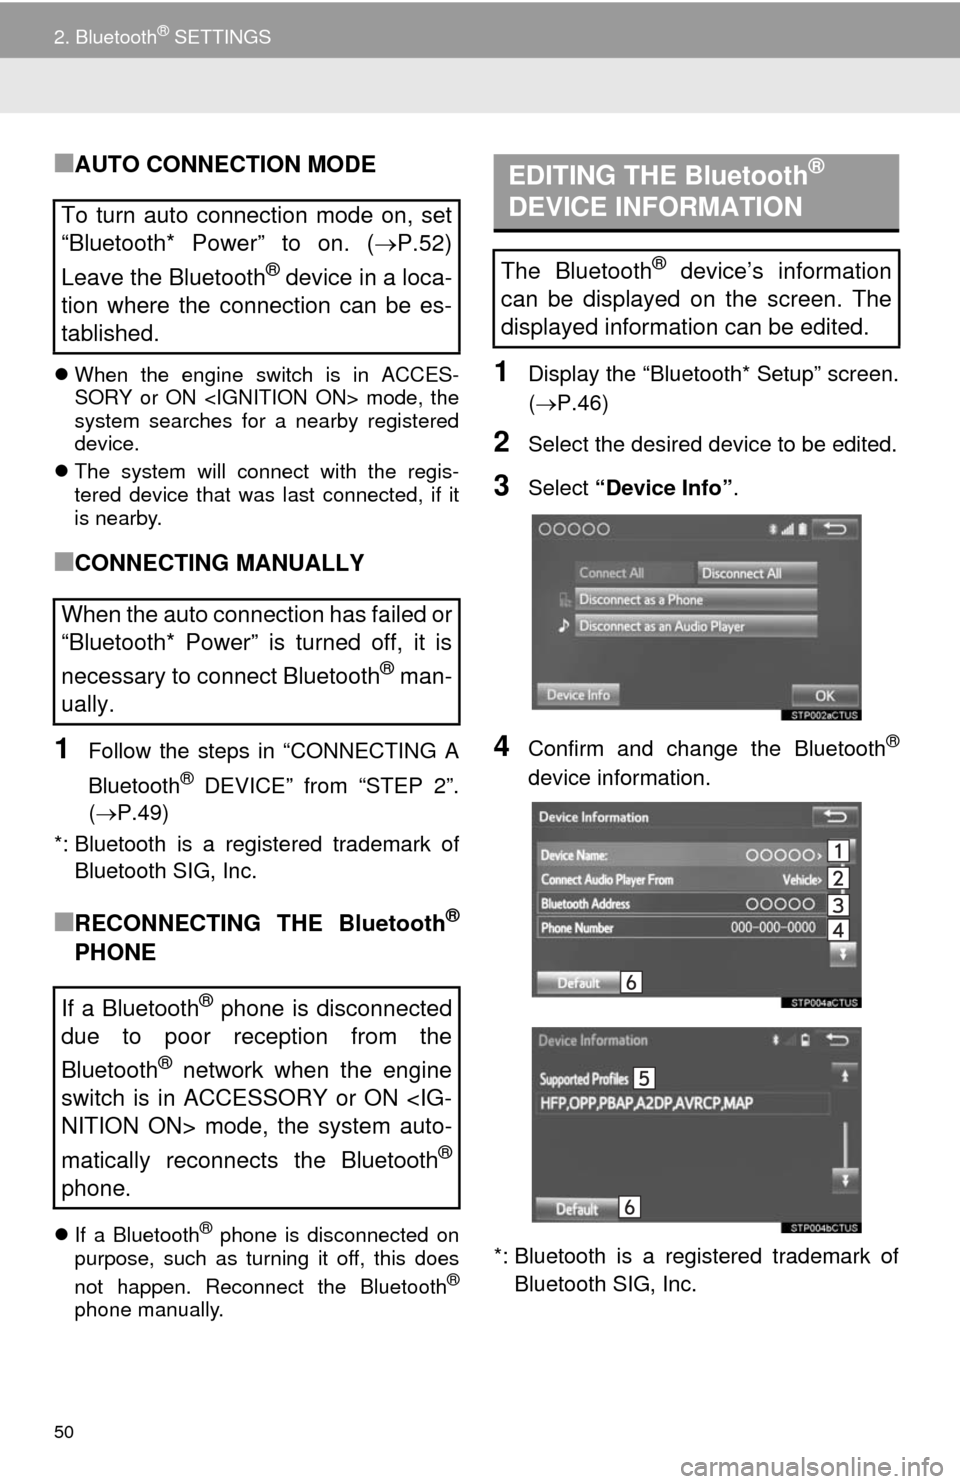
1Display the “Bluetooth* Setup” screen.
(P.46)
2Select the desired device to be edited.
3Select “Device Info”.
4Confirm and change the Bluetooth®
device information.
*: Bluetooth is a registered trademark of
Bluetooth SIG, Inc.
To turn auto connection mode on, set
“Bluetooth* Power” to on. (P.52)
Leave the Bluetooth
® device in a loca-
tion where the connection can be es-
tablished.
When the auto connection has failed or
“Bluetooth* Power” is turned off, it is
necessary to connect Bluetooth
® man-
ually.
If a Bluetooth
® phone is disconnected
due to poor reception from the
Bluetooth
® network when the engine
switch is in ACCESSORY or ON
NITION ON> mode, the system auto-
matically reconnects the Bluetooth
®
phone.
EDITING THE Bluetooth®
DEVICE INFORMATION
The Bluetooth® device’s information
can be displayed on the screen. The
displayed information can be edited.
Page 51 of 292

51
2. Bluetooth® SETTINGS
2
BASIC FUNCTION
1Select “Device Name”.
2Enter the name and select “OK”.
1Select “Connect Audio Player from”.
2Select the desired connection method.
“Vehicle”: Select to connect the audio
system to the audio player.
“Device”: Select to connect the audio
player to the audio system.
Depending on the audio player, the “Vehi-
cle” or “Device” connection method may
be best. As such, refer to the manual that
comes with the audio player.
To reset the connection method, select
“Default”.
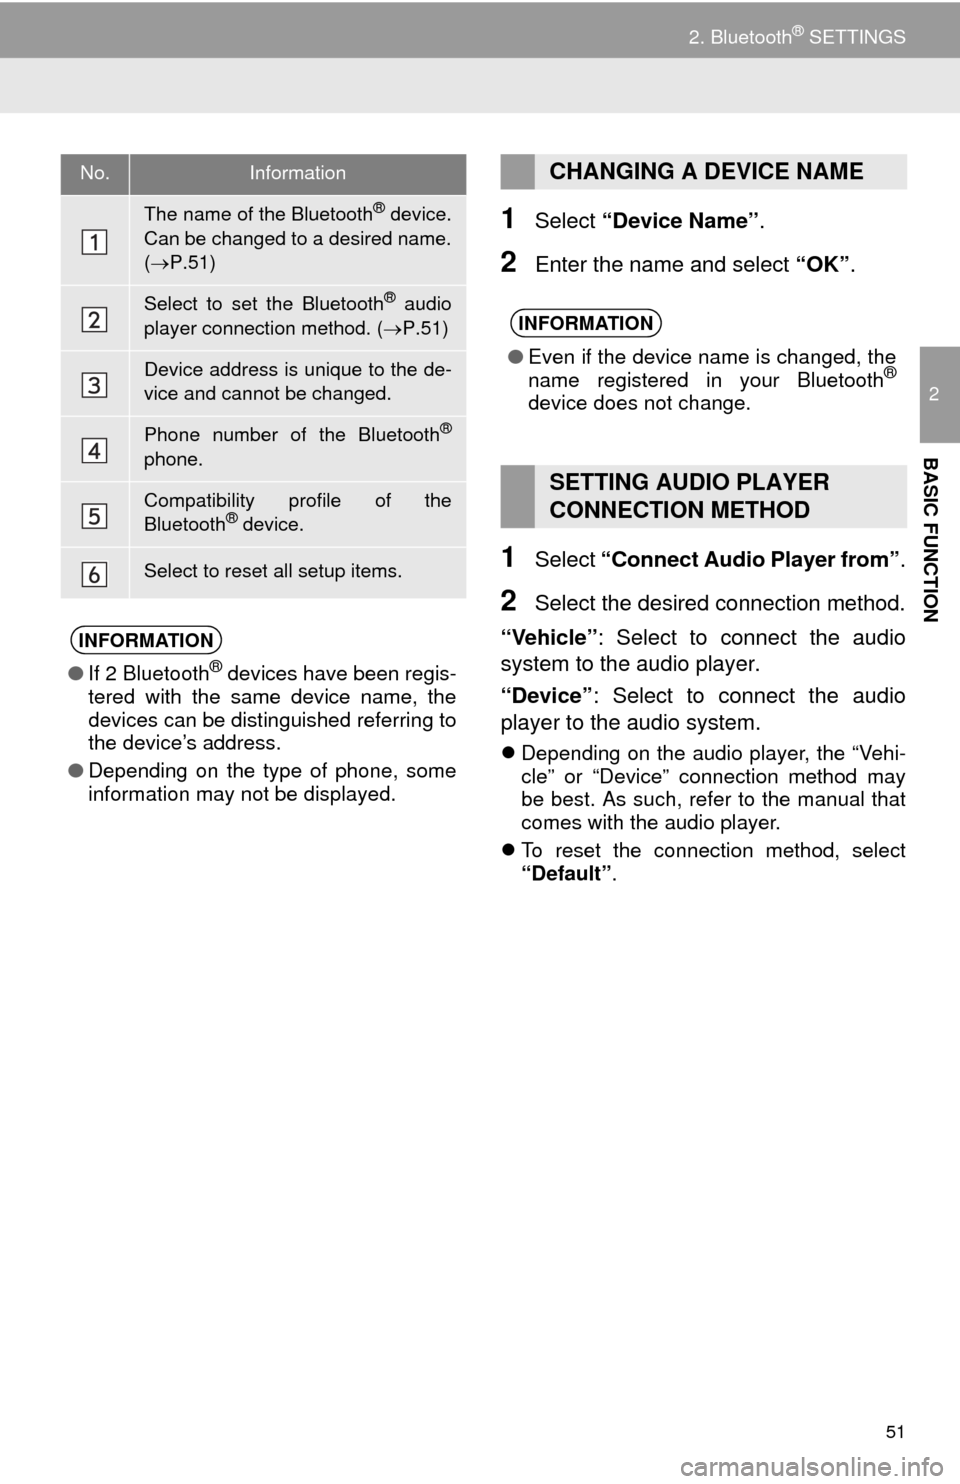
No.Information
The name of the Bluetooth® device.
Can be changed to a desired name.
(P.51)
Select to set the Bluetooth® audio
player connection method. (P.51)
Device address is unique to the de-
vice and cannot be changed.
Phone number of the Bluetooth®
phone.
Compatibility profile of the
Bluetooth® device.
Select to reset all setup items.
INFORMATION
●If 2 Bluetooth® devices have been regis-
tered with the same device name, the
devices can be distinguished referring to
the device’s address.
●Depending on the type of phone, some
information may not be displayed.
CHANGING A DEVICE NAME
INFORMATION
●Even if the device name is changed, the
name registered in your Bluetooth®
device does not change.
SETTING AUDIO PLAYER
CONNECTION METHOD
Page 52 of 292
52
2. Bluetooth® SETTINGS
1Display the “Bluetooth* Setup” screen.
(P.46)
2Select “System Settings”.
3Select the desired item to be set.
*: Bluetooth is a registered trademark of
Bluetooth SIG, Inc.
“Bluetooth* Settings”
SCREEN
The Bluetooth® settings can be con-
firmed and changed.
No.InformationPage
Select to set Bluetooth®
connection on/off.53
Displays system name.
Can be changed to a de-
sired name.
53
PIN-code used when the
Bluetooth® device was reg-
istered. Can be changed to
a desired code.53
Device address is unique
to the device and cannot be
changed.
Select to set the phone
connection status display
on/off.
Select to set the connec-
tion status display of the
audio player on/off.
Compatibility profile of the
system device.
Select to reset all setup
items.
Page 55 of 292

55
3. OTHER SETTINGS
2
BASIC FUNCTION
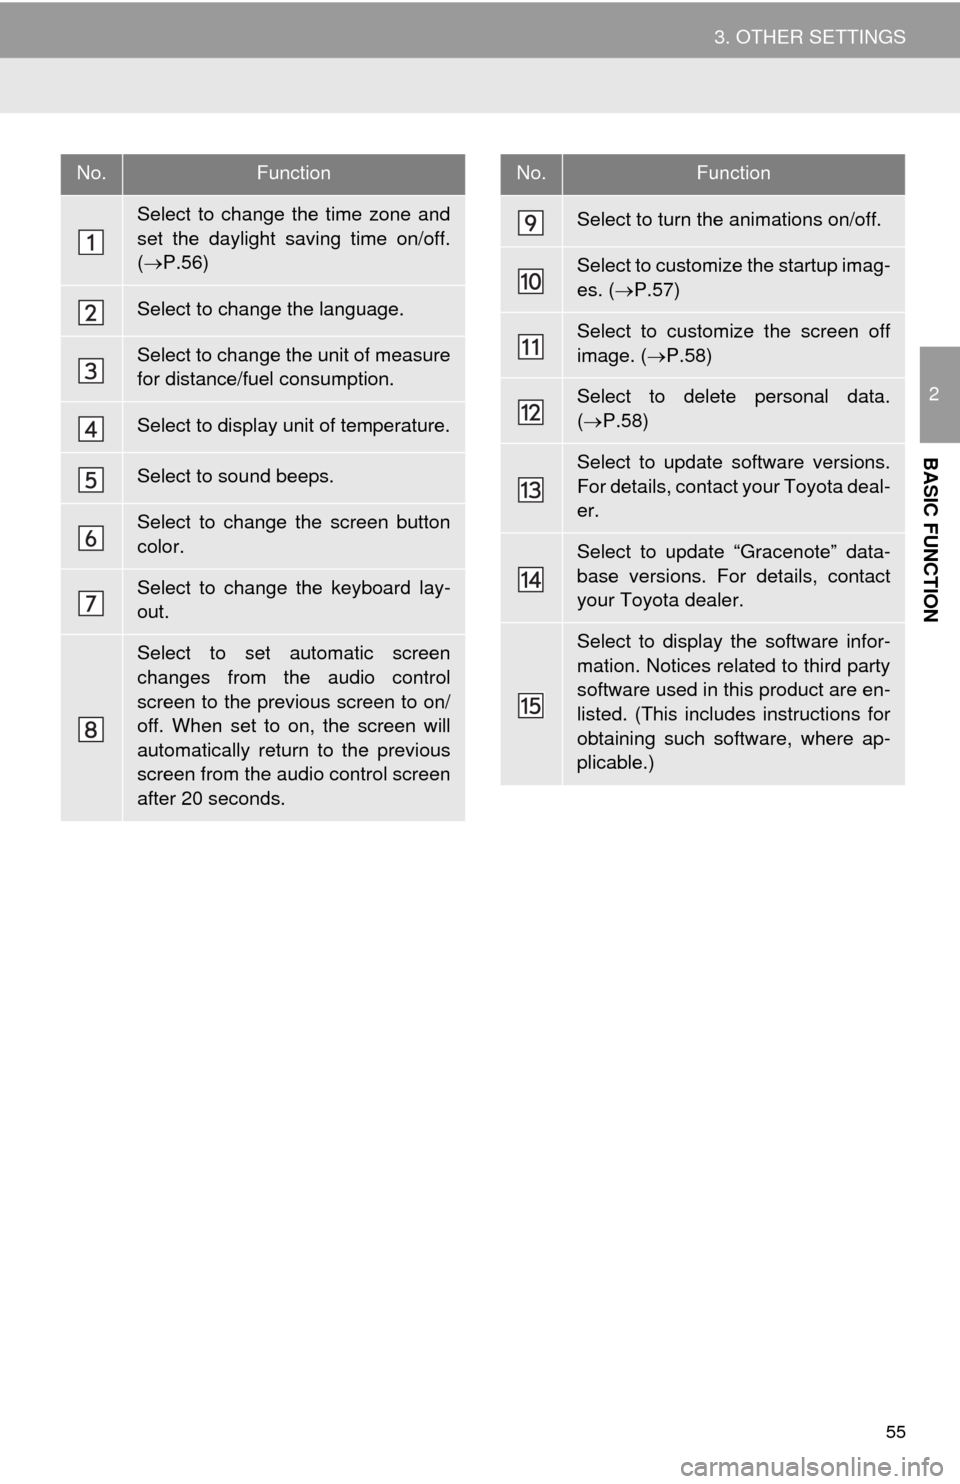
No.Function
Select to change the time zone and
set the daylight saving time on/off.
(P.56)
Select to change the language.
Select to change the unit of measure
for distance/fuel consumption.
Select to display unit of temperature.
Select to sound beeps.
Select to change the screen button
color.
Select to change the keyboard lay-
out.
Select to set automatic screen
changes from the audio control
screen to the previous screen to on/
off. When set to on, the screen will
automatically return to the previous
screen from the audio control screen
after 20 seconds.
Select to turn the animations on/off.
Select to customize the startup imag-
es. (P.57)
Select to customize the screen off
image. (P.58)
Select to delete personal data.
(P.58)
Select to update software versions.
For details, contact your Toyota deal-
er.
Select to update “Gracenote” data-
base versions. For details, contact
your Toyota dealer.
Select to display the software infor-
mation. Notices related to third party
software used in this product are en-
listed. (This includes instructions for
obtaining such software, where ap-
plicable.)
No.Function
Page 56 of 292
56
3. OTHER SETTINGS
1Display the “General Settings” screen.
(P.54)
2Select “System Time”.
3Select the items to be set.
4Select “OK”.
■SETTING THE TIME ZONE
1Select “Time Zone”.
2Select the desired time zone.
SYSTEM TIME SETTINGS
Used for changing time zones and the
on/off settings of daylight saving time.
No.Function
Select to change the time zone.
(P.56)
Select to set daylight saving time on/
off.
Page 57 of 292

57
3. OTHER SETTINGS
2
BASIC FUNCTION
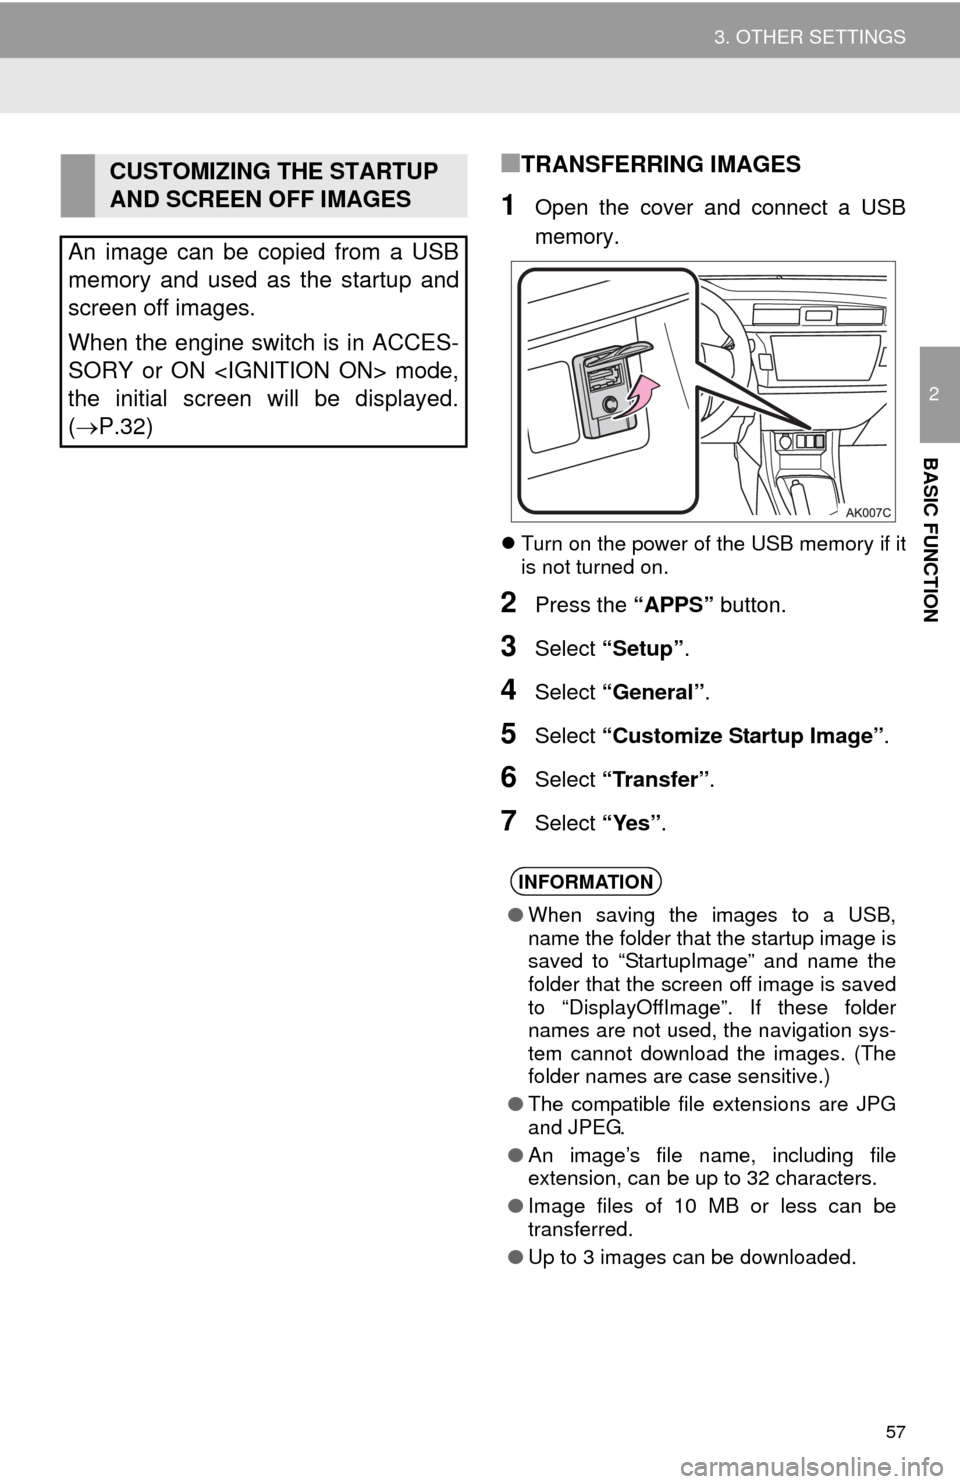
■TRANSFERRING IMAGES
1Open the cover and connect a USB
memory.
Turn on the power of the USB memory if it
is not turned on.
2Press the “APPS” button.
3Select “Setup”.
4Select “General”.
5Select “Customize Startup Image”.
6Select “Transfer”.
7Select “Yes”.
CUSTOMIZING THE STARTUP
AND SCREEN OFF IMAGES
An image can be copied from a USB
memory and used as the startup and
screen off images.
When the engine switch is in ACCES-
SORY or ON mode,
the initial screen will be displayed.
(P.32)
INFORMATION
●When saving the images to a USB,
name the folder that the startup image is
saved to “StartupImage” and name the
folder that the screen off image is saved
to “DisplayOffImage”. If these folder
names are not used, the navigation sys-
tem cannot download the images. (The
folder names are case sensitive.)
●The compatible file extensions are JPG
and JPEG.
●An image’s file name, including file
extension, can be up to 32 characters.
●Image files of 10 MB or less can be
transferred.
●Up to 3 images can be downloaded.
Page 58 of 292
58
3. OTHER SETTINGS
■SETTING THE STARTUP IMAGES
1Display the “General Settings” screen.
(P.54)
2Select “Customize Startup Image”.
3Select the desired image.
4Select “OK”.
■SETTINGS THE SCREEN OFF IM-
AGES
1Display the “General Settings” screen.
(P.54)
2Select “Customize Screen Off Im-
age”.
3Select the desired image.
4Select “OK”.
1Display the “General Settings” screen.
(P.54)
2Select “Delete Personal Data”.
3Select “Delete”.
4Select “Yes” when the confirmation
screen appears.
Registered or changed personal settings
will be deleted or returned to their default
conditions.
For example:
• General settings
• Navigation settings
• Audio settings
• Phone settings
DELETING PERSONAL DATA