Page 52 of 294

52
2. Bluetooth® SETTINGS
1Display the “Bluetooth* Setup” screen.
(P.49)
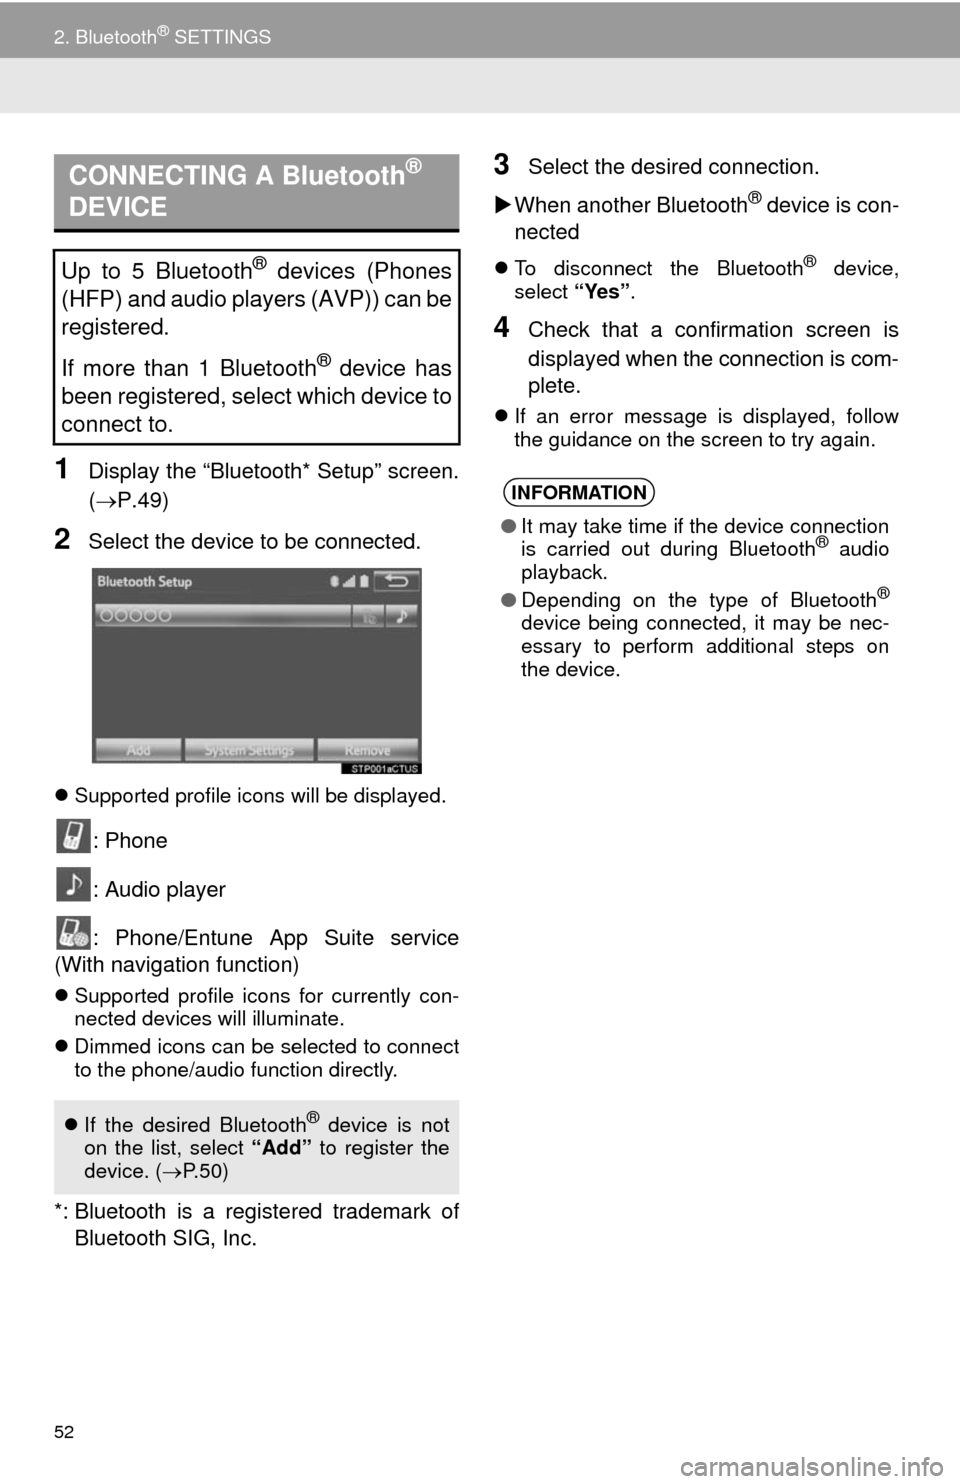
2Select the device to be connected.
Supported profile icons will be displayed.
: Phone
: Audio player
: Phone/Entune App Suite service
(With navigation function)
Supported profile icons for currently con-
nected devices will illuminate.
Dimmed icons can be selected to connect
to the phone/audio function directly.
*: Bluetooth is a registered trademark of
Bluetooth SIG, Inc.
3Select the desired connection.
When another Bluetooth
® device is con-
nected
To disconnect the Bluetooth® device,
select “Yes”.
4Check that a confirmation screen is
displayed when the connection is com-
plete.
If an error message is displayed, follow
the guidance on the screen to try again.
CONNECTING A Bluetooth®
DEVICE
Up to 5 Bluetooth® devices (Phones
(HFP) and audio players (AVP)) can be
registered.
If more than 1 Bluetooth
® device has
been registered, select which device to
connect to.
If the desired Bluetooth® device is not
on the list, select “Add” to register the
device. (P. 5 0 )
INFORMATION
●It may take time if the device connection
is carried out during Bluetooth® audio
playback.
●Depending on the type of Bluetooth
®
device being connected, it may be nec-
essary to perform additional steps on
the device.
Page 54 of 294
54
2. Bluetooth® SETTINGS
1Display the “Bluetooth* Setup” screen.
(P.49)
2Select the desired device to be edited.
3Select “Device Info”.
4Confirm and change the Bluetooth®
device information.
*: Bluetooth is a registered trademark of
Bluetooth SIG, Inc.
EDITING THE Bluetooth®
DEVICE INFORMATION
The Bluetooth® device’s information
can be displayed on the screen. The
displayed information can be edited.
No.Information
The name of the Bluetooth® device.
Can be changed to a desired name.
(P.55)
Select to set the Bluetooth® audio
player connection method. (P.55)
Device address is unique to the de-
vice and cannot be changed.
Phone number of the Bluetooth®
phone.
Compatibility profile of the
Bluetooth® device.
Select to reset all setup items.
INFORMATION
●If 2 Bluetooth® devices have been regis-
tered with the same device name, the
devices can be distinguished referring to
the device’s address.
●Depending on the type of phone, some
information may not be displayed.
Page 55 of 294
55
2. Bluetooth® SETTINGS
2
BASIC FUNCTION
1Select “Device Name”.
2Enter the name and select “OK”.
1Select “Connect Audio Player
From”.
2Select the desired connection method.
“Vehicle”: Select to connect the audio
system to the audio player.
“Device”: Select to connect the audio
player to the audio system.
Depending on the audio player, the “Vehi-
cle” or “Device” connection method may
be best. As such, refer to the manual that
comes with the audio player.
To reset the connection method, select
“Default”.
1Display the “Bluetooth* Setup” screen.
(P.49)
2Select “System Settings”.
3Select the desired item to be set.
*: Bluetooth is a registered trademark of
Bluetooth SIG, Inc.
CHANGING A DEVICE NAME
INFORMATION
●Even if the device name is changed, the
name registered in your Bluetooth®
device does not change.
SETTING AUDIO PLAYER
CONNECTION METHOD
“System Settings” SCREEN
The Bluetooth® settings can be con-
firmed and changed.
Page 56 of 294

56
2. Bluetooth® SETTINGS
1Select “Bluetooth* Power”.
When “Bluetooth* Power” is on:
Vehicles without a smart key system
The Bluetooth
® device is automatically
connected when the engine switch is
turned to the “ACC” or “ON” position.
Vehicles with a smart key system
The Bluetooth
® device is automatically
connected when the “POWER” <“EN-
GINE START STOP”> switch is turned
to ACCESSORY or ON
mode.
When “Bluetooth* Power” is off:
The Bluetooth
® device is disconnected,
and the system will not connect to it next
time.
1Select “Bluetooth* Name”.
2Enter a name and select “OK”.
1Select “Bluetooth* PIN”.
2Enter a PIN-code and select “OK”.
*: Bluetooth is a registered trademark of
Bluetooth SIG, Inc.
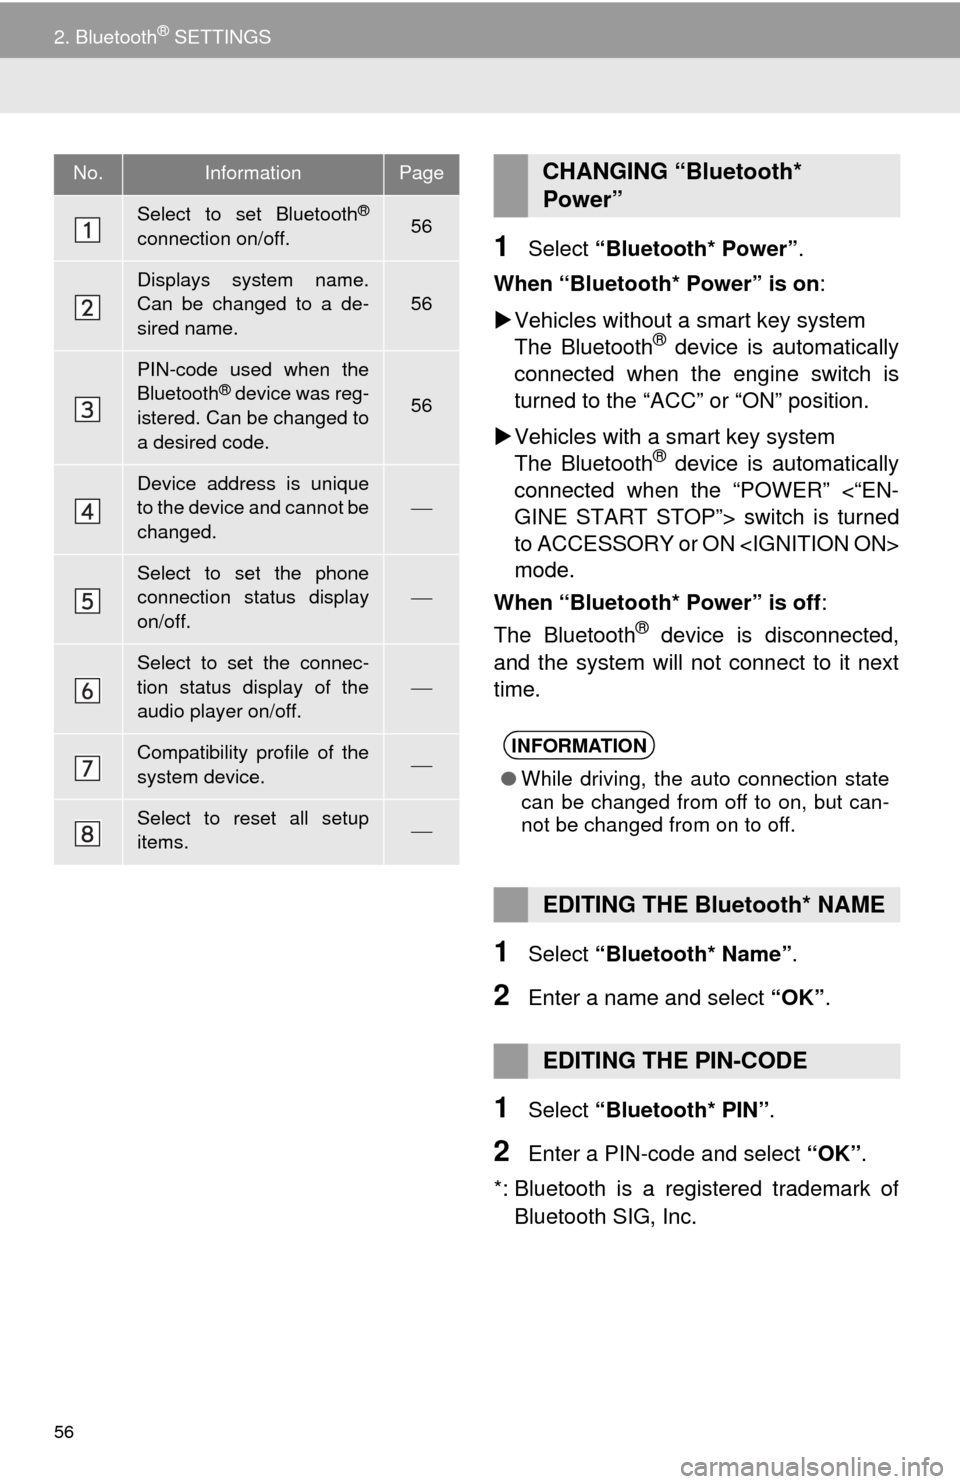
No.InformationPage
Select to set Bluetooth®
connection on/off.56
Displays system name.
Can be changed to a de-
sired name.
56
PIN-code used when the
Bluetooth® device was reg-
istered. Can be changed to
a desired code.56
Device address is unique
to the device and cannot be
changed.
Select to set the phone
connection status display
on/off.
Select to set the connec-
tion status display of the
audio player on/off.
Compatibility profile of the
system device.
Select to reset all setup
items.
CHANGING “Bluetooth*
Power”
INFORMATION
●While driving, the auto connection state
can be changed from off to on, but can-
not be changed from on to off.
EDITING THE Bluetooth* NAME
EDITING THE PIN-CODE
Page 58 of 294

58
3. OTHER SETTINGS
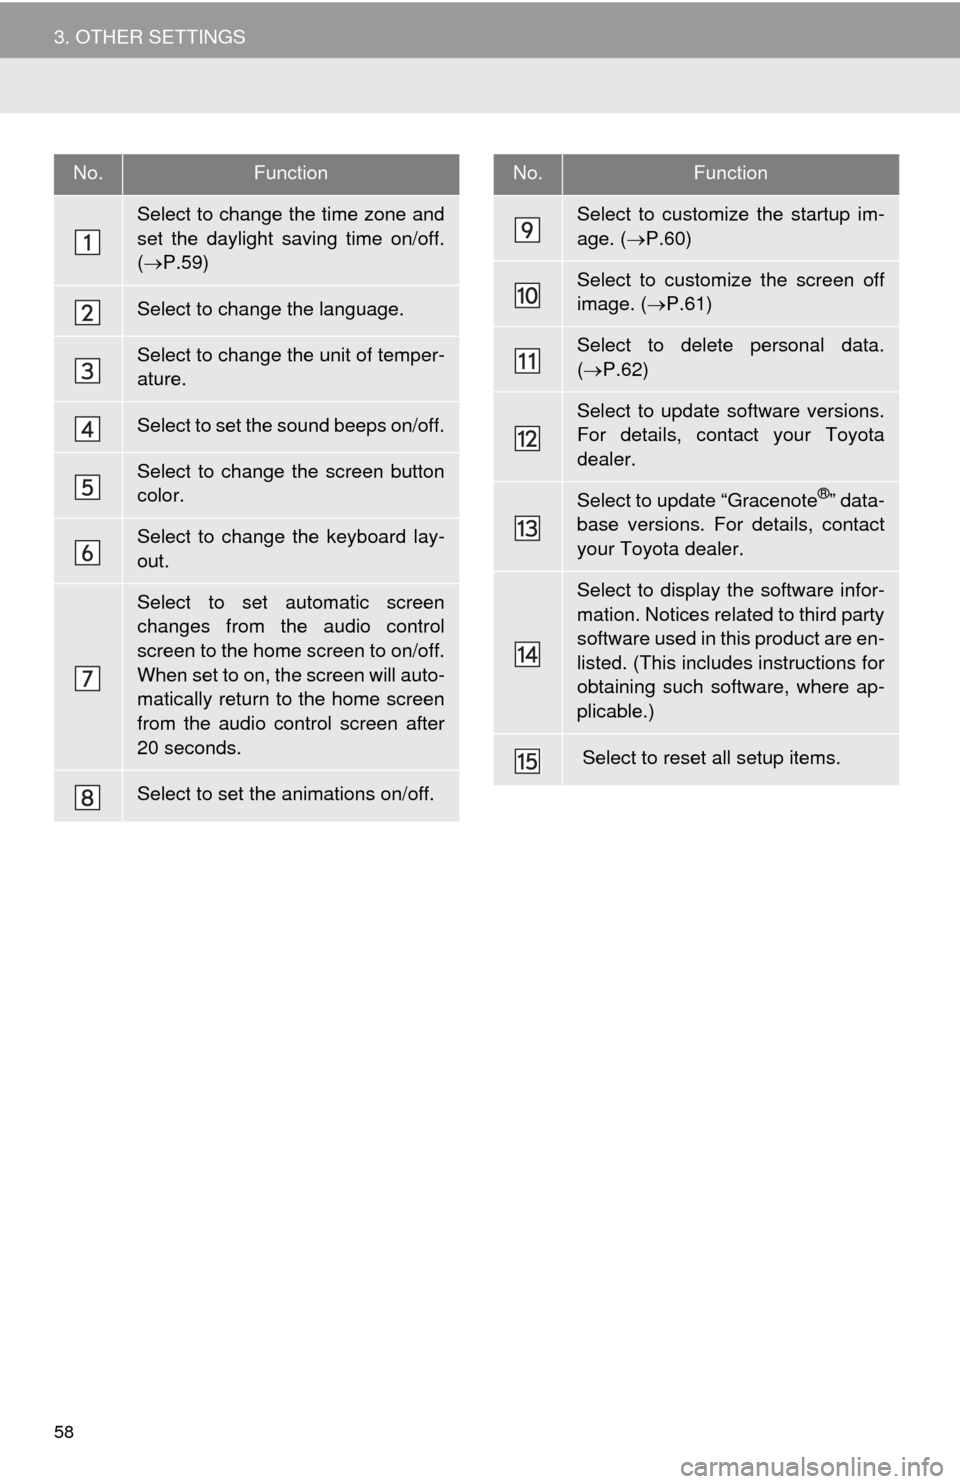
No.Function
Select to change the time zone and
set the daylight saving time on/off.
(P.59)
Select to change the language.
Select to change the unit of temper-
ature.
Select to set the sound beeps on/off.
Select to change the screen button
color.
Select to change the keyboard lay-
out.
Select to set automatic screen
changes from the audio control
screen to the home screen to on/off.
When set to on, the screen will auto-
matically return to the home screen
from the audio control screen after
20 seconds.
Select to set the animations on/off.
Select to customize the startup im-
age. (P.60)
Select to customize the screen off
image. (P.61)
Select to delete personal data.
(P.62)
Select to update software versions.
For details, contact your Toyota
dealer.
Select to update “Gracenote®” data-
base versions. For details, contact
your Toyota dealer.
Select to display the software infor-
mation. Notices related to third party
software used in this product are en-
listed. (This includes instructions for
obtaining such software, where ap-
plicable.)
Select to reset all setup items.
No.Function
Page 59 of 294
59
3. OTHER SETTINGS
2
BASIC FUNCTION
1Display the “General Settings” screen.
(P.57)
2Select “System Time”.
3Select the items to be set.
4Select “OK”.
■SETTING THE TIME ZONE
1Select “Time Zone”.
2Select the desired time zone.
SYSTEM TIME SETTINGS
Used for changing time zones and the
on/off settings of daylight saving time.
No.Function
Select to change the time zone.
(P.59)
Select to set daylight saving time on/
off.
Page 60 of 294
60
3. OTHER SETTINGS
■TRANSFERRING IMAGES
1Press the lid.
2Open the cover and connect a USB
memory.
Turn on the power of the USB memory if it
is not turned on.
3Press the “APPS” button.
4Select “Setup”.
5Select “General”.
6Select “Customize Startup Image” or
“Customize Screen Off Image”.
7Select “Transfer”.
8Select “Yes”.
CUSTOMIZING THE STARTUP
AND SCREEN OFF IMAGES
An image can be copied from a USB
memory and used as the startup and
screen off images.
Vehicles without a smart key system
When the engine switch is in the “ACC”
or “ON” position, the initial screen will
be displayed. (P.32)
Vehicles with a smart key system
When the “POWER” <“ENGINE
START STOP”> switch is in ACCES-
SORY or ON mode,
the initial screen will be displayed.
(P.32)
Page 61 of 294
61
3. OTHER SETTINGS
2
BASIC FUNCTION
■SETTING THE STARTUP IMAGES
1Display the “General Settings” screen.
(P.57)
2Select “Customize Startup Image”.
3Select the desired image.
4Select “OK”.
■SETTINGS THE SCREEN OFF IM-
AGES
1Display the “General Settings” screen.
(P.57)
2Select “Customize Screen Off Im-
age”.
3Select the desired image.
4Select “OK”.
INFORMATION
●When saving the images to a USB,
name the folder that the startup image is
saved to “StartupImage” and name the
folder that the screen off image is saved
to “DisplayOffImage”. If these folder
names are not used, the system cannot
download the images. (The folder
names are case sensitive.)
●The compatible file extensions are JPG
and JPEG.
●Image files of 5 MB or less can be trans-
ferred.
●Up to 3 images can be downloaded.
●Files with non-ASCII filenames can not
be downloaded.