Page 266 of 612
266 3-2. Using the audio system
Adjusting the screen contrast/brightnessSelect “General” or “Camera” on the “Display Settings”
screen.
Adjust the display as desired by selecting “+” or “-”.
Day modeWhen the headlights are turned on, the screen dims.
However, the screen can be switc hed to day mode by selecting “Day
Mode”.
The screen will stay in day mode when the headlights are turned on until
“Day Mode” is selected again.
STEP1
STEP2
Page 360 of 612

360 3-2. Using the audio system
Things you should know■ If you notice any symptoms
If you notice any of the following symptoms, refer to the likely
cause and the solution, and re-check.
If the symptom is not resolved by the solution, have the vehicle
inspected by your Toyota dealer.
Likely causeSolution
The image is difficult to see
• The vehicle is in a dark area
• The temperature around the lens is either high or low
• The outside temperature is low
• There are water droplets on the camera
• It is raining or humid
• Foreign matter (mud etc.) is adhering to the camera
• There are scratches on the cam- era
• Sunlight or headlights are shining directly into the camera
• The vehicle is under fluorescent lights, sodium lights, mercury
lights etc. If this happens due to these causes,
it does not indicate a malfunction.
Back up while visually checking the
vehicle’s surroundings. (Use the
monitor again once conditions have
been improved.)
To adjust the image on the rear view
monitor system screen.
(
P. 265)
The image is blurry
Dirt or foreign matter (such as water
droplets, snow, mud etc.) is adhering
to the camera. Rinse the camera lens with water
and wipe it clean with a soft cloth.
Wash with a mild soap if the dirt is
stubborn.
The image is out of alignment
The camera or surrounding area has
received a strong impact. Have the vehicle inspected by your
Toyota dealer.
Page 472 of 612
472 4-3. Do-it-yourself maintenance
Replacing light bulbs■ Headlights high beam and daytime running lights
Turn the bulb base counterclock-
wise.
Unplug the connector while
depressing the lock release.
■Rear bulb locations
Rear turn signal light
Stop/tail light License plate lightsBack-up light
Rear side marker light
STEP1
STEP2
Page 479 of 612
479
4-3. Do-it-yourself maintenance
4
Maintenance and care
■
Lights other than the above
If any of the lights listed below has burnt out, have it replaced by
your Toyota dealer.
● Headlight low beams (discharge bulb)
● High mounted stoplight
■Discharge headlights (if equipped)
If voltage to the discharge bulbs is insufficient, the bulbs may not come on,
or may go out temporarily. The discharge bulbs will come on when normal
power is restored.
■ LED light bulbs
The high mounted stoplight consists of a number of LEDs. If any of the LEDs
burn out, take your vehicle to your Toyota dealer to have the light replaced.
■ Condensation build-up on th e inside of the lens
Temporary condensation build-up on the inside of the headlight lens does
not indicate a malfunction.
Contact your Toyota dealer for more information in the following situations:
● Large drops of water have built up on the inside of the lens.
● Water has built up inside the headlight.
Page 480 of 612
480 4-3. Do-it-yourself maintenance
■Removing and installing the clips
The luggage trim cover and trunk panel cover clip
The fender liner clip
■ When replacing light bulbs
P. 470
CAUTION
■Replacing light bulbs
●Turn off the lights. Do not attempt to replace the bulb immediately after
turning off the lights.
The bulbs become very hot and may cause burns.
● Do not touch the glass portion of the light bulb with bare hands. When i\
t is
unavoidable to hold the glass portion, use and hold with a clean dry cloth
to avoid getting moisture and oils on the bulb.
Also, if the bulb is scratched or dropped, it may blow out or crack.
● Fully install light bulbs and any parts used to secure them. Failure to do so
may result in heat damage, fire, or water entering the headlight unit. This
may damage the headlights or cause condensation to build up on the lens.
Removing
Installing
Installing
Page 481 of 612

481
4-3. Do-it-yourself maintenance
4
Maintenance and care
CAUTION
■
Discharge headlights (if equipped)
●Contact your Toyota dealer before replacing the discharge headlights
(including light bulbs).
● Do not touch the discharge headlight’s high voltage socket when the head-
lights are turned on.
An extremely high voltage of 30000 V will be discharged and could result
in serious injury or death by electric shock.
● Do not attempt to take apart or repair the low beam discharge headlight
bulbs, connectors, power supply circuits, or related components.
Doing so could result in electric shock and serious injury or death.
■ To prevent damage or fire
Make sure bulbs are fully seated and locked.
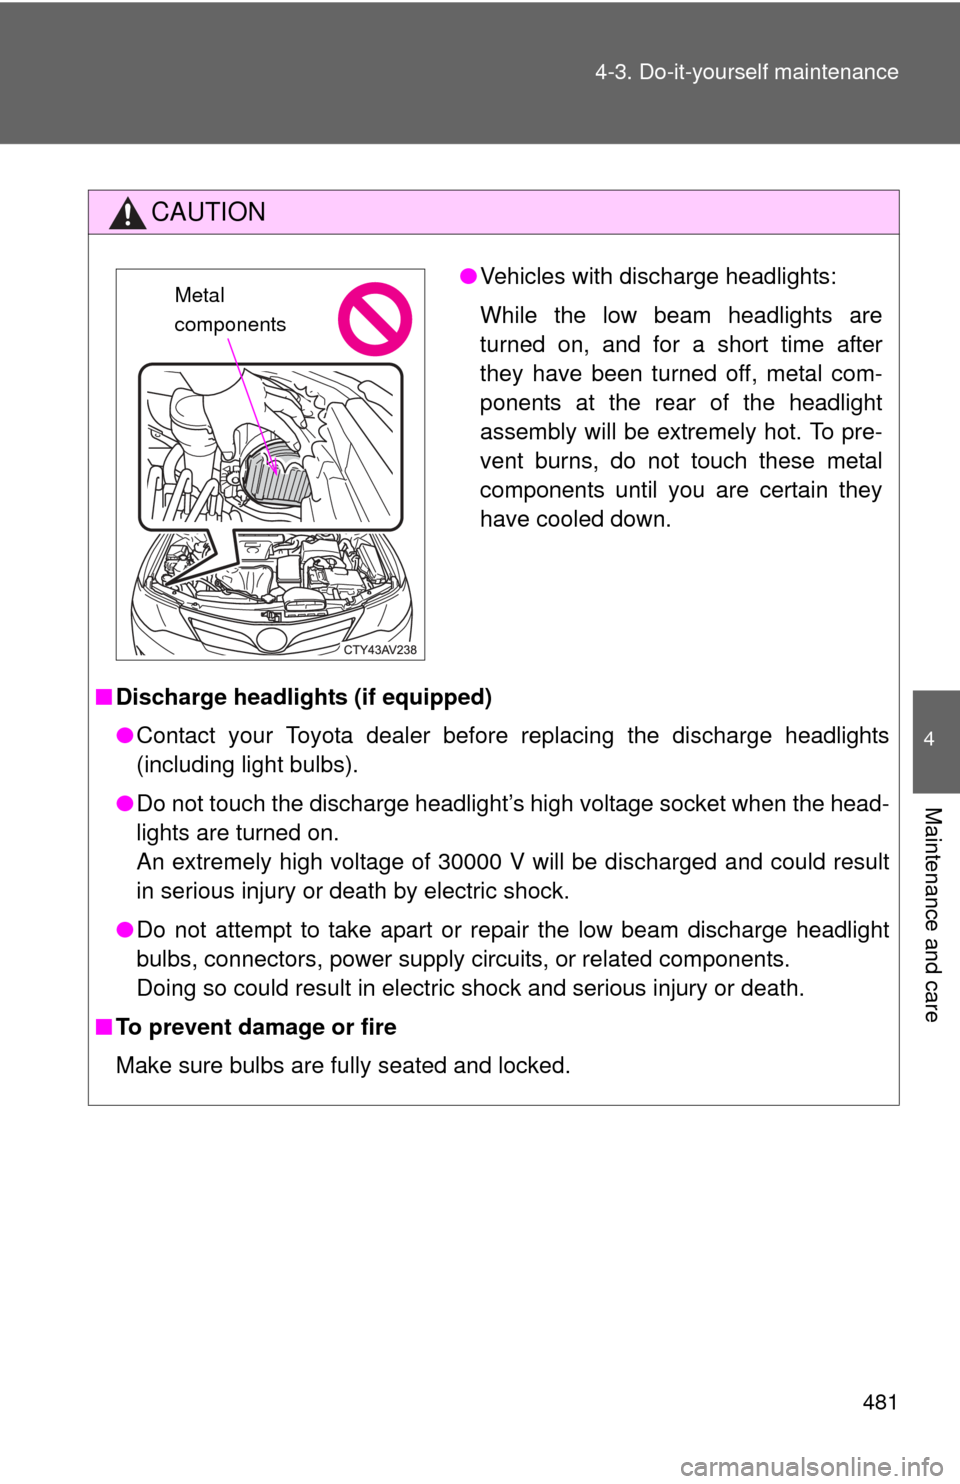
●Vehicles with discharge headlights:
While the low beam headlights are
turned on, and for a short time after
they have been turned off, metal com-
ponents at the rear of the headlight
assembly will be extremely hot. To pre-
vent burns, do not touch these metal
components until you are certain they
have cooled down.Metal
components
Page 531 of 612

5
When trouble arises
531
5-2. Steps to take in an emergency
If the hybrid system will not start
Reasons for the hybrid system not starting vary depending on the
situation. Check the following and perform the appropriate proce-
dure:
■ The hybrid system will not start even though the correct
starting procedure is being followed. ( P. 157)
One of the following may be the cause of the problem:
● The electronic key may not be functioning properly. ( P. 536)
● There may not be sufficient fuel in the vehicle’s tank.
Refuel the vehicle.
● There may be a malfunction in the immobilizer system.
( P. 106)
● There may be a malfunction in the steering lock system.
● The hybrid system may be malfun ctioning due to an electrical
problem such as an open circuit or a blown fuse. However,
depending on the type of malf unction, an interim measure is
available to start the hybrid system. ( P. 532)
■ The interior lights and headlights are dim, or the horn does
not sound or sounds at a low volume.
One of the following may be the cause of the problem:
●The 12-volt battery may be discharged. ( P. 538)
● The 12-volt battery terminal c onnections may be loose or cor-
roded.
Page 532 of 612
532 5-2. Steps to take in an emergency
Emergency start functionWhen the hybrid system does not start, the following steps can be
used as an interim measure to start the hybrid system if the
“POWER” switch is functioning normally: Set the parking brake.
Shift the shift lever to P.
Turn the “POWER” switch to ACCESSORY mode.
Press and hold the “POWER” switch for about 15 seconds
while depressing the brake pedal firmly.
Even if the hybrid system can be started using the above steps, the
system may be malfunctioning. Have the vehicle inspected by your
Toyota dealer.
■ The interior lights and headlights do not turn on, or the horn
does not sound.
One of the following may be the cause of the problem:
●One or both of the 12-volt ba ttery terminals may be discon-
nected.
● The 12-volt battery may be discharged. ( P. 538)
Contact your Toyota dealer if the problem cannot be repaired, or if
repair procedures are unknown.
STEP1
STEP2
STEP3
STEP4