2014 TOYOTA AVALON ECO mode
[x] Cancel search: ECO modePage 11 of 346
11
1. NAVIGATION OPERATION
1
BASIC FUNCTION
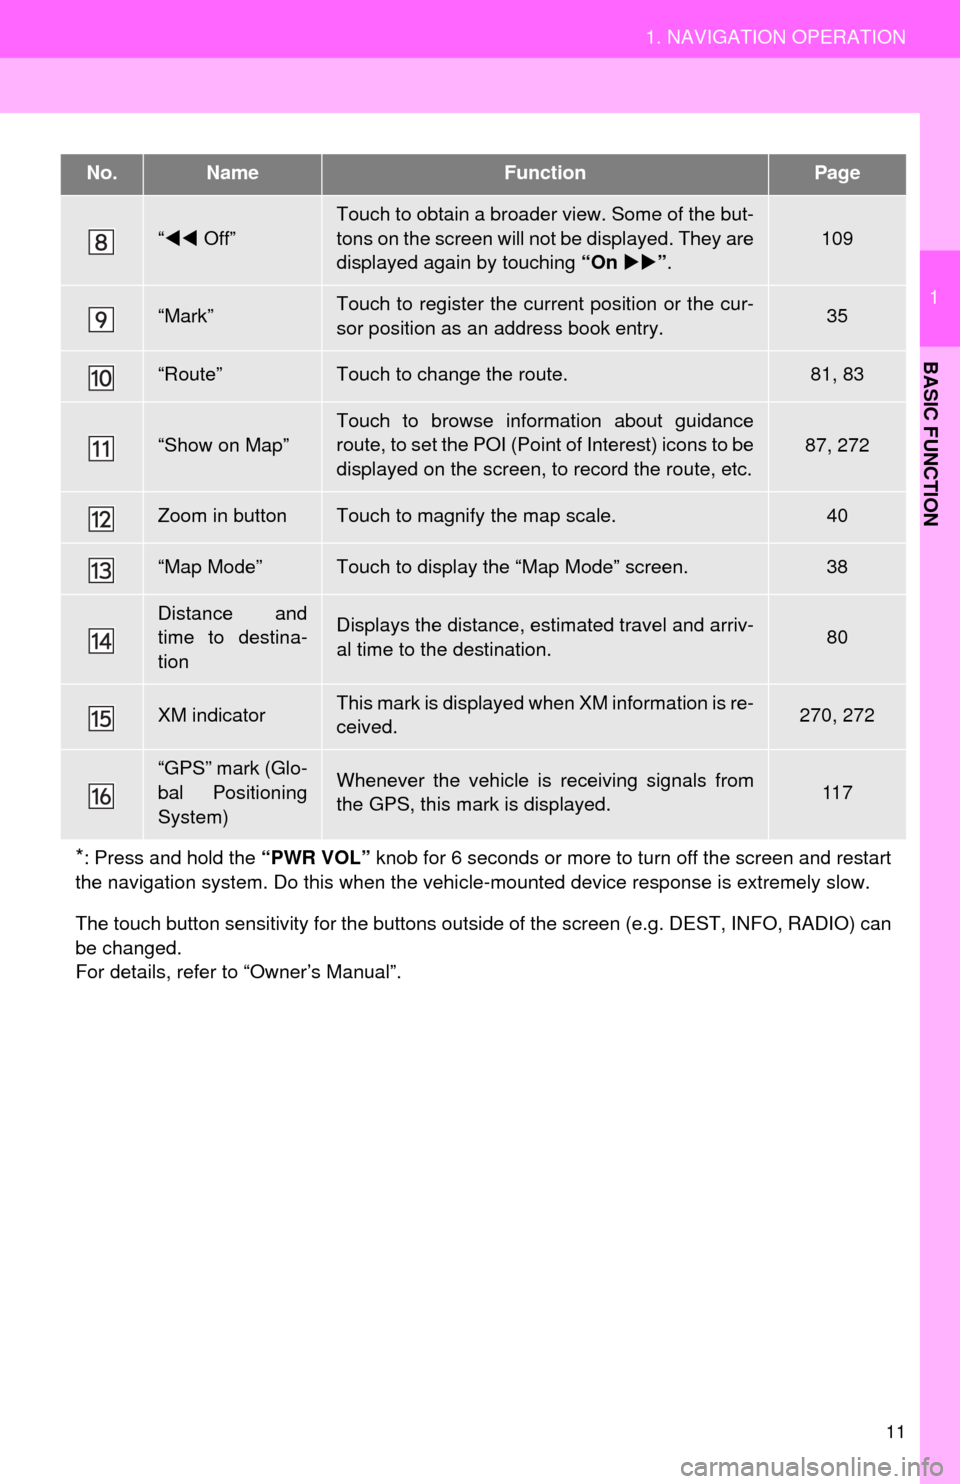
“ Off”
Touch to obtain a broader view. Some of the but-
tons on the screen will not be displayed. They are
displayed again by touching “On ”.
109
“Mark”Touch to register the current position or the cur-
sor position as an address book entry.35
“Route”Touch to change the route.81, 83
“Show on Map”Touch to browse information about guidance
route, to set the POI (Point of Interest) icons to be
displayed on the screen, to record the route, etc.87, 272
Zoom in buttonTouch to magnify the map scale.40
“Map Mode”Touch to display the “Map Mode” screen.38
Distance and
time to destina-
tionDisplays the distance, estimated travel and arriv-
al time to the destination.80
XM indicatorThis mark is displayed when XM information is re-
ceived.270, 272
“GPS” mark (Glo-
bal Positioning
System)Whenever the vehicle is receiving signals from
the GPS, this mark is displayed.11 7
*: Press and hold the “PWR VOL” knob for 6 seconds or more to turn off the screen and restart
the navigation system. Do this when the vehi cle-mounted device response is extremely slow.
The touch button sensitivity for the buttons outsi de of the screen (e.g. DEST, INFO, RADIO) can
be changed.
For details, refer to “Owner’s Manual”.
No.NameFunctionPage
Page 28 of 346
28
1. BASIC INFORMATION BEFORE OPERATION
1. INITIAL SCREEN
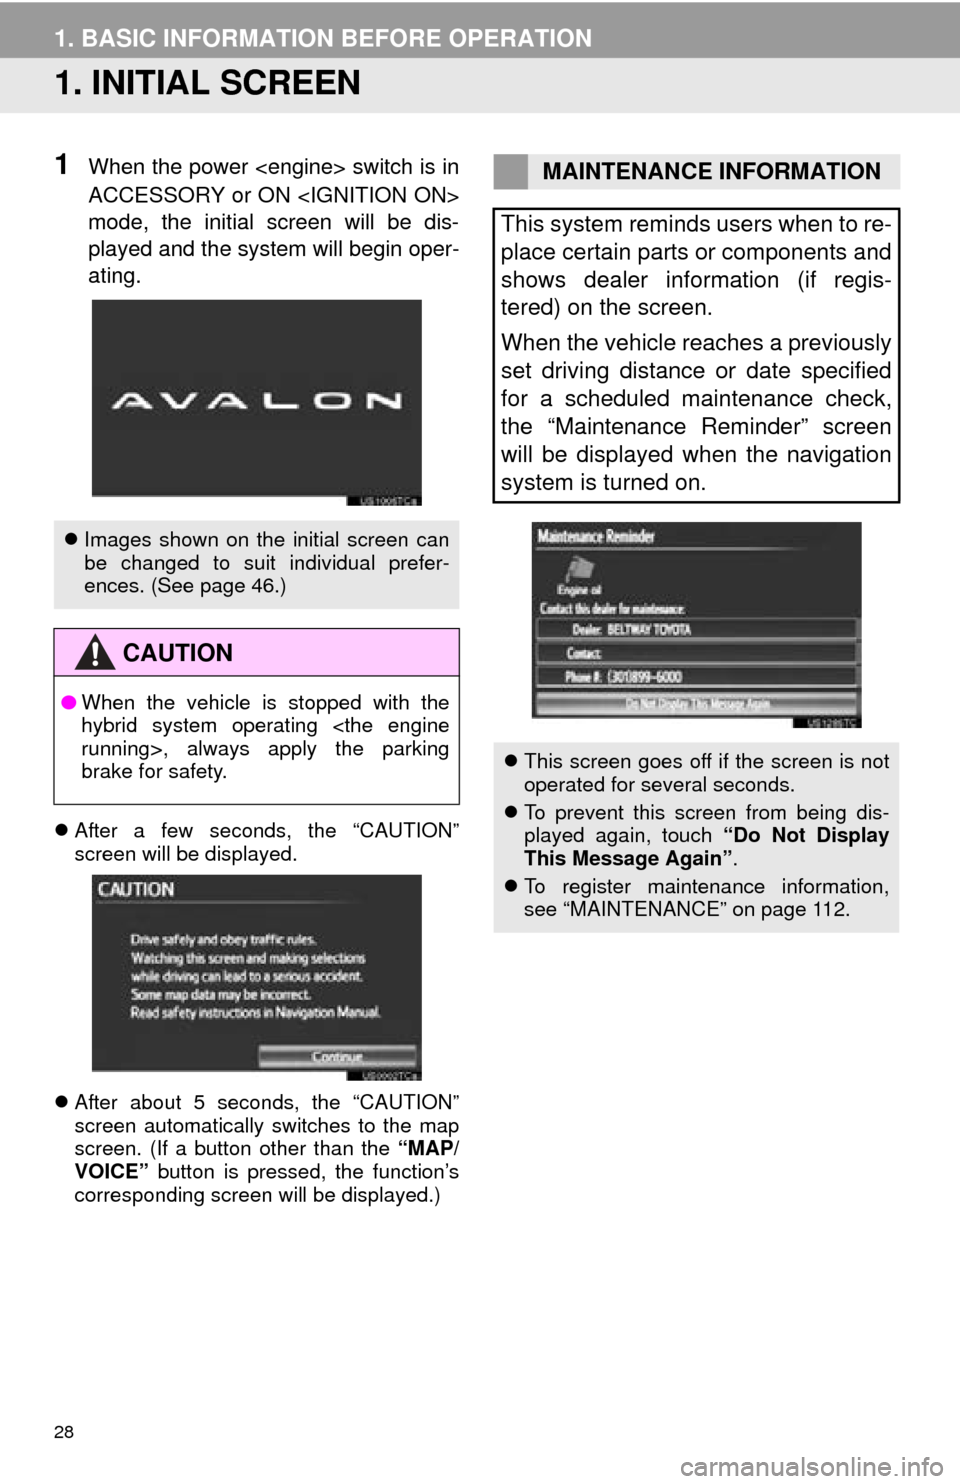
1When the power
ACCESSORY or ON
mode, the initial screen will be dis-
played and the system will begin oper-
ating.
After a few seconds, the “CAUTION”
screen will be displayed.
After about 5 seconds, the “CAUTION”
screen automatically switches to the map
screen. (If a button other than the “MAP/
VOICE” button is pressed, the function’s
corresponding screen will be displayed.)
Images shown on the initial screen can
be changed to suit individual prefer-
ences. (See page 46.)
CAUTION
●When the vehicle is stopped with the
hybrid system operating
>, always apply the parking
brake for safety.
MAINTENANCE INFORMATION
This system reminds users when to re-
place certain parts or components and
shows dealer information (if regis-
tered) on the screen.
When the vehicle reaches a previously
set driving distance or date specified
for a scheduled maintenance check,
the “Maintenance Reminder” screen
will be displayed when the navigation
system is turned on.
This screen goes off if the screen is not
operated for several seconds.
To prevent this screen from being dis-
played again, touch “Do Not Display
This Message Again” .
To register maintenance information,
see “MAINTENANCE” on page 112.
Page 39 of 346
39
1. BASIC INFORMATION BEFORE OPERATION
2
BASIC FUNCTION
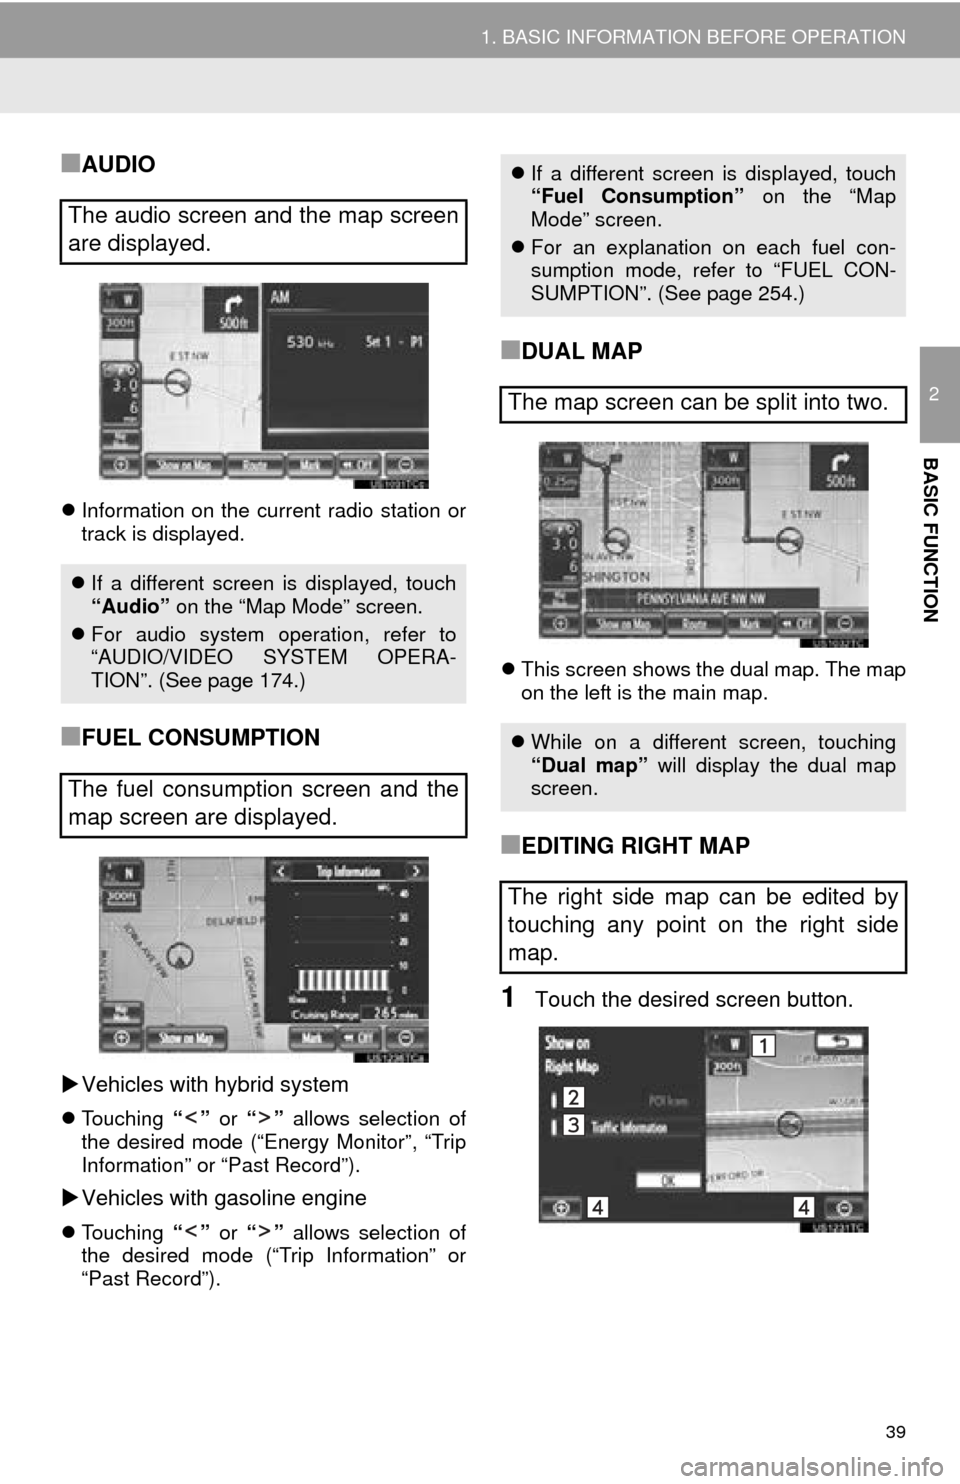
■AUDIO
Information on the current radio station or
track is displayed.
■FUEL CONSUMPTION
Vehicles with hybrid system
Touching “” or “” allows selection of
the desired mode (“Energy Monitor”, “Trip
Information” or “Past Record”).
Vehicles with gasoline engine
Touching “” or “” allows selection of
the desired mode (“Trip Information” or
“Past Record”).
■DUAL MAP
This screen shows the dual map. The map
on the left is the main map.
■EDITING RIGHT MAP
1Touch the desired screen button.
The audio screen and the map screen
are displayed.
If a different screen is displayed, touch
“Audio” on the “Map Mode” screen.
For audio system operation, refer to
“AUDIO/VIDEO SYSTEM OPERA-
TION”. (See page 174.)
The fuel consumption screen and the
map screen are displayed.
If a different screen is displayed, touch
“Fuel Consumption” on the “Map
Mode” screen.
For an explanation on each fuel con-
sumption mode, refer to “FUEL CON-
SUMPTION”. (See page 254.)
The map screen can be split into two.
While on a different screen, touching
“Dual map” will display the dual map
screen.
The right side map can be edited by
touching any point on the right side
map.
Page 71 of 346
71
1. DESTINATION SEARCH
3
NAVIGATION SYSTEM
2. STARTING ROUTE GUIDANCE
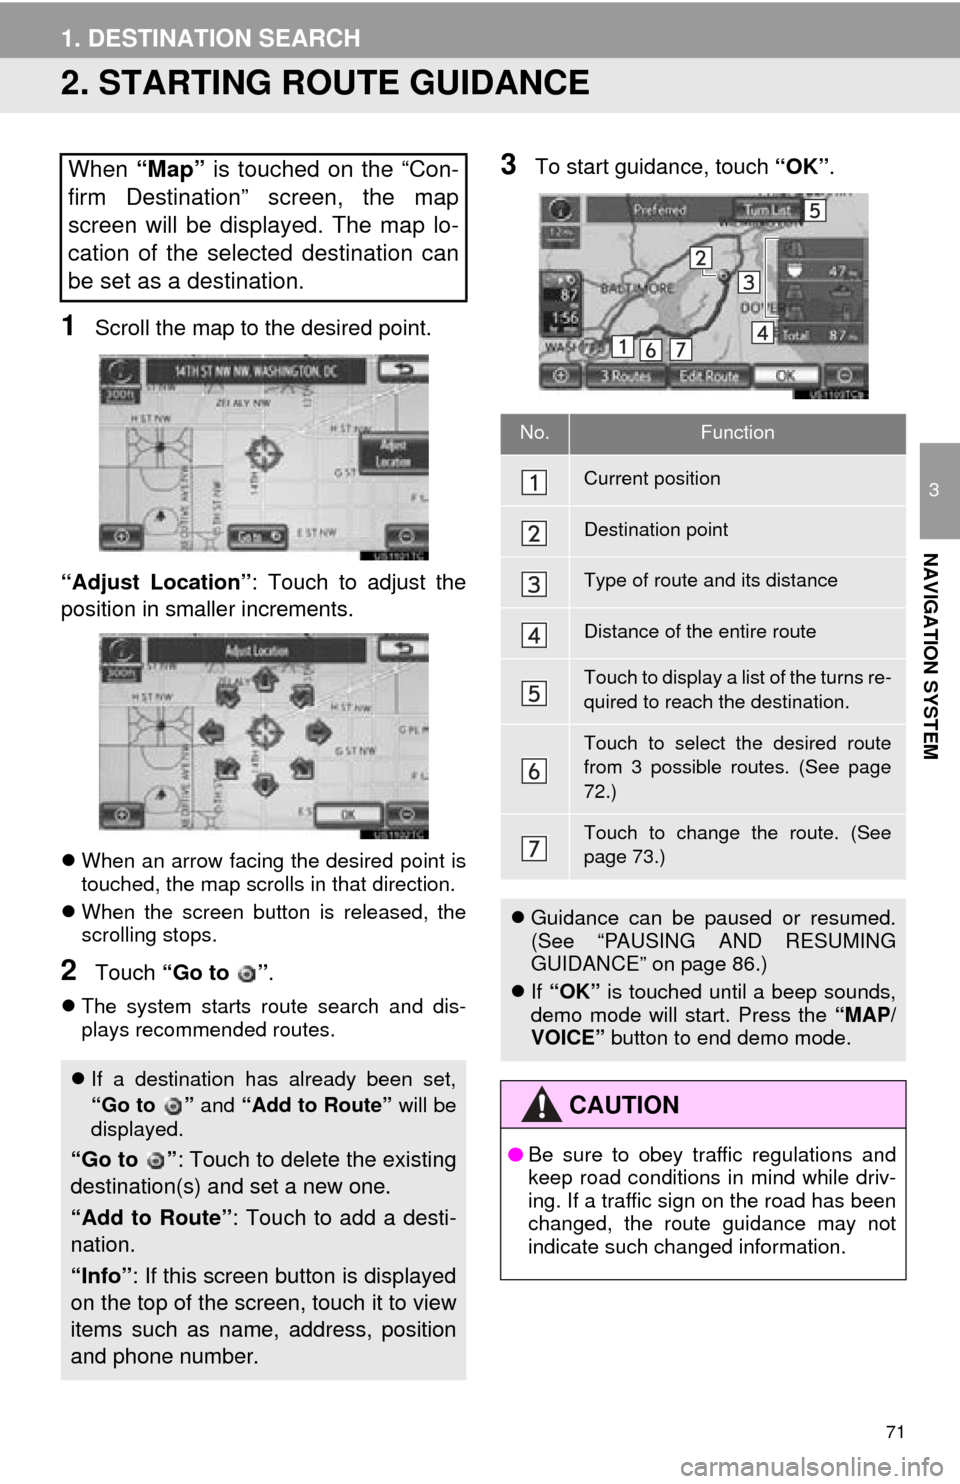
1Scroll the map to the desired point.
“Adjust Location” : Touch to adjust the
position in smaller increments.
When an arrow facing the desired point is
touched, the map scrolls in that direction.
When the screen button is released, the
scrolling stops.
2Touch “Go to ” .
The system starts route search and dis-
plays recommended routes.
3To start guidance, touch “OK”.When “Map” is touched on the “Con-
firm Destination” screen, the map
screen will be displayed. The map lo-
cation of the selected destination can
be set as a destination.
If a destination has already been set,
“Go to ” and “Add to Route” will be
displayed.
“Go to ” : Touch to delete the existing
destination(s) and set a new one.
“Add to Route” : Touch to add a desti-
nation.
“Info” : If this screen button is displayed
on the top of the scree n, touch it to view
items such as name , address, position
and phone number.
No.Function
Current position
Destination point
Type of route and its distance
Distance of the entire route
Touch to display a list of the turns re-
quired to reach the destination.
Touch to select the desired route
from 3 possible routes. (See page
72.)
Touch to change the route. (See
page 73.)
Guidance can be paused or resumed.
(See “PAUSING AND RESUMING
GUIDANCE” on page 86.)
If “OK” is touched until a beep sounds,
demo mode will start. Press the “MAP/
VOICE” button to end demo mode.
CAUTION
●Be sure to obey traffic regulations and
keep road conditions in mind while driv-
ing. If a traffic sign on the road has been
changed, the route guidance may not
indicate such changed information.
Page 130 of 346

130
1. PHONE OPERATION
5When the connection is completed,
this screen is displayed.
Now you can use the Bluetooth® phone.
When a phone is connected while
Bluetooth® audio is playing
This screen is displayed, and the
Bluetooth® audio will stop temporarily.
If a Bluetooth
® phone is disconnected on
purpose, such as turning it off, this does
not happen. Reconnect the Bluetooth
®
phone manually.
RECONNECTING THE
Bluetooth® PHONE
If a Bluetooth® phone is disconnected
due to poor reception from the
Bluetooth
® network when the power
ON
system automatically reconnects the
Bluetooth
® phone. When “Display
Phone Status” is set to “On”, the
connection status is displayed.
Page 180 of 346
180
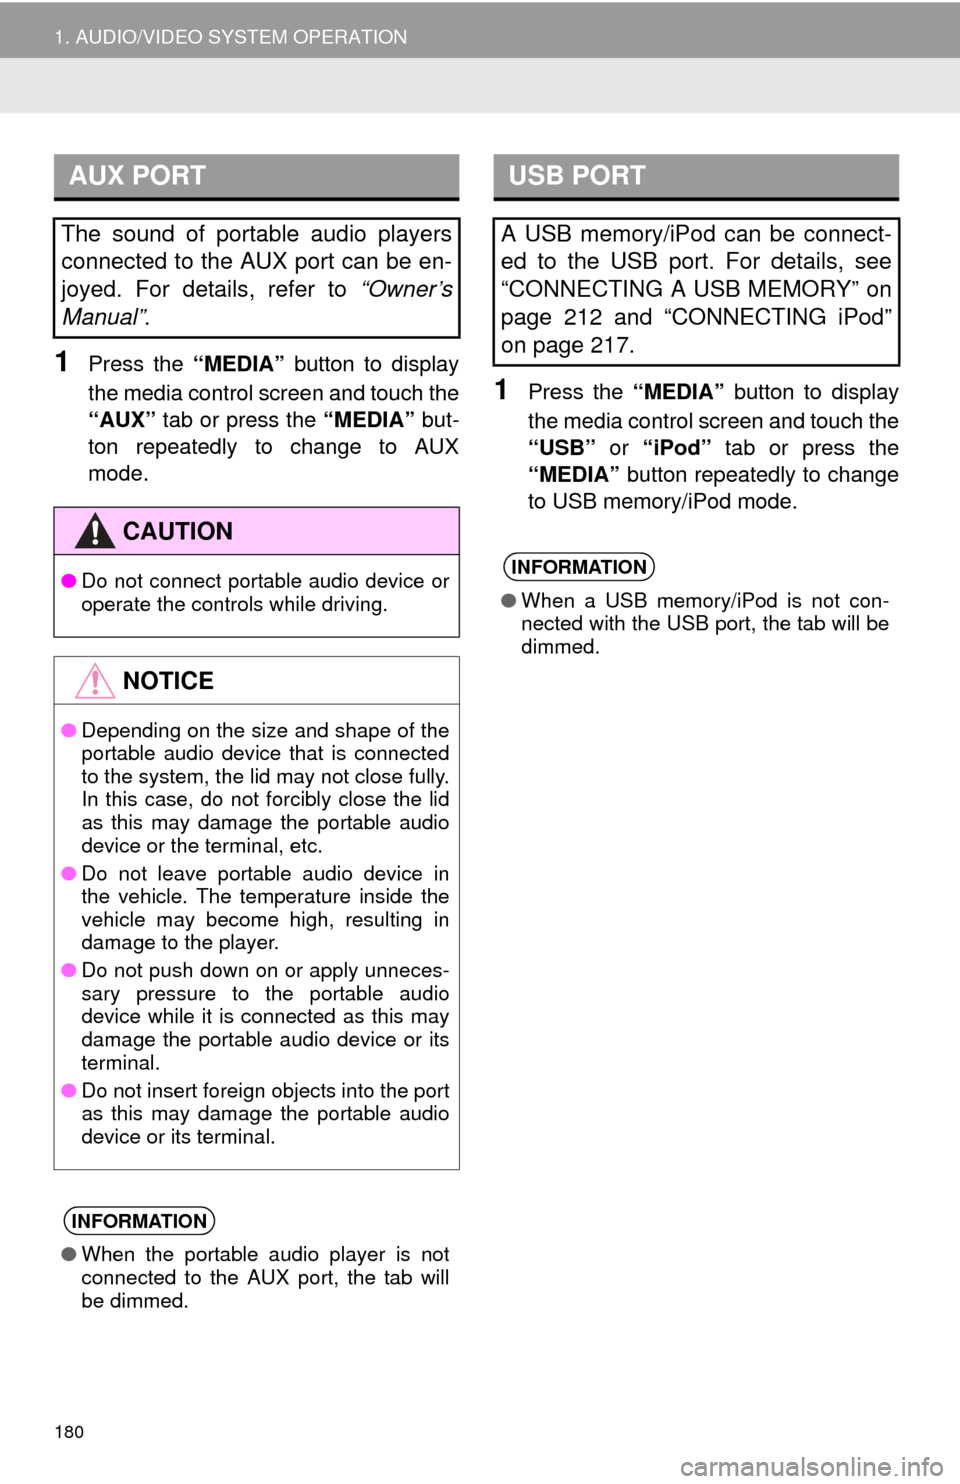
1. AUDIO/VIDEO SYSTEM OPERATION
1Press the “MEDIA” button to display
the media control screen and touch the
“AUX” tab or press the “MEDIA” but-
ton repeatedly to change to AUX
mode.
1Press the “MEDIA” button to display
the media control screen and touch the
“USB” or “iPod” tab or press the
“MEDIA” button repeatedly to change
to USB memory/iPod mode.
AUX PORT
The sound of portable audio players
connected to the AUX port can be en-
joyed. For details, refer to “Owner’s
Manual” .
CAUTION
●Do not connect portable audio device or
operate the controls while driving.
NOTICE
●Depending on the size and shape of the
portable audio device that is connected
to the system, the lid may not close fully.
In this case, do not forcibly close the lid
as this may damage the portable audio
device or the terminal, etc.
● Do not leave portable audio device in
the vehicle. The temperature inside the
vehicle may become high, resulting in
damage to the player.
● Do not push down on or apply unneces-
sary pressure to the portable audio
device while it is connected as this may
damage the portable audio device or its
terminal.
● Do not insert foreign objects into the port
as this may damage the portable audio
device or its terminal.
INFORMATION
●When the portable audio player is not
connected to the AUX port, the tab will
be dimmed.
USB PORT
A USB memory/iPod can be connect-
ed to the USB port. For details, see
“CONNECTING A USB MEMORY” on
page 212 and “CONNECTING iPod”
on page 217.
INFORMATION
●When a USB memory/iPod is not con-
nected with the USB port, the tab will be
dimmed.
Page 182 of 346
182
1. AUDIO/VIDEO SYSTEM OPERATION
Preset tuning: Touch one of the mix pre-
set channels on the left side of the screen
to select the desired station. The screen
button is highlighted and the station fre-
quency appears on the screen.
Seek tuning : Press the “” or “” button
of “SEEK/TRACK” . The radio will begin
seeking up or down for a station of the
nearest frequency and will stop when a
station is found. Each time the button is
pressed, the stations will be searched au-
tomatically one after another.
To scan all the frequencies : Touch
“SCAN” . “SCAN” will appear on the
screen. The radio will find the next station
and stay there for 10 seconds if “All” or
“HD Only” is selected, or 5 seconds if
“Analog” is selected, and then scan
again. To stay tuned to a station and stop
the scanning, touch “SCAN” again. (To
set HD Radio
™ system, see page 239.)
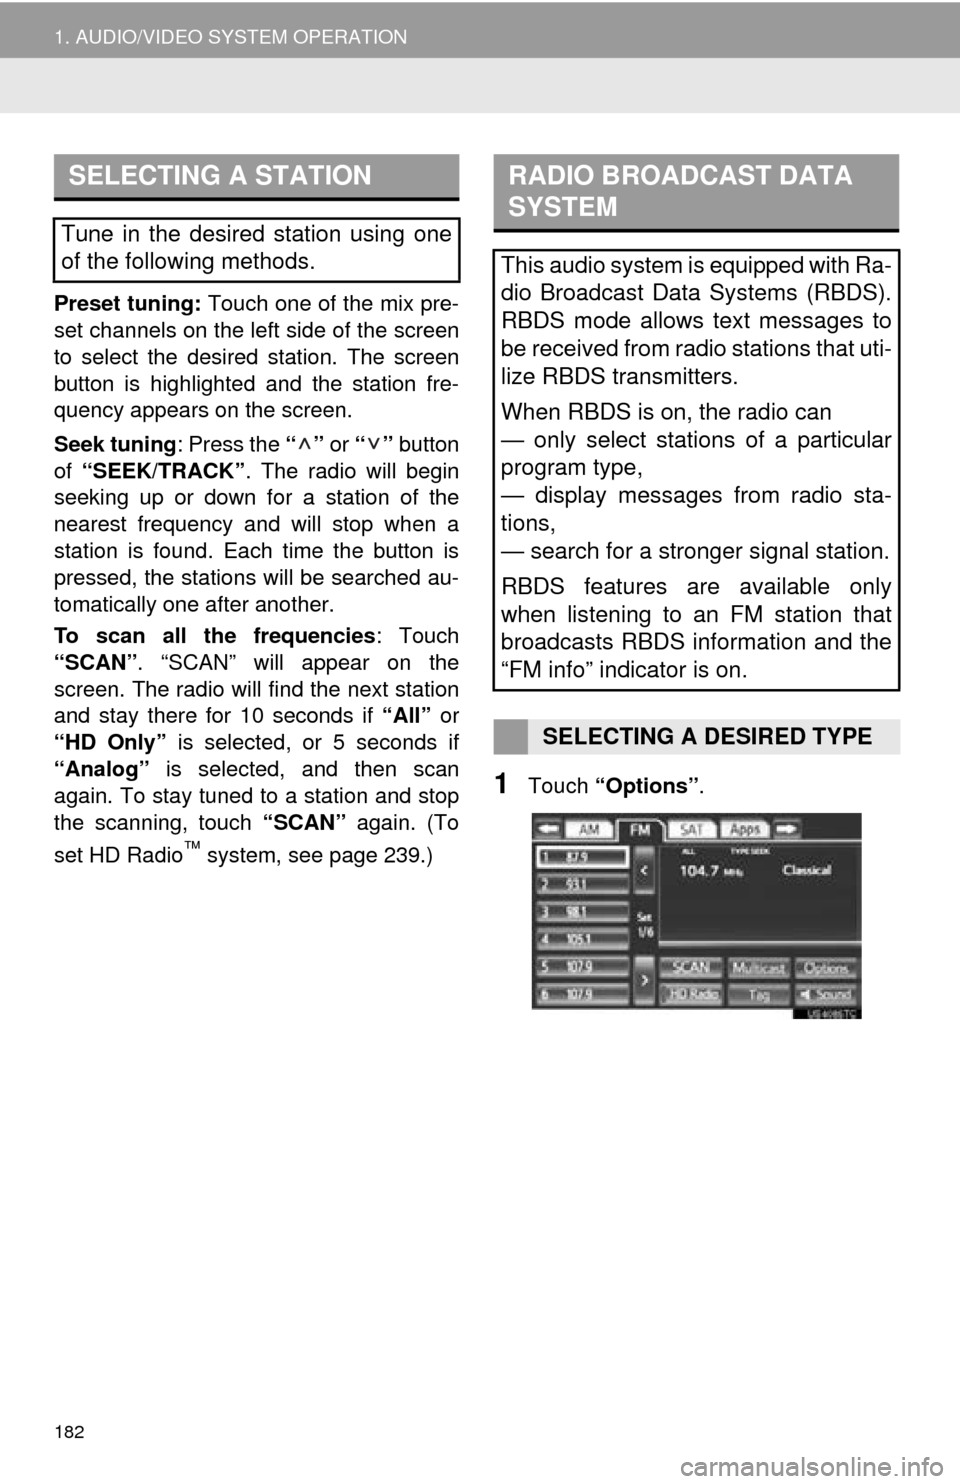
1Touch “Options” .
SELECTING A STATION
Tune in the desired station using one
of the following methods.
RADIO BROADCAST DATA
SYSTEM
This audio system is equipped with Ra-
dio Broadcast Data Systems (RBDS).
RBDS mode allows text messages to
be received from radio stations that uti-
lize RBDS transmitters.
When RBDS is on, the radio can
— only select stations of a particular
program type,
— display messages from radio sta-
tions,
— search for a stronger signal station.
RBDS features are available only
when listening to an FM station that
broadcasts RBDS information and the
“FM info” indicator is on.
SELECTING A DESIRED TYPE
Page 186 of 346
186
1. AUDIO/VIDEO SYSTEM OPERATION
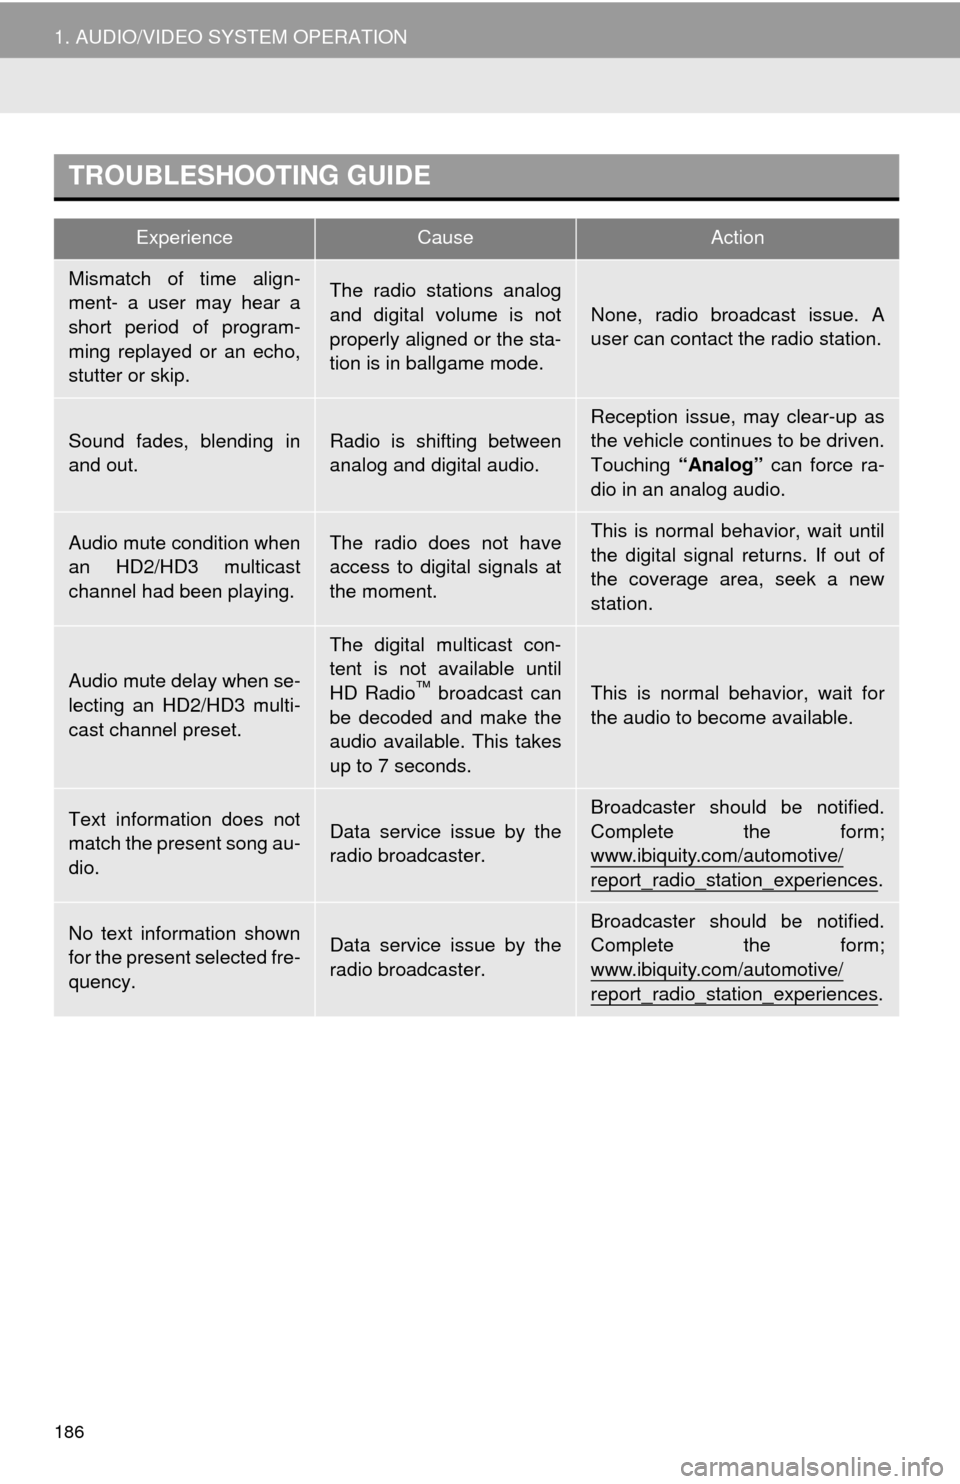
TROUBLESHOOTING GUIDE
ExperienceCauseAction
Mismatch of time align-
ment- a user may hear a
short period of program-
ming replayed or an echo,
stutter or skip.The radio stations analog
and digital volume is not
properly aligned or the sta-
tion is in ballgame mode.
None, radio broadcast issue. A
user can contact the radio station.
Sound fades, blending in
and out.Radio is shifting between
analog and digital audio.Reception issue, may clear-up as
the vehicle continues to be driven.
Touching “Analog” can force ra-
dio in an analog audio.
Audio mute condition when
an HD2/HD3 multicast
channel had been playing.The radio does not have
access to digital signals at
the moment.This is normal behavior, wait until
the digital signal returns. If out of
the coverage area, seek a new
station.
Audio mute delay when se-
lecting an HD2/HD3 multi-
cast channel preset.
The digital multicast con-
tent is not available until
HD Radio
™ broadcast can
be decoded and make the
audio available. This takes
up to 7 seconds.This is normal behavior, wait for
the audio to become available.
Text information does not
match the present song au-
dio.Data service issue by the
radio broadcaster.
Broadcaster should be notified.
Complete the form;
www.ibiquity.com/automotive/
report_radio_station_experiences.
No text information shown
for the present selected fre-
quency.Data service issue by the
radio broadcaster.Broadcaster should be notified.
Complete the form;
www.ibiquity.com/automotive/
report_radio_station_experiences.