2014 TOYOTA AVALON stop start
[x] Cancel search: stop startPage 65 of 346

65
1. DESTINATION SEARCH
3
NAVIGATION SYSTEM
5After inputting a phone number, touch
“OK”.
When a phone number is input, the “Con-
firm Destination” screen may be dis-
played. If “Go” is touched on the “Confirm
Destination” screen, the navigation sys-
tem performs a search for the route. (See
“STARTING ROUTE GUIDANCE” on
page 71.)
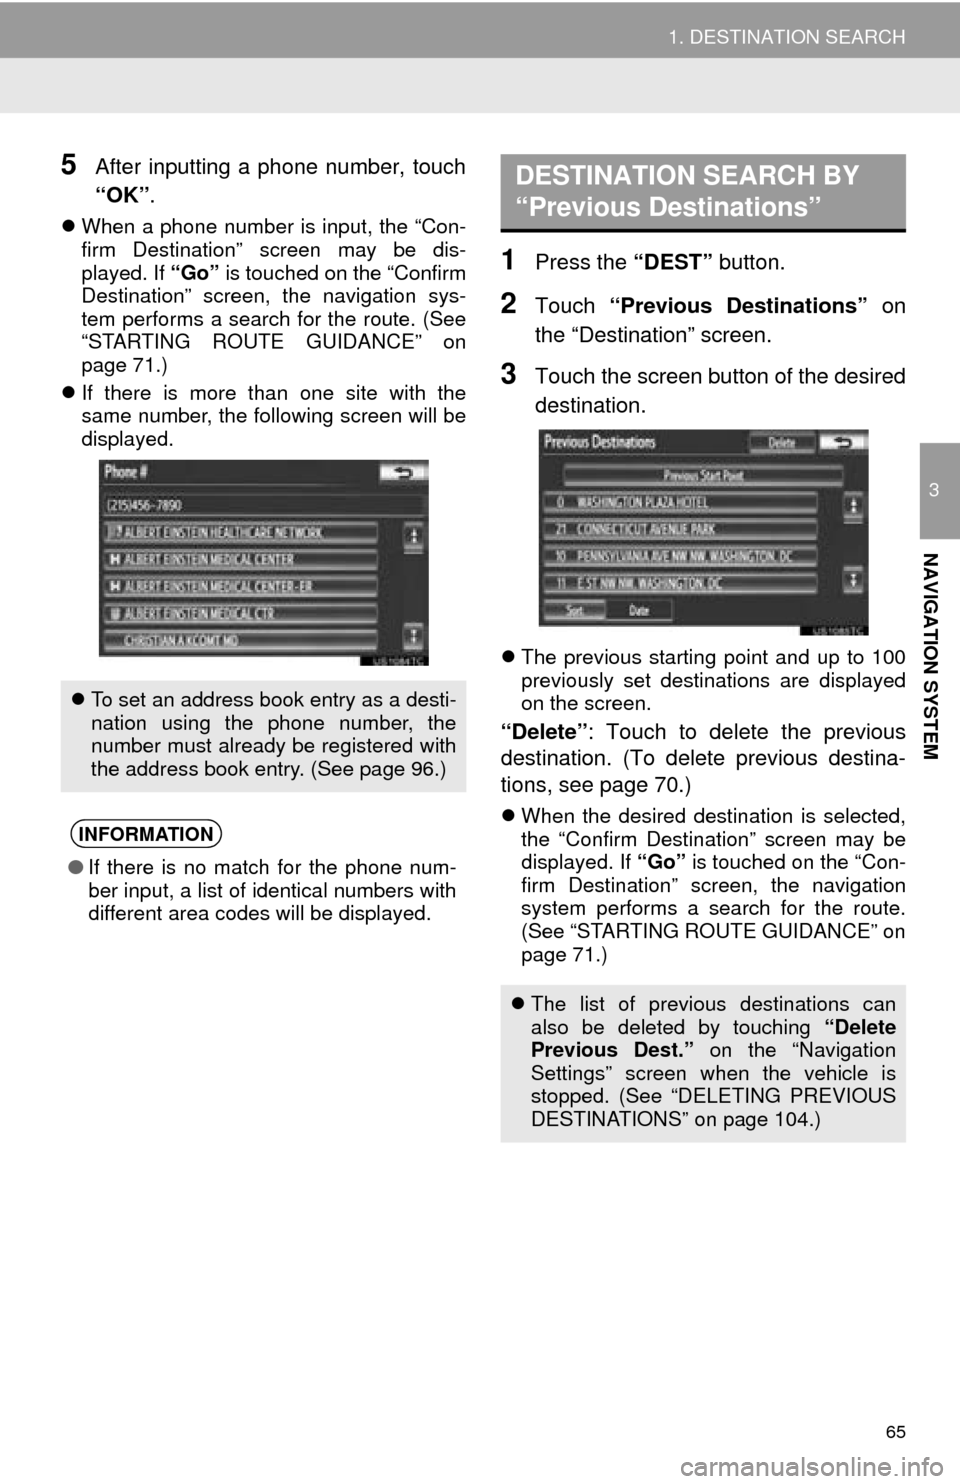
If there is more than one site with the
same number, the following screen will be
displayed.
1Press the “DEST” button.
2Touch “Previous Destinations” on
the “Destination” screen.
3Touch the screen button of the desired
destination.
The previous starting point and up to 100
previously set destinations are displayed
on the screen.
“Delete” : Touch to delete the previous
destination. (To delete previous destina-
tions, see page 70.)
When the desired destination is selected,
the “Confirm Destination” screen may be
displayed. If “Go” is touched on the “Con-
firm Destination” screen, the navigation
system performs a search for the route.
(See “STARTING ROUTE GUIDANCE” on
page 71.)
To set an address book entry as a desti-
nation using the phone number, the
number must already be registered with
the address book entry. (See page 96.)
INFORMATION
● If there is no match for the phone num-
ber input, a list of identical numbers with
different area codes will be displayed.
DESTINATION SEARCH BY
“Previous Destinations”
The list of previous destinations can
also be deleted by touching “Delete
Previous Dest.” on the “Navigation
Settings” screen when the vehicle is
stopped. (See “DELETING PREVIOUS
DESTINATIONS” on page 104.)
Page 71 of 346

71
1. DESTINATION SEARCH
3
NAVIGATION SYSTEM
2. STARTING ROUTE GUIDANCE
1Scroll the map to the desired point.
“Adjust Location” : Touch to adjust the
position in smaller increments.
When an arrow facing the desired point is
touched, the map scrolls in that direction.
When the screen button is released, the
scrolling stops.
2Touch “Go to ” .
The system starts route search and dis-
plays recommended routes.
3To start guidance, touch “OK”.When “Map” is touched on the “Con-
firm Destination” screen, the map
screen will be displayed. The map lo-
cation of the selected destination can
be set as a destination.
If a destination has already been set,
“Go to ” and “Add to Route” will be
displayed.
“Go to ” : Touch to delete the existing
destination(s) and set a new one.
“Add to Route” : Touch to add a desti-
nation.
“Info” : If this screen button is displayed
on the top of the scree n, touch it to view
items such as name , address, position
and phone number.
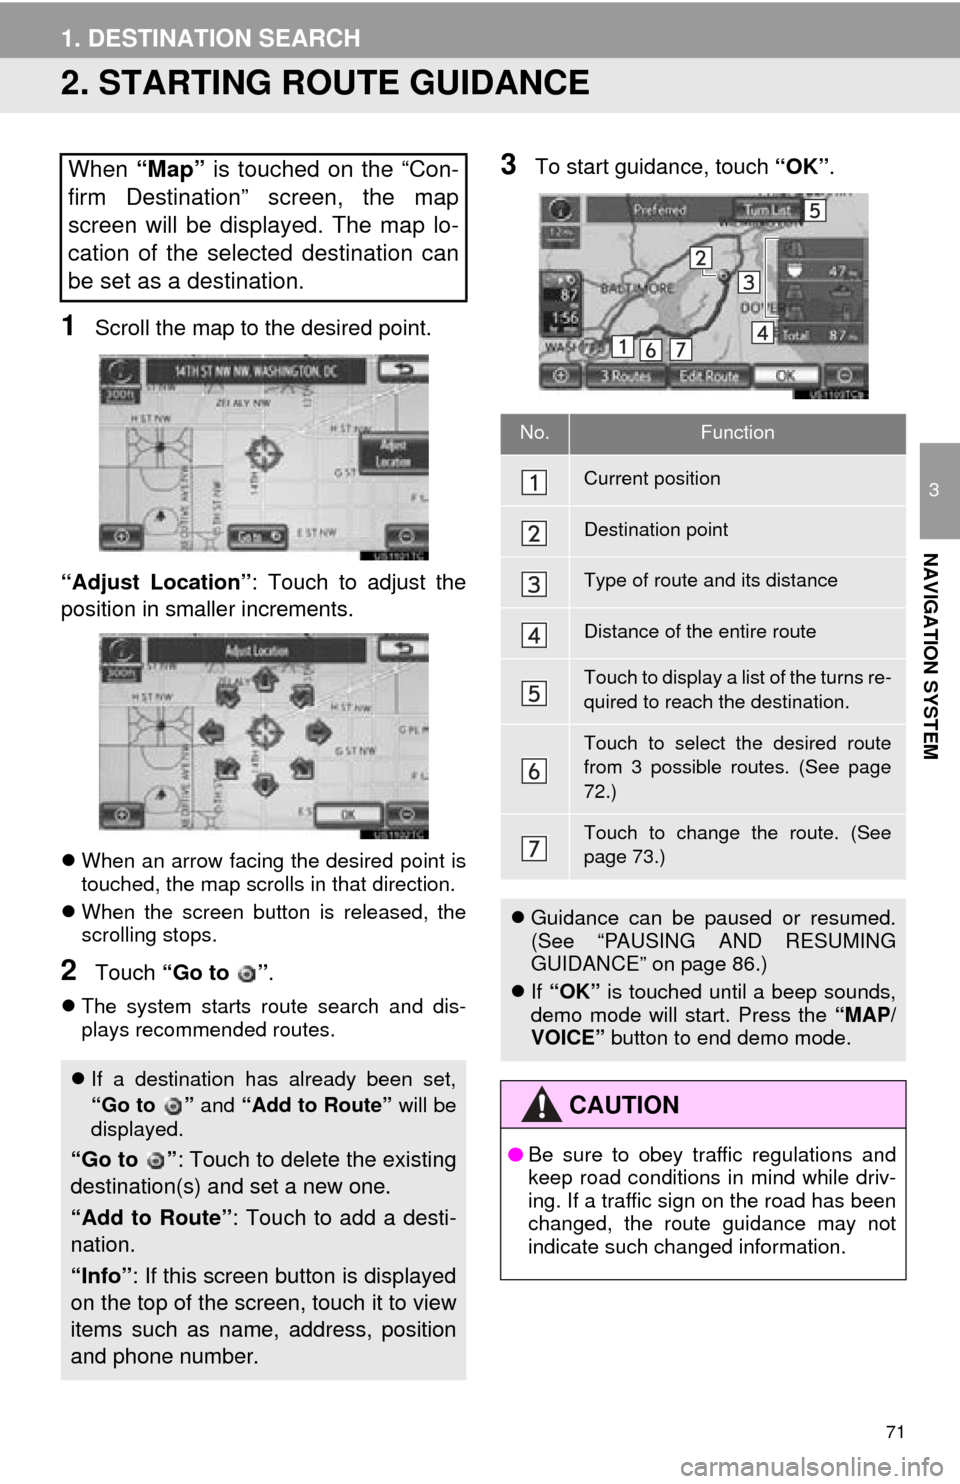
No.Function
Current position
Destination point
Type of route and its distance
Distance of the entire route
Touch to display a list of the turns re-
quired to reach the destination.
Touch to select the desired route
from 3 possible routes. (See page
72.)
Touch to change the route. (See
page 73.)
Guidance can be paused or resumed.
(See “PAUSING AND RESUMING
GUIDANCE” on page 86.)
If “OK” is touched until a beep sounds,
demo mode will start. Press the “MAP/
VOICE” button to end demo mode.
CAUTION
●Be sure to obey traffic regulations and
keep road conditions in mind while driv-
ing. If a traffic sign on the road has been
changed, the route guidance may not
indicate such changed information.
Page 90 of 346

90
2. ROUTE GUIDANCE
1Touch “Show on Map” .
2Touch “Route Trace” .
The “Route Trace” indicator is highlighted.
1Touch “Show on Map” .
2Touch “Route Trace” .
Touching “Yes” stops recording and the
route trace remains displayed on the
screen.
Touching “No” stops recording and the
route trace is erased.
ROUTE TRACE
Up to 124 miles (200 km) of the trav-
eled route can be stored and retraced
on the display.
INFORMATION
● This feature is available when the map
scale is more than 30 miles (50 km).
TO START RECORDING THE
ROUTE TRACE
TO STOP RECORDING THE
ROUTE TRACE
Page 141 of 346

141
1. PHONE OPERATION
4
TELEPHONE
7. Bluetooth® PHONE MESSAGE FUNCTION
1Press the button or the switch
on the steering wheel.
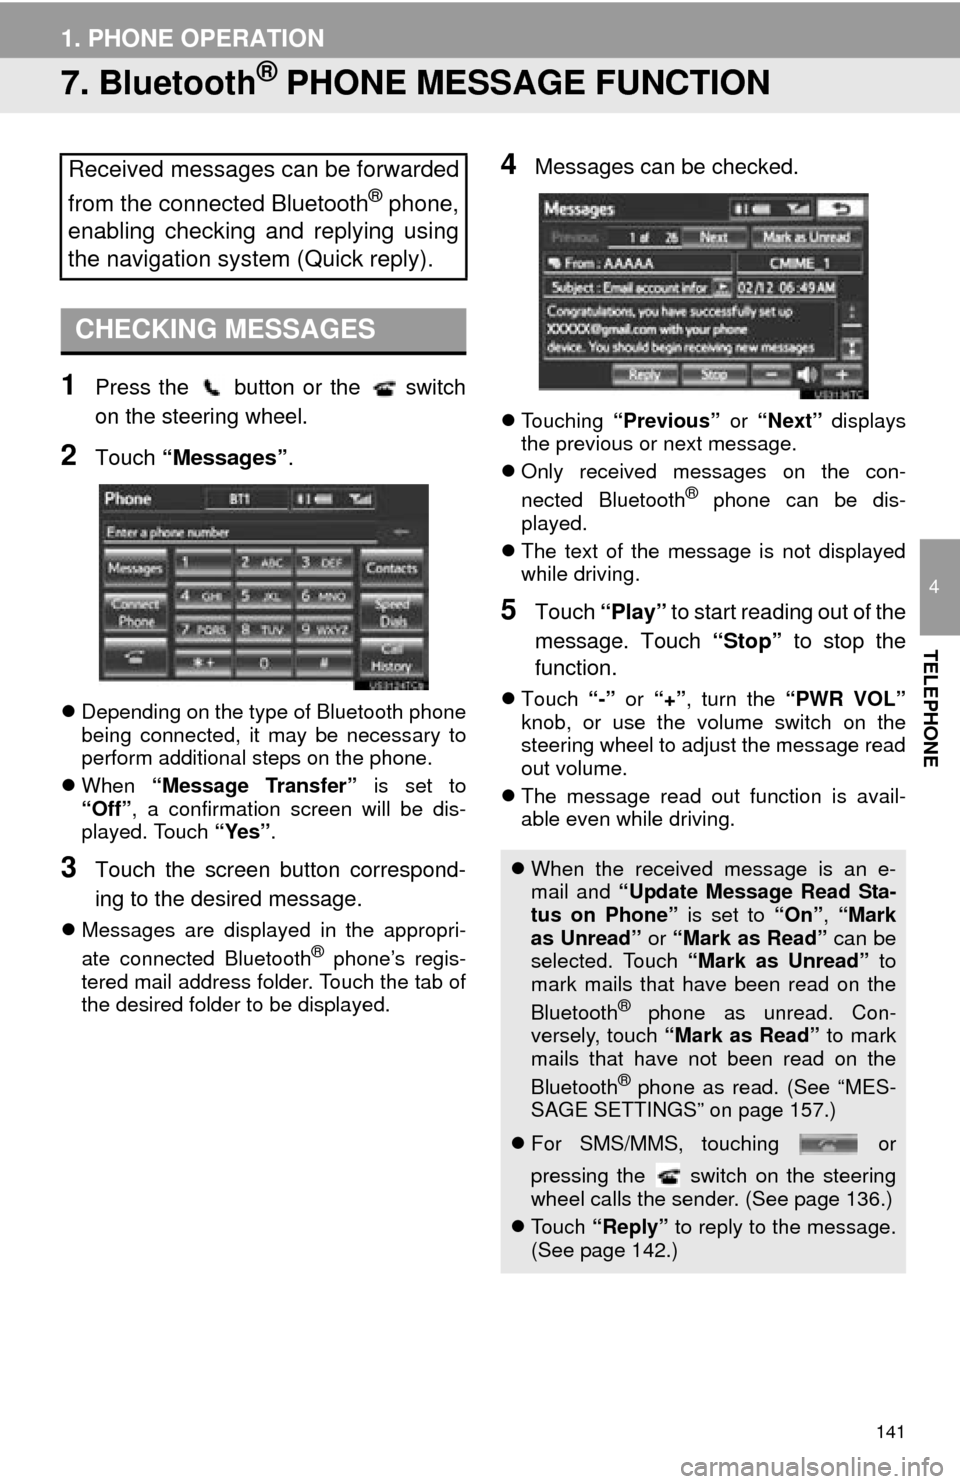
2Touch “Messages” .
Depending on the type of Bluetooth phone
being connected, it may be necessary to
perform additional steps on the phone.
When “Message Transfer” is set to
“Off” , a confirmation screen will be dis-
played. Touch “Yes”.
3Touch the screen button correspond-
ing to the desired message.
Messages are displayed in the appropri-
ate connected Bluetooth® phone’s regis-
tered mail address folder. Touch the tab of
the desired folder to be displayed.
4Messages can be checked.
Touching “Previous” or “Next” displays
the previous or next message.
Only received messages on the con-
nected Bluetooth
® phone can be dis-
played.
The text of the message is not displayed
while driving.
5Touch “Play” to start reading out of the
message. Touch “Stop” to stop the
function.
Touch “-” or “+” , turn the “PWR VOL”
knob, or use the volume switch on the
steering wheel to adjust the message read
out volume.
The message read out function is avail-
able even while driving.
Received messages can be forwarded
from the connected Bluetooth
® phone,
enabling checking and replying using
the navigation system (Quick reply).
CHECKING MESSAGES
When the received message is an e-
mail and “Update Message Read Sta-
tus on Phone” is set to “On”, “Mark
as Unread” or “Mark as Read” can be
selected. Touch “Mark as Unread” to
mark mails that have been read on the
Bluetooth
® phone as unread. Con-
versely, touch “Mark as Read” to mark
mails that have not been read on the
Bluetooth
® phone as read. (See “MES-
SAGE SETTINGS” on page 157.)
For SMS/MMS, touching or
pressing the switch on the steering
wheel calls the sender. (See page 136.)
To u c h “Reply” to reply to the message.
(See page 142.)
Page 200 of 346

200
1. AUDIO/VIDEO SYSTEM OPERATION
■PLAYING THE FILES IN ALL THE
FOLDERS ON THE DISC IN RAN-
DOM ORDER
1Touch “RAND” repeatedly until
“FLD.RAND” appears on the screen.
Once “FLD.RAND” appears on the
screen, the system selects a file randomly
from all of the existing folders. To cancel
this function, touch “RAND” again.
INFORMATION
●When a file is skipped or the system is
inoperative, touch “RAND” to reset.
OPERATING A DVD DISC
The playback condition of some DVD
discs may be determined by the DVD
software producer. This DVD player
plays a disc as the software producer
intended. As such some functions may
not work properly. Be sure to read the
instruction manual that comes with the
individual DVD disc. For detailed infor-
mation about DVD video discs, see
“DVD PLAYER AND DVD VIDEO
DISC INFORMATION” on page 210.
PRECAUTIONS ON DVD VIDEO
DISC
When recording with a DVD video, au-
dio tracks may not record in some cas-
es while the menu is displayed. As
audio will not play in this case, verify
that the video tracks are playing and
then activate playback.
When playback of a disc is completed:
If an audio CD or MP3/WMA disc is
playing, the first track or file starts.
If a DVD video is playing, playback will
stop or the menu screen will be dis-
played.
The title/chapter number and playback
time display may not appear while
playing back certain DVD video discs.
CAUTION
● Conversational speech on some DVDs
is recorded at a low volume to empha-
size the impact of sound effects. If you
adjust the volume assuming that the
conversations represent the maximum
volume level that the DVD will play, you
may be startled by louder sound effects
or when you change to a different audio
source. The louder sounds may have a
significant impact on the human body or
pose a driving hazard. Keep this in mind
when you adjust the volume.