Page 44 of 298
44
2. Bluetooth® SETTINGS
Bluetooth is a registered trademark of Bluetooth SIG, Inc.
PROFILES
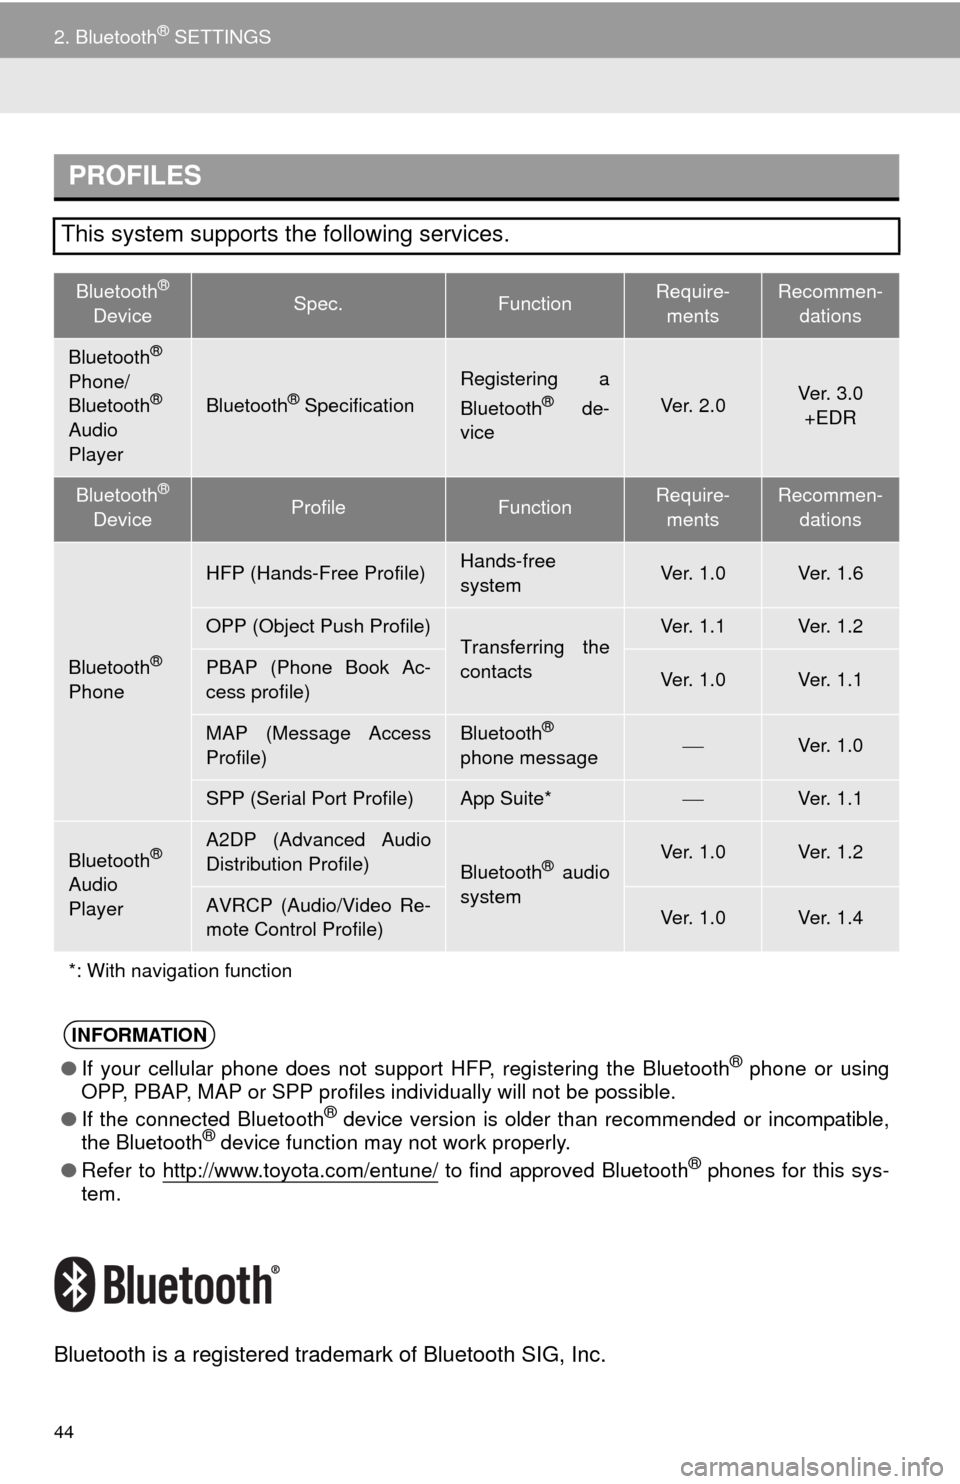
This system supports the following services.
Bluetooth®
DeviceSpec.FunctionRequire-
mentsRecommen-
dations
Bluetooth®
Phone/
Bluetooth®
Audio
PlayerBluetooth® Specification
Registering a
Bluetooth® de-
viceVe r. 2 . 0Ve r. 3 . 0
+EDR
Bluetooth®
DeviceProfileFunctionRequire-
mentsRecommen-
dations
Bluetooth®
Phone
HFP (Hands-Free Profile)Hands-free
systemVe r. 1 . 0Ve r. 1 . 6
OPP (Object Push Profile)Transferring the
contactsVe r. 1 . 1Ve r. 1 . 2
PBAP (Phone Book Ac-
cess profile)Ve r. 1 . 0Ve r. 1 . 1
MAP (Message Access
Profile)Bluetooth®
phone messageVe r. 1 . 0
SPP (Serial Port Profile)App Suite*Ve r. 1 . 1
Bluetooth®
Audio
Player
A2DP (Advanced Audio
Distribution Profile)
Bluetooth® audio
systemVe r. 1 . 0Ve r. 1 . 2
AVRCP (Audio/Video Re-
mote Control Profile)Ve r. 1 . 0Ve r. 1 . 4
*: With navigation function
INFORMATION
●If your cellular phone does not support HFP, registering the Bluetooth® phone or using
OPP, PBAP, MAP or SPP profiles individually will not be possible.
●If the connected Bluetooth
® device version is older than recommended or incompatible,
the Bluetooth® device function may not work properly.
●Refer to http://www.toyota.com/entune/
to find approved Bluetooth® phones for this sys-
tem.
Page 61 of 298
61
3. OTHER SETTINGS
2
BASIC FUNCTION
■DELETING TRANSFERRED IMAG-
ES
1Display the “General Settings” screen.
(P.56)
2Select “Customize Startup Image” or
“Customize Screen Off Image”.
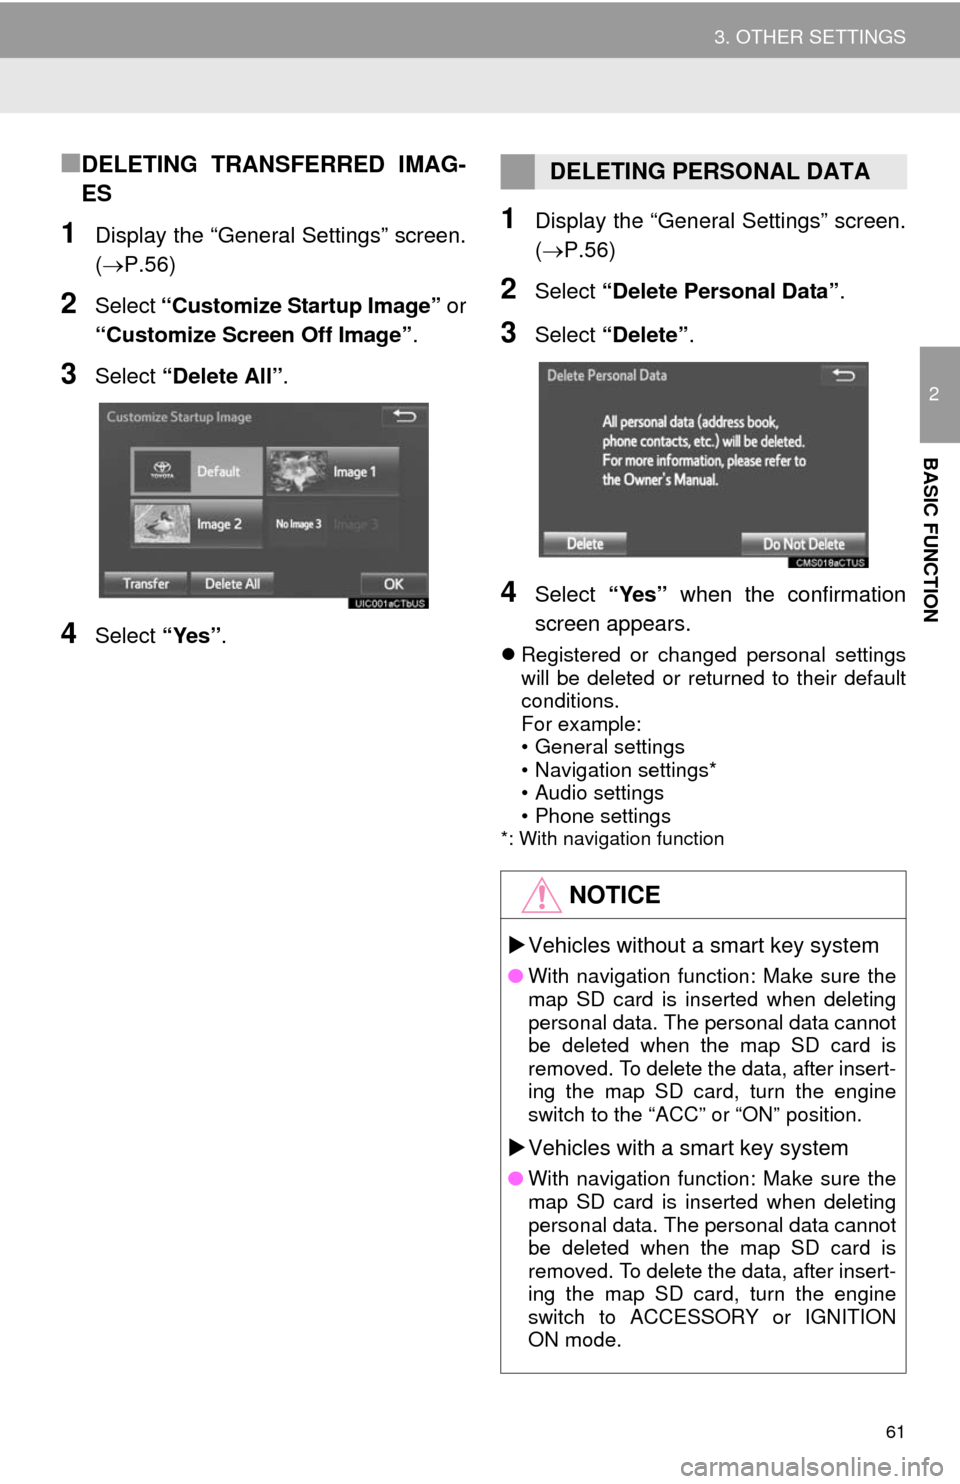
3Select “Delete All”.
4Select “Yes”.
1Display the “General Settings” screen.
(P.56)
2Select “Delete Personal Data”.
3Select “Delete”.
4Select “Yes” when the confirmation
screen appears.
Registered or changed personal settings
will be deleted or returned to their default
conditions.
For example:
• General settings
• Navigation settings*
• Audio settings
• Phone settings
*: With navigation function
DELETING PERSONAL DATA
NOTICE
Vehicles without a smart key system
●With navigation function: Make sure the
map SD card is inserted when deleting
personal data. The personal data cannot
be deleted when the map SD card is
removed. To delete the data, after insert-
ing the map SD card, turn the engine
switch to the “ACC” or “ON” position.
Vehicles with a smart key system
●With navigation function: Make sure the
map SD card is inserted when deleting
personal data. The personal data cannot
be deleted when the map SD card is
removed. To delete the data, after insert-
ing the map SD card, turn the engine
switch to ACCESSORY or IGNITION
ON mode.
Page 62 of 298
62
3. OTHER SETTINGS
2. VOICE SETTINGS
1Press the “APPS” button.
2Select “Setup”.
3Select “Voice”.
4Select the items to be set.
Voice volume, etc. can be set.
INFORMATION
●“Voice Settings” screen can also be dis-
played from the voice recognition top
screen. (P.134)
VOICE SETTINGS SCREEN
No.Function
Select to adjust the volume of voice
guidance.
*Select to set the voice guidance dur-
ing route guidance on/off.
Select to set the voice recognition
prompts.
Select to train voice recognition.
The voice command system adapt
the user accent.
Select to set the voice prompt inter-
rupt on/off.
*
Select to set the web search engine.
The search engines are App Suite
applications. (P.271)
Select to set the voice recognition
tutorial.
Select to reset all setup items.
*: With navigation function
Page 64 of 298
64
3. OTHER SETTINGS
4. MAINTENANCE*
1Press the “APPS” button.
2Select “Maintenance”.
3Select the desired item.
When this system is turned on, the
“Maintenance Reminder” screen dis-
plays when it is time to replace a part
or certain components. (P.32)
*: With navigation function
No.Function
Select to set the condition of parts or
components.
Select to add new information items
separately from provided ones.
Select to cancel all conditions which
have been entered.
Select to reset the item which have
expired conditions.
Select to call the registered dealer.
Select to register/edit dealer infor-
mation. (P.65)
When set to on, the indicator will illu-
minate. The system is set to give
maintenance information with the
“Maintenance Reminder” screen.
(P.32)
INFORMATION
●When the vehicle needs to be serviced,
the screen button color will change to
orange.
Page 72 of 298
72
1. BASIC OPERATION
2. SOME BASICS
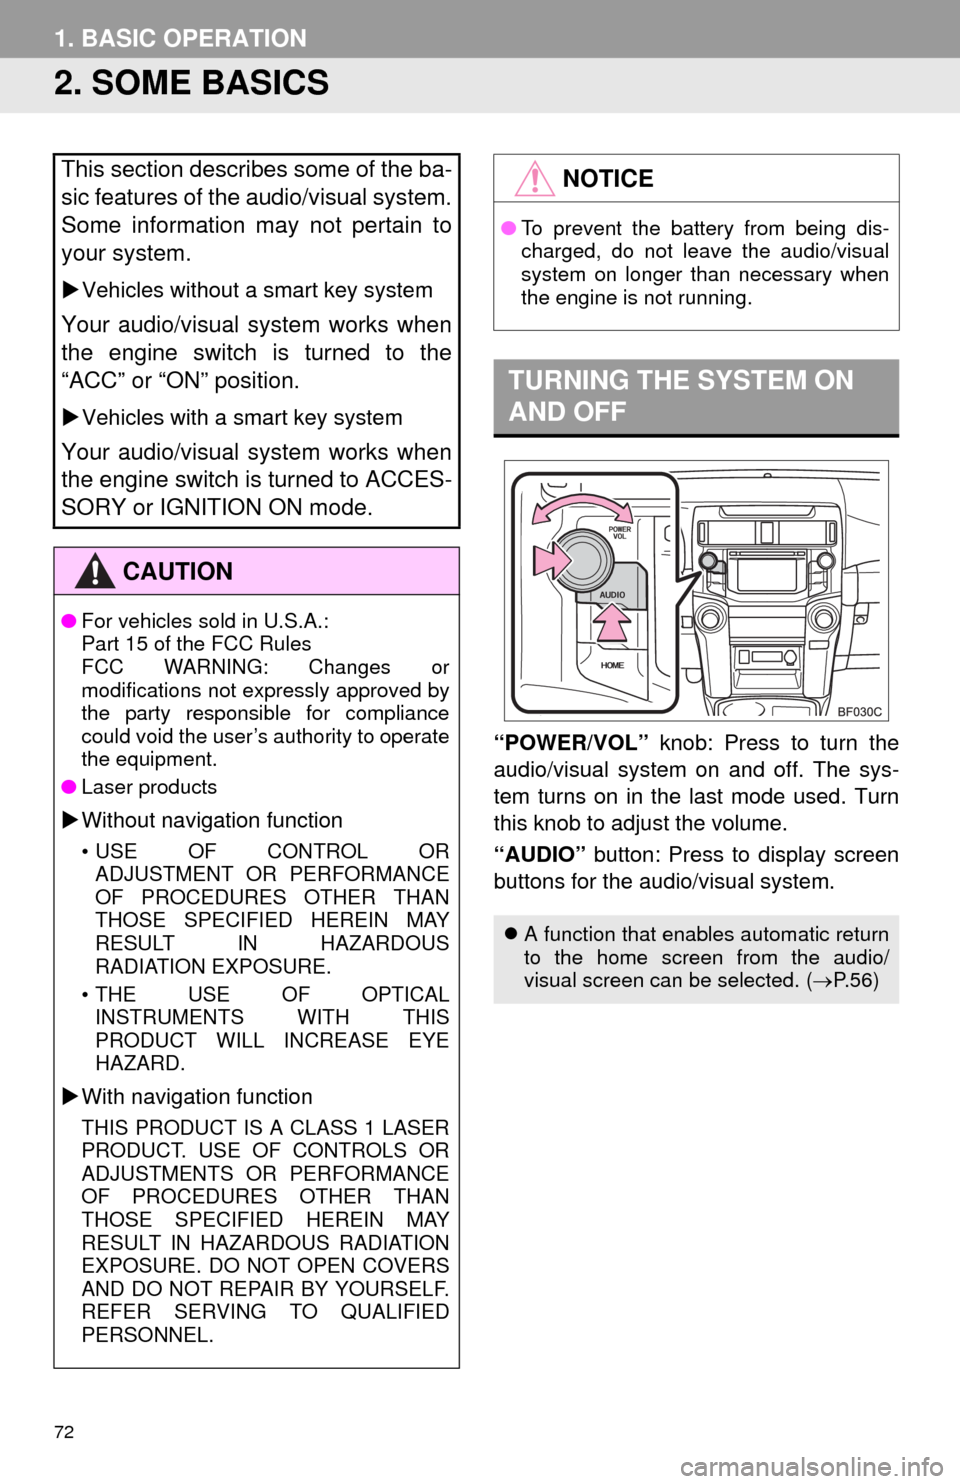
“POWER/VOL” knob: Press to turn the
audio/visual system on and off. The sys-
tem turns on in the last mode used. Turn
this knob to adjust the volume.
“AUDIO” button: Press to display screen
buttons for the audio/visual system.
This section describes some of the ba-
sic features of the audio/visual system.
Some information may not pertain to
your system.
Vehicles without a smart key system
Your audio/visual system works when
the engine switch is turned to the
“ACC” or “ON” position.
Vehicles with a smart key system
Your audio/visual system works when
the engine switch is turned to ACCES-
SORY or IGNITION ON mode.
CAUTION
●For vehicles sold in U.S.A.:
Part 15 of the FCC Rules
FCC WARNING: Changes or
modifications not expressly approved by
the party responsible for compliance
could void the user’s authority to operate
the equipment.
●Laser products
Without navigation function
• USE OF CONTROL OR
ADJUSTMENT OR PERFORMANCE
OF PROCEDURES OTHER THAN
THOSE SPECIFIED HEREIN MAY
RESULT IN HAZARDOUS
RADIATION EXPOSURE.
• THE USE OF OPTICAL
INSTRUMENTS WITH THIS
PRODUCT WILL INCREASE EYE
HAZARD.
With navigation function
THIS PRODUCT IS A CLASS 1 LASER
PRODUCT. USE OF CONTROLS OR
ADJUSTMENTS OR PERFORMANCE
OF PROCEDURES OTHER THAN
THOSE SPECIFIED HEREIN MAY
RESULT IN HAZARDOUS RADIATION
EXPOSURE. DO NOT OPEN COVERS
AND DO NOT REPAIR BY YOURSELF.
REFER SERVING TO QUALIFIED
PERSONNEL.
NOTICE
●To prevent the battery from being dis-
charged, do not leave the audio/visual
system on longer than necessary when
the engine is not running.
TURNING THE SYSTEM ON
AND OFF
A function that enables automatic return
to the home screen from the audio/
visual screen can be selected. (P.56)
Page 79 of 298
79
3
AUDIO/VISUAL SYSTEM
2. RADIO OPERATION
1. AM/FM RADIO
■CONTROL SCREEN
Without navigation function
OVERVIEW
Select “AM” or “FM” on the “Select Audio Source” screen. (P.73)
Top screen
Option screen
Page 81 of 298
81
2. RADIO OPERATION
3
AUDIO/VISUAL SYSTEM
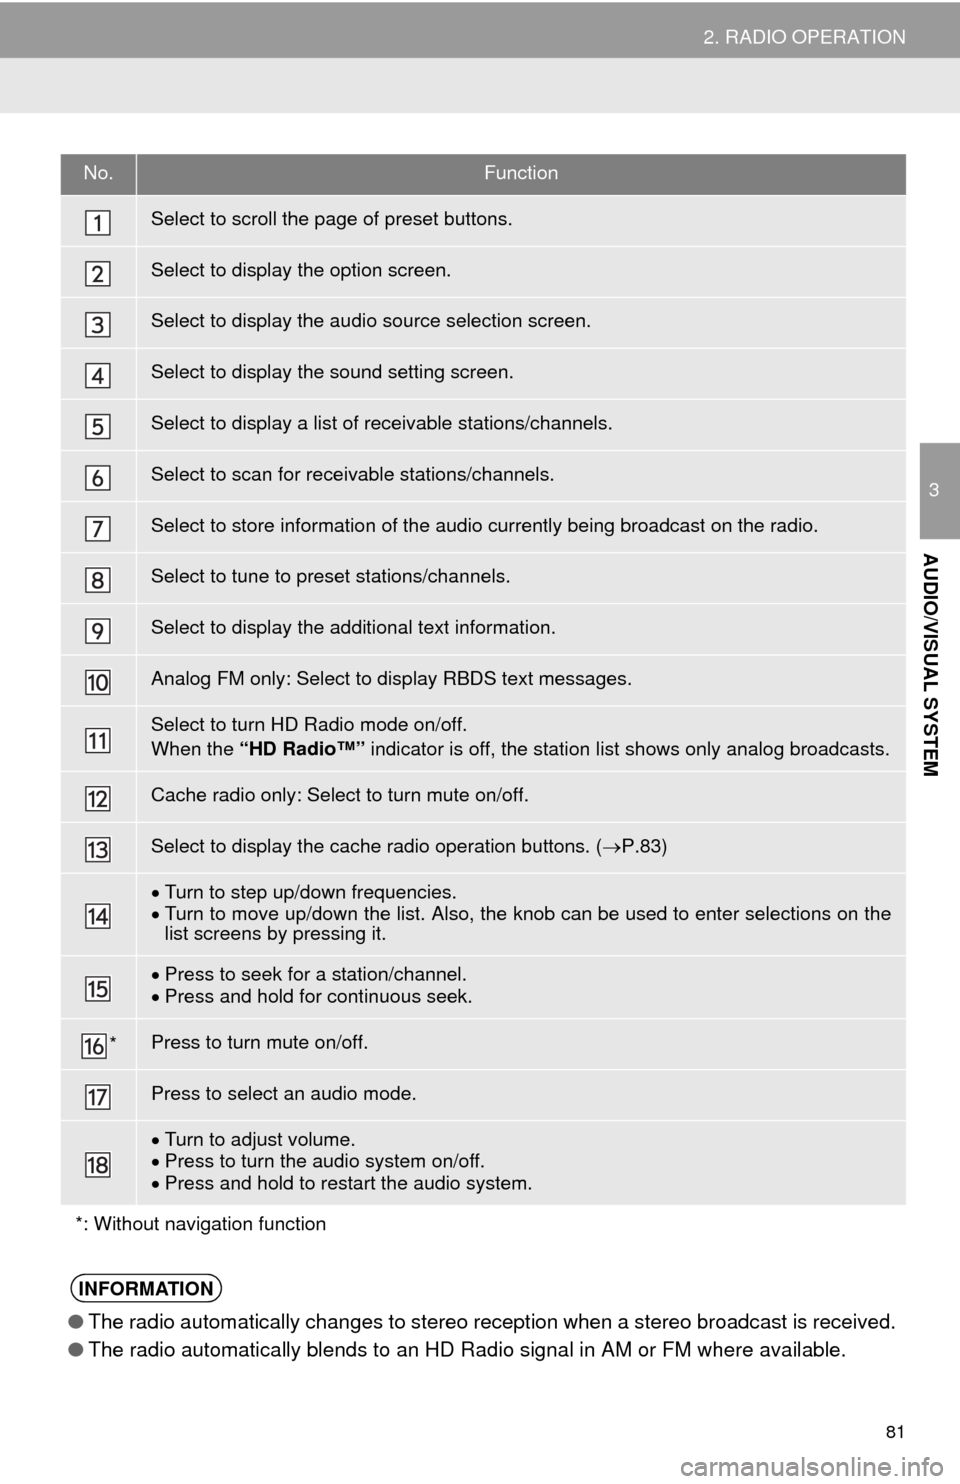
No.Function
Select to scroll the page of preset buttons.
Select to display the option screen.
Select to display the audio source selection screen.
Select to display the sound setting screen.
Select to display a list of receivable stations/channels.
Select to scan for receivable stations/channels.
Select to store information of the audio currently being broadcast on the radio.
Select to tune to preset stations/channels.
Select to display the additional text information.
Analog FM only: Select to display RBDS text messages.
Select to turn HD Radio mode on/off.
When the “HD Radio™” indicator is off, the station list shows only analog broadcasts.
Cache radio only: Select to turn mute on/off.
Select to display the cache radio operation buttons. (P.83)
Turn to step up/down frequencies.
Turn to move up/down the list. Also, the knob can be used to enter selections on the
list screens by pressing it.
Press to seek for a station/channel.
Press and hold for continuous seek.
*Press to turn mute on/off.
Press to select an audio mode.
Turn to adjust volume.
Press to turn the audio system on/off.
Press and hold to restart the audio system.
*: Without navigation function
INFORMATION
●The radio automatically changes to stereo reception when a stereo broadcast is received.
●The radio automatically blends to an HD Radio signal in AM or FM where available.
Page 83 of 298
83
2. RADIO OPERATION
3
AUDIO/VISUAL SYSTEM
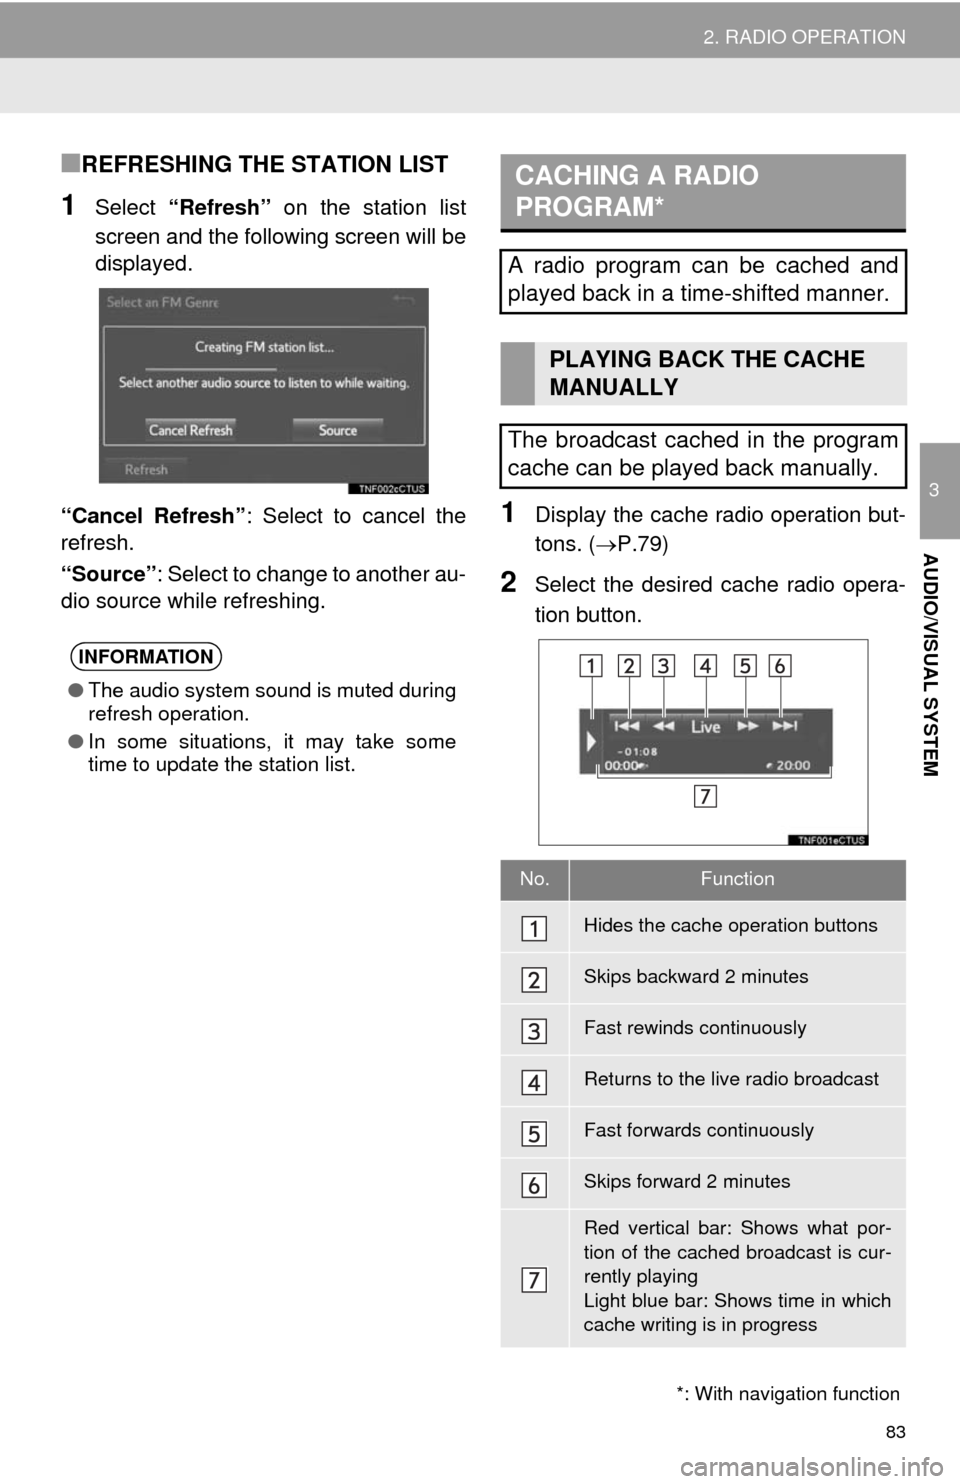
■REFRESHING THE STATION LIST
1Select “Refresh” on the station list
screen and the following screen will be
displayed.
“Cancel Refresh”: Select to cancel the
refresh.
“Source”: Select to change to another au-
dio source while refreshing.
1Display the cache radio operation but-
tons. (P.79)
2Select the desired cache radio opera-
tion button.
INFORMATION
●The audio system sound is muted during
refresh operation.
●In some situations, it may take some
time to update the station list.
*: With navigation function
CACHING A RADIO
PROGRAM*
A radio program can be cached and
played back in a time-shifted manner.
PLAYING BACK THE CACHE
MANUALLY
The broadcast cached in the program
cache can be played back manually.
No.Function
Hides the cache operation buttons
Skips backward 2 minutes
Fast rewinds continuously
Returns to the live radio broadcast
Fast forwards continuously
Skips forward 2 minutes
Red vertical bar: Shows what por-
tion of the cached broadcast is cur-
rently playing
Light blue bar: Shows time in which
cache writing is in progress