Page 228 of 298

228
2. DESTINATION SEARCH
1Select “Turn List”.
2Check that the turn list is displayed.
1Select “Edit Route”.
2Select the desired item.
DISPLAYING TURN LIST
A list of turn information from the cur-
rent position to the destination can be
displayed.
No.Information
Current position
Distance to the next turn
Turn direction at the intersection
Select to display the map of the se-
lected point.
INFORMATION
●However, not all road names on the
route may appear on the list. If a road
changes its name without requiring a
turn (such as on a street that runs
through 2 or more cities), the name
change will not appear on the list. The
street names will be displayed in order
from the starting point, along with the
distance to the next turn.
EDITING ROUTE
Destinations can be added, reordered
or deleted, and conditions for the route
to the destination can be changed.
No.FunctionPage
Select to add destinations.237
Select to delete destina-
tions. 237
Select to reorder destina-
tions. 237
Select to set route prefer-
ences. 238
Select to change route
type.238
INFORMATION
●Even if the “Freeways” indicator is
dimmed, the route cannot avoid includ-
ing a freeway in some cases. (P.238)
●If the calculated route includes a trip by
ferry, the route guidance shows a sea
route. After traveling by ferry, the current
position may be incorrect. Upon recep-
tion of GPS signals, it is automatically
corrected.
Page 236 of 298
236
3. ROUTE GUIDANCE
3. EDITING ROUTE
1Press the “APPS” button.
2Select “Navigation”.
3Select “Options”.
4Select “Edit Route”.
5Select the item to be set.
6Check that the entire route map is dis-
played. (P.226)
No.FunctionPage
Select to add destinations.237
Select to delete destina-
tions.237
Select to reorder destina-
tions.237
Select to set route prefer-
ences.238
Select to change route
type.238
Select to set detours.239
Select to start from adja-
cent road.240
Page 237 of 298
237
3. ROUTE GUIDANCE
8
NAVIGATION SYSTEM
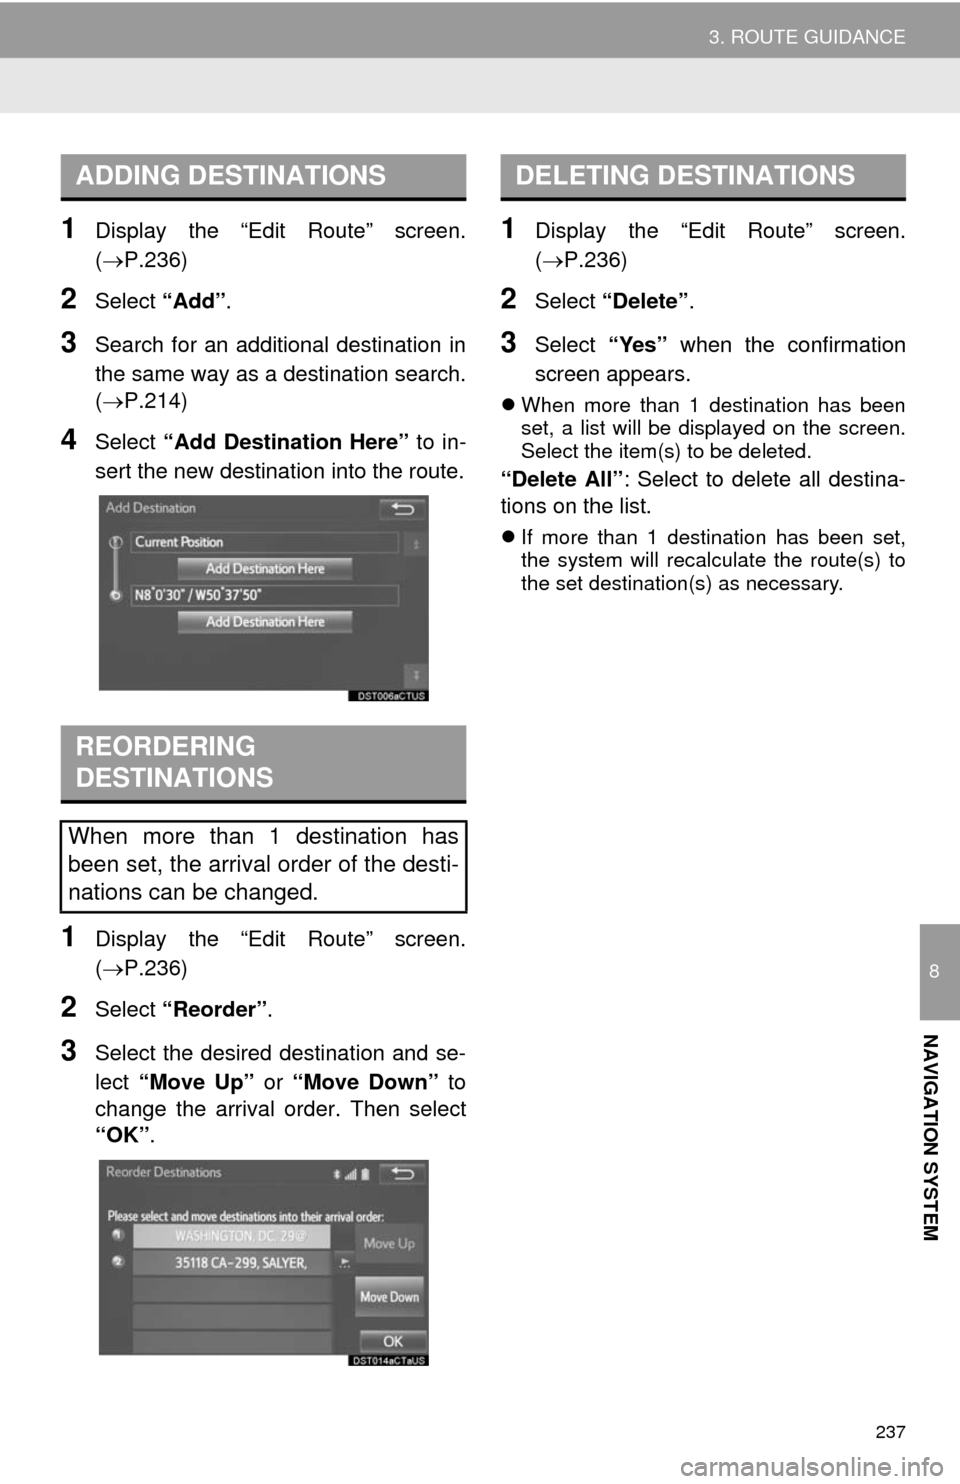
1Display the “Edit Route” screen.
(P.236)
2Select “Add”.
3Search for an additional destination in
the same way as a destination search.
(P.214)
4Select “Add Destination Here” to in-
sert the new destination into the route.
1Display the “Edit Route” screen.
(P.236)
2Select “Reorder”.
3Select the desired destination and se-
lect “Move Up” or “Move Down” to
change the arrival order. Then select
“OK”.
1Display the “Edit Route” screen.
(P.236)
2Select “Delete”.
3Select “Yes” when the confirmation
screen appears.
When more than 1 destination has been
set, a list will be displayed on the screen.
Select the item(s) to be deleted.
“Delete All”: Select to delete all destina-
tions on the list.
If more than 1 destination has been set,
the system will recalculate the route(s) to
the set destination(s) as necessary.
ADDING DESTINATIONS
REORDERING
DESTINATIONS
When more than 1 destination has
been set, the arrival order of the desti-
nations can be changed.
DELETING DESTINATIONS
Page 241 of 298
241
8
NAVIGATION SYSTEM
4. MEMORY POINTS
1. MEMORY POINTS SETTINGS
1Press the “APPS” button.
2Select “Setup”.
3Select “Navigation”.
4Select the desired item to be set.Home, preset destinations, address
book entries, areas to avoid can be set
as memory points. The registered
points can be used as the destinations.
(P.214)
Registered areas to avoid, will be
avoided when the system searches for
a route.
No.FunctionPage
Select to set home.242
Select to set preset desti-
nations.243
Select to set the address
book.245
Select to set areas to
avoid.247
Select to delete previous
destinations.249
Select to set detailed navi-
gation settings.250
Page 242 of 298
242
4. MEMORY POINTS
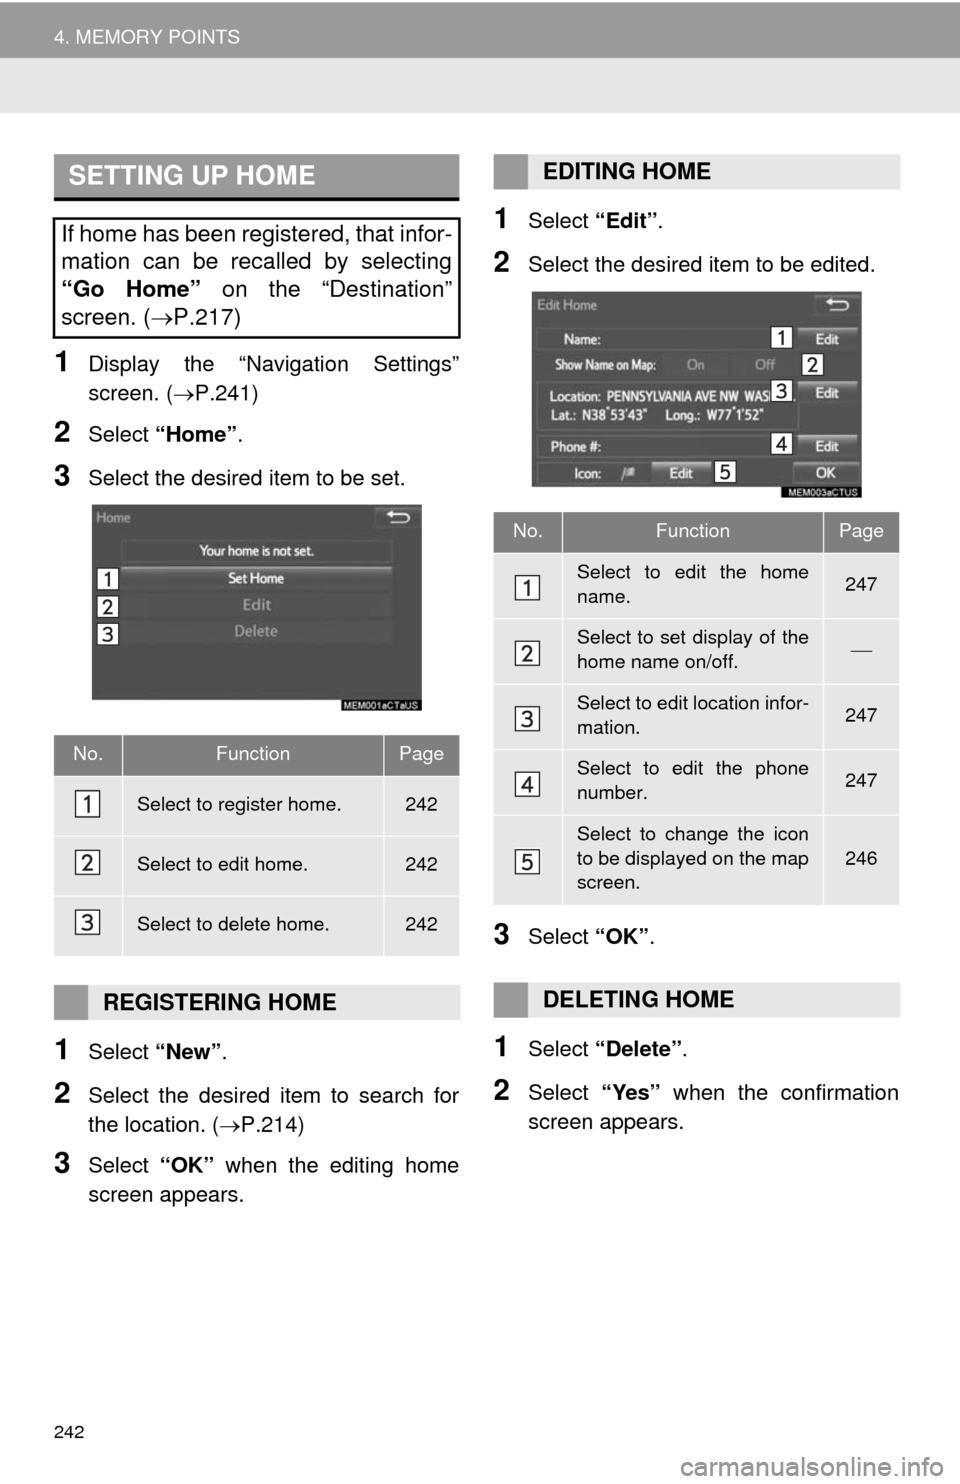
1Display the “Navigation Settings”
screen. (P.241)
2Select “Home”.
3Select the desired item to be set.
1Select “New”.
2Select the desired item to search for
the location. (P.214)
3Select “OK” when the editing home
screen appears.
1Select “Edit”.
2Select the desired item to be edited.
3Select “OK”.
1Select “Delete”.
2Select “Yes” when the confirmation
screen appears.
SETTING UP HOME
If home has been registered, that infor-
mation can be recalled by selecting
“Go Home” on the “Destination”
screen. (P.217)
No.FunctionPage
Select to register home.242
Select to edit home.242
Select to delete home.242
REGISTERING HOME
EDITING HOME
No.FunctionPage
Select to edit the home
name.247
Select to set display of the
home name on/off.
Select to edit location infor-
mation.247
Select to edit the phone
number.247
Select to change the icon
to be displayed on the map
screen.
246
DELETING HOME
Page 243 of 298
243
4. MEMORY POINTS
8
NAVIGATION SYSTEM
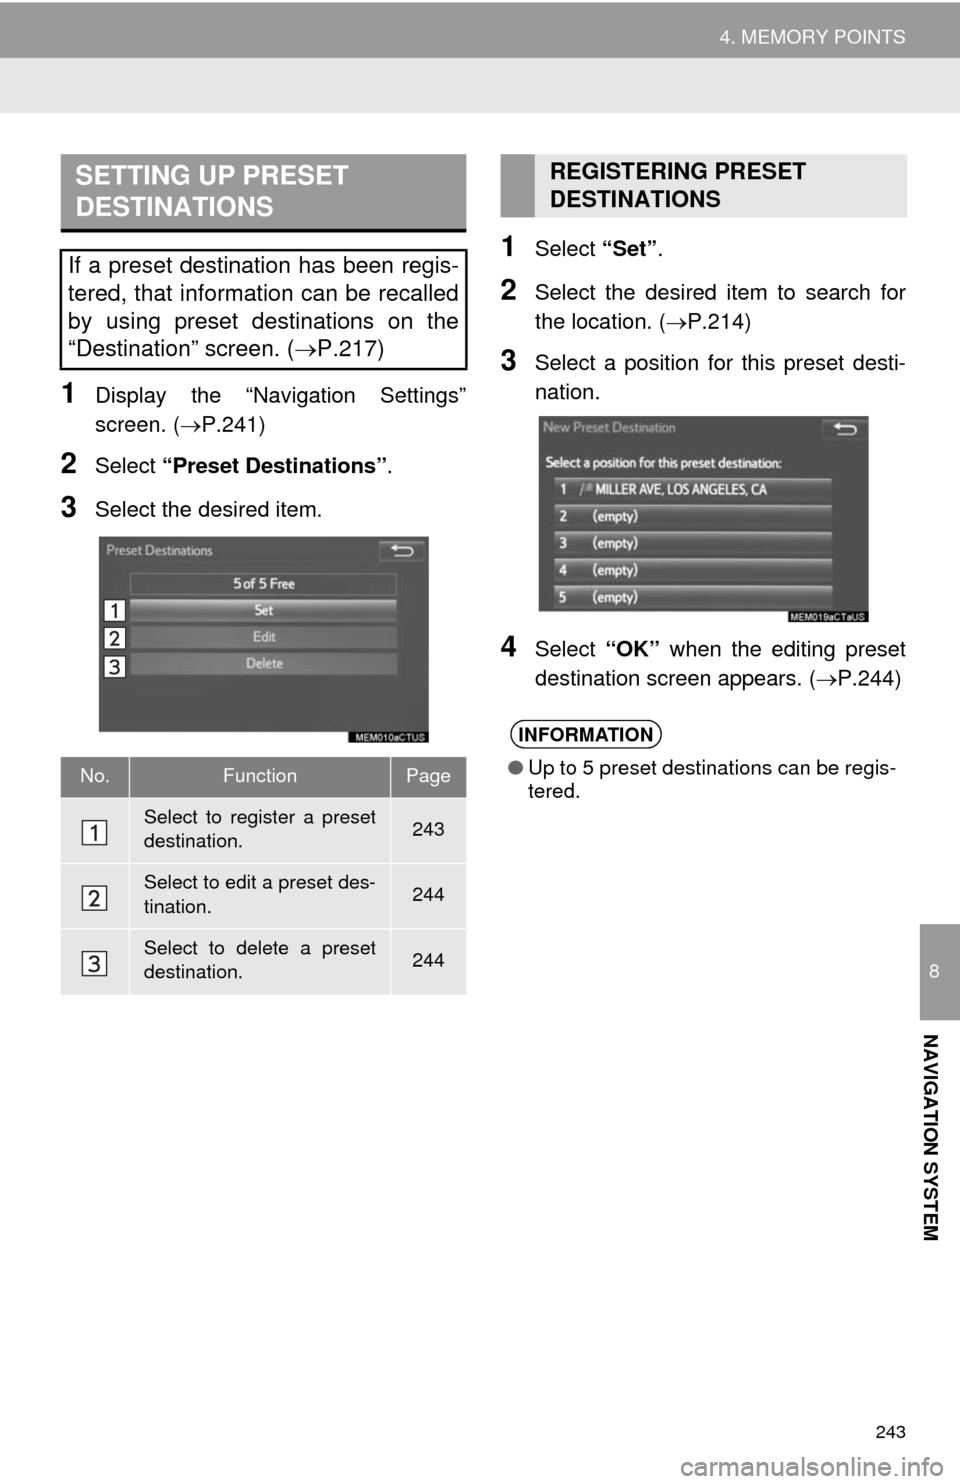
1Display the “Navigation Settings”
screen. (P.241)
2Select “Preset Destinations”.
3Select the desired item.
1Select “Set”.
2Select the desired item to search for
the location. (P.214)
3Select a position for this preset desti-
nation.
4Select “OK” when the editing preset
destination screen appears. (P.244)
SETTING UP PRESET
DESTINATIONS
If a preset destination has been regis-
tered, that information can be recalled
by using preset destinations on the
“Destination” screen. (P.217)
No.FunctionPage
Select to register a preset
destination.243
Select to edit a preset des-
tination.244
Select to delete a preset
destination.244
REGISTERING PRESET
DESTINATIONS
INFORMATION
●Up to 5 preset destinations can be regis-
tered.
Page 244 of 298
244
4. MEMORY POINTS
1Select “Edit”.
2Select the desired preset destination.
3Select the item to be edited.
4Select “OK”.
1Select “Delete”.
2Select the preset destination to be de-
leted and select “Delete”.
3Select “Yes” when the confirmation
screen appears.
EDITING PRESET
DESTINATIONS
No.FunctionPage
Select to edit the preset
destination name.247
Select to set display of the
preset destination name
on/off.
Select to edit location infor-
mation.247
Select to edit the phone
number.247
Select to change the icon
to be displayed on the map
screen.246
DELETING PRESET
DESTINATIONS
Page 249 of 298
249
4. MEMORY POINTS
8
NAVIGATION SYSTEM
■CHANGING THE NAME
1Select “Edit” next to “Name”.
2Enter a name and select “OK”.
■CHANGING THE LOCATION
1Select “Edit” next to “Location”.
2Scroll the map to the desired point
(P.206) and select “OK”.
■CHANGING THE AREA SIZE
1Select “Edit” next to “Size”.
2Select either or to
change the size of the area to be avoid-
ed and select “OK”.
1Select “Delete”.
2Select the area to be deleted and se-
lect “Delete”.
3Select “Yes” when the confirmation
screen appears.
1Display the “Navigation Settings”
screen. (P.241)
2Select “Delete Previous Dest.”.
3Select the previous destination to be
deleted and select “Delete”.
4Select “Yes” when the confirmation
screen appears.
DELETING AREAS TO AVOID
DELETING PREVIOUS
DESTINATIONS
Previous destinations can be deleted.