2014 TESLA MODEL S light
[x] Cancel search: lightPage 36 of 159

Inflation Effects
When airbags inflate, a fine powder is
released. This powder can irritate the skin and should be thoroughly flushed from the eyes
and from any cuts or abrasions.
After inflation, the airbags deflate to provide a
gradual cushioning effect for the occupants and to ensure the driver’s forward vision is notobscured.
If airbags have inflated, or if your vehicle has been in an accident, always have the airbags,
seat belt pre-tensioners and any associated
components checked and, if necessary,
replaced by Tesla.
In a collision, in addition to the airbags
inflating:
• Doors unlock and the door handles extend.
• Hazard warning lights turn on.
• Interior lights turn on.
• High voltage is disabled.
To restore Battery power, use the touchscreen
to manually power off Model S, then press the
brake to power it back on again.
Airbag Warning IndicatorThe airbag indicator on the
instrument panel remains lit if the
airbag system is malfunctioning. The
only time this indicator should light
up is briefly when Model S first starts
up, in which case it turns off within a few seconds. If it remains lit, contact
Tesla immediately and do not drive.
Airbag Warnings
Warning: All occupants, including the
driver, should always wear their seat
belts, whether or not an airbag is also
provided at their seating position, to
minimize the risk of severe injury or death
in the event of a collision.Warning: Front seat occupants should
not place their arms over the airbag
module, as an inflating bag can cause
fractures or other injuries.Warning: Do not use seat covers on
Model S. Doing so could restrict
deployment of the side air bags if an
accident occurs. It can also reduce theaccuracy of the occupant detection
system.Warning: Airbags inflate with
considerable speed and force, which can
cause injury. To limit injuries, ensure that
occupants are wearing seat belts and are
correctly seated, with the seat positioned
as far back as possible. The National
Highway Traffic Safety Administration (NHTSA) recommends a minimum
distance of 10" (25 cm) between an occupant’s chest and an airbag.Warning: Do not use a child safety seat or
seat young children on a seat with an operational airbag in front of it. Doing socan cause injury or death if the airbaginflates.Warning: To ensure correct inflation of
the side airbags, maintain an
unobstructed gap between an occupant’s
torso and the side of Model S.Warning: Passengers should not lean their
heads against the doors. Doing so can cause injury if a curtain airbag inflates.Warning: Do not allow passengers to
obstruct the operation of an airbag by
placing feet, knees or any other part of the body on or near an airbag.Warning: Do not attach or place objects
on or near the front airbags, the side of
the front seats, the headliner at the side of the vehicle, or any other airbag coverthat could interfere with inflation of an
airbag. Objects can cause serious injury if the vehicle is in a collision severe enoughto cause the airbag to inflate.Warning: Following inflation, some airbag
components are hot. Do not touch until
they have cooled.
Airbags
34Model S Owner's Manual
Page 38 of 159

Adjusting Position
Adjust the steering wheel to the desired driving position by moving the control on the
left side of the steering column.Warning: Do not make adjustments while
driving.
Adjusting Sensitivity
You can adjust the feel and sensitivity of the
steering system to suit your personal preference:
1. On the touchscreen, touch Controls.
2. Choose a steering option:
• Comfort - reduces the effort required to turn the wheel. In town, Model S
feels easier to drive and park.
• Standard - Tesla believes that this setting offers the best handling andresponse in all conditions.
• Sport - Increases the effort required to turn the wheel. When driving athigher speeds, Model S feels more
responsive.
The only way to really know which option you
like best is to try them.
Using Left Steering Wheel Buttons
Use the buttons on the left side of the steering
wheel to change radio stations, control the
media player’s volume, and control what
displays on the left side of the instrument panel (whenever the Navigation app is not
displaying instructions).
Note: The volume control on the steering
wheel does not adjust spoken navigation instructions. To control the volume of
navigation instructions, use the navigation
window on the touchscreen (see Using Maps
on page 81).
1. Next
If you are listening to local or satellite
radio and you have defined more than one
radio preset, press to play the next preset in the radio band that is currently playing.
If you have not defined more than one
preset, press to go to the next available
frequency.
If you are listening to Internet radio, or to
an audio file on a connected Bluetooth or USB device, press to skip to the next song
or station.
2. Scroll Wheel
• To adjust the media volume, roll up or down.
• To mute the media volume, or to pause/play an audio file, tap the
wheel.
• To choose what displays on the left side of the instrument panel, press
and hold the scroll wheel to display
the available options. Then roll the
scroll wheel to browse through the
options. Tap the scroll wheel when the option you want is highlighted.
3. Previous
Same as described above for Next, except
it skips to the previous song or station.
Note: Regardless of how you customize the
left side of the instrument panel, it
automatically changes to display navigation instructions (if applicable), or to let you knowif a door or trunk is open when Model S is in a
driving gear.
Steering Wheel
36Model S Owner's Manual
Page 39 of 159

Using Right Steering Wheel Buttons
Use the buttons on the right side of the steering wheel to control the phone, tochoose and control a Model S feature bytapping the scroll wheel, to use voice
commands, and to choose what displays on the right side of the instrument panel.
Note: Regardless of how you customize the
right side of the instrument panel, it automatically displays the phone menu to
help you easily handle phone calls on your
Bluetooth connected phone.
1. Phone Menu or Voice Commands
During a phone call, press to display the phone menu, which gives you the option
to mute, hold, or end the call.
Press and hold to use voice commands to
call a contact, navigate, or listen to
Internet music. When you hear the tone,
speak your command. Release the button
when you finish speaking. For details, see Using Voice Commands on page 37.
2. Scroll Wheel
• To choose what displays on the right side of the instrument panel, pressand hold the scroll wheel to displaythe available options. Then roll the
scroll wheel to browse through the options. Tap the scroll wheel when the
option you want is highlighted.
• When the right side of the instrument panel displays a menu, rolling the
wheel highlights the next item in a
menu and tapping the wheel selects
the highlighted item. When a menu is
not displayed, rolling the wheel
adjusts your chosen controllable
feature (see Item 3 below).
3. Customize the Scroll Wheel/Exit a Menu
Press, then use the scroll wheel to select
Phone to browse through and select
contacts and recent calls.
Press, then use the scroll wheel to select
Customize to choose the Model S feature
that you want to control whenever you
roll the wheel when a menu is not
displayed. You can choose from:
• All. Allows you to roll the wheel and
choose from all available functions
(listed next).
• Climate Temps . Roll the wheel to
change the temperature, or press the
wheel to turn the climate control
system on and off.
• Fan Speed . Roll the wheel to adjust
the speed of the fan used to cool or
heat the cabin.
• Display Brightness . Roll the wheel to
change the brightness level of the
displays, or press the wheel to restore default settings.
• Sunroof (if equipped). Roll the wheel
to adjust the position of the sunroof.
• Media Source . Roll the wheel to
control what Media Player is playing,
or press the wheel to add/remove the
currently playing station or audio track as a Favorite.
Press the lower right button at any time to either exit a menu, or go back one level in the
menu structure.
Using Voice Commands
You can use voice commands to call a
contact, navigate, or listen to Internet music.
Press and hold the voice button on the upper
right side of the steering wheel. When you
hear the tone, speak your command while
continuing to hold down the voice button.
Release the button when you finish speaking.
• To call a contact on your Bluetooth- connected phone, say “Call” or “Dial,”
followed by the contact’s first and/or last name(s). For example, “Call Eric” or “Call
Mike Phillips.”
• To search for, or navigate to, a location, say “Where is,” “Drive,” or “Navigate,”followed by an address, business name,business category, or landmark. Forexample, “Drive to Tesla in Menlo Park,”
“Drive to Starbucks on Homestead in
Cupertino,” or “Where is Stanford
University?” If you have defined a navigation address for your home or work
locations, you can use a voice command to "Navigate home" or "Navigate to work."
Steering Wheel
Driving37
Page 41 of 159

Adjusting Exterior Side MirrorsPress the button associated with the mirror
you want to adjust (left or right). The button's
light turns on and you can then press the dial
to move the mirror to the desired position.
Repeat for the other side mirror. If Model S is
equipped with the optional tech package, you
may need to touch SAVE on the touchscreen
to save the mirror adjustment in your driver
profile.
To fold exterior mirrors, press the center
button.
If Model S is equipped with the optional tech
package, the driver’s side mirror automatically
dims at night, in proportion to the level of
glare from the headlights of a vehicle behind
you (except when in Reverse gear). Also, both
exterior side mirrors have heaters that turn on and off with the rear window heater.
Mirror Auto-tilt When Reversing
If Model S is equipped with the optional tech
package, both exterior mirrors can
automatically tilt downward when backing up.
To adjust the auto-tilt position, shift into
Reverse, then adjust the mirrors as described above (press the button associated with themirror you want to adjust, then press the dial
to move the mirror to the desired position). Touch SAVE on the touchscreen to save the
mirror adjustment in your driver profile.
When you shift back into Drive, the mirrors tilt back to their normal (upward) position. But
now that you have adjusted them for backing
up, they automatically tilt to the selected
downward position whenever you shift into
Reverse.
You can turn the auto-tilt feature on or off using the touchscreen, Touch Controls >
Settings > Vehicle > Mirror Auto-Tilt .
Rear View Mirror
Except when in Reverse gear, the rear view mirror automatically dims in proportion to thelevel of glare from the headlights of a vehiclebehind you.
Mirrors
Driving39
Page 43 of 159

Shifting GearsWhen Model S is in Park, you must press the
brake to shift to another gear.
Move the lever up or down to change gears.
If you try to shift into a gear that the current
driving speed prohibits, you will hear a chime
and the gear does not change.
Reverse
Push the lever all the way up and release. You can only shift into Reverse when Model S is
stopped or moving less than 5 mph (8 km/h). If moving less than 1 mph (1.6 km/h), you must
press the brake.
Neutral
Push the lever up or down to the first position
and release to shift into Neutral. Neutral
allows Model S to roll freely.
If Model S is in Park and you use the
touchscreen to release the parking brake ( Controls > E-Brake & Power Off ), Model S
shifts into Neutral (see Parking Brake on page
59).
Model S automatically shifts into Park when you exit. To leave Model S in Neutral, use the
touchscreen to engage Tow mode (see Leaving Model S in Neutral - Tow Mode on
page 41).
Drive
Push the lever all the way down and release. You can shift into Drive when Model S isstopped or moving less than 5 mph (8 km/h)
in Reverse. If Model S is moving less than
1 mph (1.6 km/h), you must press the brake to shift into Drive.
Park
With Model S stopped, press the end of the gear selector. Whenever Model S is in Park,
the parking brake is applied.
Model S automatically shifts into Park
whenever you:
• Leave the vehicle.
• Connect a charge cable.
Leaving Model S in Neutral - Tow
Mode
Model S automatically shifts into Parkwhenever you finish driving and leaveModel S. To keep Model S in Neutral when youexit, allowing it to roll freely (for example,pulling onto a transporter, etc.), activate Tow
mode:
1. Shift into Park.
2. Press the brake pedal.
3. Touch Controls > E-Brake & Power Off >
Tow Mode .
Model S beeps, and shifts into Neutral (which
releases the parking brake).
When Tow mode is active, Model S
displays this indicator light on the
instrument panel, along with a
message telling you that Model S will
remain free rolling.
Note: In Tow mode, Model S does not shift
into a driving gear. To cancel Tow mode, shift into Park or touch Tow mode again. Towmode also cancels if you use the touchscreen
to apply the parking brake ( Controls > E-
Brake & Power Off > Parking Brake ).
Gears
Driving41
Page 44 of 159
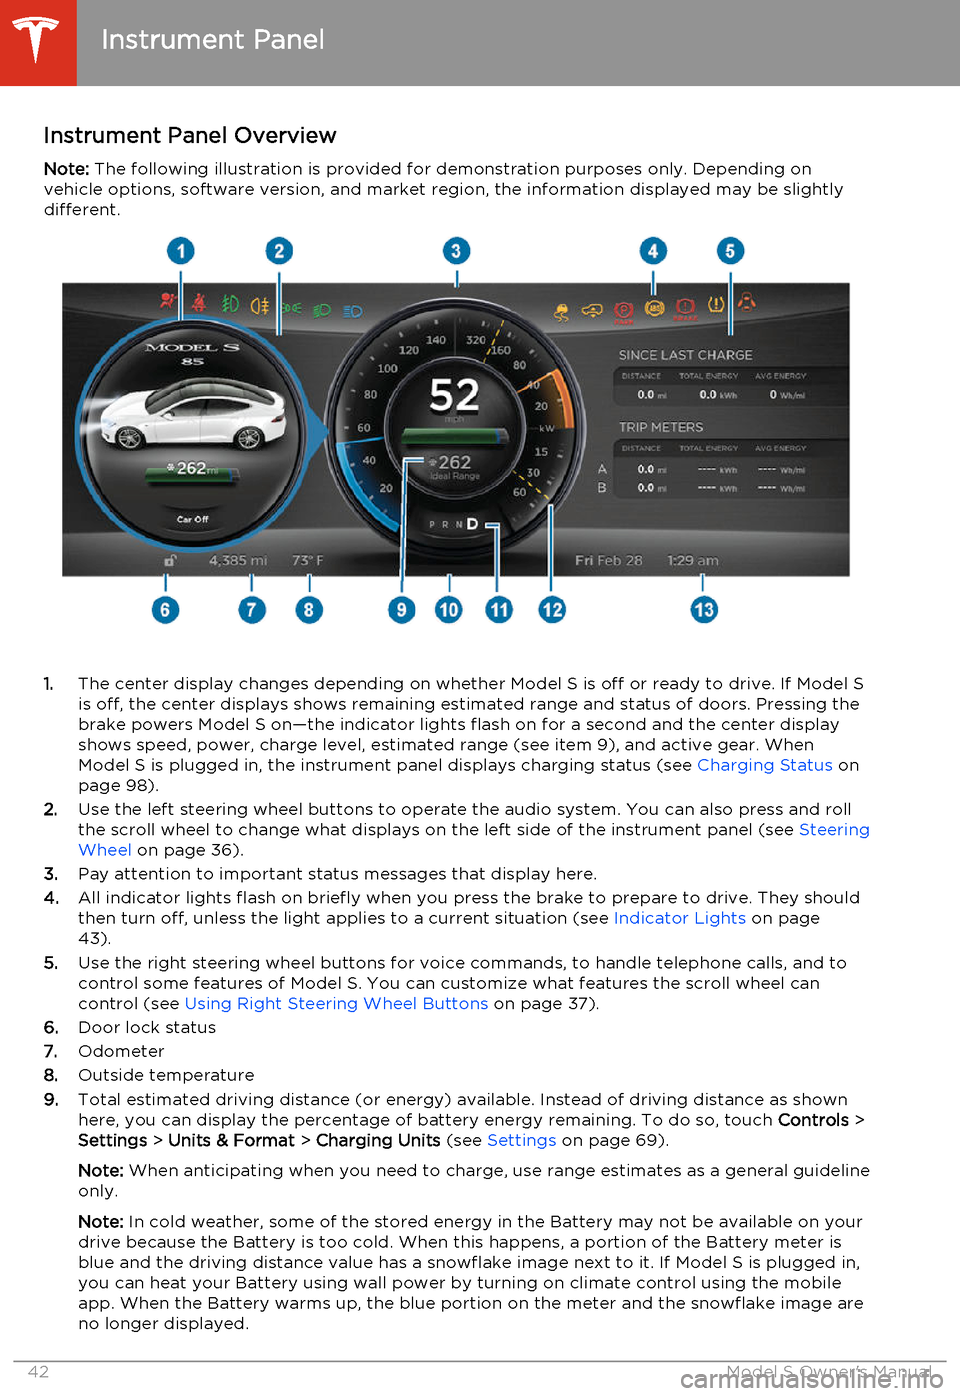
Instrument Panel OverviewNote: The following illustration is provided for demonstration purposes only. Depending on
vehicle options, software version, and market region, the information displayed may be slightly different.
1. The center display changes depending on whether Model S is off or ready to drive. If Model S
is off, the center displays shows remaining estimated range and status of doors. Pressing thebrake powers Model S on—the indicator lights flash on for a second and the center display
shows speed, power, charge level, estimated range (see item 9), and active gear. When
Model S is plugged in, the instrument panel displays charging status (see Charging Status on
page 98).
2. Use the left steering wheel buttons to operate the audio system. You can also press and roll
the scroll wheel to change what displays on the left side of the instrument panel (see Steering
Wheel on page 36).
3. Pay attention to important status messages that display here.
4. All indicator lights flash on briefly when you press the brake to prepare to drive. They should
then turn off, unless the light applies to a current situation (see Indicator Lights on page
43).
5. Use the right steering wheel buttons for voice commands, to handle telephone calls, and to
control some features of Model S. You can customize what features the scroll wheel can control (see Using Right Steering Wheel Buttons on page 37).
6. Door lock status
7. Odometer
8. Outside temperature
9. Total estimated driving distance (or energy) available. Instead of driving distance as shown
here, you can display the percentage of battery energy remaining. To do so, touch Controls >
Settings > Units & Format > Charging Units (see Settings on page 69).
Note: When anticipating when you need to charge, use range estimates as a general guideline
only.
Note: In cold weather, some of the stored energy in the Battery may not be available on your
drive because the Battery is too cold. When this happens, a portion of the Battery meter is
blue and the driving distance value has a snowflake image next to it. If Model S is plugged in,
you can heat your Battery using wall power by turning on climate control using the mobile
app. When the Battery warms up, the blue portion on the meter and the snowflake image are
no longer displayed.
Instrument Panel
42Model S Owner's Manual
Page 45 of 159

10.Pay attention to alert messages that appear at the bottom center of the instrument panel. If
any alerts are in effect, you can view information about them by touching the alert icon
(exclamation mark) on the touchscreen’s status bar (the topmost area of the touchscreen).
11. Currently selected gear: Park, Reverse, Neutral, or Drive.
12. Dashed lines appear on the power meter if Model S is limiting power. The dashed lines appear
on the top portion when power available for acceleration is being limited, and on the bottom
portion when power that can be gained by regenerative braking is limited. Model S limits
power for many reasons. Here are just a few examples:
• Acceleration may be limited when the Battery is reaching a low state of charge or if the powertrain is hot.
• Both acceleration and regenerative braking may be limited when the ambient temperature is either very high or very low.
• Regenerative braking may be limited when the Battery is fully charged.
13. Date and time
Indicator Lights Indicator lights flash on briefly when you press the brake pedal to prepare for driving. Unless anindicator light applies to a current situation, they should turn off. If an indicator light fails to turnon or off, contact Tesla.
In addition to indicator lights, alerts display on the top or bottom center of the instrument panel.
If alerts are in effect, an alert icon (exclamation mark) displays on the top of the touchscreen.
Touch this icon to display a description of the alert.IndicatorDescriptionAirbag safety. If this indicator does not flash on briefly when Model S
prepares to drive, or if it remains on, contact Tesla immediately. See Airbag
Warning Indicator on page 34.A seat belt for an occupied seat is not fastened. Note: Depending on the
date of manufacture, rear seating positions may not be equipped with a seat
belt reminder. See Seat Belts on page 19.Front fog lights (optional). See Lights on page 46.Parking lights (side marker lights, tail lights, and license plate lights) are on.
See Lights on page 46.Headlight low beams are on.Headlight high beams are on. See Headlight High Beams on page 48.Instrument Panel
Driving43
Page 46 of 159

IndicatorDescriptionElectronic stability control systems are applying the brake to the relevant
wheel to prevent slippage (light flashes). See Traction Control on page 60.The traction control system has been disabled. See Traction Control on page
60.A Smart Air Suspension fault is detected. Contact Tesla. See Smart Air
Suspension on page 75.Smart Air Suspension’s automatic self-leveling is disabled. In other words,
Model S is in Jack mode and is ready to be lifted or pulled onto a transporter. Jack mode cancels when Model S is driven over 4.5 mph(7 km/h). See Smart Air Suspension on page 75.
The parking brake is manually applied. See Parking Brake on page 59.A parking brake fault is detected. Contact Tesla. See Parking Brake on page
59.An ABS (Anti-lock Braking System) fault is detected. See Brakes on page
58. Contact Tesla immediately.A brake system fault is detected or the brake fluid level is low. See Brakes
on page 58. Contact Tesla immediately.Tire pressure warning. The pressure of a tire is out of range. If a fault with
the Tire Pressure Monitoring System (TPMS) is detected, the indicator
flashes. For a TPMS fault, contact Tesla. See Tire Care and Maintenance on
page 100.
A door or trunk is open. See Using Exterior Door Handles on page 6.Flashes green when the left turn signal is operating. Both turn signal
indicators flash green when the hazard warning flashers are operating.Instrument Panel
44Model S Owner's Manual