2014 SUBARU IMPREZA WRX ECO mode
[x] Cancel search: ECO modePage 266 of 414

&Sport Sharp (S#) mode
! For maximum performance driving
For sports-minded drivers, the Sport
Sharp (S#) mode offers an exhilarating
level of engine performance and control.
The throttle becomes more responsive
regardless of the engine speed. Delivering
maximum driving enjoyment, this mode is
ideal for tackling twisting roads and for
merging or overtaking other vehicles on
the freeway with confidence. &
SI-DRIVE selector
When you rotate the SI-DRIVE selector to
the left, the current SI-DRIVE mode
changes to Sport (S) mode. When you
rotate it to the right, the mode changes to
Sport Sharp (S#) mode, and when you
push it, the mode changes to Intelligent (I)
mode. After performing this operation, the
switch returns to its original location.
NOTE . The next time you turn on the
engine, after you turned off the engine
in the Sport Sharp (S#) mode, the SI-
DRIVE mode changes to the Sport (S)mode.. The next time you turn on the
engine, after you turned off the engine
in the Sport (S) mode or Intelligent (I)
mode, the SI-DRIVE mode will stay in the same mode as when the engine
was turned off..
While the engine is running, if the
CHECK ENGINE warning light/malfunc-
tion indicator light illuminates, the SI-
DRIVE mode changes to the Sport (S)
mode. In this case, it is not possible to
change to the Sport Sharp (S#) mode or
Intelligent (I) mode.. If there is a possibility that the
engine could overheat because of a
temperature increase of the engine
coolant, it is not possible to change to
the Sport Sharp (S#) mode. While the
vehicle is in the Sport Sharp (S#) mode,
it changes to the Sport (S) mode when
the engine coolant temperature in- creases.. If any of the SI-DRIVE indicators
blink, the SI-DRIVE system may be
malfunctioning. Contact your SUBARU
dealer.
Starting and operating/SI –DRIVE (STI)7-23
Page 273 of 414

7-30Starting and operating/Vehicle Dynamics Control system
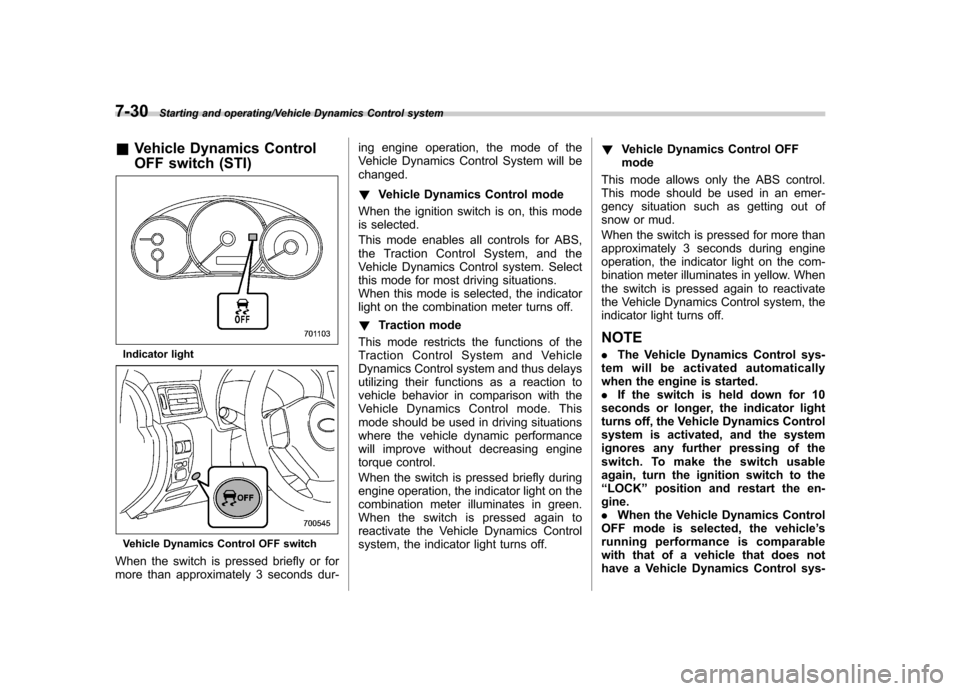
&Vehicle Dynamics Control
OFF switch (STI)
Indicator light
Vehicle Dynamics Control OFF switch
When the switch is pressed briefly or for
more than approximately 3 seconds dur- ing engine operation, the mode of the
Vehicle Dynamics Control System will bechanged. !
Vehicle Dynamics Control mode
When the ignition switch is on, this mode
is selected.
This mode enables all controls for ABS,
the Traction Control System, and the
Vehicle Dynamics Control system. Select
this mode for most driving situations.
When this mode is selected, the indicator
light on the combination meter turns off. ! Traction mode
This mode restricts the functions of the
Traction Control System and Vehicle
Dynamics Control system and thus delays
utilizing their functions as a reaction to
vehicle behavior in comparison with the
Vehicle Dynamics Control mode. This
mode should be used in driving situations
where the vehicle dynamic performance
will improve without decreasing engine
torque control.
When the switch is pressed briefly during
engine operation, the indicator light on the
combination meter illuminates in green.
When the switch is pressed again to
reactivate the Vehicle Dynamics Control
system, the indicator light turns off. !
Vehicle Dynamics Control OFFmode
This mode allows only the ABS control.
This mode should be used in an emer-
gency situation such as getting out of
snow or mud.
When the switch is pressed for more than
approximately 3 seconds during engine
operation, the indicator light on the com-
bination meter illuminates in yellow. When
the switch is pressed again to reactivate
the Vehicle Dynamics Control system, the
indicator light turns off.
NOTE . The Vehicle Dynamics Control sys-
tem will be activated automatically
when the engine is started.. If the switch is held down for 10
seconds or longer, the indicator light
turns off, the Vehicle Dynamics Control
system is activated, and the system
ignores any further pressing of the
switch. To make the switch usable
again, turn the ignition switch to the“ LOCK ”position and restart the en-
gine.. When the Vehicle Dynamics Control
OFF mode is selected, the vehicle ’s
running performance is comparable
with that of a vehicle that does not
have a Vehicle Dynamics Control sys-
Page 274 of 414

tem. Do not deactivate the Vehicle
Dynamics Control system except when
absolutely necessary..Even when the Vehicle Dynamics
Control OFF mode is selected, compo-
nents of the brake control system may
still activate. When the brake control
system is activated, the Vehicle Dy-
namics Control operation indicator
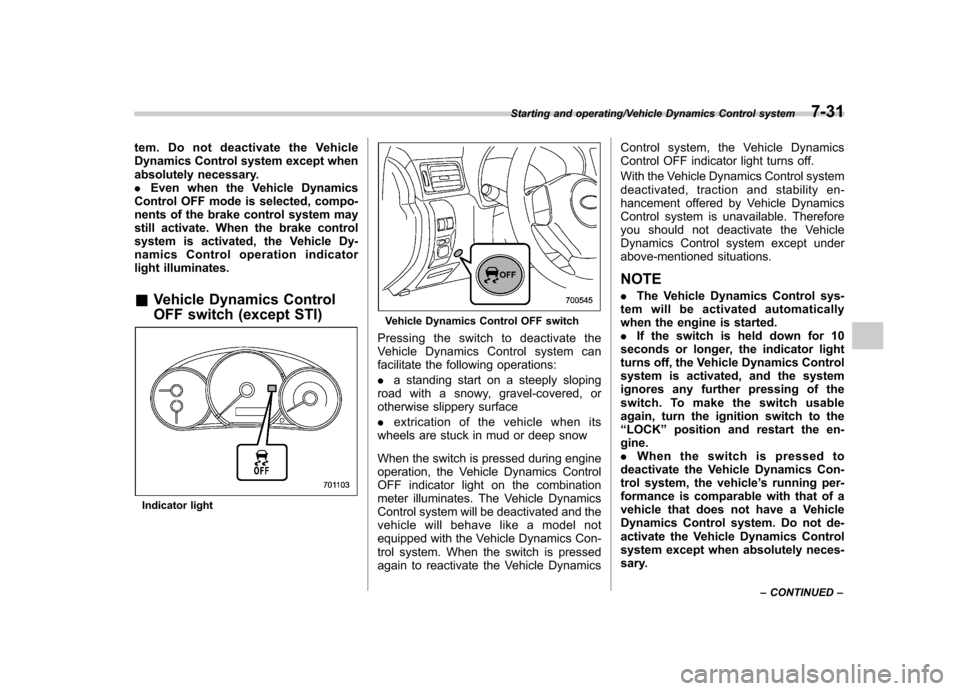
light illuminates. & Vehicle Dynamics Control
OFF switch (except STI)
Indicator light
Vehicle Dynamics Control OFF switch
Pressing the switch to deactivate the
Vehicle Dynamics Control system can
facilitate the following operations: . a standing start on a steeply sloping
road with a snowy, gravel-covered, or
otherwise slippery surface . extrication of the vehicle when its
wheels are stuck in mud or deep snow
When the switch is pressed during engine
operation, the Vehicle Dynamics Control
OFF indicator light on the combination
meter illuminates. The Vehicle Dynamics
Control system will be deactivated and the
vehicle will behave like a model not
equipped with the Vehicle Dynamics Con-
trol system. When the switch is pressed
again to reactivate the Vehicle Dynamics Control system, the Vehicle Dynamics
Control OFF indicator light turns off.
With the Vehicle Dynamics Control system
deactivated, traction and stability en-
hancement offered by Vehicle Dynamics
Control system is unavailable. Therefore
you should not deactivate the Vehicle
Dynamics Control system except under
above-mentioned situations. NOTE .
The Vehicle Dynamics Control sys-
tem will be activated automatically
when the engine is started.. If the switch is held down for 10
seconds or longer, the indicator light
turns off, the Vehicle Dynamics Control
system is activated, and the system
ignores any further pressing of the
switch. To make the switch usable
again, turn the ignition switch to the“ LOCK ”position and restart the en-
gine.. Whentheswitchispressedto
deactivate the Vehicle Dynamics Con-
trol system, the vehicle ’s running per-
formance is comparable with that of a
vehicle that does not have a Vehicle
Dynamics Control system. Do not de-
activate the Vehicle Dynamics Control
system except when absolutely neces-
sary.
Starting and operating/Vehicle Dynamics Control system7-31
– CONTINUED –
Page 284 of 414

New vehicle break-in driving–the first
1,000 miles (1,600 km) ..................................... 8-2
Fuel economy hints ............................................ 8-2
Engine exhaust gas (carbon monoxide) ............ 8-2
Catalytic converter .............................................. 8-3
Periodic inspections ........................................... 8-4
Driving in foreign countries ............................... 8-4
Driving tips for AWD models .............................. 8-4
Winter driving ...................................................... 8-6
Operation during cold weather ............................. 8-6
Driving on snowy and icy roads .......................... 8-7Corrosion protection
............................................ 8-8
Snow tires ........................................................... 8-8
Tire chains .......................................................... 8-9
Rocking the vehicle ............................................. 8-9
Loading your vehicle ......................................... 8-10
Vehicle capacity weight ...................................... 8-10
GVWR and GAWR (Gross Vehicle Weight Rating and Gross Axle Weight Rating) ........................ 8-11
Roof molding and crossbar (if equipped) ............ 8-12
Trailer towing ..................................................... 8-13 Driving tips
8
Page 287 of 414

8-4Driving tips/Periodic inspections
Periodic inspections
To keep your vehicle in the best condition
at all times, always have the recom-
mended maintenance services listed in
the maintenance schedule in the“War-
ranty and Maintenance Booklet ”per-
formed at the specified time or mileageintervals. Driving in foreign countries
When planning to use your vehicle in
another country: .
Confirm the availability of the correct
fuel. Refer to “Fuel requirements ”F 7-3.
. Comply with all regulations and re-
quirements of each country. Driving tips for AWD models
WARNING
. Always maintain a safe driving
speed according to the road and
weather conditions in order to
avoid having an accident on a
sharp turn, during sudden brak-
ing or under other similar condi-tions.
. Always use the utmost care in
driving –overconfidence be-
cause you are driving an All-
Wheel Drive vehicle could easily
lead to a serious accident.
. When you replacing or installing
tire(s), all four tires must be the
same for following items.
(a) Size
(b) Circumference
(c) Speed symbol
(d) Load index
(e) Construction
(f) Manufacturer
(g) Brand (tread pattern)
(h) Degrees of wear
For the items (a) to (d), you must
obey the specification that is
Page 288 of 414

printed on the tire placard. The
tire placard is located on the
bottom of driver’s door pillar.
If all of four tires are not the same
for items (a) to (h), there is a
possibility that serious mechan-
ical damage could occur to the
drive train of your car, and affect
the following. — Ride
— Handling
— Braking
— Speedometer/Odometer
calibration— Clearance between the body
and tires
It also may be dangerous and
lead to loss of vehicle control,
and it can lead to an accident.
CAUTION
If you use a temporary spare tire to
replace a flat tire, be sure to use the
original temporary spare tire stored
in the vehicle. Using other sizes may
result in severe mechanical damage
to the drive train of your vehicle.
All-Wheel Drive distributes the engine
power to all four wheels. AWD models
provide better traction when driving on
slippery, wet or snow-covered roads and
when moving out of mud, dirt and sand.
By shifting power between the front and
rear wheels, SUBARU AWD can also
provide added traction during acceleration
and added engine braking force duringdeceleration.
Therefore, your SUBARU AWD vehicle
may handle differently than an ordinary
two wheel drive vehicle and it contains
some features unique to AWD. For safety
purposes as well as to avoid damaging
the AWD system, you should keep the
following tips in mind. . An AWD model is better able to climb
steeper roads under snowy or slippery conditions than a two wheel drive vehicle.
There is little difference in handling,
however, during extremely sharp turns or
sudden braking. Therefore, when driving
down a slope or turning corners, be sure
to reduce your speed and maintain an
ample distance from other vehicles. .
Always check the cold tire pressure
before starting to drive. The recom-
mended tire pressure is provided on the
tire placard, which is located under the
door latch on the driver ’s side.
. Frequent driving of an AWD model
under hard-driving conditions such as
steep hills or dusty roads will necessitate
more frequent replacement of the follow-
ing items than that specified in “Mainte-
nance schedule ”F 11-3.
– Engine oil
– Brake fluid
– Rear differential gear oil
– Manual transmission oil
. There are some precautions that you
must observe when towing your vehicle.
For detailed information, refer to “Towing ”
F 9-12.
Driving tips/Driving tips for AWD models8-5
Page 315 of 414

10-2Appearance care/Exterior care
Exterior care &Washing
CAUTION
. When washing the vehicle, the
brakes may get wet. As a result,
the brake stopping distance will
be longer. To dry the brakes,
drive the vehicle at a safe speed
while lightly depressing the
brake pedal to heat up thebrakes.
. Do not wash the engine compart-
ment and area adjacent to it. If
water enters the engine air in-
take, electrical parts or the power
steering fluid reservoir, it will
cause engine trouble or a mal-
function of power steering.
. Do not use any organic solvents
when washing the surface of the
bulb assembly cover. However, if
a detergent with organic solvents
is used to wash the cover sur-
face, completely rinse off the
detergent with water. Otherwise,
the cover surface may be da-maged.
. For 5-door models, since your
vehicle is equipped with a rear wiper, automatic car-wash
brushes could become tangled
around it, damaging the wiper
arm and other components. Ask
the automatic car-wash operator
not to let the brushes touch the
wiper arm or to fix the wiper arm
on the rear window glass with
adhesive tape before operating
the machine.
NOTE
When having your vehicle washed in
an automatic car wash, make sure
beforehand that the car wash is of
suitable type.
The best way to preserve your vehicle ’s
beauty is frequent washing. Wash the
vehicle at least once a month to avoid
contamination by road grime.
Wash dirt off with a wet sponge and plenty
of lukewarm or cold water. Do not wash
the vehicle with hot water and in directsunlight.
Salt, chemicals, insects, tar, soot, tree
sap, and bird droppings should be washed
off by using a light detergent, as required.
If you use a light detergent, make certain
that it is a neutral detergent. Do not use
strong soap or chemical detergents. All cleaning agents should be promptly
flushed from the surface and not allowed
to dry there. Rinse the vehicle thoroughly
with plenty of lukewarm water. Wipe the
remaining water off with a chamois or softcloth. !
Washing the underbody
Chemicals, salts and gravel used for
deicing road surfaces are extremely cor-
rosive, accelerating the corrosion of un-
derbody components, such as the exhaust
system, fuel and brake lines, brake
cables, floor pan and fenders, and sus-pension.
Thoroughly flush the underbody and in-
side of the fenders with lukewarm or cold
water at frequent intervals to reduce the
harmful effects of such agents.
Mud and sand adhering to the underbody
components may accelerate their corro-sion.
After driving off-road or on muddy or
sandy roads, wash the mud and sand off
the underbody. Carefully flush the suspen-
sion and axle parts, as they are particu-
larly prone to mud and sand buildup. Do
not use a sharp-edged tool to remove
caked mud.
Page 320 of 414

Maintenance schedule....................................... 11-3
Maintenance precautions ................................... 11-3
Before checking or servicing in the engine compartment .................................................... 11-4
When checking or servicing in the engine compartment .................................................... 11-4
When checking or servicing in the engine compartment while the engine is running .......... 11-5
Engine hood ....................................................... 11-5
Engine compartment overview .......................... 11-6
Turbo models except STI .................................... 11-6
STI..................................................................... 11-7
Engine oil ............................................................ 11-8
Checking the oil level ......................................... 11-8
Changing the oil and oil filter .............................. 11-9
Recommended grade and viscosity .................. 11-10
Synthetic oil ..................................................... 11-10
Cooling system ................................................ 11-11
Cooling fan, hose and connections ................... 11-11
Engine coolant ................................................. 11-12
Air cleaner element .......................................... 11-13
Replacing the air cleaner element ..................... 11-13
Spark plugs ...................................................... 11-14
Recommended spark plugs .............................. 11-14
Drive belts ........................................................ 11-15
Manual transmission oil .................................. 11-16
Checking the oil level ....................................... 11-16
Recommended grade and viscosity .................. 11-16
Rear differential gear oil .................................. 11-17
Recommended grade and viscosity .................. 11-17Power steering fluid
........................................ 11-17
Checking the fluid level .................................... 11-17
Recommended fluid ......................................... 11-18
Brake fluid ........................................................ 11-18
Checking the fluid level .................................... 11-18
Recommended brake fluid ............................... 11-19
Clutch fluid ....................................................... 11-19
Checking the fluid level .................................... 11-19
Recommended clutch fluid ............................... 11-20
Brake booster .................................................. 11-20
Brake pedal ...................................................... 11-21
Checking the brake pedal free play .................. 11-21
Checking the brake pedal reserve distance....... 11-21
Clutch pedal ..................................................... 11-21
Checking the clutch function ............................ 11-21
Checking the clutch pedal free play .................. 11-22
Hill start assist system .................................... 11-22
Replacement of brake pad and lining ............ 11-22
Breaking-in of new brake pads and linings ....... 11-23
Parking brake stroke ....................................... 11-23
Tires and wheels .............................................. 11-24
Types of tires ................................................... 11-24
Tire pressure monitoring system (TPMS) (if equipped) ...................................................... 11-24
Tire inspection ................................................. 11-25
Tire pressures and wear .................................. 11-26
Wheel balance ................................................. 11-28
Wear indicators ............................................... 11-28
Tire rotation direction mark .............................. 11-29
Tire rotation ..................................................... 11-29
Maintenance and service
11