2014 SKODA YETI USB
[x] Cancel search: USBPage 9 of 64
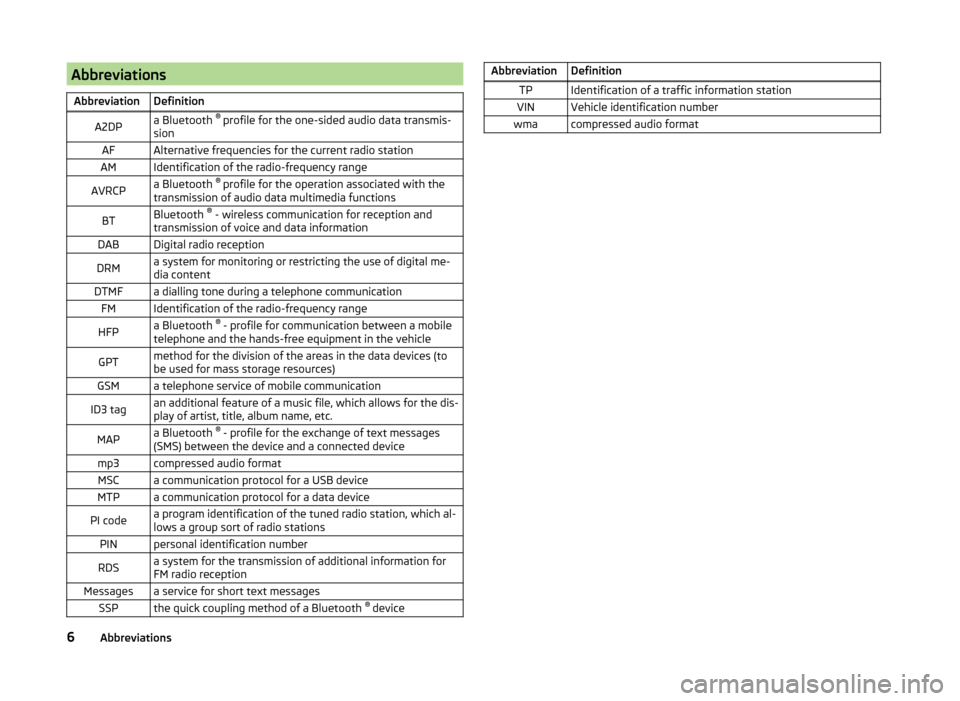
AbbreviationsAbbreviationDefinitionA2DPa Bluetooth ®
profile for the one-sided audio data transmis-
sionAFAlternative frequencies for the current radio stationAMIdentification of the radio-frequency rangeAVRCPa Bluetooth ®
profile for the operation associated with the
transmission of audio data multimedia functionsBTBluetooth ®
- wireless communication for reception and
transmission of voice and data informationDABDigital radio receptionDRMa system for monitoring or restricting the use of digital me-
dia contentDTMFa dialling tone during a telephone communicationFMIdentification of the radio-frequency rangeHFPa Bluetooth ®
- profile for communication between a mobile
telephone and the hands-free equipment in the vehicleGPTmethod for the division of the areas in the data devices (to
be used for mass storage resources)GSMa telephone service of mobile communicationID3 tagan additional feature of a music file, which allows for the dis-
play of artist, title, album name, etc.MAPa Bluetooth ®
- profile for the exchange of text messages
(SMS) between the device and a connected devicemp3compressed audio formatMSCa communication protocol for a USB deviceMTPa communication protocol for a data devicePI codea program identification of the tuned radio station, which al-
lows a group sort of radio stationsPINpersonal identification numberRDSa system for the transmission of additional information for
FM radio receptionMessagesa service for short text messagesSSPthe quick coupling method of a Bluetooth ®
deviceAbbreviationDefinitionTPIdentification of a traffic information stationVINVehicle identification numberwmacompressed audio format6Abbreviations
Page 17 of 64
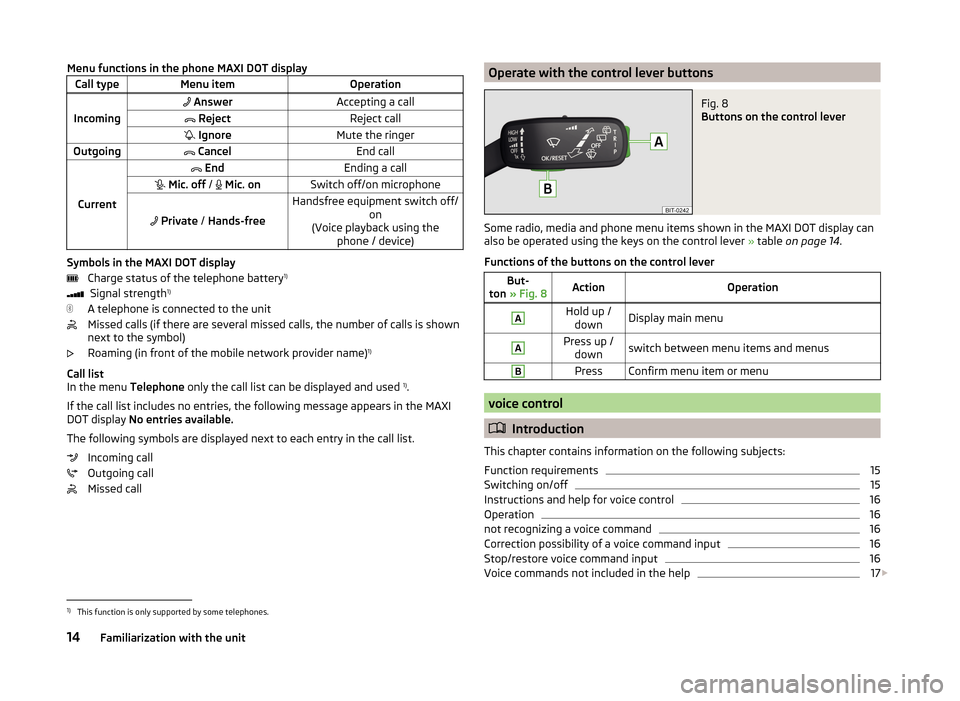
Menu functions in the phone MAXI DOT displayCall typeMenu itemOperation
Incoming
AnswerAccepting a call RejectReject call IgnoreMute the ringerOutgoing CancelEnd call
Current
EndEnding a call Mic. off / Mic. onSwitch off/on microphone
Private / Hands-free
Handsfree equipment switch off/
on
(Voice playback using the phone / device)
Symbols in the MAXI DOT display
Charge status of the telephone battery 1)
Signal strength 1)
A telephone is connected to the unit
Missed calls (if there are several missed calls, the number of calls is shown
next to the symbol)
Roaming (in front of the mobile network provider name) 1)
Call list
In the menu Telephone only the call list can be displayed and used 1)
.
If the call list includes no entries, the following message appears in the MAXI
DOT display No entries available.
The following symbols are displayed next to each entry in the call list. Incoming call
Outgoing call
Missed call
Operate with the control lever buttonsFig. 8
Buttons on the control lever
Some radio, media and phone menu items shown in the MAXI DOT display can
also be operated using the keys on the control lever » table on page 14 .
Functions of the buttons on the control lever
But-
ton » Fig. 8ActionOperationAHold up /
downDisplay main menuAPress up / downswitch between menu items and menusBPressConfirm menu item or menu
voice control
Introduction
This chapter contains information on the following subjects:
Function requirements
15
Switching on/off
15
Instructions and help for voice control
16
Operation
16
not recognizing a voice command
16
Correction possibility of a voice command input
16
Stop/restore voice command input
16
Voice commands not included in the help
17
1)
This function is only supported by some telephones.
14Familiarization with the unit
Page 23 of 64
Additional keypad language settings›
Press the button
→
→ More keypad languages .
In this menu, the keyboard character arrangement for the chosen language
can be selected, and with this the option for fast entry of the characters used
in the selected language.
It is then possible to swap between the languages in the input screen showing
a keyboard by pressing the function keys
» page 11 .
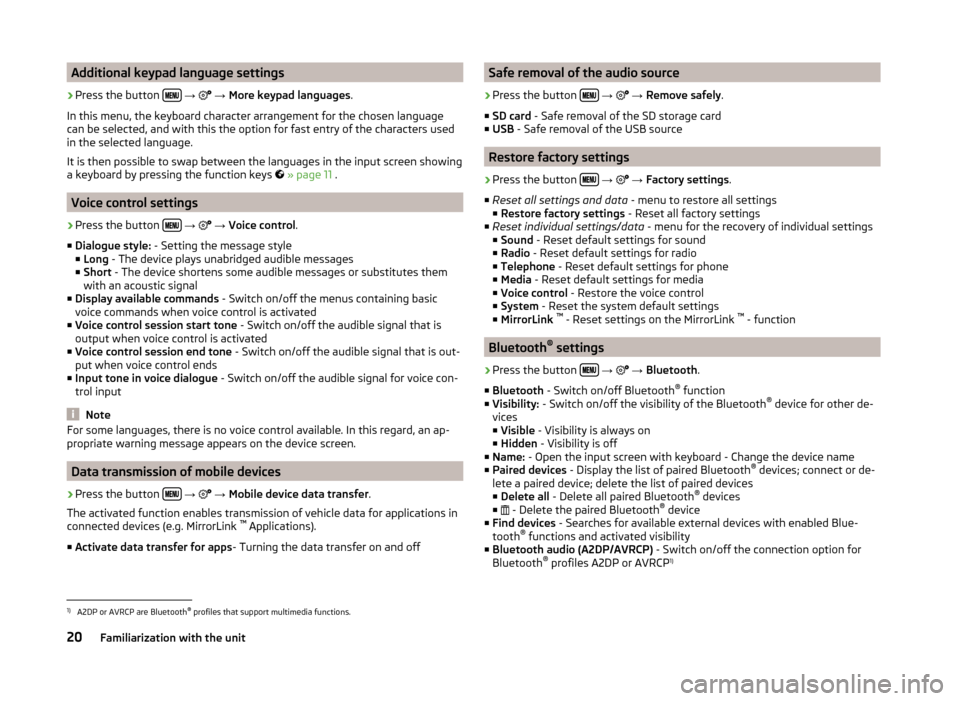
Voice control settings
›
Press the button
→
→ Voice control .
■ Dialogue style: - Setting the message style
■ Long - The device plays unabridged audible messages
■ Short - The device shortens some audible messages or substitutes them
with an acoustic signal
■ Display available commands - Switch on/off the menus containing basic
voice commands when voice control is activated
■ Voice control session start tone - Switch on/off the audible signal that is
output when voice control is activated
■ Voice control session end tone - Switch on/off the audible signal that is out-
put when voice control ends
■ Input tone in voice dialogue - Switch on/off the audible signal for voice con-
trol input
Note
For some languages, there is no voice control available. In this regard, an ap-
propriate warning message appears on the device screen.
Data transmission of mobile devices
›
Press the button
→
→ Mobile device data transfer .
The activated function enables transmission of vehicle data for applications in
connected devices (e.g. MirrorLink ™
Applications).
■ Activate data transfer for apps - Turning the data transfer on and off
Safe removal of the audio source›
Press the button
→
→ Remove safely .
■ SD card - Safe removal of the SD storage card
■ USB - Safe removal of the USB source
Restore factory settings
›
Press the button
→
→ Factory settings .
■ Reset all settings and data - menu to restore all settings
■ Restore factory settings - Reset all factory settings
■ Reset individual settings/data - menu for the recovery of individual settings
■ Sound - Reset default settings for sound
■ Radio - Reset default settings for radio
■ Telephone - Reset default settings for phone
■ Media - Reset default settings for media
■ Voice control - Restore the voice control
■ System - Reset the system default settings
■ MirrorLink ™
- Reset settings on the MirrorLink ™
- function
Bluetooth ®
settings
›
Press the button
→
→ Bluetooth .
■ Bluetooth - Switch on/off Bluetooth ®
function
■ Visibility: - Switch on/off the visibility of the Bluetooth ®
device for other de-
vices
■ Visible - Visibility is always on
■ Hidden - Visibility is off
■ Name: - Open the input screen with keyboard - Change the device name
■ Paired devices - Display the list of paired Bluetooth ®
devices; connect or de-
lete a paired device; delete the list of paired devices ■ Delete all - Delete all paired Bluetooth ®
devices
■ - Delete the paired Bluetooth ®
device
■ Find devices - Searches for available external devices with enabled Blue-
tooth ®
functions and activated visibility
■ Bluetooth audio (A2DP/AVRCP) - Switch on/off the connection option for
Bluetooth ®
profiles A2DP or AVRCP 1)
1)
A2DP or AVRCP are Bluetooth
®
profiles that support multimedia functions.
20Familiarization with the unit
Page 28 of 64
A radio station can be stored in the device memory in one of the following
ways.
Save station from the menu Radio›
In the menu Radio hold the desired station button
C
» Fig. 11 on page 22
until you hear an acoustic signal.
If a station was already stored in the desired position it is replaced with the
currently selected station.
Save station from the station list
›
In the list of available stations » page 23 press the function key of the de-
sired station longer.
A list of the station keys
C
is shown as well as a list of the functions keys for
the storage groups
E
» Fig. 11 on page 22 .
›
Select a storage group.
›
Press the station button.
The station is stored under the selected station button.
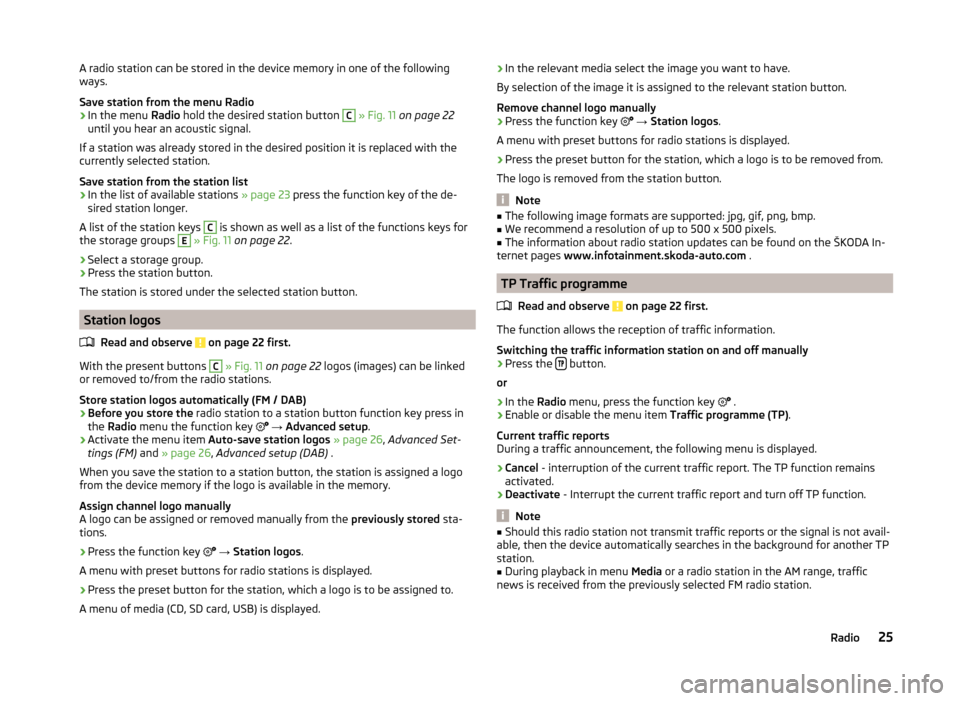
Station logos
Read and observe
on page 22 first.
With the present buttons
C
» Fig. 11 on page 22 logos (images) can be linked
or removed to/from the radio stations.
Store station logos automatically (FM / DAB)
›
Before you store the radio station to a station button function key press in
the Radio menu the function key
→ Advanced setup .
›
Activate the menu item Auto-save station logos » page 26 , Advanced Set-
tings (FM) and » page 26 , Advanced setup (DAB) .
When you save the station to a station button, the station is assigned a logo
from the device memory if the logo is available in the memory.
Assign channel logo manually
A logo can be assigned or removed manually from the previously stored sta-
tions.
›
Press the function key
→ Station logos .
A menu with preset buttons for radio stations is displayed.
›
Press the preset button for the station, which a logo is to be assigned to.
A menu of media (CD, SD card, USB) is displayed.
› In the relevant media select the image you want to have.
By selection of the image it is assigned to the relevant station button.
Remove channel logo manually›
Press the function key
→ Station logos .
A menu with preset buttons for radio stations is displayed.
›
Press the preset button for the station, which a logo is to be removed from.
The logo is removed from the station button.
Note
■ The following image formats are supported: jpg, gif, png, bmp.■We recommend a resolution of up to 500 x 500 pixels.■
The information about radio station updates can be found on the ŠKODA In-
ternet pages www.infotainment.skoda-auto.com .
TP Traffic programme
Read and observe
on page 22 first.
The function allows the reception of traffic information.
Switching the traffic information station on and off manually
›
Press the button.
or
›
In the Radio menu, press the function key
.
›
Enable or disable the menu item
Traffic programme (TP).
Current traffic reports
During a traffic announcement, the following menu is displayed.
›
Cancel - interruption of the current traffic report. The TP function remains
activated.
›
Deactivate - Interrupt the current traffic report and turn off TP function.
Note
■
Should this radio station not transmit traffic reports or the signal is not avail-
able, then the device automatically searches in the background for another TP
station.■
During playback in menu Media or a radio station in the AM range, traffic
news is received from the previously selected FM radio station.
25Radio
Page 33 of 64
In the area Athe display shows the selected audio source, and possibly the
audio source folder. Movement within the folder is done by pressing the func-
tion key for the folder.
By pressing one of the function keys for playback B
the playback starts and at
the same time the menu Media » Fig. 15 is displayed.
Note
■
In the folders and title lists a directory max. of 1000 entries is displayed de-
pending on the date of creation. The entries are arranged alphabetically.■
The scanning speed of the folder / track list depends on the connection
speed and volume of data.
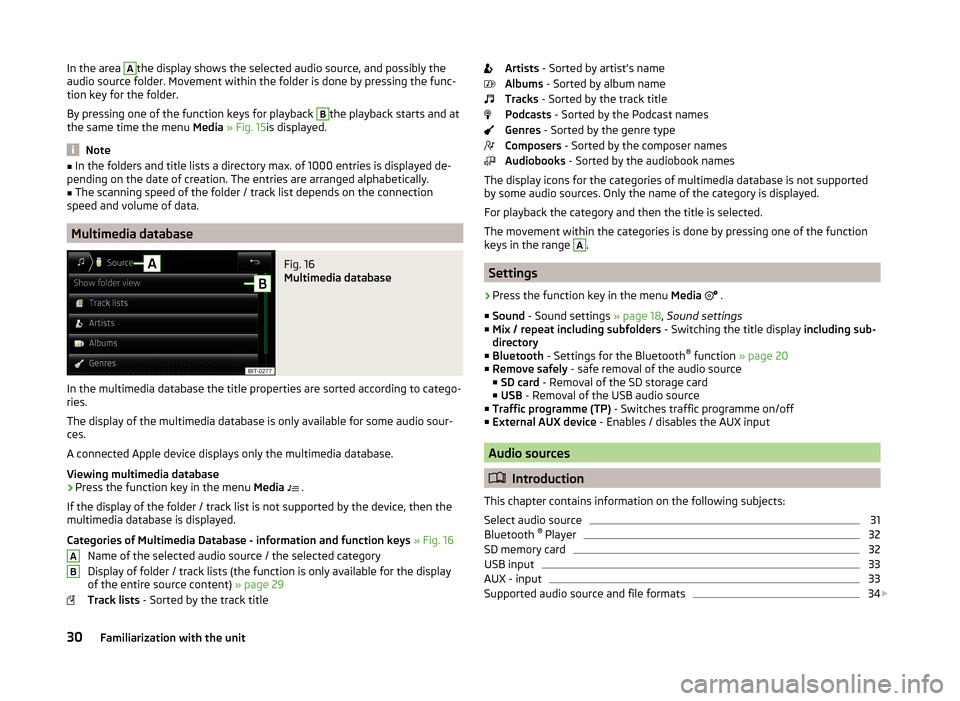
Multimedia database
Fig. 16
Multimedia database
In the multimedia database the title properties are sorted according to catego-
ries.
The display of the multimedia database is only available for some audio sour-
ces.
A connected Apple device displays only the multimedia database.
Viewing multimedia database
›
Press the function key in the menu Media
.
If the display of the folder / track list is not supported by the device, then the
multimedia database is displayed.
Categories of Multimedia Database - information and function keys » Fig. 16
Name of the selected audio source / the selected category
Display of folder / track lists (the function is only available for the display
of the entire source content) » page 29
Track lists - Sorted by the track title
ABArtists - Sorted by artist's name
Albums - Sorted by album name
Tracks - Sorted by the track title
Podcasts - Sorted by the Podcast names
Genres - Sorted by the genre type
Composers - Sorted by the composer names
Audiobooks - Sorted by the audiobook names
The display icons for the categories of multimedia database is not supported by some audio sources. Only the name of the category is displayed.
For playback the category and then the title is selected.
The movement within the categories is done by pressing one of the function
keys in the range A
.
Settings
›
Press the function key in the menu Media
.
■ Sound - Sound settings » page 18, Sound settings
■ Mix / repeat including subfolders - Switching the title display including sub-
directory
■ Bluetooth - Settings for the Bluetooth ®
function » page 20
■ Remove safely - safe removal of the audio source
■ SD card - Removal of the SD storage card
■ USB - Removal of the USB audio source
■ Traffic programme (TP) - Switches traffic programme on/off
■ External AUX device - Enables / disables the AUX input
Audio sources
Introduction
This chapter contains information on the following subjects:
Select audio source
31
Bluetooth ®
Player
32
SD memory card
32
USB input
33
AUX - input
33
Supported audio source and file formats
34
30Familiarization with the unit
Page 34 of 64
First and foremost, pay attention to the safety instructions » page 7 , Impor-
tant notes .
The device allows you to play audio files in various formats and to connect dif-
ferent source types » page 34.
For an audio source with a memory split into several areas, only the memory
areas of the supported formats can be read » tab. Supported audio sources on
page 34 .WARNING■
Never place audio sources close to the airbags. They could be thrown into
the passenger compartment when the airbags are deployed, injuring the
occupants.■
Never place audio sources on the dash panel, in your hand or on your
knees. They could be thrown into the passenger compartment during sud-
den driving manoeuvres, thereby injuring the occupants.
■
Always route the connection cable of the audio source such that is does
not restrict you when driving.
CAUTION
Do not store any important data on the connected external sources. ŠKODA
assumes no responsibility for lost or damaged files or connected audio sour-
ces.
Note
See the owner's manual of the specific manufacturer for operating the exter-
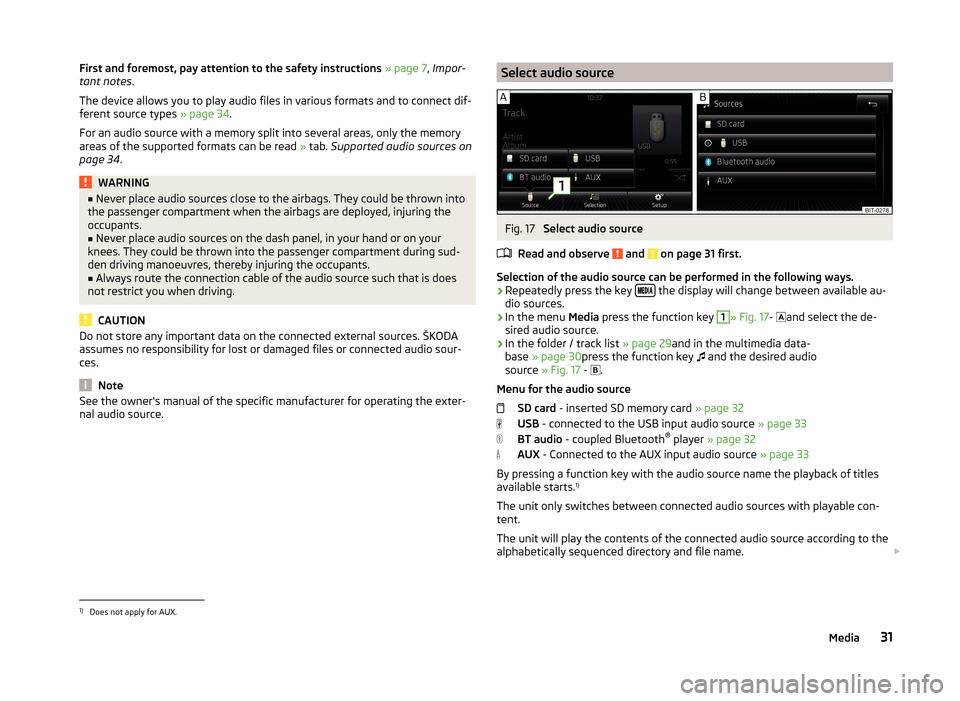
nal audio source.Select audio sourceFig. 17
Select audio source
Read and observe
and on page 31 first.
Selection of the audio source can be performed in the following ways.
› Repeatedly press the key
the display will change between available au-
dio sources.
› In the menu
Media press the function key
1
» Fig. 17 -
and select the de-
sired audio source.
› In the folder / track list
» page 29and in the multimedia data-
base » page 30 press the function key
and the desired audio
source » Fig. 17 -
.
Menu for the audio source SD card - inserted SD memory card » page 32
USB - connected to the USB input audio source » page 33
BT audio - coupled Bluetooth ®
player » page 32
AUX - Connected to the AUX input audio source » page 33
By pressing a function key with the audio source name the playback of titles
available starts. 1)
The unit only switches between connected audio sources with playable con-
tent.
The unit will play the contents of the connected audio source according to the
alphabetically sequenced directory and file name.
1)
Does not apply for AUX.
31Media
Page 35 of 64
If the main and the additional telephones » page 39are connected to the de-
vice the audio source appears after selection BT Audio a menu for selecting
the Bluetooth ®
Player.
Bluetooth ®
Player
Read and observe
and on page 31 first.
The unit allows audio files of a connected Bluetooth ®
player to play using the
A2DP and AVRCP audio profile.
›
For connecting follow the same instructions as for pairing the device with a
telephone » page 41.
If an Apple device is connected as a Bluetooth ®
player, and this is connected
to the USB input, then the Bluetooth ®
connection is dropped.
The following warning message appears in the device screen Bluetooth-Audio
(A2DP) ... Connection cancelled.
Note
■
We recommend setting the maximum output level of the Bluetooth ®
Play-
er » page 18 , Sound settings .■
Some operator options via the device may not be supported and are depend-
ent on the Bluetooth ®
player being used.
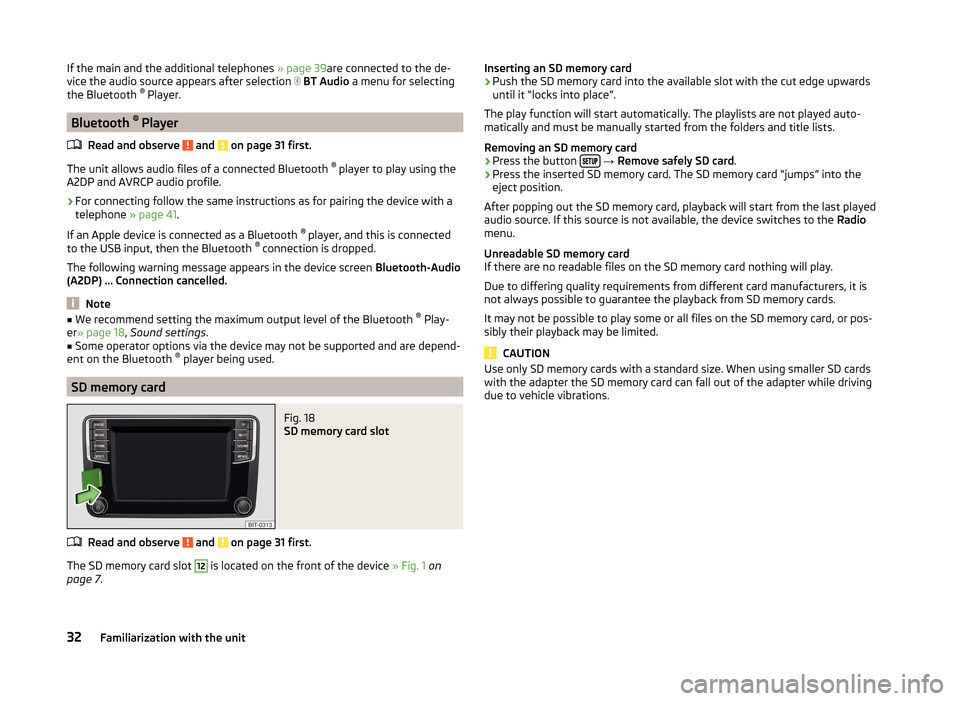
SD memory card
Fig. 18
SD memory card slot
Read and observe and on page 31 first.
The SD memory card slot
12
is located on the front of the device » Fig. 1 on
page 7 .
Inserting an SD memory card›Push the SD memory card into the available slot with the cut edge upwards
until it “locks into place”.
The play function will start automatically. The playlists are not played auto-
matically and must be manually started from the folders and title lists.
Removing an SD memory card›
Press the button
→ Remove safely SD card .
›
Press the inserted SD memory card. The SD memory card “jumps” into the
eject position.
After popping out the SD memory card, playback will start from the last played
audio source. If this source is not available, the device switches to the Radio
menu.
Unreadable SD memory card
If there are no readable files on the SD memory card nothing will play.
Due to differing quality requirements from different card manufacturers, it is
not always possible to guarantee the playback from SD memory cards.
It may not be possible to play some or all files on the SD memory card, or pos-
sibly their playback may be limited.
CAUTION
Use only SD memory cards with a standard size. When using smaller SD cards
with the adapter the SD memory card can fall out of the adapter while driving
due to vehicle vibrations.32Familiarization with the unit
Page 36 of 64
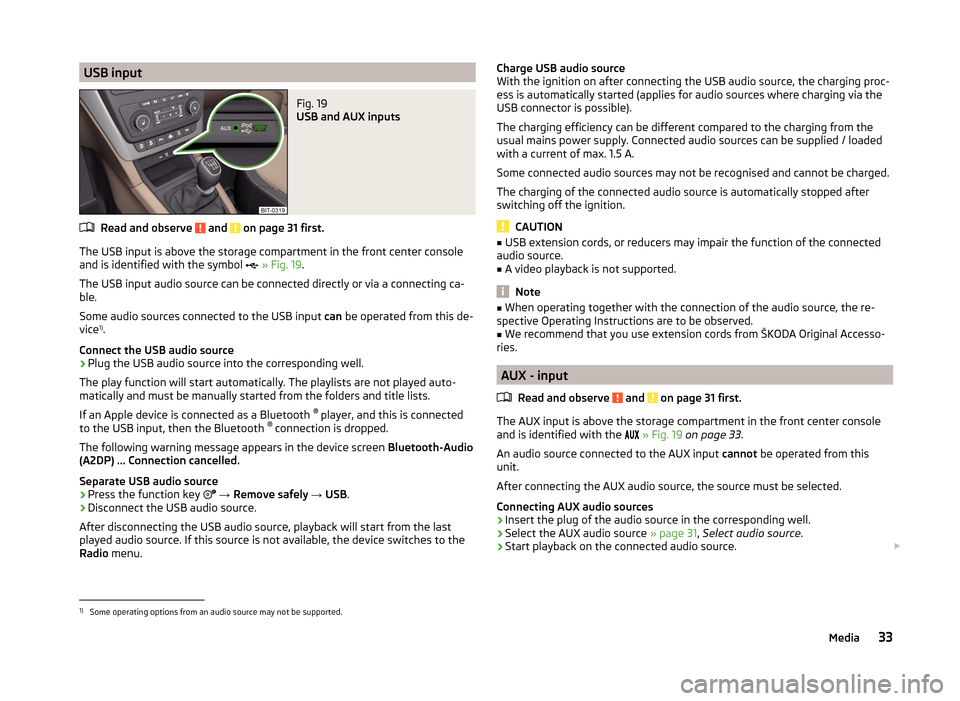
USB inputFig. 19
USB and AUX inputs
Read and observe and on page 31 first.
The USB input is above the storage compartment in the front center console
and is identified with the symbol
» Fig. 19 .
The USB input audio source can be connected directly or via a connecting ca-
ble.
Some audio sources connected to the USB input can be operated from this de-
vice 1)
.
Connect the USB audio source
›
Plug the USB audio source into the corresponding well.
The play function will start automatically. The playlists are not played auto-
matically and must be manually started from the folders and title lists.
If an Apple device is connected as a Bluetooth ®
player, and this is connected
to the USB input, then the Bluetooth ®
connection is dropped.
The following warning message appears in the device screen Bluetooth-Audio
(A2DP) ... Connection cancelled.
Separate USB audio source
›
Press the function key
→ Remove safely → USB .
›
Disconnect the USB audio source.
After disconnecting the USB audio source, playback will start from the last
played audio source. If this source is not available, the device switches to the
Radio menu.
Charge USB audio source
With the ignition on after connecting the USB audio source, the charging proc-
ess is automatically started (applies for audio sources where charging via the
USB connector is possible).
The charging efficiency can be different compared to the charging from the
usual mains power supply. Connected audio sources can be supplied / loaded
with a current of max. 1.5 A.
Some connected audio sources may not be recognised and cannot be charged.
The charging of the connected audio source is automatically stopped after
switching off the ignition.
CAUTION
■ USB extension cords, or reducers may impair the function of the connected
audio source.■
A video playback is not supported.
Note
■ When operating together with the connection of the audio source, the re-
spective Operating Instructions are to be observed.■
We recommend that you use extension cords from ŠKODA Original Accesso-
ries.
AUX - input
Read and observe
and on page 31 first.
The AUX input is above the storage compartment in the front center console
and is identified with the
» Fig. 19 on page 33 .
An audio source connected to the AUX input cannot be operated from this
unit.
After connecting the AUX audio source, the source must be selected.
Connecting AUX audio sources
›
Insert the plug of the audio source in the corresponding well.
›
Select the AUX audio source » page 31, Select audio source .
›
Start playback on the connected audio source.
1)
Some operating options from an audio source may not be supported.
33Media