2014 SKODA OCTAVIA window
[x] Cancel search: windowPage 5 of 50
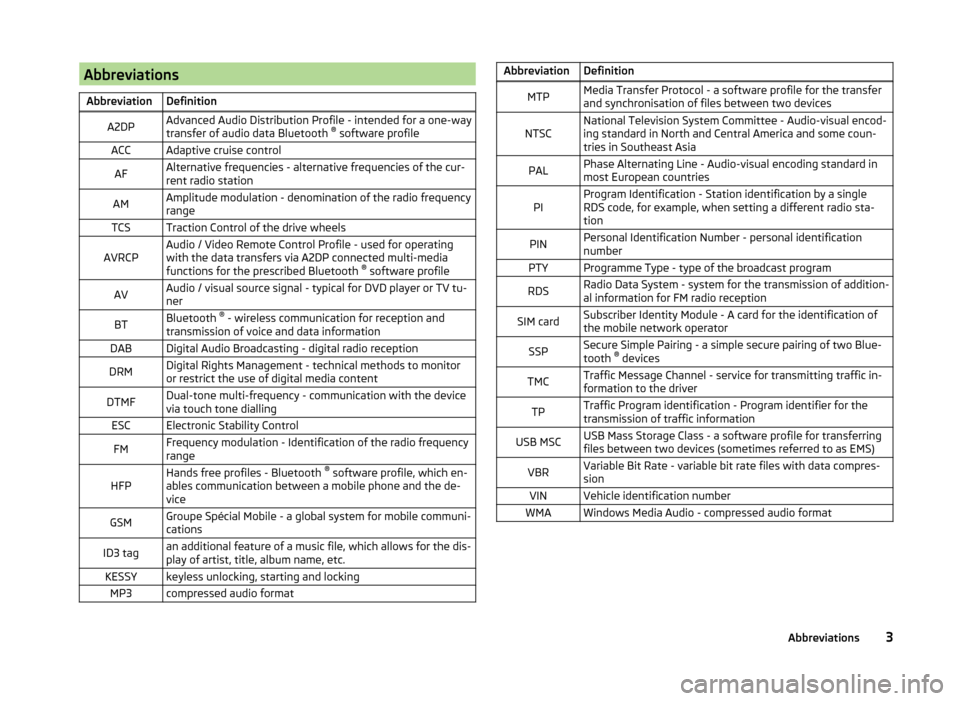
AbbreviationsAbbreviationDefinitionA2DPAdvanced Audio Distribution Profile - intended for a one-way
transfer of audio data Bluetooth ®
software profileACCAdaptive cruise controlAFAlternative frequencies - alternative frequencies of the cur-
rent radio stationAMAmplitude modulation - denomination of the radio frequency
rangeTCSTraction Control of the drive wheelsAVRCPAudio / Video Remote Control Profile - used for operating
with the data transfers via A2DP connected multi-media
functions for the prescribed Bluetooth ®
software profileAVAudio / visual source signal - typical for DVD player or TV tu-
nerBTBluetooth ®
- wireless communication for reception and
transmission of voice and data informationDABDigital Audio Broadcasting - digital radio receptionDRMDigital Rights Management - technical methods to monitor
or restrict the use of digital media contentDTMFDual-tone multi-frequency - communication with the device
via touch tone diallingESCElectronic Stability ControlFMFrequency modulation - Identification of the radio frequency
rangeHFPHands free profiles - Bluetooth ®
software profile, which en-
ables communication between a mobile phone and the de-
viceGSMGroupe Spécial Mobile - a global system for mobile communi-
cationsID3 tagan additional feature of a music file, which allows for the dis-
play of artist, title, album name, etc.KESSYkeyless unlocking, starting and lockingMP3compressed audio formatAbbreviationDefinitionMTPMedia Transfer Protocol - a software profile for the transfer
and synchronisation of files between two devicesNTSCNational Television System Committee - Audio-visual encod-
ing standard in North and Central America and some coun-
tries in Southeast AsiaPALPhase Alternating Line - Audio-visual encoding standard in
most European countriesPIProgram Identification - Station identification by a single
RDS code, for example, when setting a different radio sta-
tionPINPersonal Identification Number - personal identification
numberPTYProgramme Type - type of the broadcast programRDSRadio Data System - system for the transmission of addition-
al information for FM radio receptionSIM cardSubscriber Identity Module - A card for the identification of
the mobile network operatorSSPSecure Simple Pairing - a simple secure pairing of two Blue-
tooth ®
devicesTMCTraffic Message Channel - service for transmitting traffic in-
formation to the driverTPTraffic Program identification - Program identifier for the
transmission of traffic informationUSB MSCUSB Mass Storage Class - a software profile for transferring
files between two devices (sometimes referred to as EMS)VBRVariable Bit Rate - variable bit rate files with data compres-
sionVINVehicle identification numberWMAWindows Media Audio - compressed audio format3Abbreviations
Page 9 of 50

Unit operation
Concerning the device screen operation
Introduction
This chapter contains information on the following subjects:
Operation
7
Alphanumeric with keyboard
8
Numerical keyboard
8
First and foremost, pay attention to the safety instructions » page 4 , Impor-
tant notes .
This chapter covers the instrument operation and the work with the touch
screen and with various types of input keyboards.
Operation
Fig. 2
Screen display
Description of the display
News menu selected
Return to the higher-level menu
Open a submenu of the function with the “pop-up window”
Function with “checkbox”
Scroll bar - Shows the position in the menu; touch the scroll bar to navi-
gate the menu
Function keys
Screen areas which confirm a function or a menu are called “ function keys”.
Function keys with a white background are active and selectable.
ABCDEFunction keys with a green background represent currently selectable func-
tions or menus.
Function keys with a grey background are inactive and therefore not selecta-
ble.
Status line
In some menus a status bar located at the top of the screen shows the time
and outdoor temperature along with other information.
Selecting menu/menu item/function › Drag your finger over the screen in the required direction
› Turn the menu knob 2
» Fig. 1 on page 5 .
Confirming menu/menu item/function
› Touch the function key with your finger
› Press the menu knob
2
.
Returning to higher-level menu
› by pressing the function key
.
› By pressing the relevant button next to the screen;
› By touching the screen outside of the “pop-up window” with your finger.
Open submenu of a function
› by pressing the function key
opens a “pop-up window” with a function
menu.
Switching function on/off with “checkbox”
›
or
- Function is switched on
›
or
- Function is switched off
Set value › is achieved by touching the function keys with the symbols
.
› By touching or moving your finger over the scale.
Note
For some menus or menu items, the current setting is displayed, e.g.
Distance:
Km ... or distance: ... mi .7Unit operation
Page 18 of 50

Radio
Operation
Introduction
This chapter contains information on the following subjects:
Main menu
16
List of available stations
17
Search and select available stations
18
Save radio station
18
Search available stations (Scan)
18
Traffic programme
19
First and foremost, pay attention to the safety instructions » page 4 , Impor-
tant notes .
The device allows analogue radio reception of FM and AM frequency ranges as
well as DAB digital radio reception.
Radio reception DAB allows multiple stations to be transmitted in a single fre-
quency in the form of an ensemble or group. It also allows for the transmission
of additional data and information (e.g. messages, sport, weather, warnings,
etc.).
CAUTION
■ Car parks, tunnels, tall buildings or mountains can interfere with the radio
signal even causing it to fail completely.■
For vehicles with window antennas do not stick foil or metal coated stickers
to the window as this can lead to interference.
■
In countries where the RDS function is not supported sufficiently, we recom-
mend turning off the AF and RDS function. Otherwise, these settings can af-
fect the functionality of the radio.
Main menuFig. 9
Radio: Main menu
Read and observe on page 16 first.
Main Menu - Information and function keys » Fig. 9
The selected radio station (frequency or identifier)
Station keys
Choice of radio range (FM / AM / DAB)
Choice of storage groups in the selected broadcasting ranges (e.g. FM1,
FM2 or FM3)
Changing stations either in the list of available stations or the station but-
tons depending on the settings of the menu Arrow buttons: » page 19 ,
Settings
Manual / semi-automatic station search » page 18
Radio Text display
Menu Settings Radio
Call up the main menu
›
Press the button.
Choose broadcasting range
›
Press the button repeatedly.
or
›
Press the function button
C
» Fig. 9 , and select the desired range.
ABCD
16Radio
Page 26 of 50

Select audio sourceFig. 14
Select audio source
Read and observe
and on page 23 first.
The choice of the audio source can be done
› by repeatedly pressing the button
.
› in the main menu after pressing the function key
A
» Fig. 14 -
.
› In the folders and title lists
» Fig. 12 on page 21 and in the multimedia data-
base » Fig. 13 on page 22 after holding down the function key for a while
» Fig. 14 -
.
Menu for the audio source SD card - inserted SD memory card » page 25
USB - USB flash drive or a USB device » page 25
BT audio - coupled Bluetooth ®
player » page 24
AUX - a device connected to the AUX input » page 26
By pressing a function key with the audio source name the playback of titles available starts.
Supported audio sources and file formats
Read and observe
and on page 23 first.
Supported audio sources
SD memory cardSD, SDHC, SDXCUSB devicesUSB flash drive, HDD (no special software required)
Specifications forUSB devices:USB 1.x, 2.X and 3.x or higher, supported by USB 2.x (the
speed of data transmission then corresponds to the max-
imum speed of USB 2.x)
Max. speed of 480 Mb/sSpecification Bluetooth ®
-
PlayerBluetooth protocolsA2DPand AVRCP (1.0 - 1.4)Other sourcesPortable player (e.g., iPod ®
, iPad ®
, iPhone ®
, MTP player (in
MSC operation))
Supported file formats
Codec type
(File formats)MPEG-1/2/2.5 (Layer-3)Windows
Media Audio 8, 9 and 10File suffixmp3wmaPlaylistsm3u; pls; wpl; asxFile systemSD memory cardFAT16, VFAT, FAT32, exFATUSB flash drive, HDDFile
propertiesBitratemax. 320 kb/sSampling ratemax. 48 kHz
Prerequisites and restrictions
For a good playback, we recommend using files with a low level of compres-
sion (for example, a bit rate of at least 160 kb / s or higher compressed MP3
files).
Files that are protected by Digital Rights Management (DRM) technology can-
not be played back by the device.
At the time of publication, the device has been tested with most audio sources
available in the various markets. However, it is possible that some audio sour-
ces or files will be unreadable or unplayable.
Bluetooth ®
player
Read and observe
and on page 23 first.
The device allows you to play audio files from a connected Bluetooth ®
Player.
The Bluetooth ®
player and the device can be connected using the A2DP or
AVRCP audio profile.
24Media
Page 36 of 50

Search for a contact in the list
The input screen » Fig. 17 also functions as an alphanumeric keypad that you
can use to search for contacts in the phonebook.
For example, if you enter 32, the unit will display contacts with the letter se-
quence DA, FA, EB, etc.
On the right side next to the numerical keyboard a list of contacts found from
the directory appears according to the lettered specified. By pressing the cor-
responding function key for the respective contact the dialling starts.
Enter the code
Typing the prefix can be performed in the following ways.
› By pressing the function key
(the dialling of the entered phone number
with the prefix starts).
› By entering of characters or numbers (e.g.
or 00 and the like a prefix char-
acter is inserted in line A
).
The prefix may, for example be for international calls, phone calls via a virtual
mobile network operator, or distinguishing between business and private calls.
If the contact number contains a prefix, pressing the function key causes a
further prefix to be added before the number and the connection starts. The
phone number contains at this time two prefixes and a phone call is not initi-
ated.
List of telephone contacts
Fig. 18
List of telephone contacts / contact details
› Press in the menu the
Telephone function key » Fig. 16 on page 27 .
A list of telephone contacts is
» Fig. 18 shown.
The device telephone book contains up to 2000 free memory locations for im-
ported telephone contacts. Each contact can contain up to 5 telephone num-
bers.
The list of phone contacts can also be called during an ongoing call.
Select contact
Pressing the function key with one of the displayed contacts starts the selec-
tion 1)
.
If a contact contains several telephone numbers, the system displays a menu
containing the telephone numbers for this contact after pressing the function
key.
Pressing the function key with one of the indicated telephone numbers starts
the dialling 1)
.
Contact details
By pressing the function key In the list of phone contacts
the contact de-
tails » Fig. 18
are displayed.
By pressing the function key in the contact details a window for editing the
phone number of the contact is displayed before dialling.
Pressing the function key with one of the indicated telephone numbers starts
the dialling 1)
.
Find contact
By pressing the function key A
» Fig. 18 Find the keyboard for entering the
contact search is opened in the telephone book » page 8, Alphanumeric with
keyboard .
By pressing the function key for the selected contact, the dialling is started 1)
.
Invite list Upon first connection of the telephone with the device, the system begins to
download the telephone book from the telephone and from the SIM card 2)
into
the device memory 3)
. Depending on the number of contacts this may take sev-
eral minutes to complete.
1)
A phone call can be made if no other call is active.
2)
Some telephones do not support downloading of contacts from the SIM card.
3)
With some telephones a confirmation for importing contacts to the device is necessary.
34Telephone
Page 41 of 50

■Conv. cons. Displays up to three consumers which have the largest share of
fuel consumption and displays the fuel consumption to run all convenience
systems
■ Veh. status - Displays vehicle status » Fig. 21 or tyre pressure monitoring in-
formation
■ Veh. status - Displays vehicle status information
■ - No message /
Announcements - warning messages relating to ve-
hicle status or number of messages (if there is only one message, one
warning message text is displayed)
■ Start-st. - Display information about the status of the START-STOP
system
■ Tyre Press. Loss Indicator - Tyre pressure monitoring function » Fig. 22
■
SET - Start a new calibration process
Switching between the individual menus can be done by using the function
keys
.
Note
After pressing the button the last displayed view from the menu is shown
.
Auxiliary heater and ventilation
Fig. 23
Auxiliary heater: Main menu/set preset time
Call up the main menu
›
Press the button on the Climatronic control panel
.
or
›
Press the button
→
.
Main Menu - Information and function keys
» Fig. 23
Departure time: Day and time when the vehicle is to be ready for use
Heating/ventilation: Set the operating mode
List of pre-selected times, activation / deactivation of the preset time
Set the preset times 1 to 3 and the duration (10 - 60 minutes) when heating the windows are shown in red / with continuous aeration,the windows are shown in blue
› Only one preset time can be active. The activated preset time will be deacti-
vated again after it has started automatically. For the next start, activate one
of the preset times.
› The system in operation switches off on expiration of the operating duration
or can be deactivated by pressing the icon for direct on / off switching or
via radio remote control.
Note
■ In the selection of the day in the preset time, there is an option between
Sunday and Monday without the specified day. If this setting is selected, the
vehicle will be ready for use at the selected time, regardless of the current day.■
If a different time is set » page 14, Time and date settings , the activated pre-
set time is automatically deactivated. The preset time must be reactivated.
ESC-and ASR systems
›
Press the button
→
→ ESC system .
■ Activated - Switch on all components of the ESC system
■ ASR off - Switch off the ASR system
■ ESC Sport - activation of ESC Sport
Tyre
›
Press the button
→
→ Tyres .
■ Tyre Press. Loss Indicator - Tyre pressure monitoring function
■
SET - Start a new calibration process
■ Winter tyres - Sets the speed limit for winter tyres
■ Speed warning - Snow tyres speed warning on/off
■ Warning at - Sets the speed for the warning
Assistance systems
›
Press the button
→
→ Driver assistance .
ABCDE39Vehicle systems
Page 43 of 50

■Background lighting - Sets the interior lighting
■ Instrument lighting - Set the brightness of the instrument/switch lighting
■ Footwell lighting - Sets the brightness of the footwell light
■ Light assistance - Setting of outdoor lighting
■ Light Assist - Switch on/off the head light assist
■ Switch-on time: - Set the sensibility of the light sensor against the change
in intensity of the ambient light ■ Early - High sensibility
■ Medium - Medium sensibility
■ Late - Low sensibility
■ Aut. headlight contr. (rain) - Activate/deactivate automatic headlight con-
trol in rain
■ Daytime running lights - Activate/deactivate daytime running lights
■ Comfort turn signal - Activate/deactivate lane change flashing
■ Travel mode: - Travel mode on/off
■ Left - For right-hand traffic
■ Right - For left-hand traffic
■ “Coming/leaving home ” - Setting the COMING HOME / LEAVING HOME-func-
tion ■ “Coming home funct. ” - Set the period that the lights remain on after you
leave the vehicle (0 - 30 seconds; 0 = function deactivated)
■ “Leaving home fnct. ” Set the period that the lights remain on after you un-
lock the vehicle (0 - 30 seconds; 0 = function deactivated)
Mirrors and wiper
›
Press the button
→
→ Mirrors and wipers .
■ Mirrors - Adjusts the mirrors
■ Synchronous adjustment - Activate/deactivate synchronous mirror adjust-
ment
■ Lowering (reverse) - Activation / deactivation of the lowering of the pas-
senger's side mirror
■ Fold in (when parked) - Activate/deactivate folding the mirror via the re-
mote control key or by using the sensor in the handle (KESSY)
■ Wipers - Adjusts the windscreen wipers
■ Automatic wiping (rain) - Activate/deactivate automatic windscreen wiping
in rain
■ Automatic rear wiper - Activate/deactivate automatic rear window wiping
Opening and closing›
Press the button
→
→ Opening and closing .
■ Window operation - Window operation settings
■ Conven. open.: - Set the convenience opening feature
■ All - All windows
■ Driver - Driver's window only
■ Off - Deactivates the convenience opening
■ Central locking - Settings for opening and closing of doors
■ Door unlock.: - Set the door unlocking feature
■ All - All doors
■ Single door - Driver's door or driver's or passenger door with KESSY sys-
tem
■ Side - Doors on the driver's side or on the driver's or passenger's side
with KESSY system
■ Automatic locking - Activate/deactivate automatic locking when starting
off
■ Acoustic confirmation - Activate/deactivate acoustic signals when locking/
unlocking the vehicle with an anti-theft alarm system
Seats
›
Press the button
→
→ Seats .
■ Store seat position - Store the driver's seat position and exterior mirror posi-
tion in the remote control key when locking the vehicle ■ Vehicle key activated - Activate/deactivate storing the driver's seat posi-
tion and exterior mirror position when locking the vehicle
Instrument cluster (multifunction display)
›
Press the button
→
→ Instrument cluster
In this menu it is possible to hide/show the appearance of the menu items in
the instrument cluster multifunction display and reset the trip data.
■ Current consumption - Display of current fuel consumption on/off
■ Average consumption - Display of average fuel consumption on/off
■ Refuel quantity - Display of refuel quantity on/off
■ Convenience consumers - Display of fuel consumption of convenience con-
sumers on/off
■ Eco tips - Display of tips for economical driving on/off
■ Travelling time - Display of travelling time on/off
41Vehicle systems
Page 44 of 50

■Distance - Display of distance travelled on/off
■ Average speed - Display of average speed on/off
■ Digital speed display - Display of current speed on/off
■ Speed warning - Winter tyres warning on/off
■ Oil temperature - Oil temperature on/off
■ Coolant temperature - Coolant temperature on/off
■ Reset Since start data - Reset the single-trip memory in the device screen
and in the display of the instrument cluster
■ Reset Long-term data - Reset the long-term memory in the device screen
and in the display of the instrument cluster
Time, date and unit setting
›
Press
→ Time and date .
Description of the time and date settings » page 14 .
›
Press the button
→ Units .
Description of unit settings » page 14.
Service
›
Press the button
→
→ Service button.
■ VIN: ... - Display the vehicle identification number
■ Inspection: --- or --- - Number of km/days remaining until the next service
event
■ Oil change service: --- or --- - Number of km/days remaining until the next oil
change
Restore factory settings
›
Press the button
→
→ Factory settings .
In this menu you have the possibility to reset the menu items in the settings of the vehicle systems to factory settings.
■ All settings
■ All settings - Restoration of the settings all menu items
■ Individual settings
■ Driver assistance - Restoration of the driver assistance menus
■ Parking and manoeuvring - Restoration of the Parking and manoeuvring
menu items
■ Light - Restoration of the light menus
■
Mirrors and wipers - Restoration of the Mirrors and wipers menu
■ Opening and closing - Restoration of the Opening/closing menu items
■ Instrument cluster - Restoration of the instrument cluster menu
If one of the above menu items is selected, the system will ask you whether
you really want to restore the settings.
■ Cancel - Return to higher-level menu
■ Reset - Restore the settings
Climatronic settings
Fig. 25
Climatronic: Main menu
In the Climatronic menu the system displays the desired temperature for the
driver's side and front passenger side » Fig. 25.
Depending on the desired temperature, the airflow from the air outlet vents is
shown in blue (temperature under 22 °C) or red (temperature above 22.5 °C).
When using Climatronic in automatic mode, the lettering AUTO is shown on
the screen.
Call up the main menu
›
Press the button on the Climatronic control panel.
■ Profile: light - Low power operation of the air conditioning, quiet operation
■ Profile: medium - Basic operating performance of the air conditioning
■ Profile: strong - Intensive operating performance of the air conditioning
■ On /Off - Switches Climatronic on/off
■ - Set the auxiliary heater and ventilation
» page 39
■ - Settings for Climatronic
■ Air con. profile: - See climate profile (light, medium, intensive.)
■ Automatic air recirculation - Automatic re-circulated air mode on/off
■ Automatic auxiliary heater - Quick interior heating on/off
■ Autom. window heating - Activates/deactivates the automatic windscreen
heating
42Vehicle systems