2014 SKODA OCTAVIA navigation system
[x] Cancel search: navigation systemPage 58 of 83

›In the
Navigation main menu, press → Other POIs → Options → Address .
Some address positions are already pre-filled with the data of the last destina-
tion.
The pre-filled positions can be adjusted by touching the item and then adjust-
ing it in the input screen » page 8.
To start navigation, you need to enter country, city and street.
The information is entered step by step in individual input screens.
When entering the street, instead of a street name, it is possible to select the centre of the entered city by touching Centre. Then it is no longer necessary to
enter the house number or junction.
When entering the address, the function key Map is displayed on the input
screen » page 8 . When you press the function key, the system opens a screen
with the map » page 56 where you can specify the address more precisely or
check it.
You need to enter both the building number and a further address indicator in
the form of a number. The device displays a list of destinations found from
combinations of the two numbers.
If the entered house number was not found, a menu opens to clarify the desti-
nation:
■ No house number - Enter an address without a house number and display a
menu with destination details
■ Nearest house number: - Confirmation of the proposed house number
■ Enter junction - Open a menu with junctions with the selected street
If the address is entered correctly, destination details are dis-
played » page 66 .MapFig. 41
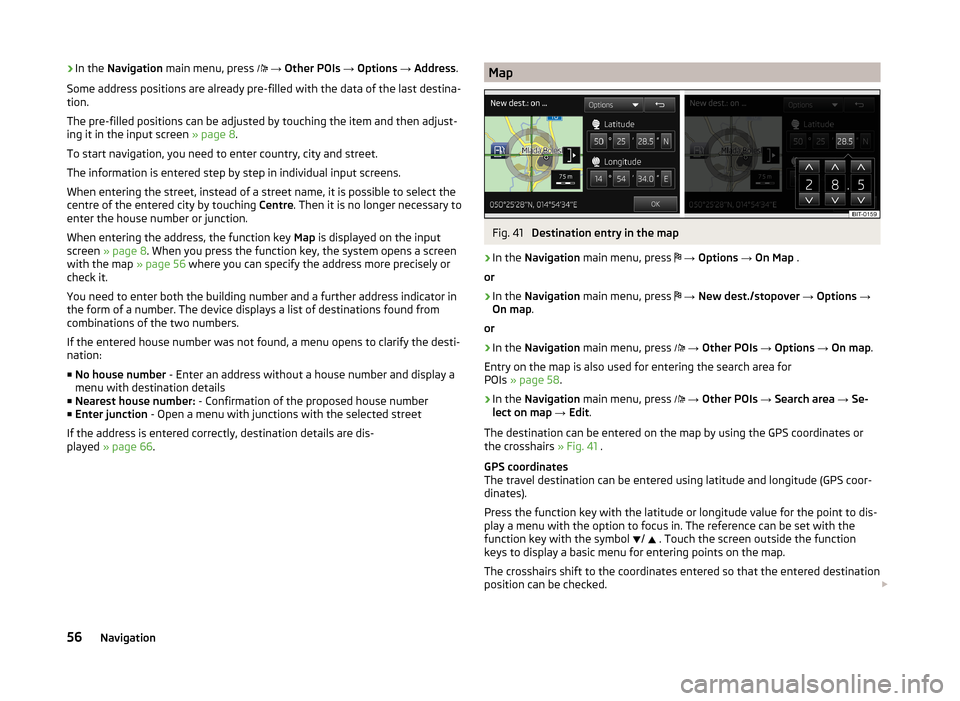
Destination entry in the map
›
In the
Navigation main menu, press
→ Options → On Map .
or
›
In the Navigation main menu, press
→ New dest./stopover → Options →
On map .
or
›
In the Navigation main menu, press
→ Other POIs → Options → On map .
Entry on the map is also used for entering the search area for
POIs » page 58 .
›
In the Navigation main menu, press
→ Other POIs → Search area → Se-
lect on map → Edit .
The destination can be entered on the map by using the GPS coordinates or
the crosshairs » Fig. 41 .
GPS coordinates
The travel destination can be entered using latitude and longitude (GPS coor- dinates).
Press the function key with the latitude or longitude value for the point to dis-
play a menu with the option to focus in. The reference can be set with the
function key with the symbol /
. Touch the screen outside the function
keys to display a basic menu for entering points on the map.
The crosshairs shift to the coordinates entered so that the entered destination position can be checked.
56Navigation
Page 64 of 83

Route calculation
The route is calculated automatically according to the entered destination. The calculation takes the settings of the route options » page 48 (route type, dy-
namic route, etc.) into account.
The route is recalculated each time if you ignore driving recommendations or
change the route. This process takes only a few seconds. Nav. announcements
can only then be re-transmitted.
If Demo mode is switched on » page 49, a prompt appears asking whether you
want the guidance to start in demo mode or normal mode.
Demo mode provides a travel simulation to the entered destination. It offers
the chance to travel the calculated route “virtually” on the device screen.
If an alternative route option is set, function keys are displayed, following the
calculation, for the route types with information on the route length and the
expected travelling time.
Route Type economically
quickly
short
Selecting the route type will start route guidance.
After the route has been calculated, additional information specific to the se-
lected route is displayed on the function keys for the route types » page 48,
e.g., use of motorways , toll roads
and the like.
If the option for alternative routes is disabled, the route is calculated and route
guidance is started according to the preferred route » page 48.
It is possible to select a pre-calculated route before the calculation of the re-
maining routes is completed.
The unit tries to allow for continued guidance even if the navigation data is in-
complete or there is no data at all for the given area (e.g., one-way streets,
road types, etc.).Interrupt and continue route guidance
If the ignition is switched off and on again and the key was left in the ignition
(in vehicles with the KESSY system, when the ignition was switched off):
› within 30 minutes - route guidance is continued, taking into account the cal-
culated route
› Between 30 and 40 min - the screen switches to “standby” mode (energy-
saving mode of the screen); the route guidance continues using the calcula-
ted route
› Between 40 min and 120 min - the unit screen displays the message
Contin-
ue route guidance? ; after you confirm the message, the route guidance con-
tinues using the calculated route;
› After 120 min - The route guidance is cancelled.
Switch ignition off and on again and remove the key temporarily (in vehicles
with the KESSY system, switch off the ignition and open the driver's door):
› Within 10 min - route guidance is continued, taking into account the calcula-
ted route
› Between 10 min and 120 min - the screen switches to “standby mode” (ener-
gy-saving mode of the screen); the unit screen displays the message Contin-
ue route guidance? ; after you confirm the message, the route guidance con-
tinues using the calculated route
› After 120 min - The route guidance is cancelled.
Explanation of graphic navigation instructions
The graphical navigation instructions are displayed: › in the MAXI DOT display
» page 9;
› in the extra window of the device screen
» page 53.
Nav. announcements
The device outputs the navigation announcements. The navigation announce-
ments are started as soon as the route calculation is complete or a route type
has been selected.
The navigation announcements are generated by the instrument system. The
flawless clarity of the message (eg, road or city name) cannot always be guar-
anteed.
Before turning, up to 3 recommendations are issued:
The last navigation announcement can be repeated: › by pressing the menu knob
2
» Fig. 1 on page 5 ;
› Press the dial
2
» Fig. 10 on page 12 on the multifunction steering wheel.
62Navigation
Page 66 of 83

›Traffic programme TP in the FM frequency range
» page 23.
› Traffic programme in the DAB frequency range
› TMC traffic information with a dynamic adjustment for the current route
The following conditions are required for the correct TMC function: The vehicle is within reception range of the FM RDS-TMC.
Adequate and uninterrupted signal reception of a traffic information sta-
tion 1)
.
Current navigation data in the device.
Operation
TMC (Traffic Message Channel) is a digital data service emitted by the radio
station for continuous transmission of traffic information.
›
Press to display a list of traffic reports
Traffic report …/….
Touch one of the traffic report entries to display traffic report de-
tails » page 64 .
If a TMC traffic radio station is available for current location, the TMC traffic re-
ports are updated continuously in the background. The station you are listen-
ing to does not have to be a TMC station.
The reception of TMC traffic reports is always switched on and cannot be
turned off.
The accuracy of the dynamic route guidance depends on the transmitted traf-
fic reports. The radio stations broadcasting this information are responsible for
the content.
TMC traffic reports can only be evaluated and saved by the radio navigation
system when navigation data are available for the driven area.
Switching dynamic route on/off
›
In the Navigation main menu, press
→ Route Options → Dynamic route .
When the Dynamic route » page 48 function is switched on, the traffic reports
influence the dynamic route guidance by means of TMC messages.
Dynamic route switched on
Information on traffic problems received via TMC which affect the route are displayed in the map by means of a coloured symbol (e.g.,
,
,
, etc.). Traffic
problems, which do not affect the route, are displayed in the map by means of
a grey symbol. The direction in which a traffic problem is found, is displayed by
means of an arrow in the symbol.
Dynamic route switched off
You are not alerted to received traffic disruptions along your route and are gui-
ded through the traffic disruption by the radio navigation system. The traffic
reports are updated automatically in the unit and displayed by pressing the
button
.
If one of the announced traffic disruptions lies on your route, you can switch on dynamic route guidance during your current route guidance or block the
route manually » page 63.
Note
Making a diversion from a traffic jam based on TMC traffic reports may not al-
ways offer a time advantage, e.g. if the diversion route is also congested.
Detailed traffic reports
After pressing the
button, a screen appears with the following informa-
tion:
■ Function key All - Show all traffic information
■ Function key Route - only display the traffic information on the current route
■ A map showing the traffic obstruction
■ A window with a description of the traffic information
■ Location of event, the accuracy depends on the timeliness of the naviga-
tion data
■ Description of up to three events related to the respective information
■ Description of the direction with respect to the event
■ probable duration of the event
■ Additional information, such as probable delay time
■ An information line, on how current the information is and on the provider
of the message
■ Symbol that specifies the type of information
■ - zoom in window with described traffic obstruction
1)
For vehicles with window antennas, if the windows have foil stuck to them or metal-coated stickers this
may cause you to experience some interference.
64Navigation
Page 67 of 83

■ - zoom out window with described traffic obstruction
■ - show previous traffic information
■ - show the following traffic information
■ - display list of all received traffic messages
My tour
Introduction
This chapter contains information on the following subjects:
New tour
65
Tour editing
65
Tour memory
65
First and foremost, pay attention to the safety instructions » page 4 , Impor-
tant notes .
New tour
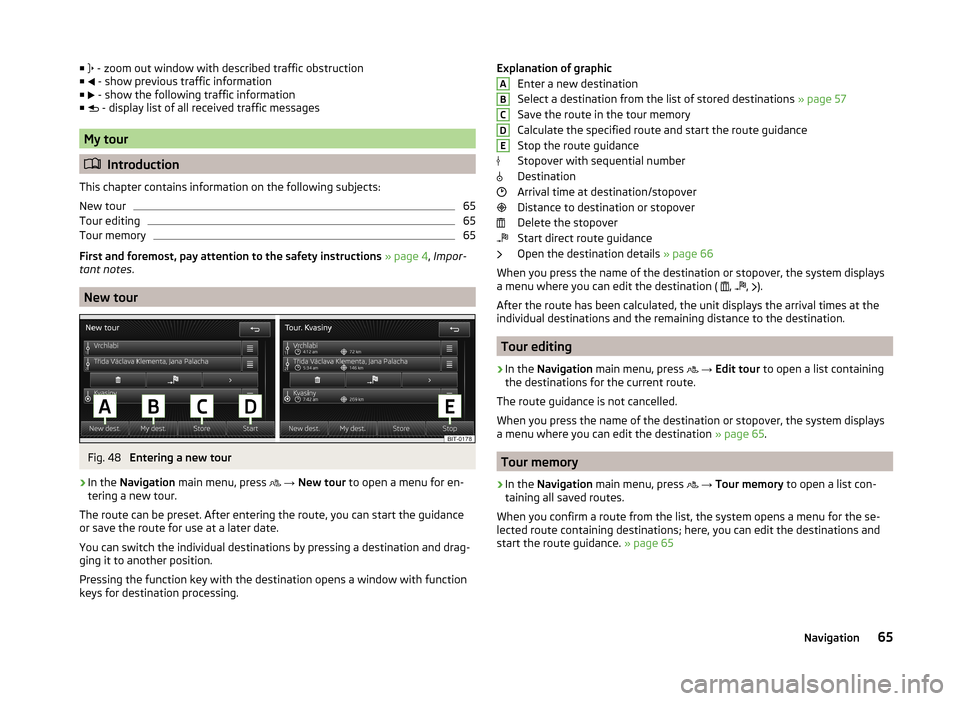
Fig. 48
Entering a new tour
›
In the Navigation main menu, press
→ New tour to open a menu for en-
tering a new tour.
The route can be preset. After entering the route, you can start the guidance or save the route for use at a later date.
You can switch the individual destinations by pressing a destination and drag- ging it to another position.
Pressing the function key with the destination opens a window with function
keys for destination processing.
Explanation of graphic
Enter a new destination
Select a destination from the list of stored destinations » page 57
Save the route in the tour memory
Calculate the specified route and start the route guidance
Stop the route guidance
Stopover with sequential number
Destination
Arrival time at destination/stopover
Distance to destination or stopover
Delete the stopover
Start direct route guidance
Open the destination details » page 66
When you press the name of the destination or stopover, the system displays
a menu where you can edit the destination ( ,
,
).
After the route has been calculated, the unit displays the arrival times at the
individual destinations and the remaining distance to the destination.
Tour editing
›
In the Navigation main menu, press
→ Edit tour to open a list containing
the destinations for the current route.
The route guidance is not cancelled.
When you press the name of the destination or stopover, the system displays
a menu where you can edit the destination » page 65.
Tour memory
›
In the Navigation main menu, press
→ Tour memory to open a list con-
taining all saved routes.
When you confirm a route from the list, the system opens a menu for the se-
lected route containing destinations; here, you can edit the destinations and
start the route guidance. » page 65
ABCDE65Navigation
Page 77 of 83

Index
A
ACC
71
Additional keyboard languages19
Address55
Adjusting Volume
6
Adjust vehicle systems ESC system
70
Advanced settings49
AM21
Anti-theft protection4
Apple devices33
ASR70
Audio21
Media26
Radio21
Automatic distance control71
Automatic front window wiping in rain72
Automatic headlight in rain72
Automatic locking72
Automatic rear window wiping72
Automatic scan22
AUX33
Auxiliary heater and ventilation Settings
70
B
Bluetooth Connect telephone to the device
40
Settings20
Switch on/off20
Visibility20
Bluetooth audio31
Bluetooth player31
C
CD
31
Climatronic automatic air recirculation
73
Automatic operation73
mode73
COMING HOME72
Communication37
Phonebox39
Component protection4
Control lever9
Convenience consumer69
D
DAB
21
Settings25
Station information24
Data Convenience consumer
69
Travel69
Vehicle status69
Date19
Daytime running lights72
Declaration of conformity4
Description of the unit5
Destination details66
Destination entry Home address
51
Destination management66
Destination details66
Stopover66
Device operation Control lever
9
MAXI DOT display9
Multifunction steering wheel11, 12
Device pairing41
Device screen Important notice5
Maintenance5
Operation7
Digital radio reception Settings
25
Display5, 7
Display in instrument cluster Telefon
11
Display in the instrument cluster9
Door release72
Driving mode68
Driving Mode Selection68
DVD31
DVD video34
Main menu34
Menu35
Operation34
Settings35
DVD video menu35
DVD video playback34
Dynamic route Switch on/off
64
E
Eco tips
73
Edit tour65
Enter destination Address
55
From the list57
Home address57
Map56
Own destination58
POI58
Enter into map56
ESC sport70
Explanation of graphic navigation instructions62
75Index
Page 80 of 83

Emergencies61
Other destinations61
proactive passenger protection71
R
Radio
21
Automatic scan22
DAB - settings25
FM - settings24
List of available stations22
Main menu21
Multifunction steering wheel9
Operation21
Preface21
Radio station store22
Search22
Settings24
Station logo23
Traffic programme (TP)23
Voice control13
Radio station Automatic scan
22
Logo23
Search22
Store22
Radio station logo23
Radio station search22
Radio station store22
Route63
Route calculation62
Route guidance61
Route info.63
Route list63
Route options48
S
Saved destinations
57
Scan Media
28
Screen5, 18
SD memory card32
Search area59
Select in the map56
Seats Settings
72
Select frequency range See main menu
21
Select input source Media
26
Selection of travel mode68
Select radio channel See main menu
21
Select source Images
36
Select video source34
Semi-automatic station scan22
Settings Additional keyboard languages
19
Bluetooth20
DAB25
Driving mode68
DVD video35
FM24
Images36
Keyboard19
Language17
Manage favourites43
Media28
Menus17
Navigation48
Radio24
Restore factory settings20
Screen18
Sound18
Telephone39
Time and date19
Unit17
Units19
User profile43
Voice control20
Volume6
Setting vehicle systems Auxiliary heater and ventilation
70
Parking and manoeuvring71
Restore factory settings73
Setup17
Set vehicle systems Assistance systems
71
Tyre70
Sound18
Source29
Speed limit for snow tyres70
START-STOP69
Station See main menu
21
Status line7
Stopover65, 66
Switching off Volume
6
Switching the unit off6
Switching the unit on6
Synchronous adjustment of both mirrors72
T
Telephone
37
Bluetooth profile40
Conference46
Connect to the device40
Disconnection43
Fast connection42
Functions43
Main menu38
Multifunction steering wheel11
On screen messages38
Pairing41
Select telephone42
Settings39
Telephone conference46
78Index
Page 81 of 83

Telephone conversation45
Telephone functions43
Tilting the mirror surface - lowering in reverse72
Time19
Tiredness recognition71
TMC traffic information
63
Touch screen5
Tour memory65
TP (Traffic programme)23
Traffic63
Dynamic route64
Information64
Operation64
traffic information TMC
63
Traffic programme (TP)23
traffic reports63
Traffic reports Information
64
Operation64
Traffic sign recognition71
Traffic signs51
Travel light - travel mode72
Tyre pressure monitor69, 70
U
Unit menus
6
Unit operation7
Device screen7
Multifunction steering wheel9
Unit screen7
Unit overview5
Units19
Unit screen Keyboard
8
Operation7
USB33
V
vCard
58
Vehicle equipment Declaration of conformity
4
Vehicle identification number73
Vehicle settings68
Vehicle systems68
vehicle systems settings mirrors and wiper
72
Opening and closing72
Vehicle systems settings Climatronic
73
Light72
Multifunction display73
Seats72
Service73
Video21, 34
Media26
VIN number73
Voice control13
Function requirements14
Navigation16
not recognizing a voice command15
Operation15
Settings20
Stop/restore input/15
switching on/off14
Voice command input correction15
W
Windows comfort control
72
Wireless link to the outside antenna see Phonebox
39
79Index