2014 SKODA OCTAVIA phone
[x] Cancel search: phonePage 15 of 83

Turn setting wheel 2 » Fig. 10 on the multifunction steering wheel to display
the Last destinations menu.
The menu shows the Home address menu item and a list of recent destina-
tions.
When you select one of the menu items, the destination name and the follow-
ing items are displayed:
■ OK - Start navigation
■ Cancel - Return to the Navigation menu – the compass/vehicle symbol will
be displayedIf the home address is not defined when the menu item Home address is se-
lected, the following message appears: Please enter the home address on the
infotainment system.Buttons and wheels of the Navigation menuButton/
wheel » Fig. 10ActionFunction1PressInterrupt current navigation announcement1Turn upwardsIncrease volume of navigation announcements1Turn downwardsReduce volume of navigation announcements2Press brieflyRepeat or clarify the last navigation announcement or confirm a menu item in the list of recent destina-
tions2Turn upwardsShow the option to stop navigation or display the list of recent destinations2Turn downwards3Press brieflyReturn to a previous level on menu3Press and hold buttonReturn to Main MenuVoice control
Introduction
This chapter contains information on the following subjects:
Function requirements
14
Switching on/off
14
Help for voice control
15
Operation
15
not recognizing a voice command
15
Correction possibility of a voice command input
15
Stop/restore voice command input
15
Not in the help voice commands
16First and foremost, pay attention to the safety instructions » page 4 , Impor-
tant notes .
Some equipment functions can be operated using voice commands. Thus, the
use of the device is accelerated and increased comfort while driving.
Voice control can be used in the Radio, Media , Telephone and Navigation me-
nus.
The voice control system can be operated either by the driver or by the front
passenger. 13Unit operation
Page 16 of 83

WARNING■Please pay attention to the traffic first and foremost! As the driver you
are fully responsible for road safety. Only use the system so that you are in
full control of your vehicle in every traffic situation - risk of accident!■
Do not use the voice control system when under stress or in an emergen-
cy. Your voice commands may not be recognized in such situations. The tel-
ephone connection may not be established or the connection may take too
much time to complete. The emergency number should be dialled manually!
Function requirements
Read and observe
on page 14 first.
Function requirements for voice control. The ignition is switched on.
The unit is switched on.
No phone call is in progress.
The parking aid is not active.
Requirements for optimum voice command recognition.
› Only give voice commands when the symbol is displayed on the device
screen or in the information display.
› Speak with a normal tone of voice without intonation and excessive pauses.
› Avoid a bad pronunciation.
› Close doors, windows and the sliding roof, in order to prevent external dis-
turbances affecting recognition of the voice commands.
› It is recommended to speak louder at higher speeds, so that the tone of your
voice is louder than the increased surrounding noise.
› During voice control, limit additional noise in the vehicle, e.g. passengers
talking at the same time.
CAUTION
For some languages, there is no voice control available. This device indicates
this fact through a text message that is displayed after setting the device lan-
guage screen » page 17.Note■
During voice control, no navigation announcements and traffic announce-
ments are played.■
Some voice commands must be spelled out when pronouncing depending on
the selected language of communication, such as the Source Selection “ SD”
card one .
Switching on/off
Fig. 11
Multifunction steering wheel
Read and observe
on page 14 first.
Switching on voice control › Briefly press the
button on the device.
› Briefly press the symbol key
1
on the multifunction steering wheel.
Activation of voice control is indicated by an acoustic signal and the device
screen will display a collection of basic voice commands for the current menu.
The menu display as well as the acoustic signal can be enabled or disa-
bled » page 20 .
Switching off voice control › Press the
button on the device for a long time or press it twice.
› With a long or double press the symbol key
on the multifunction steering
wheel.
› Touch the screen with your fingers (any part of the screen with the excep-
tion of the function key ).
› Press a button on the device (except for a short pressing of the
button).
› Utter the voice command
Cancel voice control.
14Familiarization with the unit
Page 19 of 83
Unit settings
Setup menu
Introduction
This chapter contains information on the following subjects:
Main menu
17
Sound settings
18
Screen settings
18
Time and date settings
19
Keyboard settings
19
Additional keypad language settings
19
Unit settings
19
Voice control settings
20
Restore factory settings
20
Bluetooth ®
settings
20
First and foremost, pay attention to the safety instructions » page 4 , Impor-
tant notes .
This chapter covers the basic settings of the device.
Additional settings are described in the individual menus ■ Radio » page 24
■ Media » page 28
■ DVD video » page 35
■ Images » page 36
■ Phone » page 39
■ Navigation » page 48
■ Vehicle system settings » page 68
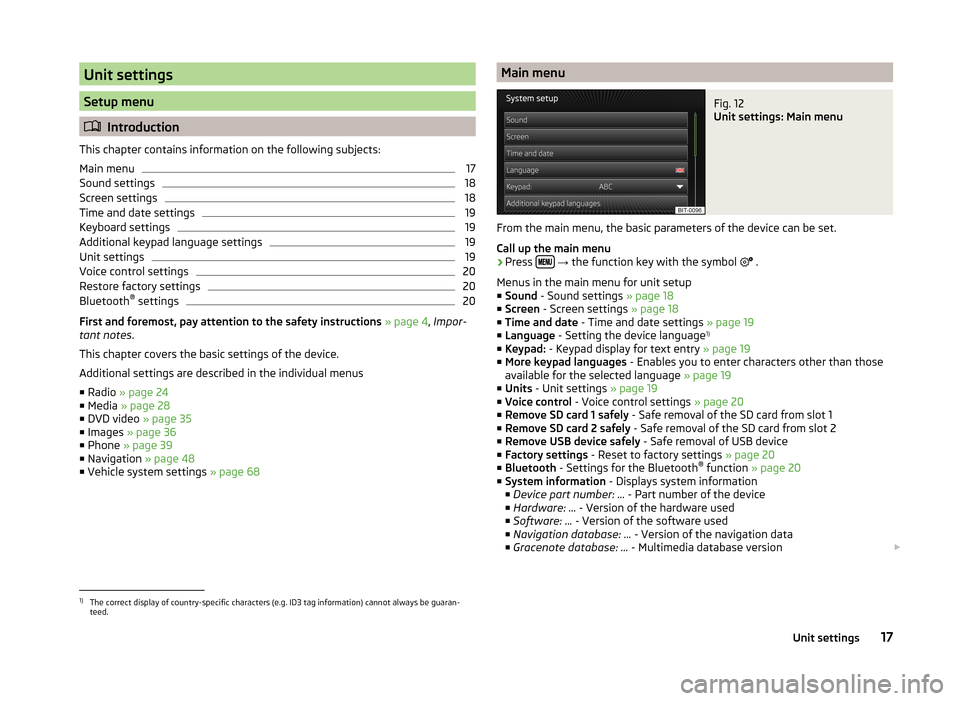
Main menuFig. 12
Unit settings: Main menu
From the main menu, the basic parameters of the device can be set.
Call up the main menu
›
Press
→ the function key with the symbol
.
Menus in the main menu for unit setup
■ Sound - Sound settings » page 18
■ Screen - Screen settings » page 18
■ Time and date - Time and date settings » page 19
■ Language - Setting the device language 1)
■ Keypad: - Keypad display for text entry » page 19
■ More keypad languages - Enables you to enter characters other than those
available for the selected language » page 19
■ Units - Unit settings » page 19
■ Voice control - Voice control settings » page 20
■ Remove SD card 1 safely - Safe removal of the SD card from slot 1
■ Remove SD card 2 safely - Safe removal of the SD card from slot 2
■ Remove USB device safely - Safe removal of USB device
■ Factory settings - Reset to factory settings » page 20
■ Bluetooth - Settings for the Bluetooth ®
function » page 20
■ System information - Displays system information
■ Device part number: ... - Part number of the device
■ Hardware: ... - Version of the hardware used
■ Software: ... - Version of the software used
■ Navigation database: ... - Version of the navigation data
■ Gracenote database: ... - Multimedia database version
1)
The correct display of country-specific characters (e.g. ID3 tag information) cannot always be guaran-
teed.
17Unit settings
Page 20 of 83
■Media Codec: ... - Media codec version
■ Update software - Manual software update (for more information see the
ŠKODA Website www.infotainment.skoda-auto.com )
■ Copyright - Information on licences and copyrights are only available in Eng-
lish
Sound settings
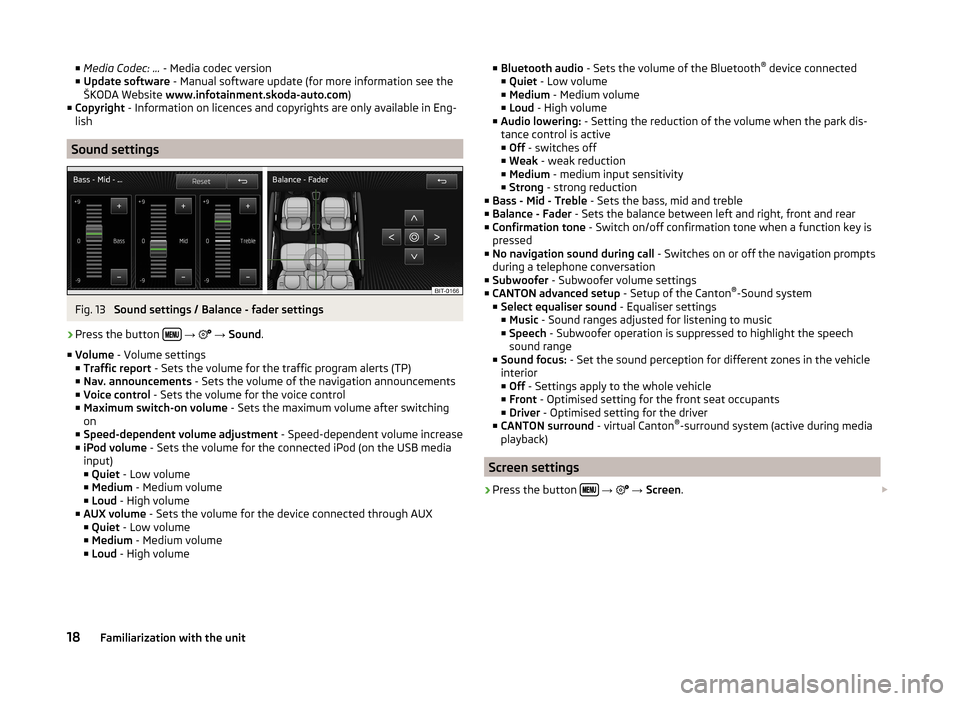
Fig. 13
Sound settings / Balance - fader settings
›
Press the button
→
→ Sound .
■ Volume - Volume settings
■ Traffic report - Sets the volume for the traffic program alerts (TP)
■ Nav. announcements - Sets the volume of the navigation announcements
■ Voice control - Sets the volume for the voice control
■ Maximum switch-on volume - Sets the maximum volume after switching
on
■ Speed-dependent volume adjustment - Speed-dependent volume increase
■ iPod volume - Sets the volume for the connected iPod (on the USB media
input)
■ Quiet - Low volume
■ Medium - Medium volume
■ Loud - High volume
■ AUX volume - Sets the volume for the device connected through AUX
■ Quiet - Low volume
■ Medium - Medium volume
■ Loud - High volume
■
Bluetooth audio - Sets the volume of the Bluetooth ®
device connected
■ Quiet - Low volume
■ Medium - Medium volume
■ Loud - High volume
■ Audio lowering: - Setting the reduction of the volume when the park dis-
tance control is active ■ Off - switches off
■ Weak - weak reduction
■ Medium - medium input sensitivity
■ Strong - strong reduction
■ Bass - Mid - Treble - Sets the bass, mid and treble
■ Balance - Fader - Sets the balance between left and right, front and rear
■ Confirmation tone - Switch on/off confirmation tone when a function key is
pressed
■ No navigation sound during call - Switches on or off the navigation prompts
during a telephone conversation
■ Subwoofer - Subwoofer volume settings
■ CANTON advanced setup - Setup of the Canton®
-Sound system
■ Select equaliser sound - Equaliser settings
■ Music - Sound ranges adjusted for listening to music
■ Speech - Subwoofer operation is suppressed to highlight the speech
sound range
■ Sound focus: - Set the sound perception for different zones in the vehicle
interior
■ Off - Settings apply to the whole vehicle
■ Front - Optimised setting for the front seat occupants
■ Driver - Optimised setting for the driver
■ CANTON surround - virtual Canton®
-surround system (active during media
playback)
Screen settings
›
Press the button
→
→ Screen .
18Familiarization with the unit
Page 22 of 83
■Gas consumption: - Gas consumption units
■ kg/100km - Kilograms per 100 km
■ km/kg - Kilometres per kilogram
■ m³/100km - Cubic metres per 100 kilometres
■ km/m³ - Kilometres per cubic metre
■ Pressure: - Pressure units for tyre pressure
■ kPa - Kilopascal
■ bar - bar
■ psi - Pounds per square inch
Voice control settings
›
Press the button
→
→ Voice control .
■ Dialogue style: - Setting the dialogue style
■ Long - Long dialogue (the system plays complete acoustic messages)
■ Short - Short dialogue (the system shortens some acoustic messages or
substitutes them with an acoustic signal)
■ Display available commands - Switch on/off the menus containing basic
voice commands when voice control is activated
■ Voice control session start tone - Switch on/off the audible signal that is
output when voice control is activated
■ Voice control session end tone - Switch on/off the audible signal that is out-
put when voice control is ended
■ Input tone in voice dialogue - Switch on/off the audible signal that is output
to signal that voice control is waiting for a command
Restore factory settings
›
Press the button
→
→ Factory settings .
■ Reset all settings and data
■ Restore factory settings - Reset all factory settings
■ Reset individual settings/data
■ Sound - Restore default settings for sound
■ Radio - Restore default settings for radio
■ Vehicle - Restore default settings for the vehicle systems
■ Telephone - Restore default settings for phone
■ Media - Restore default settings for media
■ Voice control - Restore default settings for voice control
■
Navigation - Restore default settings for navigation
■ System - Restore the system default settings
Bluetooth ®
settings
›
Press the button
→
→ Bluetooth .
■ Bluetooth - Switch on/off Bluetooth ®
function
■ Visibility: - Switch on/off the visibility of the Bluetooth ®
device for other de-
vices
■ Visible - Visibility is always on
■ Hidden - Visibility is off
■ At start-up - Turns on visibility for 5 minutes after switching on the ignition
or until the driving speed has exceeded 5 km/h
■ Name: - Open the input screen with keyboard - Change the device name
■ Paired devices - Display the list of paired Bluetooth ®
devices; connect or de-
lete a paired device; delete the list of paired devices ■ Delete all - Delete all paired Bluetooth ®
devices
■ - Delete the paired Bluetooth ®
device
■ Find devices - Searches for available external devices with enabled Blue-
tooth ®
functions and activated visibility » page 41
■ Bluetooth audio (A2DP/AVRCP) - Switch on/off the connection option for
Bluetooth ®
profiles A2DP and AVRCP 1)
1)
A2DP and AVRCP are Bluetooth
®
profiles that support multimedia functions.
20Familiarization with the unit
Page 28 of 83
Media
Operation
Introduction
This chapter contains information on the following subjects:
Main menu
26
Title / folder list
27
Track/folder database
27
Playback
28
Media settings
28
First and foremost, pay attention to the safety instructions » page 4 , Impor-
tant notes .
You can use the unit to play audio and video files in different for-
mats » page 29 , connect different signal source types, or store audio files in
the internal memory of the Jukebox.
When the signal source has been connected, the device starts to automatically
play audio files in alphabetical order.
Types of device operation » page 7 .
› On the device via the operating elements.
› Using the function keys on the device screen.
› Using the Maxi DOT display.
Main menu
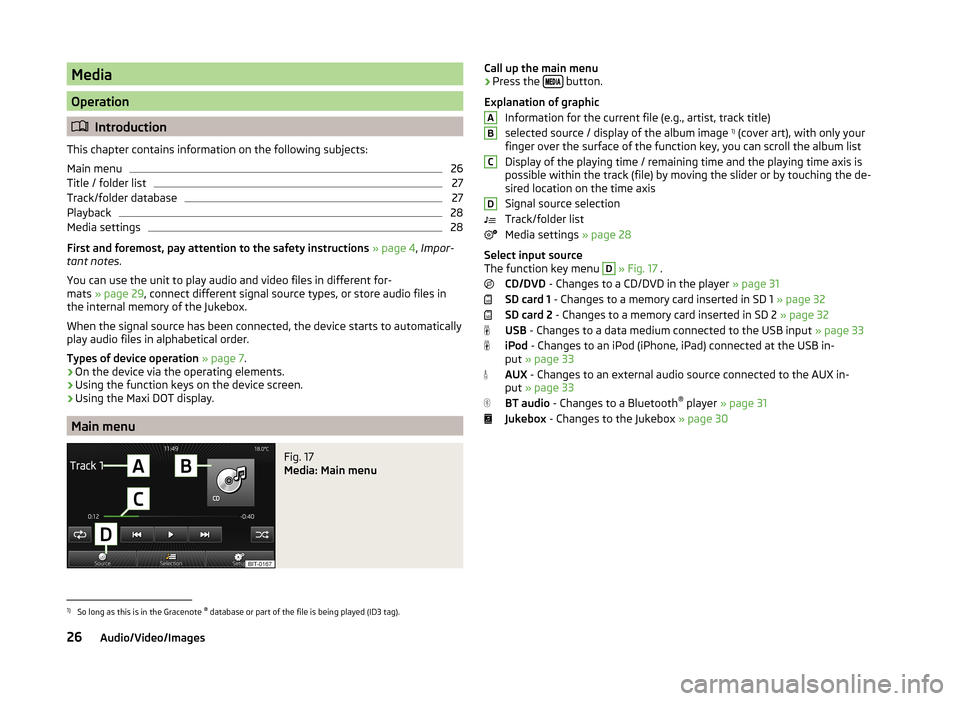
Fig. 17
Media: Main menu
Call up the main menu›Press the
button.
Explanation of graphic Information for the current file (e.g., artist, track title)
selected source / display of the album image 1)
(cover art), with only your
finger over the surface of the function key, you can scroll the album list
Display of the playing time / remaining time and the playing time axis is
possible within the track (file) by moving the slider or by touching the de-
sired location on the time axis
Signal source selection
Track/folder list
Media settings » page 28
Select input source
The function key menu D
» Fig. 17 .
CD/DVD - Changes to a CD/DVD in the player » page 31
SD card 1 - Changes to a memory card inserted in SD 1 » page 32
SD card 2 - Changes to a memory card inserted in SD 2 » page 32
USB - Changes to a data medium connected to the USB input » page 33
iPod - Changes to an iPod (iPhone, iPad) connected at the USB in-
put » page 33
AUX - Changes to an external audio source connected to the AUX in-
put » page 33
BT audio - Changes to a Bluetooth ®
player » page 31
Jukebox - Changes to the Jukebox » page 30
ABCD1)
So long as this is in the Gracenote ®
database or part of the file is being played (ID3 tag).
26Audio/Video/Images
Page 31 of 83
signal sources
Introduction
This chapter contains information on the following subjects:
Sources and file formats supported
29
Requirements and restrictions
30
Jukebox
30
Bluetooth ®
player
31
CD/DVD
31
SD memory card
32
USB-, AUX inputs
33
First and foremost, pay attention to the safety instructions » page 4 , Impor-
tant notes .
WARNING■
Never place external signal sources close to the airbags. Loose objects
could hit a deployed airbag and injure occupants – danger of death!■
Never place external signal sources on the console panel. Loose objects
can be thrown forward during a sudden manoeuvre or in case of an acci-
dent and can injure the occupants or other road users.
■
Do not hold external sources while driving in your hand or on your knees.
Loose objects can be thrown forward during a sudden manoeuvre or in
case of an accident and can injure the occupants or other road users.
■
Always route the connection cable of the external signal source such that
is does not restrict you when driving in any way.
CAUTION
We recommend that you do not save any important data to the Jukebox, to
CD /DVD media, Bluetooth ®
players, to SD memory cards or connected external
signal sources. The ŠKODA Partner is not responsible for damage due to the
loss of data stored on these storage devices.
Note
With some signal sources, the output level can be changed at source.Sources and file formats supported
Read and observe
and on page 29 first.
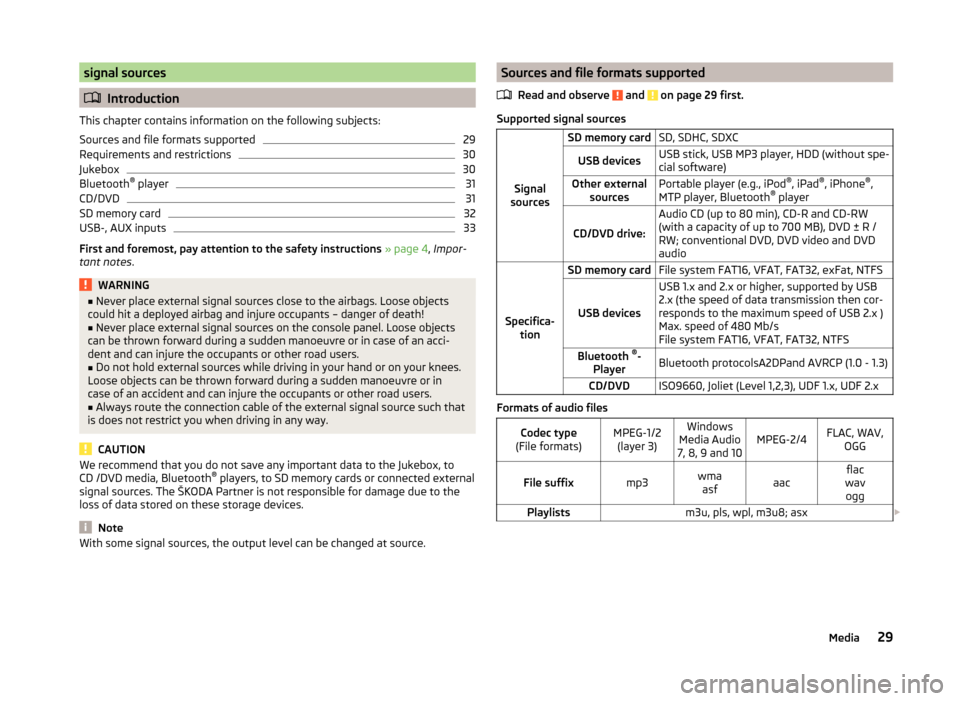
Supported signal sourcesSignal
sources
SD memory cardSD, SDHC, SDXCUSB devicesUSB stick, USB MP3 player, HDD (without spe-
cial software)Other external sourcesPortable player (e.g., iPod ®
, iPad ®
, iPhone ®
,
MTP player, Bluetooth ®
player
CD/DVD drive:
Audio CD (up to 80 min), CD-R and CD-RW
(with a capacity of up to 700 MB), DVD ± R /
RW; conventional DVD, DVD video and DVD
audio
Specifica- tion
SD memory cardFile system FAT16, VFAT, FAT32, exFat, NTFS
USB devices
USB 1.x and 2.x or higher, supported by USB
2.x (the speed of data transmission then cor-
responds to the maximum speed of USB 2.x )
Max. speed of 480 Mb/s
File system FAT16, VFAT, FAT32, NTFSBluetooth ®
-
PlayerBluetooth protocolsA2DPand AVRCP (1.0 - 1.3)CD/DVDISO9660, Joliet (Level 1,2,3), UDF 1.x, UDF 2.x
Formats of audio files
Codec type
(File formats)MPEG-1/2 (layer 3)Windows
Media Audio
7, 8, 9 and 10MPEG-2/4FLAC, WAV, OGGFile suffixmp3wmaasfaacflac
wav oggPlaylistsm3u, pls, wpl, m3u8; asx 29Media
Page 33 of 83
The following information is displayed:
■ Free: - Amount of memory used
■ In use: - Amount of memory free
■ Free files: - Number of files that can be imported (maximum 3000)
The current memory capacity is displayed on the screen when files are being imported or deleted.
Import files
Supported audio/video files » page 29 can be imported from the sources cur-
rently connected into the internal memory.
› Press the button
→ Manage Jukebox → Import .
› A menu of available sources is displayed.
› Select the source desired.
› Select folders B
or files
C
.
› Press the symbol button
D
.
› The
Import completed. (... from ... file (s)) . Import completed successfully.
message indicates that import of the folder or files selected has been com-
pleted.
› Press the button
and close the file import window.
Delete files
The function is available if there are any audio or video files in the Jukebox.
› Press the button
→ Manage Jukebox → Delete .
› A menu of available media is displayed.
› Select the available medium for deletion.
› Select folders
B
or files
C
.
› Press the symbol button
.
› Press
Delete .
› The
Files have been deleted. message indicates that the folders/files selec-
ted were successfully deleted.
› Press the button
and close the delete files window.
Note
■
It is not possible to copy the contents of copyright protected CDs or DVDs to
the Jukebox.■
Files that have already been copied are recognized and cannot be copied
again (shown in grey).
■
It is not possible to copy files while simultaneously playing back audio or vid-
eo files in the CD/DVD drive.
Bluetooth ®
player
Read and observe
and on page 29 first.
The device makes a wireless connection (pairing) to the Bluetooth ®
player pos-
sible.
›
Follow the same instructions as for pairing the device with a tele-
phone » page 40 .
CAUTION
Do not connect an Apple device to the device via Bluetooth ®
and USB at the
same time, as this may result in a malfunction.
Note
■ We recommend adjusting the volume on the portable player to the maximum
level.■
The volume can also be adjusted by setting the input sensitivity of the unit
for Bluetooth ®
player » page 18 , Sound settings .
■
The supported media functions are dependent on the type of Bluetooth ®
player used.
CD/DVD
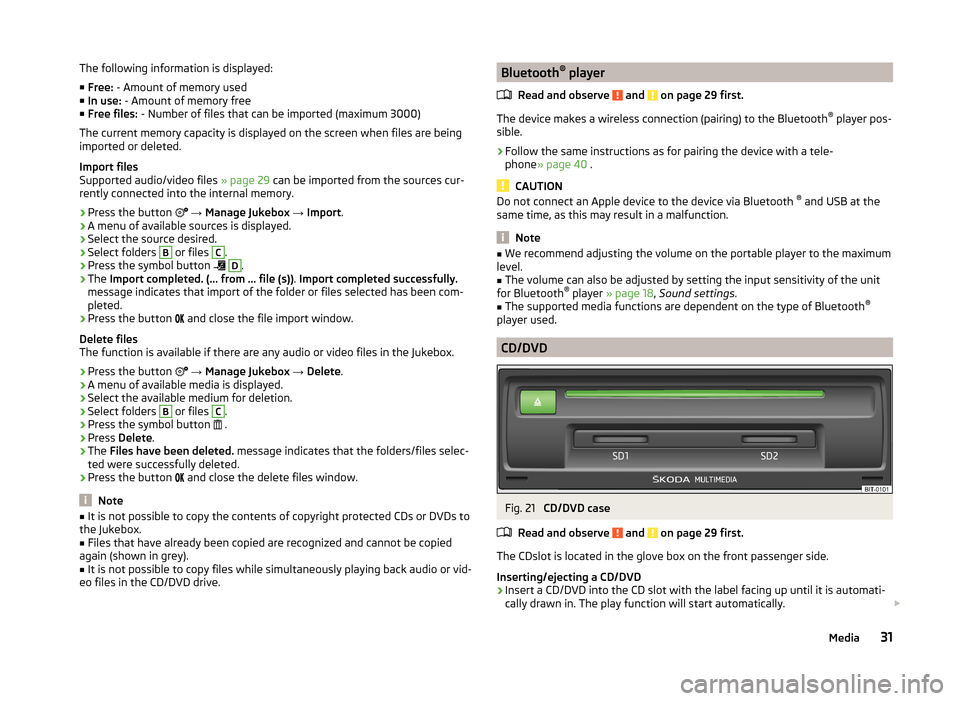
Fig. 21
CD/DVD case
Read and observe
and on page 29 first.
The CDslot is located in the glove box on the front passenger side.
Inserting/ejecting a CD/DVD
›
Insert a CD/DVD into the CD slot with the label facing up until it is automati-
cally drawn in. The play function will start automatically.
31Media