2014 SKODA OCTAVIA change time
[x] Cancel search: change timePage 47 of 77

■Suggest 3 alternative routes - Switch on/off manual selection of the route
type (economical, fast, short) » page 57
■ Route: - Automatic selection of the preferred route type (manual route selec-
tion is switched off)
■ Economical - Calculate the most economical route with shortest travelling
time and distance travelled – displayed in green
■ Fast - Calculate the fastest route to the destination, even if a detour is nec-
essary - displayed in red
■ Short - Calculate the shortest route to the destination, even if a longer
travelling time is required - displayed in orange
■ Dynamic route - Switch on/off dynamic route calculation using TMC traffic
reports » page 59
■
Avoid motorways - Switch on/off the use of motorways in the route calcu-
lation
■
Avoid ferries and motorail trains - Switch on/off avoidance of ferries and
motorail trains
■
Avoid toll roads - Switch on/off the use of toll roads in the route calcula-
tion
■
Avoid tunnels - Switch on/off the use of tunnels for which tolls have to
paid in the route calculation
■
Avoid routes requiring toll stickers - Switch on/off the use of roads re-
quiring road tax disk display (with a valid road tax disk) in the route calcula-
tion
■ Available toll stickers - Displays the list of roads requiring road tax disk dis-
play
Map
›
In the Navigation main menu, press
→ Map .
■ Day/night: -Selection of map display colour
■ Day - coloured
■ Night - in shades of grey
■ Automatic - Map with light or dark coloured background; the background
changes once you turn on the lights (does not apply to daytime running
lights)
■ Autozoom - Switch on/off the automatic zoom in/out of the map display
while driving » page 47
■ Show traffic signs - Switch on/off the display of traffic signs
■ Select categories for POIs - Select POIs to be displayed in the map from a list
of available POIs (max. 10 POIs) » page 55
■ Show brands for POIs - Switch on/off the display company logos at the POIs
■
Show favourites - Switch on/off the display of favourites
■ Lane guidance - Switch on/off the display of a window with the recommen-
ded lane for complicated intersections » page 58
Fuelling options
›
In the Navigation main menu, press
Fuel options .
■ Select preferred fuel station - Selects your preferred fuel station brand (the
selected station brand will be displayed on the first positions of the list of
nearest fuel stations found)
■ Fuel warning - Switch on/off the display of the warning message for low on
fuel Warning: fuel tank almost empty. Would you like to find a fuel station
nearby? If the message appears in the unit screen, the system offers the fol-
lowing features: ■ Cancel - Close the window with the warning
■ Find - Search for the nearest fuel station
Navigation announcements
›
In the Navigation main menu, press
→ Nav. announcement .
■ Volume - Set the volume of the navigation announcements
■ No voice guidance during call - Switch on/off navigation announcements
during a telephone call (using a phone connected to the hands-free sys-
tem » page 33 )
Advanced settings
›
In the Navigation main menu, press
→ Advanced setup .
■ Time display: - Select the time to be displayed in the status line
■ Time of arrival - displays the expected time to destination
■ Travelling time - Display the expected travelling time to the destination
■ Status line: Status line - Display information about your selected destination
in the status line ■ Destination - Display information about the length and duration of the
guidance to the destination
■ Stopover - Displays information about the length and duration of the guid-
ance to the stopover
■ Note: national border crossed - Switch on/off the display of the information
window with speed limits when crossing the national border
■ Demo mode - Switch on/off guidance in demo mode
45Description of the navigation system
Page 50 of 77
Switching off›In the Navigation main menu, press .
or›
in the split screen on
the button.
or
›
In the Navigation main menu, press
→ Split screen .
Menus in the split screen
■ Audio - Playback operation of the currently selected audio
source » page 48
■ Compass - Displays the current vehicle location in relation to the compass di-
rections » page 48
■ Manoeuv. - Display of the next or following navigation announcement (ma-
noeuvre) » page 49
■ Traffic - Display of traffic signs which are stored in the navigation data of the
maps » page 49
■ GPS - Displays the geographical coordinates of the current vehicle loca-
tion » page 49
Audio
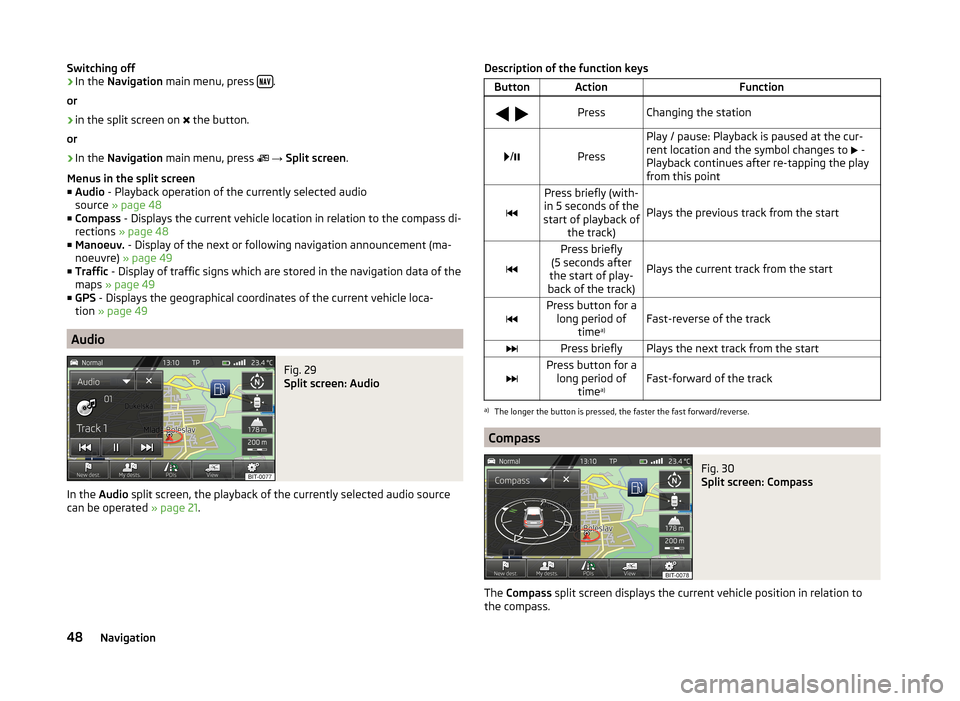
Fig. 29
Split screen: Audio
In the Audio split screen, the playback of the currently selected audio source
can be operated » page 21.
Description of the function keysButtonActionFunction
PressChanging the station
/Press
Play / pause: Playback is paused at the cur-
rent location and the symbol changes to
-
Playback continues after re-tapping the play
from this point
Press briefly (with-
in 5 seconds of the
start of playback of the track)
Plays the previous track from the start
Press briefly
(5 seconds after
the start of play-
back of the track)
Plays the current track from the startPress button for a long period of time a)Fast-reverse of the trackPress brieflyPlays the next track from the startPress button for a
long period of time a)Fast-forward of the track
a)
The longer the button is pressed, the faster the fast forward/reverse.
Compass
Fig. 30
Split screen: Compass
The
Compass split screen displays the current vehicle position in relation to
the compass.
48Navigation
Page 53 of 77
›In the
Navigation main menu, press → Other POIs → Options → Address .
Some address positions are already pre-filled with the data of the last destina-
tion.
The pre-filled positions can be adjusted by touching the item and then adjust-
ing it in the input screen » page 8.
To start navigation, you need to enter country, city and street.
The information is entered step by step in individual input screens.
When entering the street, instead of a street name, it is possible to select the centre of the entered city by touching Centre. Then it is no longer necessary to
enter the house number or junction.
Both the house number and also a further address supplement in the form of a number can be entered. The system displays a list of destinations found from
combinations of the two numbers.
If the entered house number was not found, a menu opens to clarify the desti-
nation:
■ No house number - Enter an address without a house number and display a
menu with destination details
■ Nearest house number: - Confirmation of the proposed house number
■ Enter junction - Open a menu with junctions with the selected street
If the address is entered correctly, destination details are dis-
played » page 60 .
Map
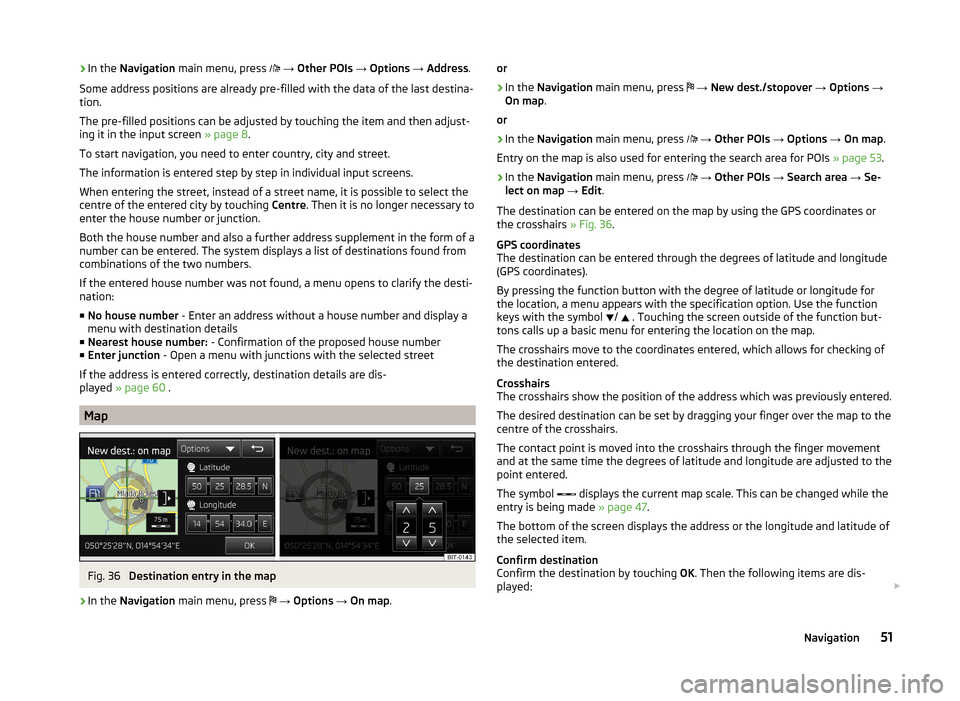
Fig. 36
Destination entry in the map
›
In the Navigation main menu, press
→ Options → On map .
or›
In the Navigation main menu, press
→ New dest./stopover → Options →
On map .
or
›
In the Navigation main menu, press
→ Other POIs → Options → On map .
Entry on the map is also used for entering the search area for POIs » page 53.
›
In the Navigation main menu, press
→ Other POIs → Search area → Se-
lect on map → Edit .
The destination can be entered on the map by using the GPS coordinates or
the crosshairs » Fig. 36.
GPS coordinates
The destination can be entered through the degrees of latitude and longitude
(GPS coordinates).
By pressing the function button with the degree of latitude or longitude for
the location, a menu appears with the specification option. Use the function
keys with the symbol /
. Touching the screen outside of the function but-
tons calls up a basic menu for entering the location on the map.
The crosshairs move to the coordinates entered, which allows for checking of
the destination entered.
Crosshairs
The crosshairs show the position of the address which was previously entered.
The desired destination can be set by dragging your finger over the map to the
centre of the crosshairs.
The contact point is moved into the crosshairs through the finger movement
and at the same time the degrees of latitude and longitude are adjusted to the
point entered.
The symbol displays the current map scale. This can be changed while the
entry is being made » page 47.
The bottom of the screen displays the address or the longitude and latitude of
the selected item.
Confirm destination
Confirm the destination by touching OK. Then the following items are dis-
played:
51Navigation
Page 59 of 77
Route calculation
The route is calculated automatically according to the entered destination. The calculation takes the settings of the route options » page 44 (route type, dy-
namic route, etc.) into account.
The route is recalculated each time if you ignore driving recommendations or
change the route. This process takes only a few seconds. Navigation an-
nouncements can only then be re-transmitted.
If Demo mode is switched on » page 45, a prompt appears asking whether you
want the guidance to start in demo mode or normal mode.
The Demo mode displays a simulated drive to the destination entered. There is
the option of travelling the calculated route “as a simulation” just on the
screen.
If an alternative route option is set, function keys are displayed, following the
calculation, for the route types with information on the route length and the
expected travelling time.
Route type economical
fast
short
Selecting the route type will start route guidance.
If the option for alternative routes is disabled, the route is calculated and route
guidance is started according to the preferred route » page 44.
It is possible to select a pre-calculated route before the calculation of the re-
maining routes is completed.
The unit tries to allow for continued guidance even if the navigation data is in-
complete or there is no data at all for the given area (e.g., one-way streets,
road types, etc.).
Interrupt and continue route guidance
If the ignition is switched off and on again and the key was left in the ignition
(in vehicles with the KESSY system, when the ignition was switched off):
› Within 30 min - route guidance is continued taking into account the calcula-
ted route
› Between 30 and 40 min - the screen switches to “standby” mode (energy-
saving mode of the screen); the route guidance continues using the calcula-
ted route› Between 40 min and 120 min - the unit screen displays the message
Contin-
ue route guidance? ; after you confirm the message, the route guidance con-
tinues using the calculated route;
› After 120 min - route guidance is cancelled.
If ignition is switched off and on again and the key removed temporarily (in
vehicles with the KESSY system, ignition switched off and the driver's door
opened):
› Within 10 min - route guidance is continued taking into account the calcula-
ted route
› Between 10 min and 120 min - the screen switches to “standby mode” (ener-
gy-saving mode of the screen); the unit screen displays the message Contin-
ue route guidance? ; after you confirm the message, the route guidance con-
tinues using the calculated route
› After 120 min - route guidance is cancelled.
Graphic navigation instructions
The graphical navigation instructions are displayed: › in the MAXI DOT display
» page 12.
› in the split screen in the unit screen
» page 49.
Navigation announcements
The device makes navigation announcements. The navigation announcements
are started as soon as the route calculation is complete or a route type has
been selected.
The navigation announcements are generated by the instrument system. The
lawless clarity of the message (eg, road or city name) cannot always be guar-
anteed.
Before turning, up to 3 recommendations are issued:
The last navigation announcement can be repeated: › by pressing the menu knob
2
» Fig. 1 on page 5 ;
› by pressing the dial
2
» Fig. 9 on page 12 on the multifunction steering
wheel.
The timing of the navigation announcement is dependent on the type of road
and the driving speed. For example, on motorways the first announcement is
given about 2000 m (6000 ft) before the place where you want to exit the mo-
torway.
57Navigation
Page 65 of 77
■Engine: - Set the engine (drive) characteristics
■ Normal - Normal
■ Sport - Sports
■ Eco - Economical
■ ACC: - Set the vehicle acceleration when adaptive cruise control is activa-
ted
■ Normal - Normal
■ Sport - Sports
■ Eco - Economical
■ Dynamic bend light.: - Set the characteristics of the adaptive headlights
■ Normal - Normal
■ Sport - Sports
■ Eco - Economical
■ Air conditioning: - Sets the Climatronic characteristics
■ Normal - Normal
■ Eco - Economical
■ Reset mode - Setting for all menu items in the Individual mode to Normal
■ Cancel - Keep the current settings
■ Reset - Set all menu items to Normal
Note
If you do not operate the unit for longer than approx. 10 seconds in the "Select
driving mode" menu, it will switch to the last selected menu or switch itself off.
Vehicle data
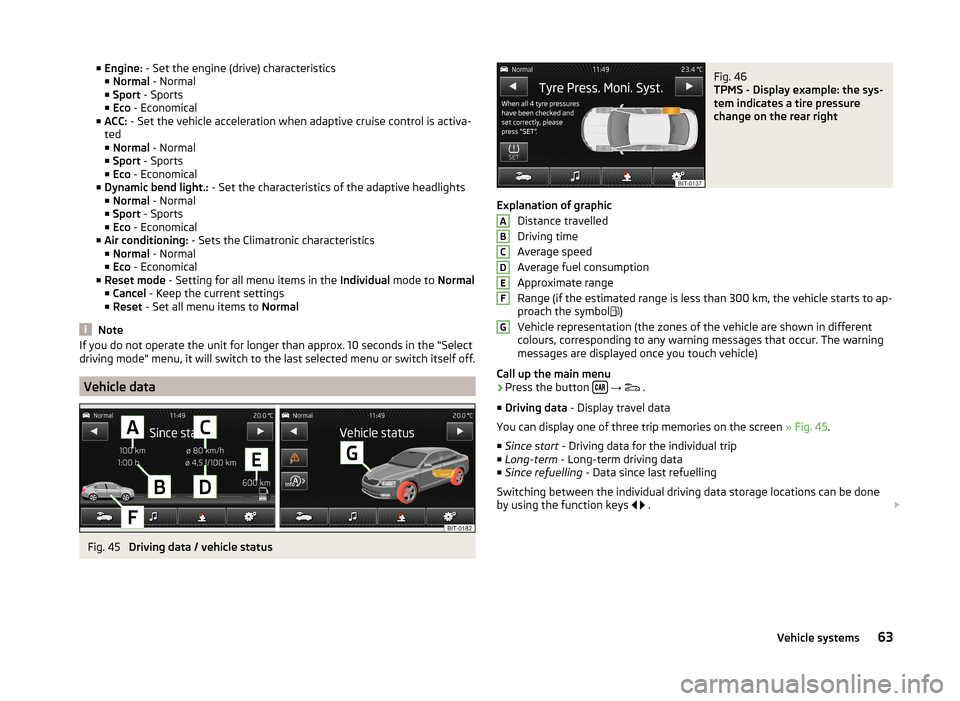
Fig. 45
Driving data / vehicle status
Fig. 46
TPMS - Display example: the sys-
tem indicates a tire pressure
change on the rear right
Explanation of graphic
Distance travelled
Driving time
Average speed
Average fuel consumption
Approximate range
Range (if the estimated range is less than 300 km, the vehicle starts to ap-
proach the symbol )
Vehicle representation (the zones of the vehicle are shown in different
colours, corresponding to any warning messages that occur. The warning
messages are displayed once you touch vehicle)
Call up the main menu
›
Press the button
→
.
■ Driving data - Display travel data
You can display one of three trip memories on the screen » Fig. 45.
■ Since start - Driving data for the individual trip
■ Long-term - Long-term driving data
■ Since refuelling - Data since last refuelling
Switching between the individual driving data storage locations can be done
by using the function keys
.
ABCDEFG63Vehicle systems
Page 68 of 77
■Rear tone setting - Setting the pitch of the beeps for the rear obstacle de-
tection
■ Audio lowering: - lowering the volume of the speakers (audio)
■ Off - No volume reduction of the sound from speakers
■ Weak - weak volume attenuation of sound from speakers
■ Medium - medium volume attenuation of sound from speakers
■ Strong - Strong volume attenuation of sound from speakers
Note
The compact display of the parking aid can be switched to a full screen view by
touching the screen within the display.
Light
›
Press the button
→
→ Light .
■ Light assistance - Setting of outdoor lighting
■ Dynamic Light Assist - Switch on/off the head light assist function
■ Switch-on time: - Set the sensibility of the light sensor against the change
in intensity of the ambient light ■ Early - High sensitivity
■ Medium - Medium sensitivity
■ Late - Low sensitivity
■ Automatic headlight control in rain - Activate/deactivate automatic head-
light control in rain
■ Daytime running lights - Activate/deactivate daytime driving lights
■ Lane change flash - Activate/deactivate lane change flashing
■ Travel mode: - Travel mode on/off
■ R-hand traffic - For right-hand traffic
■ L-hand traffic - For left-hand traffic
■ Interior lighting - Sets the interior lighting
■ Instrument/switch lighting - Set the brightness of the instrument/switch
lighting
■ Footwell lighting - Sets the brightness of the footwell light
■ Coming/Leaving Home function - Set the COMING HOME/LEAVING HOME
function
■ Coming Home function - Sets the period that the lights remain on after you
leave the vehicle (0 - 30 seconds; 0 = function deactivated)
■ Leaving Home function - Sets the period that the lights remain on after
you unlock the vehicle (0 - 30 seconds; 0 = function deactivated)
Mirrors and wiper›
Press the button
→
→ Mirrors and wipers .
■ Mirrors - Adjust the mirrors
■ Synchronous adjustment - Activate/deactivate synchronous mirror adjust-
ment
■ Lower while reversing - Activate/deactivate the lowering of the front pas-
senger mirror
■ Fold in when parked - Activate/deactivate folding the mirror via the remote
control key or by using the sensor in the handle (KESSY)
■ Wipers - Adjust the windscreen wipers
■ Automatic wiping in rain - Activate/deactivate automatic windscreen wip-
ing in rain
■ Automatic rear wiper - Activate/deactivate automatic rear window wiping
Opening and closing
›
Press the button
→
→ Opening and closing .
■ Window operation - Window operation settings
■ Conven. opening: - Set the convenience opening feature
■ All windows - All windows
■ Driver window - Driver's window only
■ Off - Deactivate intelligent opening
■ Central locking - Settings for opening and closing of doors
■ Door unlocking: - Set the door unlocking feature
■ All doors - All doors
■ Single door - Driver's door or driver's or passenger door with KESSY sys-
tem
■ Vehicle side - Doors on the driver's side or on the driver's or passenger's
side with KESSY system
■ Automatic locking - Activate/deactivate automatic locking when starting
off
■ Acoustic confirmation - Activate/deactivate acoustic signals when locking/
unlocking the vehicle with an anti-theft alarm system
Seats
›
Press the button
→
→ Seats .
66Vehicle
Page 69 of 77
■Store seat position - Save the driver's seat position and exterior mirror posi-
tion in the remote control key when locking the vehicle ■ Vehicle key activated - Activate/deactivate storing the driver's seat posi-
tion and exterior mirror position when locking the vehicle
Multifunction display
›
Press the button
→
→ Multifunction display .
In this menu it is possible to hide/show the appearance of the menu items in
the instrument cluster multifunction display and reset the driving data.
■ Current consumption - Display of current fuel consumption on/off
■ Average consumption - Display of average fuel consumption on/off
■ Refuel quantity - Display of refuel quantity on/off
■ Convenience consumers - Display of fuel consumption of convenience con-
sumers on/off
■ Eco tips - Display of tips for economical driving on/off
■ Travelling time - Display of travelling time on/off
■ Distance - Display of distance travelled on/off
■ Average speed - Display of average speed on/off
■ Digital speed display - Display of current speed on/off
■ Speed warning - Winter tyres warning on/off
■ Oil temperature - Oil temperature on/off
■ Reset Since start driving data - Reset the trip memory in the device screen
and in the display of the instrument cluster
■ Reset Long-term driving data - Reset the long-term memory in the device
screen and in the display of the instrument cluster
Service
›
Press the button
→
→ Service .
■ Vehicle no.: - Display of the vehicle identification number
■ Inspection: --- / --- - Number of km/days remaining until the next service
event
■ Oil change service: --- / --- - Number of km/days remaining until the next en-
gine oil change
Restore factory settings
›
Press the button
→
→ Factory settings .
In this menu you have the possibility to reset the menu items in the settings of
the vehicle systems to factory settings.
■ All settings - Restoration of the settings all menu items
■ Driver assistance - Restoration of the driver assistance menus
■ Parking and manoeuvring - Restoration of the Parking and manoeuvring
menu items
■ Light - Restoration of the light menus
■ Mirrors and wipers - Restoration of the Mirrors and wipers menu
■ Opening and closing - Restoration of the Opening/closing menu items
■ Multifunction display - Restoration of the Multifunction display menus
If one of the above menu items is selected, the system will ask you whether
you really want to restore the settings.
■ Cancel - Return to higher-level menu
■ Reset - Restore the settings
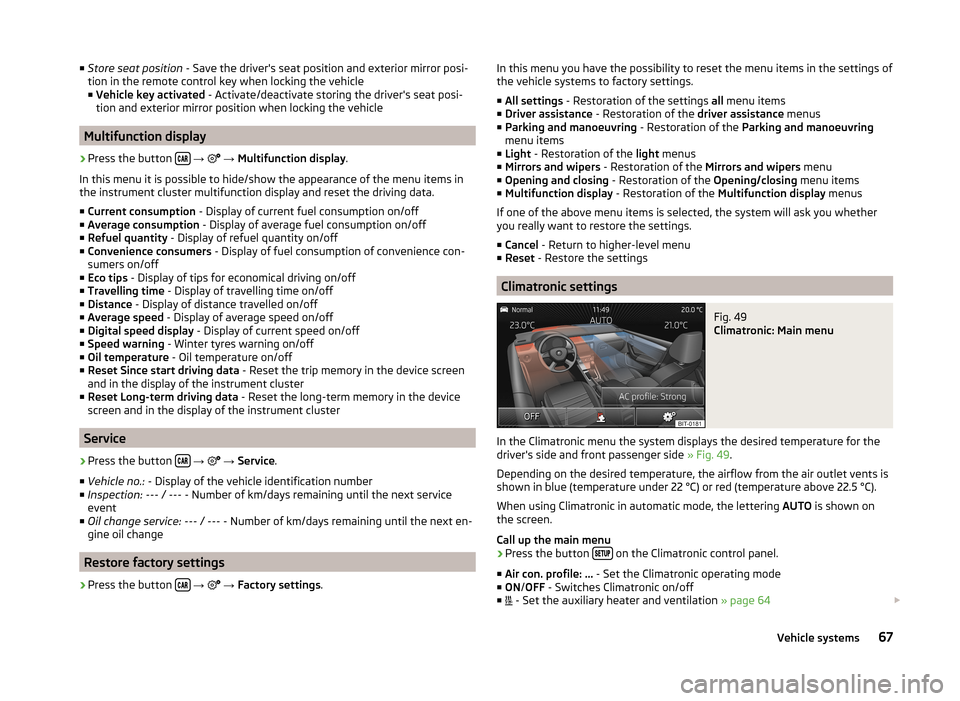
Climatronic settings
Fig. 49
Climatronic: Main menu
In the Climatronic menu the system displays the desired temperature for the
driver's side and front passenger side » Fig. 49.
Depending on the desired temperature, the airflow from the air outlet vents is
shown in blue (temperature under 22 °C) or red (temperature above 22.5 °C).
When using Climatronic in automatic mode, the lettering AUTO is shown on
the screen.
Call up the main menu
›
Press the button on the Climatronic control panel.
■ Air con. profile: ... - Set the Climatronic operating mode
■ ON /OFF - Switches Climatronic on/off
■ - Set the auxiliary heater and ventilation
» page 64
67Vehicle systems
Page 72 of 77
FM21
Settings24
Folders List Media
26
Folding down the exterior mirrors - folding in while parking
66
Frequency rang See Main Menu
21
Front Assist65
Fuelling options45
Function key7
Function keys7
G
Graphical navigation instructions
49
Graphic navigation instructions57
H
Head Light Assist
66
Home address46, 52
I
important notes touch screen
5
Important notes4
In map51
Input screen Language characters
18
Input screen with keyboard8
Input screen with numeric keyboard8
Instrument lighting66
Intelligent window control66
Introductory information4
iPod31
K
keyboard
8
Keyboard18
L
Lane Assist
65
Lane change flash66
Lane guidance58
LEAVING HOME66
Light sensor - light switch-on time66
List of available stations Radio
22
M
Main menu Media
26
Navigation43
Telephone34
Unit settings16
Manage memory46
Manoeuvre Graphic navigation instructions
57
Navigation announcements57
Map45
Display46
Introductory information46
Lane guidance58
Main menu46
Operation47
Map operation46
MAXI DOT8
MAXI DOT-Display Telephone
11
MAXI DOT display Media
9
Navigation12
operation8
Radio9
Media26
AUX30
Bluetooth audio29
CD29
File formats28
Folder List26
Main menu26
MEDIA IN31
Multifunction steering wheel9
Operation26
Playback27
Requirements and restrictions28
Scan27
SD memory card30
Select signal source26
Settings27
Signal source27
Supported media28
USB30
Voice control13
MEDIA IN31
Memory function of the remote control key66
menu Device settings
16
Menu Media
26
Radio21
Setup16
Telephone33
Multifunction display67
Multifunction steering wheel Media
9
Navigation12
Radio9
Telephone11
Multimedia AUX
30
USB30
Mute6
My destinations Menu
52
N
navigation
56
70Index