2014 SKODA OCTAVIA ESP
[x] Cancel search: ESPPage 33 of 77

USB input
External audio sources connected to the USB input cannot be operated from
your 1)
device.
Proceed as follows before removing the USB device:›
Press the button
→
→ Remove USB device safely .
Charge USB audio source
With the ignition on after connecting the USB audio source, the charging proc-
ess is automatically started (applies for audio sources where charging via the
USB connector is possible).
The charging efficiency can be different compared to the charging from the
usual mains power supply. Connected audio sources can be supplied / loaded
with a current of max. 500 mA.
Some connected audio sources may not be recognised and cannot be charged.
The charging of the connected audio source is automatically stopped after
switching off the ignition.
CAUTION
■ The AUX input must only be used for audio devices!■If an external device is connected to the AUX input, which is equipped with
an adapter for external power supply, the sound may be impaired. This de-
pends on the quality of the adapter which is used.■
USB extension cables or adapters may affect the operation of the connected
external device.
■
USB hubs are not supported.
Note
When operating as well as connecting the external device, the respective op-
erating instructions are to be observed.MEDIA IN inputFig. 21
MEDIA IN input
Read and observe and on page 28 first.
The device allows you to play audio and video files from an external, device
connected to the MEDIA-IN input.
External sources, e.g. Apple devices, which are connected to the MEDIA IN in-
put can be operated via the device.
Extension cables to connect external sources are available from ŠKODA origi-
nal accessories.
Sort tracks from a connected Apple device
› Video
(only available if a red-marked adapter is used) - Video playlists, films,
music videos, TV shows, video podcasts, rented films.
› Music
- Playlists, artists, albums, tracks, podcasts, genres, composers, audio
books.
Video setup
› Press the button
→
→ Video (iPod) button.
■ Screen – Adjust the brightness, contrast, and colour of the video (standard
option for colour adjustment during playback in NTSC)
■ Format: - Set the screen width/height ratio
1)
Some options for the control of an external device may not be supported.
31Media
Page 42 of 77

You can select the following functions:Delete the digit
Dial the entered number 1)
Add a prefix 2)
if this option has been set in the telephone set-
tings » page 35
Entering a number using the voice control » page 13
Select mailbox if its number is entered in the phone set-
tings » page 35 or enter the number directly
The input screen also functions as an alphanumeric keypad that you can use to
search for contacts in the phonebook.
For example, if you enter 32, the unit will display contacts with the letter se-
quence DA, FA, EB, etc.
Select the desired contact by pressing the corresponding function key.
Phone book
›
Press the button.
The device phone book has up to 2000 free memory locations for imported
phone contacts. Each contact can contain up to 5 telephone numbers.
The phone book can also be called during an ongoing call.
After successful pairing, the contacts are imported 3)
.
Loading the directory
Upon first connection of the mobile phone with the device, the system begins
to download the phone book from the phone and from the SIM card 4)
into the
device memory 3)
. Depending on the number of contacts this may take several
minutes to complete.
MailboxIf the phonebook downloaded from the mobile phone contains more than
2000 contacts, loading is stopped and the message Contacts not completely
imported. appears on the screen. Only contacts that have already loaded are
available and these are in the menu
.
The first 200 contacts along with the contact data, including the picture asso-
ciated with the contact, are downloaded to the device memory 5)
.
If an error occurs while loading the phone book, the message Import failed.
Please try again and check whether the BT device … allows connections.
Update phonebook
Each time the mobile phone has established a new connection with the device,
the relevant phonebook will be updated.
During the update, the phone book which was stored after the last completed
update will be available. Newly stored telephone numbers are only shown af-
ter the updating has ended.
The update can be performed manually » page 35 Import contacts .
Find contact
Press the button Find to open the input screen with keypad to search in the
phonebook » page 8.
Select contact
Press the function key with one of the displayed contacts to start dialing.
Where a contact contains several telephone numbers, the system displays a
menu containing the telephone numbers for the contact.
Contact details
Press the function key with the symbol the contact details are displayed.
Press the function key with the indicated phone numbers to start dialing.
Press the function key with the symbol and the contact will start the route
guidance.1)
If not number is entered, the last dialled number will be displayed after you press the symbol key.
2)
If the add-prefix option is switched on but the prefix is not entered in the phone settings, the last dialled
number will be displayed in the input field after you press the symbol button. or the last number dial-
led. If the prefix defined and a number is entered in the input line, press the symbol key to the prefix is
added in front of telephone number and connection starts.
3)
In some phones you need to confirm import of contacts to the device.
4)
Some mobile phones do not support downloading of contacts from the SIM card.
5)
This function is only supported by some mobile phones.
40Phone
Page 61 of 77

The device can obtain this information by using the following facilities:
› Traffic TP in the FM frequency range
» page 23 .
› TP in the DAB frequency range
› TMC traffic report with dynamic adjustment of the current route option
For the correct TMC function, the following conditions are required: The vehicle is within range of the FM RDS-TMC.
Adequate and uninterrupted signal reception of a traffic report station 1)
.
Current navigation data in the device.
Operation
TMC (Traffic Message Channel) is a digital data service emitted by the radio
station for continuous transmission of traffic information.
›
Press to display a list of traffic reports
Traffic report …/….
Touch one of the traffic report entries to display traffic report de-
tails » page 59 .
If a TMC traffic radio station is available for current location, the TMC traffic re-
ports are updated continuously in the background. The station you are listen-
ing to does not have to be a TMC station.
The reception of TMC traffic reports is always switched on and cannot be
turned off.
The accuracy of the dynamic route guidance depends on the transmitted traf-
fic reports. The radio stations broadcasting this information are responsible for
the content.
TMC traffic reports can only be evaluated and saved by the radio navigation
system when navigation data are available for the driven area.
Switch dynamic route on/off
›
In the Navigation main menu, press
→ Route options → Dynamic route .
Traffic reports influence dynamic route guidance by means of TMC reports
when the Dynamic route » page 44 function is switched on.
Dynamic route switched on
Information on traffic problems received via TMC which affect the route are
displayed in the map by means of a coloured symbol (e.g.,
,
,
, etc.). Traffic
problems, which do not affect the route, are displayed in the map by means of
a grey symbol. The direction in which a traffic problem is found, is displayed by
means of an arrow in the symbol.
Dynamic route switched off
You are not alerted to received traffic disruptions along your route and are gui-
ded through the traffic disruption by the radio navigation system. The traffic
reports are updated automatically in the unit and displayed by pressing the
button
.
If one of the announced traffic disruptions lies along your route, you can also
switch on the dynamic route guidance during the current route guidance or
block the route manually » page 58.
Note
Making a diversion from a traffic jam based on TMC traffic reports may not al-
ways offer a time advantage, e.g. if the diversion route is also congested.
Detailed traffic reports
After pressing the
button, a screen appears with the following informa-
tion:
■ All function key - Display of all traffic reports
■ Function key Route - Display of only the traffic reports on the current route
■ Map showing the traffic obstruction
■ Window with a description of traffic report:
■ Location of event location, accuracy depends on how up-to-date the navi-
gation data is
■ Description of up to three events related to the respective information
■ Description of the direction with respect to the event
■ Probable duration of the event
■ Additional information, such as probable delay time
■ Information line, which reports on the currency of the message and the
provider;
■ Symbol specifying the type of information
■ - zoom in window with described traffic obstruction
1)
For vehicles with disc antennas, if the discs are obscured with film or metal-coated stickers, you may ex-
perience interference.
59Navigation
Page 65 of 77

■Engine: - Set the engine (drive) characteristics
■ Normal - Normal
■ Sport - Sports
■ Eco - Economical
■ ACC: - Set the vehicle acceleration when adaptive cruise control is activa-
ted
■ Normal - Normal
■ Sport - Sports
■ Eco - Economical
■ Dynamic bend light.: - Set the characteristics of the adaptive headlights
■ Normal - Normal
■ Sport - Sports
■ Eco - Economical
■ Air conditioning: - Sets the Climatronic characteristics
■ Normal - Normal
■ Eco - Economical
■ Reset mode - Setting for all menu items in the Individual mode to Normal
■ Cancel - Keep the current settings
■ Reset - Set all menu items to Normal
Note
If you do not operate the unit for longer than approx. 10 seconds in the "Select
driving mode" menu, it will switch to the last selected menu or switch itself off.
Vehicle data
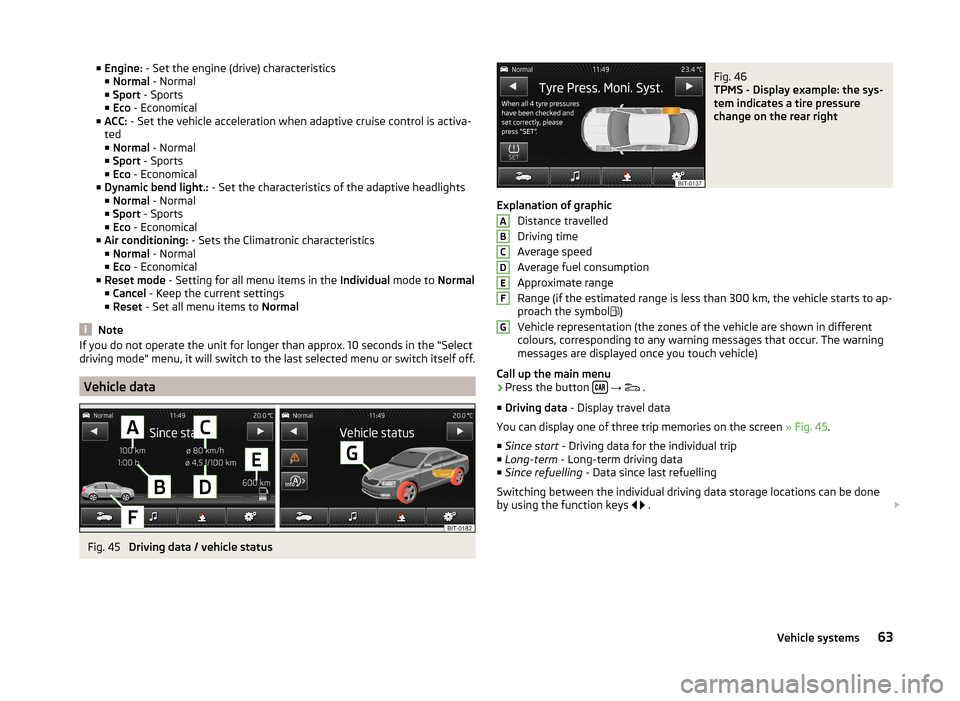
Fig. 45
Driving data / vehicle status
Fig. 46
TPMS - Display example: the sys-
tem indicates a tire pressure
change on the rear right
Explanation of graphic
Distance travelled
Driving time
Average speed
Average fuel consumption
Approximate range
Range (if the estimated range is less than 300 km, the vehicle starts to ap-
proach the symbol )
Vehicle representation (the zones of the vehicle are shown in different
colours, corresponding to any warning messages that occur. The warning
messages are displayed once you touch vehicle)
Call up the main menu
›
Press the button
→
.
■ Driving data - Display travel data
You can display one of three trip memories on the screen » Fig. 45.
■ Since start - Driving data for the individual trip
■ Long-term - Long-term driving data
■ Since refuelling - Data since last refuelling
Switching between the individual driving data storage locations can be done
by using the function keys
.
ABCDEFG63Vehicle systems