2014 SKODA FABIA display
[x] Cancel search: displayPage 4 of 60
Table of Contents
Abbreviations
Introductory information
Important notes
4
Equipment overview
4
Unit operation
Concerning the device screen operation
7
Operation through the MAXI DOT display
8
Device Settings
Menu Sound
12
Menu Setup
13
Radio
Operation
16
Settings
20
Media
Operation
22
Audio sources
24
Pictures
Image viewer
29
Communication
Telephone
30
Pair
34
Connection
37
Dial telephone number
39Telephone functions42
Text messages (SMS)
43
MirrorLink ™
45
Vehicle systems
Vehicle settings - CAR
49
Index
2Table of Contents
Page 6 of 60
Introductory information
Important notes
Introduction
This chapter contains information on the following subjects:
Declaration of Conformity
4
Component protection
4
Consequently, this vehicle does not need to contain all of the equipment com-
ponents described in these operating instructions.
The level of equipment of your vehicle refers to your purchase contract of the
vehicle. For more information, please contact your local ŠKODA retailer.
The illustrations in this Owner's Manual may have differences from your vehi-
cle; they are only intended for general information.
WARNING■ Concentrate fully at all times on your driving! As the driver you are fully
responsible for the operation of your vehicle.■
Only use the device in a way that ensures that you are in full control of
your vehicle in every traffic situation - there is a risk of accident!
■
Adjust the volume to ensure that acoustic signals from outside the vehi-
cle, e.g. sirens from emerging vehicles instructing you to give way to, such
as the police, ambulance and fire brigade, can be heard at all times.
■
High volumes can cause hearing damage.
Declaration of Conformity
Read and observe
on page 4 first.
ŠKODA AUTO a.s. hereby declares that the ŠKODA Infotainment systems meet
the basic requirements and additional provisions of Directive 1999/5/EC with
reference to radio equipment and telecommunications devices.
ŠKODA AUTO a.s. hereby declares that the “connection and the use of this
communication device is granted by the Nigerian Communications Commis-
sion.”
Component protection
Read and observe
on page 4 first.
Some electronic control units are factory-equipped with component protec-
tion.
Component protection serves as a protection mechanism for the following:
› for the impairment of factory- or garage-fitted control units after installation
in another vehicle (for example, after a theft);
› for the impairment of components operated outside of the vehicle.
› for the possibility of a legitimate installation or change of control units for re-
pairs at a ŠKODA 1)
specialist garage.
When component protection is enabled, the following message appears on the
unit display Component theft protection: the infotainment system is not fully
available at present. Please switch on the ignition.
If the component protection does not activate by switching on the ignition,
please contact a ŠKODA specialist garage.
Equipment overview
Introduction
This chapter contains information on the following subjects:
Description of the device
5
Touch screen
5
Switching the unit on/off
5
Unit menus
6
Adjust the volume and switch on
6
This chapter covers the device, switching it on and off, and the volume control.
1)
Terms used » manual , chapter explanations .
4Introductory information
Page 7 of 60
Description of the deviceFig. 1
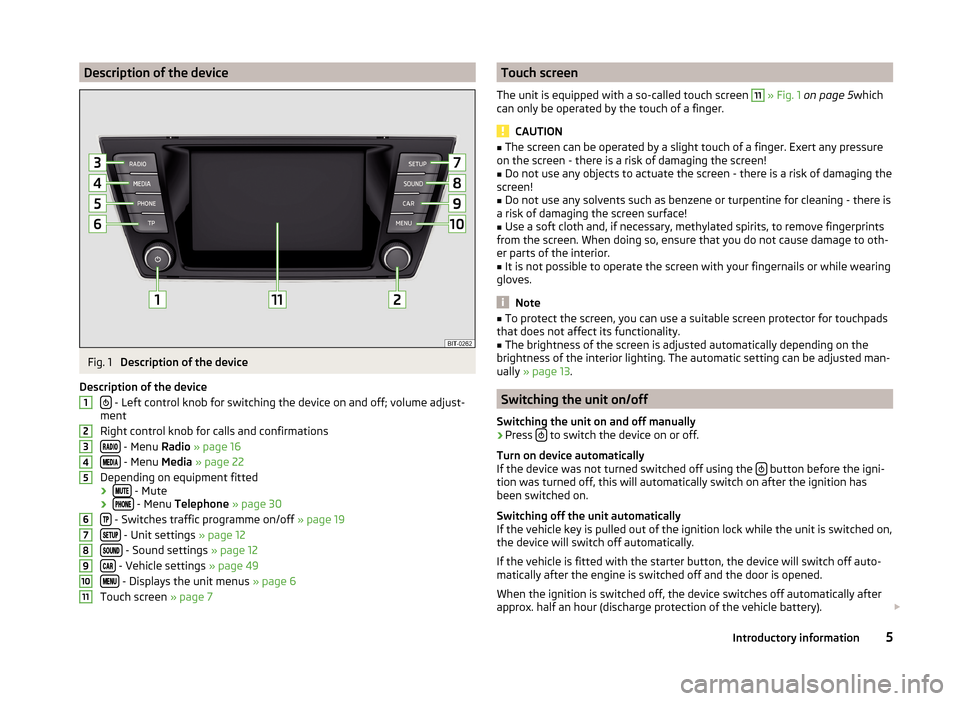
Description of the device
Description of the device
- Left control knob for switching the device on and off; volume adjust-
ment
Right control knob for calls and confirmations
- Menu Radio » page 16
- Menu Media » page 22
Depending on equipment fitted ›
- Mute
› - Menu
Telephone » page 30
- Switches traffic programme on/off » page 19
- Unit settings » page 12
- Sound settings » page 12
- Vehicle settings » page 49
- Displays the unit menus » page 6
Touch screen » page 7
1234567891011Touch screen
The unit is equipped with a so-called touch screen 11
» Fig. 1 on page 5 which
can only be operated by the touch of a finger.
CAUTION
■ The screen can be operated by a slight touch of a finger. Exert any pressure
on the screen - there is a risk of damaging the screen!■
Do not use any objects to actuate the screen - there is a risk of damaging the
screen!
■
Do not use any solvents such as benzene or turpentine for cleaning - there is
a risk of damaging the screen surface!
■
Use a soft cloth and, if necessary, methylated spirits, to remove fingerprints
from the screen. When doing so, ensure that you do not cause damage to oth-
er parts of the interior.
■
It is not possible to operate the screen with your fingernails or while wearing
gloves.
Note
■ To protect the screen, you can use a suitable screen protector for touchpads
that does not affect its functionality.■
The brightness of the screen is adjusted automatically depending on the
brightness of the interior lighting. The automatic setting can be adjusted man-
ually » page 13 .
Switching the unit on/off
Switching the unit on and off manually
›
Press to switch the device on or off.
Turn on device automatically
If the device was not turned switched off using the
button before the igni-
tion was turned off, this will automatically switch on after the ignition has
been switched on.
Switching off the unit automatically
If the vehicle key is pulled out of the ignition lock while the unit is switched on,
the device will switch off automatically.
If the vehicle is fitted with the starter button, the device will switch off auto-
matically after the engine is switched off and the door is opened.
When the ignition is switched off, the device switches off automatically after
approx. half an hour (discharge protection of the vehicle battery).
5Introductory information
Page 8 of 60
The device can be turned off automatically under certain circumstances due to
the protection against the vehicle battery discharged or the device protection.
The device informs of this via a text message on the device display.
› Warning: 12V battery low. Please start the engine or turn off the Infotain-
ment system. - The vehicle battery is low, start the engine or turn the unit
off.
› 12V battery almost empty. Infotainment system is being switched off.
- The
vehicle battery is discharged, the device switches itself off.
› Operating temperature not maintained. Infotainment system is being
switched off. - The device temperature is too low or too high, the device
switches itself off.
Note
When the device is switched on, the operating mode that were active before
switching off will be restored.
Unit menus
Fig. 2
Unit menus
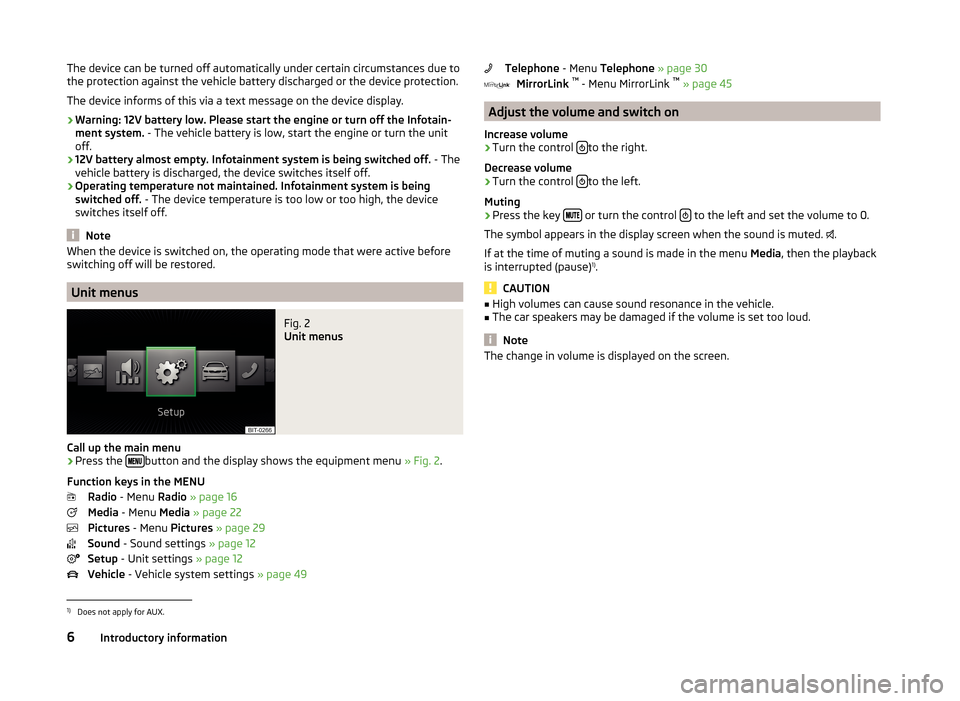
Call up the main menu
›
Press the button and the display shows the equipment menu
» Fig. 2.
Function keys in the MENU Radio - Menu Radio » page 16
Media - Menu Media » page 22
Pictures - Menu Pictures » page 29
Sound - Sound settings » page 12
Setup - Unit settings » page 12
Vehicle - Vehicle system settings » page 49
Telephone - Menu Telephone » page 30
MirrorLink ™
- Menu MirrorLink ™
» page 45
Adjust the volume and switch on
Increase volume
›
Turn the control to the right.
Decrease volume
›
Turn the control to the left.
Muting
›
Press the key or turn the control to the left and set the volume to 0.
The symbol appears in the display screen when the sound is muted. .
If at the time of muting a sound is made in the menu Media, then the playback
is interrupted (pause) 1)
.
CAUTION
■ High volumes can cause sound resonance in the vehicle.■The car speakers may be damaged if the volume is set too loud.
Note
The change in volume is displayed on the screen.1)
Does not apply for AUX.
6Introductory information
Page 9 of 60
Unit operation
Concerning the device screen operation
Introduction
This chapter contains information on the following subjects:
Operation
7
Alphanumeric with keyboard
8
This chapter covers the device operation and the operation of the touch
screen and the input keyboards.
Operation
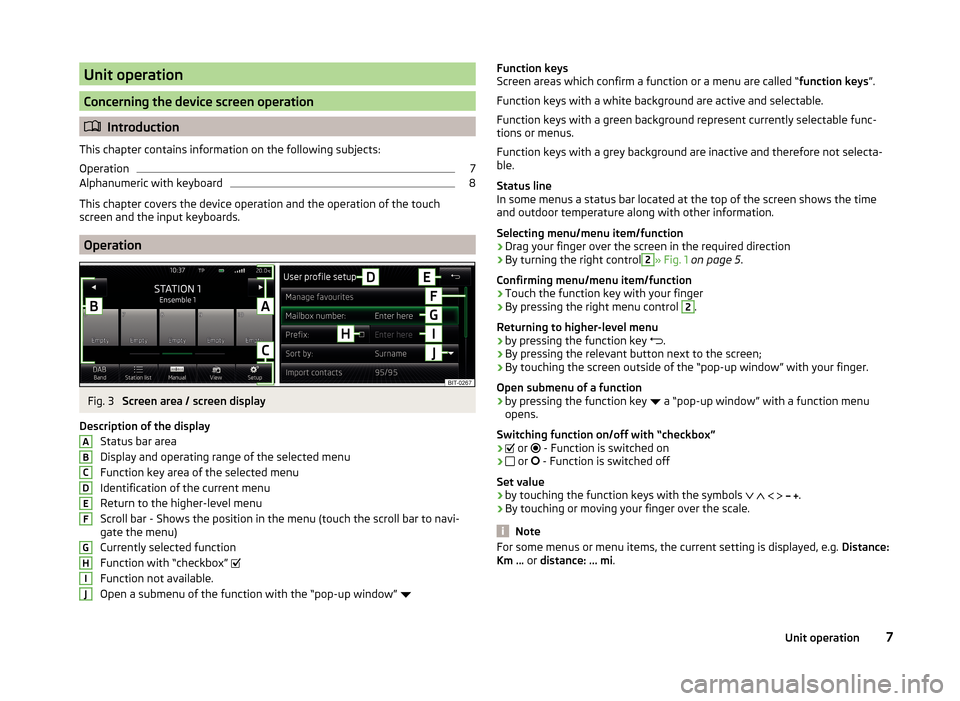
Fig. 3
Screen area / screen display
Description of the display Status bar area
Display and operating range of the selected menu
Function key area of the selected menu Identification of the current menu
Return to the higher-level menu
Scroll bar - Shows the position in the menu (touch the scroll bar to navi-
gate the menu)
Currently selected function
Function with “checkbox”
Function not available.
Open a submenu of the function with the “pop-up window”
ABCDEFGHIJFunction keys
Screen areas which confirm a function or a menu are called “ function keys”.
Function keys with a white background are active and selectable.
Function keys with a green background represent currently selectable func-
tions or menus.
Function keys with a grey background are inactive and therefore not selecta-
ble.
Status line
In some menus a status bar located at the top of the screen shows the time
and outdoor temperature along with other information.
Selecting menu/menu item/function › Drag your finger over the screen in the required direction
› By turning the right control2
» Fig. 1
on page 5 .
Confirming menu/menu item/function
› Touch the function key with your finger
› By pressing the right menu control
2
.
Returning to higher-level menu
› by pressing the function key
.
› By pressing the relevant button next to the screen;
› By touching the screen outside of the “pop-up window” with your finger.
Open submenu of a function
› by pressing the function key
a “pop-up window” with a function menu
opens.
Switching function on/off with “checkbox”
›
or
- Function is switched on
›
or
- Function is switched off
Set value › by touching the function keys with the symbols
.
› By touching or moving your finger over the scale.
Note
For some menus or menu items, the current setting is displayed, e.g.
Distance:
Km ... or distance: ... mi .7Unit operation
Page 10 of 60
Alphanumeric with keyboardFig. 4
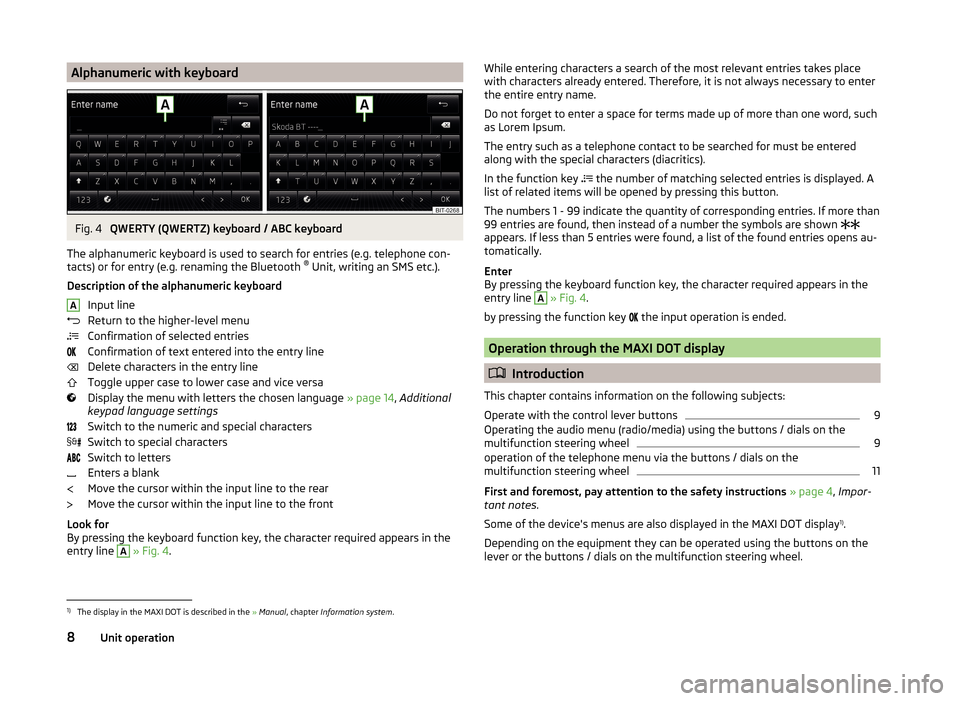
QWERTY (QWERTZ) keyboard / ABC keyboard
The alphanumeric keyboard is used to search for entries (e.g. telephone con-
tacts) or for entry (e.g. renaming the Bluetooth ®
Unit, writing an SMS etc.).
Description of the alphanumeric keyboard Input line
Return to the higher-level menu
Confirmation of selected entries
Confirmation of text entered into the entry line
Delete characters in the entry line
Toggle upper case to lower case and vice versa
Display the menu with letters the chosen language » page 14, Additional
keypad language settings
Switch to the numeric and special characters
Switch to special characters
Switch to letters
Enters a blank
Move the cursor within the input line to the rear
Move the cursor within the input line to the front
Look for
By pressing the keyboard function key, the character required appears in the
entry line
A
» Fig. 4 .
AWhile entering characters a search of the most relevant entries takes place
with characters already entered. Therefore, it is not always necessary to enter
the entire entry name.
Do not forget to enter a space for terms made up of more than one word, such
as Lorem Ipsum.
The entry such as a telephone contact to be searched for must be entered
along with the special characters (diacritics).
In the function key
the number of matching selected entries is displayed. A
list of related items will be opened by pressing this button.
The numbers 1 - 99 indicate the quantity of corresponding entries. If more than 99 entries are found, then instead of a number the symbols are shown
appears. If less than 5 entries were found, a list of the found entries opens au-
tomatically.
Enter
By pressing the keyboard function key, the character required appears in the
entry line A
» Fig. 4 .
by pressing the function key the input operation is ended.
Operation through the MAXI DOT display
Introduction
This chapter contains information on the following subjects:
Operate with the control lever buttons
9
Operating the audio menu (radio/media) using the buttons / dials on the
multifunction steering wheel
9
operation of the telephone menu via the buttons / dials on the
multifunction steering wheel
11
First and foremost, pay attention to the safety instructions » page 4 , Impor-
tant notes .
Some of the device's menus are also displayed in the MAXI DOT display 1)
.
Depending on the equipment they can be operated using the buttons on the
lever or the buttons / dials on the multifunction steering wheel.
1)
The display in the MAXI DOT is described in the » Manual , chapter Information system .
8Unit operation
Page 11 of 60

Operate with the control lever buttonsFig. 5
Buttons on the control lever
The separate menus and menu items displayed in the MAXI DOT display can beoperated as follows with the buttons on the control lever.
Functions of the buttons on the control leverBut- ton
» Fig. 5ActionOperation
APress and hold buttonDisplay main menuABriefly push up or downswitch between menu items and menusBPress brieflyConfirm menu item or menuOperating the audio menu (radio/media) using the buttons / dials on the multifunction steering wheel
Fig. 6
Multifunction steering wheel - Audio menu
›In the main menu of the MAXI DOT display select the menu item
Audio .
The information displayed in MAXI DOT display
■ Radio - Menu Radio
■ current radio station frequency band.
■ Name of the currently playing channel (if less than 5 are receivable).
■ List of receivable radio stations with choice (if more than 5 are receivable).
■ TP traffic announcements.
■ Media - Menu Media
■ Title.Buttons and wheels of the audio menu - Radio/MediaButton/
wheel » Fig. 6ActionOperationRadioMedia1Press brieflyChange source (change frequency bands and connected audio sources)1Press and hold buttonSwitch between the Radio and Media menus and open the last context status (e.g. the last radio station
or track to be played)2Press brieflySwitch off/on soundStart/stop playback2Turn upwardsIncrease volume2Turn downwardsDecrease volume 9Unit operation
Page 12 of 60

Button/
wheel » Fig. 6ActionOperationRadioMedia3Press brieflySkip to next saved radio channel
Stop traffic reportSkip to next track a)3
Hold and release
Change within the frequency range in desired di-
rection; after releasing the button, the search for the next station is startedStop traffic report
Fast forward a)
4
Press brieflySwitch to previous saved channel
Stop traffic reportGo to the previous track when pressed within 3 s from the change of track,
and to the beginning of the track when pressed 3 s after track change a)4
Hold and release
Change within the frequency range in desired di-
rection; after releasing the button, the search for the next station is startedStop traffic report
Fast rewind
5Press brieflyStop traffic reportwithout function5
Turn upwardsDisplay list of available stations Scroll upwardsGo to the previous track when pressed within 3 s from the change of track,
and to the beginning of the track when pressed 3 s after track change a)5Turn downwardsDisplay list of available stations
Scroll downwardsSkip to next track a)6Press brieflyReturn to previous level in the menu6Press and hold buttonReturn to the main menu of the MAXI DOT displaya)
Does not apply for AUX.
NoteThe button with the symbol
for voice control is not supported by the device.10Unit operation