2014 Seat Toledo tyre pressure
[x] Cancel search: tyre pressurePage 125 of 200

Care and maintenance
●
The modification of the suspension of the
vehicle wheels, including the use of non-per-
mitted combinations of tyres and rims can al-
ter the operation of the airbag system and in-
crease the risk of serious or fatal injuries in
an accident.
● During all jobs on the airbag system, in ad-
dition to the removal and fitting of parts of
the system in the course of other repair jobs,
parts of the airbag system can be damaged.
Therefore in the event of an accident, this
may cause the airbags to activate incorrectly
or not activate at all. Care and cleaning
Introduction Regular and suitable care helps to
maintain
the useful life of your vehicle. This may also
be one of the requirements for upholding any
warranty claims in the event of corrosion or
paint defects.
We recommend you use cleaning products
from the SEAT Original Accessories pro-
gramme available in SEAT dealers. Please fol-
low the instructions for use on the packag-
ing. WARNING
● Cleaning products and other materials used
for car care can damage the health if mis-
used.
● Always keep car care materials in a safe
place out of the reach of children. Risk of poi-
soning!
● When washing the car during the winter
season: Moisture and ice on the brakes may
affect braking efficiency. Risk of accident!
● The ignition must always be switched off
when the car is washed. Risk of accident!
● Do not clean the underside of the car or in-
side the wheel arches without protecting your
hands and arms. You may cut yourself on
sharp metal parts!
● Perfumes and air fresheners inside the ve-
hicle may be harmful to health at high tem-
peratures in the interior. CAUTION
● Check the colour-fastness of your clothing
to avoid damaging or visibly staining the fab-
ric (leather), upholstery and fabric trim.
● Cleaning products containing solvents may
damage the material being cleaned.
● Do not wash the vehicle in direct sunlight.
Risk of damage to paintwork.
● If washing the vehicle with a hose in win-
ter, do not direct the jet of water directly at
the locks or at the door seals or bonnet. Risk
of freezing. ●
Do not use sponges for removing insects or
abrasive household sponges, etc. on painted
surfaces. Risk of damage to the painted sur-
face!
● Do not put stickers on the inner side of the
rear window in areas where heating elements
or the aerial are located. This could cause
damage and, in the case of the aerial, radio
and navigation system reception faults.
● Do not clean the inside of the window with
sharp objects or corrosive or acidic cleaning
products. Risk of damaging the heating ele-
ments or the aerial.
● Do not attach any fragrance or air freshener
to the dash panel. Risk of damage to the
dash panel!
● To avoid damaging the parking aid system
sensors, spray them only briefly at a mini-
mum distance of 10 cm when cleaning the ve-
hicle with a high-pressure or steam cleaner.
● Do not clean the roof panel with a brush.
Risk of damage to the panel surface! For the sake of the environment
● The packaging of the product used to care
for your vehicle is hazardous waste. It must
be disposed of according to current local law.
● Only wash the car in special wash bays.
» 123Technical specifications
Advice
Operation
Safety
Page 147 of 200

Wheels and tyres
indicators is given on the tyre sidewalls by
the letters “TWI”, triangular symbols or other
symbols.
The useful life of the tyres depends primarily
on the following factors:
Tyre pressure values
Under-inflation or over-inflation will consider-
ably reduce the useful life of the tyres and
impair the vehicle's handling. Therefore,
check the tyre pressure, including the spare
wheel, at least once a month and before any
long journey.
Inflation pressures for summer tyres are lis-
ted on a sticker inside the fuel tank flap. The
pressures for winter tyres are 0.2 bar (2.9
psi/20 kPa) above the summer values.
Always check the pressure when the tyre is
cold. Do not reduce over-pressure in warm
tyres. The tyre pressures must be altered to
suit notable changes in the load being car-
ried.
Driving style
Fast cornering, heavy acceleration and hard
braking all increase tyre wear.
Wheel balancing
The wheels on new vehicles are balanced.
Various factors encountered when driving
can cause them to become unbalanced, which results in vibration of the steering
wheel.
The wheel must be rebalanced if a new tyre is
fitted or if a tyre is repaired.
Incorrect wheel alignment
Incorrect front or rear wheel alignment cau-
ses excessive tyre wear, frequently on one
side, and also impairs vehicle safety. If tyre
wear is very irregular, contact an Official
Service.
Tyre damage
To avoid damage to tyres and wheels, only
drive over kerbs or similar obstacles slowly
and at a right angle if possible.
Check tyres and wheels regularly for damage
(punctures, cracks, blisters, deformities,
etc.). Remove any foreign objects embedded
in outside of the treads.
Unusual vibration or the car pulling to one
side may indicate that one of the tyres is
damaged.
Reduce speed immediately and
s t
op if you suspect that damage may have
occurred! Check the tyres for damage (blis-
ter
s, cracks, etc.). If no external damage is
visible, drive slowly and carefully to the near-
est Official Service and have the vehicle in-
spected. Interchanging tyres
Fig. 118
Interchanging tyres. Changing wheels around
If the wear is visibly greater on the front tyres,
they should be exchanged for the rear tyres
as shown in the diagram
››› Fig. 118 . All the
ty r
es will then last for about the same time.
To ensure that the wear is equal on all tyres
and maintain their optimum useful life, they
should be changed around every 10 000 km.
Storing tyres
When you remove the tyres, mark them in or-
der to maintain the same direction of rotation
when they are installed again.
When removed, the wheels and/or tyres
should be stored in a cool, dry and preferably
dark location. Store tyres in a vertical posi-
tion, if they are not fitted on wheel rims.
145
Technical specifications
Advice
Operation
Safety
Page 149 of 200

Wheels and tyres
The tyre pressure of the spare wheel must be
checked (preferably whenever the tyre pres-
sure is checked – see sticker on fuel tank flap
››› page 144 ) to ensure the spare wheel re-
m ain
s ready for use.
If the spare wheel is not the same size or de-
sign as the tyres that are mounted on the car
(for example if the car has winter tyres or
tyres with direction tread), only use the spare
tyre for a short period of time in the event of
breakdown and drive with the corresponding
care ››› .
It must be replaced as soon as possible for a
wheel with a normal size and finish.
Temporary spare wheel
If the vehicle is equipped with a temporary
spare wheel, there will be a warning sign on
the rim of the wheel.
Follow the instructions below when driving
with this wheel fitted.
● After fitting the wheel, the warning sign
must not be covered.
● Do not drive faster than 80 km/h (50 mph)
with the spare wheel and take great care
while driving. Avoid heavy acceleration, hard
braking and fast cornering.
● The tyre pressure is the same as that of the
standard tyres. ●
Only use this spare wheel to reach the
nearest Official Service, as it is not designed
for permanent use. WARNING
● Under no circumstances must damaged
spare wheels be used.
● If the spare wheel is different in size or de-
sign to the tyres currently fitted, never drive
faster than 80 km/h (50 mph). Avoid heavy
acceleration, hard braking and fast cornering. CAUTION
Follow the instructions given on the tempora-
ry spare wheel label. Note
The tyre pressure of the spare wheel must al-
ways correspond to the highest pressure pre-
scribed for the model of vehicle in question. Tyre control systems
Tyre pressure* Fig. 120
Tyre pressure adjustment switch. The tyre pressure monitoring system uses
ABS sensors to compare the revolutions and
the circumference of each wheel. Should the
circumference of any wheel change, the
warning lamp on the general dash panel
››› page 38 will light up and an audible warn-
in g w
ill be heard.
Tyre circumference may change if:
● Tyre pressure is too low
● Tyre structure is damaged
● Vehicle load not evenly distributed
● wheels on one axle are subjected to greater
load, (e.g. driving with trailer, uphill, down-
hill);
● Snow chains are fitted »
147
Technical specifications
Advice
Operation
Safety
Page 150 of 200

Advice
● The temporary spare wheel is fitted
● One wheel on the axle has been changed
Basic system settings
Should the tyre pressure change or if one or
more wheels are changed or the position of
the wheel on the vehicle is changed, e.g.
changing round the front and rear wheels, or
where a warning lamp lights up when driv-
ing, the system must be adjusted as follows:
● Inflate all tyres to the prescribed pressures
››› page 144 .
● Sw it
ch the ignition on.
● Hold the
››› Fig. 120 button down for
at least 2 seconds. The warning lamp will
light up when the button is pressed . The
system memory is also deleted and a new
calibration process will begin, which is indi-
cated by an audible warning and the warning
lamp switching off.
● If the warning lamp remains lit and does
not switch off, not even once the basic set-
ting process is complete, this indicates a
fault in the system. Contact an Official Serv-
ice.
The warning lamp lights up
If the pressure on at least one tyre is signifi-
cantly lower than the pressure set by the driv-
er, the warning lamp ››› will light up.The warning lamp flashes
If the warning lamp flashes, there is a fault in
the system. Contact a specialised service to
have it fixed.
WARNING
● If the warning lamp lights up, slow down
immediately and avoid any severe braking or
steering manoeuvres. Stop and check the
tyres and their pressure as soon as possible.
● Under certain conditions (e.g. sporty driv-
ing style, driving on loose surfaces or in win-
ter) the warning lamp may take a while to
light up or m
ay remain switched off.
● Despite the tyre pressure monitoring sys-
tem, the driver remains responsible for main-
taining the correct tyre pressure. You must
therefore check the tyre pressure often. Note
● The tyre pressure monitoring system is not
a replacement for regularly checking the tyre
pressure, as it is unable to recognise an even
drop in pressure.
● The tyre pressure monitoring system is un-
able to warn of a sudden drop in tyre pres-
sure, e.g. a puncture. In this case, try to stop
the vehicle carefully with no severe braking
or steering manoeuvres.
● To ensure the tyre pressure monitoring sys-
tem works correctly, the basic setting must
be performed every 10 000 km (6000 miles)
or once a year. Winter service
Winter tyres Winter tyres will significantly improve han-
dling of the vehicle in winter road conditions.
The design of summer tyres (width, rubber
compound, tread pattern) gives less grip at
temperatures below +7 °C (45 °F), on ice and
snow. This applies particularly to vehicles
equipped with wide section tyres or high
s
peed ty
res (code letters H or V on the side-
wall).
In order to preserve the performance of the
vehicle as much as possible, winter tyres
must be fitted on all four wheels, the mini-
mum depth of the tread must be 4 mm and
the maximum age must be 4 years.
You can use winter tyres of a lower speed rat-
ing if the maximum speed limit of these tyres
will not be exceeded, even if the maximum
speed limit for the vehicle is higher. For the sake of the environment
Summer tyres should be fitted again in time,
as they give better handling on roads free of
snow and ice and at temperatures over +7 °C
(45 °F). Summer tyres have a shorter braking
distance, produce less rolling noise and do
not wear as quickly. They also reduce fuel
consumption. 148
Page 154 of 200

Advice
Wheel bolts The wheel bolts
are m atched to the rims.
When installing different wheels, e.g. to fit
light alloy wheels or wheels with winter tyres,
it is important to use the correct wheel bolts
with the right length and correctly shaped
bolt heads. This is essential for a secure fit of
the wheels and for proper operation of the
brake system.
Changing a wheel If possible, change the wheel on a level sur-
face.
– Pull off the hub cap ›››
page 151 or the
wheel bolt covers ›››
page 151.
– First loosen the anti-theft wheel bolts and
then the other wheel bolts ›››
page 152.
– Raise the vehicle until the wheel to be
changed is no longer touching the ground
››› page 153 .
– Remo
ve the wheel bolts and place them on
a clean surface (cloth, paper, etc.).
– Take off the wheel.
– Lift the spare wheel into position and tight-
en the wheel bolts lightly.
– Lower the vehicle. –
Tighten the wheel bolts firmly in diagonal
sequence with the box spanner and then
the anti-theft wheel bolt ››› page 152.
– Replace the hub cap and/or the bolt cov-
ers. Note
● All bolts must be clean and turn easily.
● Never grease or oil the wheel bolts!
● Note the direction of rotation when putting
on a tyre with a directional tread pattern
››› page 144. After changing a wheel
Tasks that must be carried out after changing
a wheel:
– Place the wheel with the defective tyre in
the spare wheel well and secure it using a
special bolt ›››
page 146 .
– Put
the vehicle tools back in their storage
location.
– Check the tyre pressure of the newly fitted
s
pare wheel as soon as possible.
– Have the tightening torque of the wheel
bo
lts checked as soon as possible with a
torque wrench.
– Have the flat tyre replaced or ask an Official
Service about the possibility of repair. Note
● If you notice that the wheel bolts are rusty
and difficult to turn when changing a wheel,
they must be replaced before having the
tightening torque checked.
● Drive carefully and at moderate speeds un-
til the tightening torque of the wheel bolts
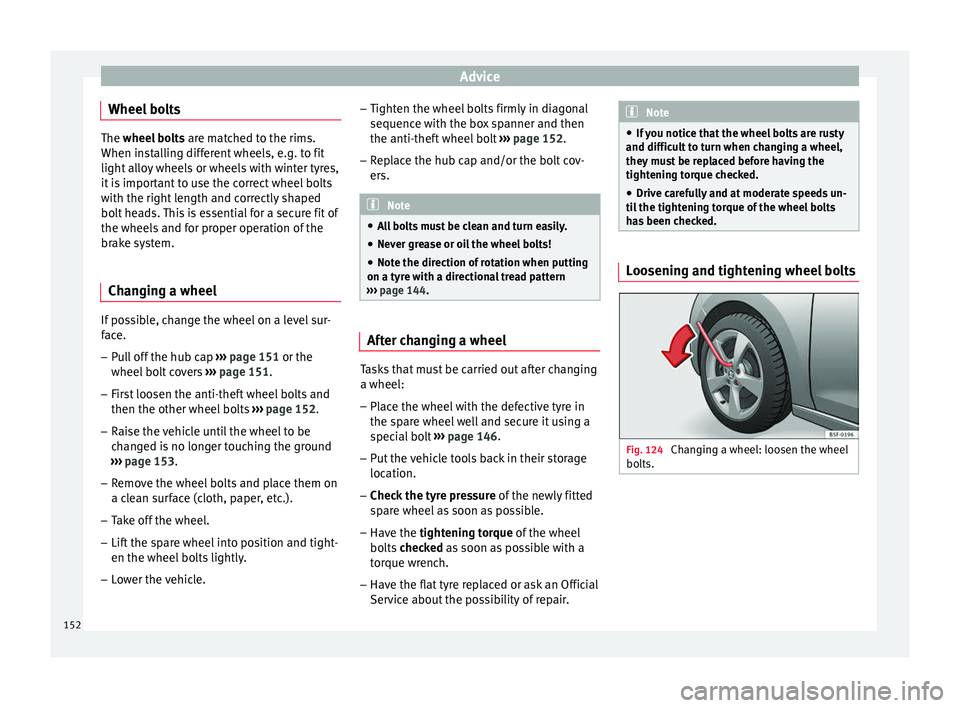
has been checked. Loosening and tightening wheel bolts
Fig. 124
Changing a wheel: loosen the wheel
bolts. 152
Page 156 of 200

Advice
– Adjust the jack so that its claw surrounds
the jacking point on the door sill ››› Fig. 126
- B underneath the stamp on the door sill.
– Make sure that the base of the jack is en-
tirely supported on a flat surface and that it
is vertical ››› Fig. 126 to the point where the
c l
aw surrounds the jacking point on the
door sill.
– Continue to wind up the jack using the
crank handle until the defective wheel is
clear off the ground.
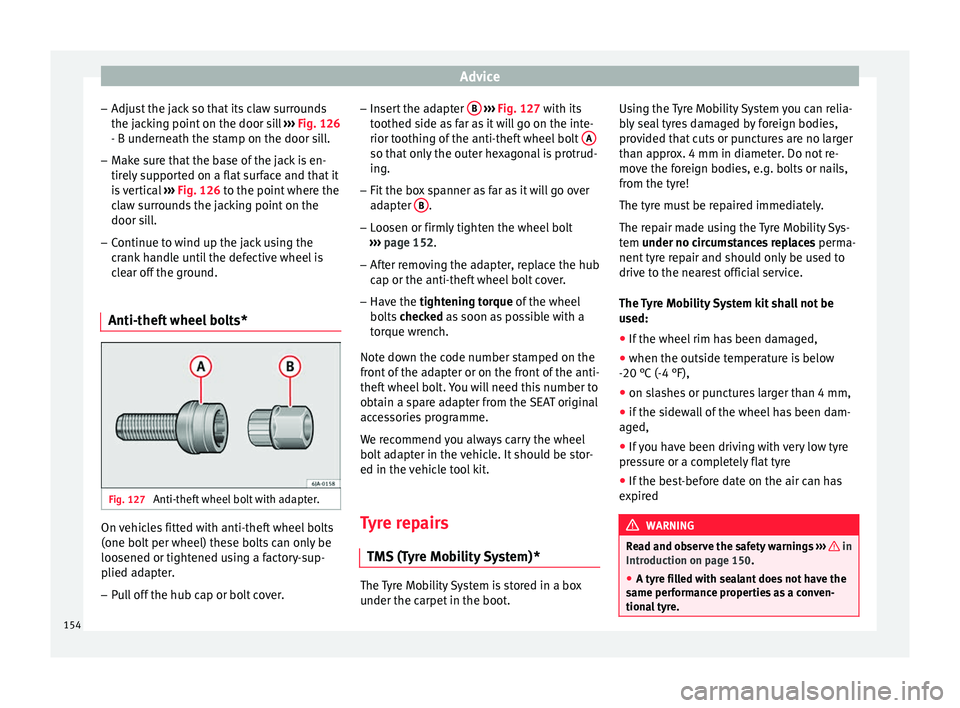
Anti-theft wheel bolts* Fig. 127
Anti-theft wheel bolt with adapter. On vehicles fitted with anti-theft wheel bolts
(one bolt per wheel) these bolts can only be
loosened or tightened using a factory-sup-
plied adapter.
– Pull off the hub cap or bolt cover. –
Insert the adapter B
››› Fig. 127 with its
t oothed s
ide as far as it will go on the inte-
rior toothing of the anti-theft wheel bolt A so that only the outer hexagonal is protrud-
ing.
– Fit the box spanner as far as it will go over
adapter B .
– Loosen or firmly tighten the wheel bolt
››› page 152 .
– Af t
er removing the adapter, replace the hub
cap or the anti-theft wheel bolt cover.
– Have the tightening torque of the wheel
bo
lts checked as soon as possible with a
tor
que wrench.
Note down the code number stamped on the
front of the adapter or on the front of the anti-
theft wheel bolt. You will need this number to
obtain a spare adapter from the SEAT original
accessories programme.
We recommend you always carry the wheel
bolt adapter in the vehicle. It should be stor-
ed in the vehicle tool kit.
Tyre repairs TMS (Tyre Mobility System)* The Tyre Mobility System is stored in a box
under the carpet in the boot.Using the Tyre Mobility System you can relia-
bly seal tyres damaged by foreign bodies,
provided that cuts or punctures are no larger
than approx. 4 mm in diameter. Do not re-
move the foreign bodies, e.g. bolts or nails,
from the tyre!
The tyre must be repaired immediately.
The repair made using the Tyre Mobility Sys-
tem
under no circumstances replaces
perm
a-
nent
tyre repair and should only be used to
drive to the nearest official service.
The Tyre Mobility System kit shall not be
used:
● If the wheel rim has been damaged,
● when the outside temperature is below
-20 °C (-4 °F),
● on slashes or punctures larger than 4 mm,
● if the sidewall of the wheel has been dam-
aged,
● If you have been driving with very low tyre
pressure or a completely flat tyre
● If the best-before date on the air can has
expired WARNING
Read and observe the safety warnings ››› in
Introduction on page 150.
● A ty r
e filled with sealant does not have the
same performance properties as a conven-
tional tyre. 154
Page 157 of 200

Emergencies
●
Do not drive faster than 80 km/h (50 mph).
● Avoid heavy acceleration, hard braking and
fast cornering.
● Check the tyre pressure after 10 minutes of
driving!
● The sealant is harmful to health and must
be immediately rinsed from affected skin. For the sake of the environment
Used or out-of-date sealant must be disposed
of in line with environmental protection regu-
lations. Note
● Observe the usage instructions provided by
the snow chain manufacturer.
● A new can of sealant can be acquired from
the selection of SEAT Original Accessories.
● Change the tyre repaired using the Tyre
Mobility System as soon as possible or ask
an official service about the possibility of re-
pairing it for you. Components of the Tyre Mobility
System*
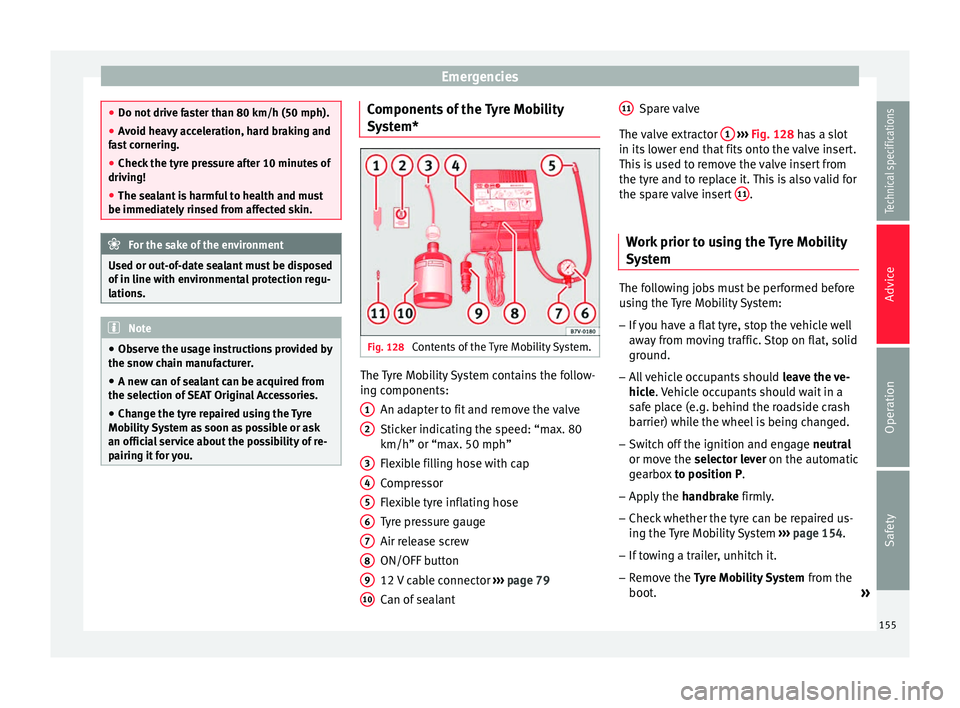
Fig. 128
Contents of the Tyre Mobility System. The Tyre Mobility System contains the follow-
ing components:
An adapter to fit and remove the valve
Sticker indicating the speed: “max. 80
km/h” or “max. 50 mph”
Flexible filling hose with cap
Compressor
Flexible tyre inflating hose
Tyre pressure gauge
Air release screw
ON/OFF button
12 V cable connector ››› page 79
Can of sealant
1 2
3
4
5
6
7
8
9
10 Spare valve
The valve extractor 1
››› Fig. 128 has a slot
in its lo
wer end that fits onto the valve insert.
This is used to remove the valve insert from
the tyre and to replace it. This is also valid for
the spare valve insert 11 .
Work prior to using the Tyre Mobility
System The following jobs must be performed before
using the Tyre Mobility System:
– If you have a flat tyre, stop the vehicle well
away from moving traffic. Stop on flat, solid
ground.
– All vehicle occupants should leave the ve-
hicle . Vehicle occupants should wait in a
s af
e place (e.g. behind the roadside crash
barrier) while the wheel is being changed.
– Switch off the ignition and engage neutral
or move the selector lever on the automatic
g
earbox to position P.
– Apply the handbrake firmly.
– Check
whether the tyre can be repaired us-
ing the Tyre Mobility System ›››
page 154.
– If towing a trailer, unhitch it.
– Remove the Tyre Mobility System from the
boot
. »
11
155
Technical specifications
Advice
Operation
Safety
Page 158 of 200

Advice
– Fix the sticker 2
››› Fig. 128
›
›› page 155
onto the dash panel where the driver will
see it.
– Do not remove the foreign body, e.g. bolts
or nails, from the tyre.
– Unscrew the tyre valve cap.
– Using the valve extractor 1 , unscrew the
valve insert and place it on a clean surface
(cloth, paper, etc.)
Filling and inflating the tyre Filling the tyre
– Shake the tyre sealant can 10
››› Fig. 128
››› page 155 thoroughly several times.
– Att ac
h the flexible filling hose 3 onto the
can 10 . The foil sealing the can will be au-
tomatically pierced.
– Remove the cap from the flexible filling
hose 3 and insert the open end as far as it
will go into the tyre valve.
– Hold the can 10 upside down and fill the
complete contents of the can into the tyre.
– Remove the empty can from the tyre.
– Screw the valve insert back into the tyre
valve using the valve extractor 1 .Inflating the tyre
–
Screw the tyre filling hose 5
››› Fig. 128
››› page 155 firmly onto the tyre valve.
– Make sure that the bleed screw 7 is
closed.
– Start the vehicle engine and leave it run-
ning.
– Plug connector 9 into the 12-volt power
socket.
– Turn on the air compressor with switch 8 .
– Leave the air compressor running until the
tyre pressure has reached 2.0 -2.5 bar
(29-36 psi/200-250 kPa). The max. operat-
ing time for the compressor is 8 minutes
››› !
– Switch the compressor off.
– When an air pressure of 2.0-2.5 bar
(29-36 psi/200-250 kPa) cannot be
reached, unscrew the flexible tube 5 from
the tyre valve.
– Drive the vehicle approx. 10 metres for-
wards or backwards, so that the sealant
can “spread evenly” in the tyre.
– Screw the flexible hose from the air com-
pressor 5 back onto the tyre valve and re-
peat the inflation process.
– If the pressure is still lower than specified,
the tyre is too badly damaged. The tyre can- not be repaired using the tyre sealant kit
››› .
– Switch the compressor off.
– Unscrew the flexible hose 5 from the tyre
valve.
When a tyre pressure of 2.0-2.5 bar
(29-36 psi/200-250 kPa) is reached, you can
continue driving at a max. speed of 80 km/h
(50 mph).
Check the tyre pressure after 10 minutes of
driving ››› page 157 . WARNING
● The flexible tyre filling hose and the air
compressor may heat up during the filling
process. Risk of injury!
● Do not place the hot flexible tyre filling
hose or hot air compressor on top of flamma-
ble materials. Risk of fire!
● If the tyre cannot be inflated to a minimum
pressure of 2.0 bar (29 psi/200 kPa), then
the tyre is too badly damaged. The sealing
product is unable to seal the tyre . Do not
continue driving and obtain professional as-
sistance. CAUTION
Do not use the air compressor for longer than
8 minutes at a time. Risk of overheating! Be-
fore using the air compressor again, leave it
to cool down for several minutes. 156