2014 Seat Leon 5D infotainment
[x] Cancel search: infotainmentPage 13 of 84

Introduction
Voice control Fig. 6
Voice control: start menu display and
main commands Many radio, media, telephone and navigation
functions may be activated through voice
commands.
The Infotainment system's voice control will
only be available for the language selected in
System setup
››› page 70 .
Set up of
voice control ››› page 13.
When you activate voice control, you can
choose which text and icons take on the col-
our of the different functions:
● Red (RADIO and MEDIA) ›››
page 12 and
››› page 12
● Green (PHONE) ››› page 12
● Blue (NAV) ››› page 13 Start and stop the voice control
●
To activate the voice control, briefly press
the button on the multi-function steering
wheel . It can also be activated with the
VOIC
E button in the Infotainment system.
● When activating voice control, a rising sig-
nal will sound and a menu containing the
main orders for that the function will appear
(the menu will appear if the option is activa-
ted in Voice control setup ››› page 13) The
spoken instructions will guide you through
the following “dialogue”.
● Pronounce the desired order and follow the
instructions of the “dialogue”. A function can
often be activated with different spoken com-
mands. In case of doubt, try to give a com-
mand.
● When an action is performed (e.g. calling a
contact), the voice control automatically de-
activates and must be reactivated again
when needed. There are certain commands
after which the voice control does not end
and waits with What do you wish to do now? .
● To end voice control manually, keep the
button pressed on the multi-function steering
wheel until you hear the corresponding con-
firmation (descending sound), or press the
button in the display. You can also briefly
press the VOICE
button twice to deactivate
voice control. Help with voice control
Listening to Help when using voice control for
the first time is recommended.
● Switch on the speech control system .
● Give the
Help command in the language
established in the System setup, and follow
the dialogue instructions. The Help order can
also be s
poken in an active function and in
dropdown menus.
Operation during the dialogue
While the infotainment system transmits a
spoken indication, the display will show the
symbol .
● The announcement can be stopped by
briefly pressing the screen, except when a list
of results appears, in which case it pauses.
To continue with the announcement, touch
the screen once more .
● Briefly press the button on the multi-
function steering wheel to interrupt the spo-
ken indication of the infotainment system
and give the next command.
IMPORTANT: The system will ONLY recognise
a command when the symbol is displayed
as “active
” on the display or touch screen.
If you make a mistake when giving a com-
mand or give an incomplete command, and it
has no effect, you can repeat the command.
The symbol remains active.
»
11
Page 15 of 84

Introduction
Voice control (NAV) – BlueBut-
tonMain Navigation commands
Search + POI
New destination
Enter street
Home address
Route guidance to
Last destinations
Begin navigation
Stop navigation
Load destination
Save position
Activate/Deactivate directions
Note
Voice control is unavailable during parking
manoeuvres Voice control setup
●
Press the Infotainment button MENU to
open the main menu System setup
.
● Press the function button SETUP to access
the system setup. ●
Press the function button Voice control .
When you close a menu, the changes will
take effect automatically.
Summary of the indications and function
buttons
Function button: effect
Dialogue style: select the type of dialogue.
Long: during the voice control you will hear some
additional help instructions. Brief
: some additional commands from the long
dialogue are omitted.
Display available commands: when you activate voice con-
trol, the spoken commands of the function you are oper-
ating at that time are viewed in the display.
Voice control session start tone: when you activate voice
control a signal will be emitted. Press to deactivate the
signal.
Voice control session end tone: when you deactivate voice
control a signal will be emitted. Press to deactivate the
signal.
Input tone in voice dialogue: the input tone to confirm a
command is activated. 13
Page 16 of 84
Audio and Media Mode
Audio and Media Mode
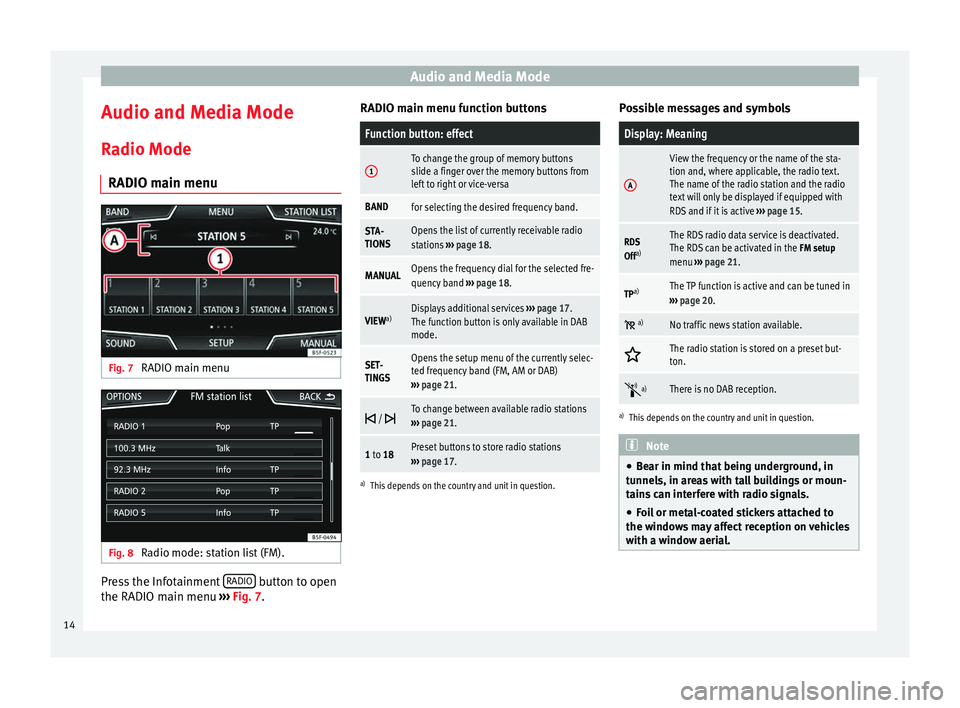
Radio Mode RADIO main menu Fig. 7
RADIO main menu Fig. 8
Radio mode: station list (FM). Press the Infotainment
RADIO button to open
the RADIO main menu ››› Fig. 7 . RADIO m
ain menu f unction buttons
Function button: effect
1To change the group of memory buttons
slide a finger over the memory buttons from
left to right or vice-versa
BANDfor selecting the desired frequency band.
STA-
TIONSOpens the list of currently receivable radio
stations
››› page 18.
MANUALOpens the frequency dial for the selected fre-
quency band ››› page 18.
VIEW a)Displays additional services
››› page 17.
The function button is only available in DAB
mode.
SET-
TINGSOpens the setup menu of the currently selec-
ted frequency band (FM, AM or DAB)
››› page 21.
/ To change between available radio stations
››› page 21.
1 to 18Preset buttons to store radio stations
››› page 17.
a)
This depends on the country and unit in question.
Possible messages and symbols
Display: Meaning
A
View the frequency or the name of the sta-
tion and, where applicable, the radio text.
The name of the radio station and the radio
text will only be displayed if equipped with
RDS and if it is active ››› page 15.
RDS
Off a)The RDS radio data service is deactivated.
The RDS can be activated in the
FM setup
menu ››› page 21.
TPa)The TP function is active and can be tuned in
››› page 20.
a)No traffic news station available.
The radio station is stored on a preset but-
ton.
a)There is no DAB reception.
a)
This depends on the country and unit in question. Note
● Bear in mind that being underground, in
tunnels, in areas with tall buildings or moun-
tains can interfere with radio signals.
● Foil or metal-coated stickers attached to
the windows may affect reception on vehicles
with a window aerial. 14
Page 18 of 84
Audio and Media Mode
Digital radio mode (DAB, DAB+ and
audio DMB) Fig. 11
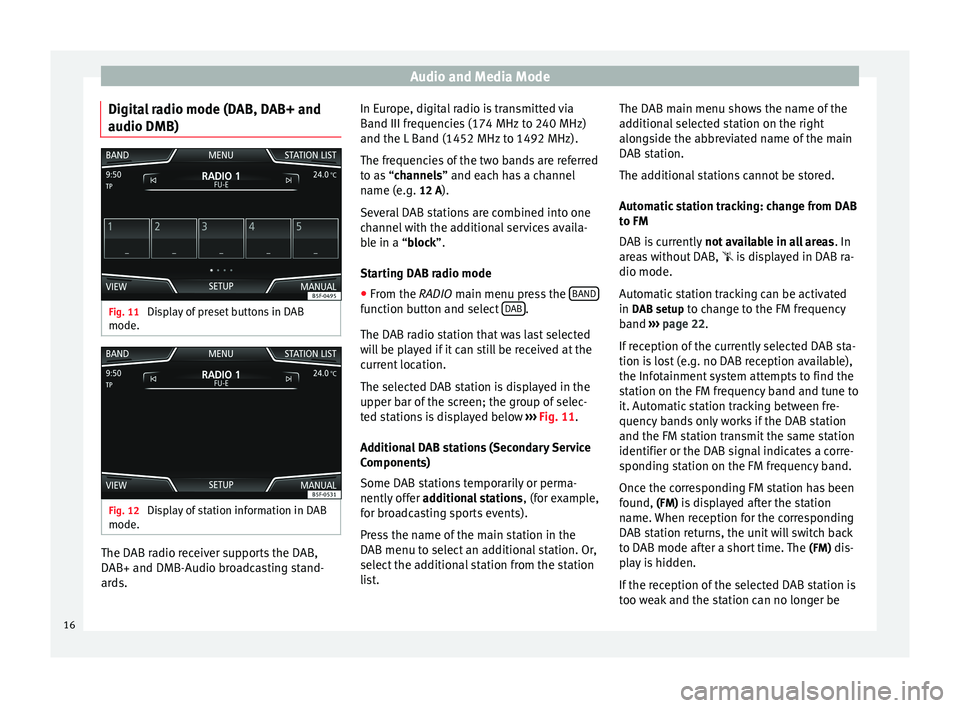
Display of preset buttons in DAB
mode. Fig. 12
Display of station information in DAB
mode. The DAB radio receiver supports the DAB,
DAB+ and DMB-Audio broadcasting stand-
ards. In Europe, digital radio is transmitted via
Band III frequencies (174 MHz to 240 MHz)
and the L Band (1452 MHz to 1492 MHz).
The frequencies of the two bands are referred
to as “
channels
” and each has a channel
n
ame (e.g. 12 A).
Several DAB stations are combined into one
channel with the additional services availa-
ble in a “block”.
St
arting DAB radio mode
● From the
RADIO main menu press the BAND function button and select
DAB .
The DAB radio station that was last selected
will be played if it can still be received at the
current location.
The selected DAB station is displayed in the
upper bar of the screen; the group of selec-
ted stations is displayed below ››› Fig. 11 .
Ad dition
al DAB stations (Secondary Service
Components)
Some DAB stations temporarily or perma-
nently offer additional stations , (for example,
for broadcasting sports events).
Press the name of the main station in the
DAB menu to select an additional station. Or,
select the additional station from the station
list. The DAB main menu shows the name of the
additional selected station on the right
alongside the abbreviated name of the main
DAB station.
The additional stations cannot be stored.
Automatic station tracking: change from DAB
to FM
DAB is currently
not available in all areas . In
areas without DAB, is displayed in DAB ra-
dio mode.
Automatic station tracking can be activated
in DAB setup to change to the FM frequency
band ››› page 22.
If r
eception of the currently selected DAB sta-
tion is lost (e.g. no DAB reception available),
the Infotainment system attempts to find the
station on the FM frequency band and tune to
it. Automatic station tracking between fre-
quency bands only works if the DAB station
and the FM station transmit the same station
identifier or the DAB signal indicates a corre-
sponding station on the FM frequency band.
Once the corresponding FM station has been
found, (FM) is displayed after the station name. When reception for the corresponding
DAB station returns, the unit will switch back
to DAB mode after a short time. The (FM)
dis-
play is hidden.
If the reception of the selected DAB station is
too weak and the station can no longer be
16
Page 20 of 84
Audio and Media Mode
Note
Not all stations are stored in the database
and therefore it is not always possible to as-
sign logos automatically. Manually save station logos in the
saved station buttons
The station logos can be imported from a
compatible data medium (for example, mem-
ory card or memories with USB port).
● Press the function button Setup and then
Station logos .
● Press the station button where you wish to
store the logo of a station.
● Select the source where the logo is stored
(for example, SD card 1 ). We recommend sav-
ing logos in the memory unit’s root directory.
● Select the station logo.
● Repeat the process to assign other logos;
press the infotainment button RADIO to re-
turn to the RADIO main menu.
● If you wish to change the logo of a preset
button that already has one assigned to it, it
must first be deleted from the button in ques-
tion. Select, tune and store a station
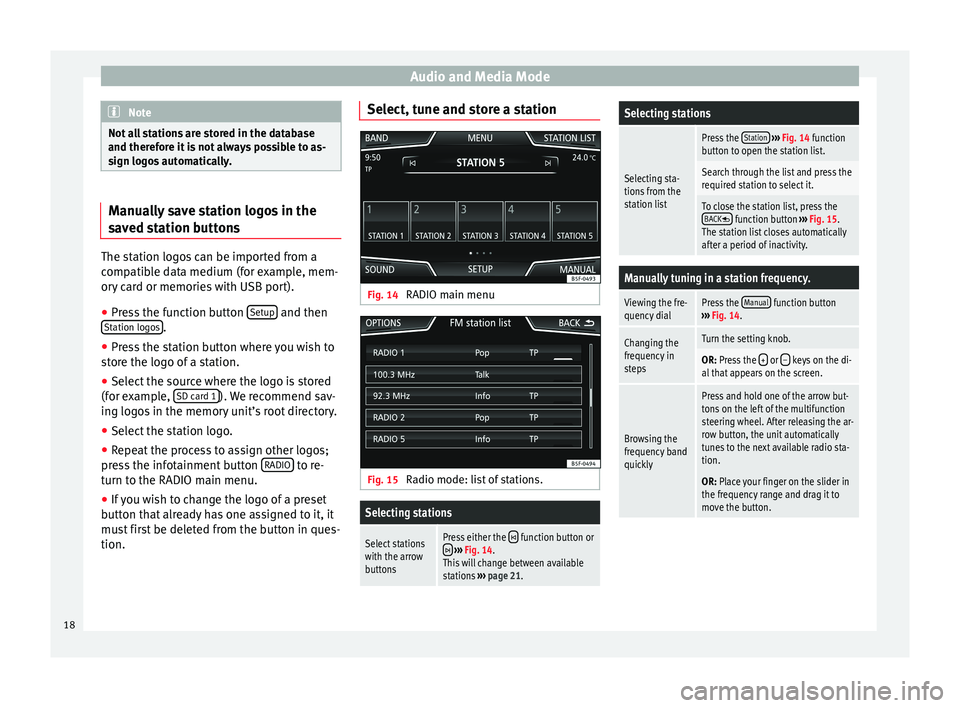
Fig. 14
RADIO main menu Fig. 15
Radio mode: list of stations.Selecting stations
Select stations
with the arrow
buttonsPress either the function button or ››› Fig. 14.
This will change between available
stations ››› page 21.
Selecting stations
Selecting sta-
tions from the
station list
Press the Station
››› Fig. 14 function
button to open the station list.
Search through the list and press the
required station to select it.
To close the station list, press the BACK function button ››› Fig. 15.
The station list closes automatically
after a period of inactivity.
Manually tuning in a station frequency.
Viewing the fre-
quency dialPress the Manual function button
››› Fig. 14.
Changing the
frequency in
stepsTurn the setting knob.
OR: Press the + or – keys on the di-
al that appears on the screen.
Browsing the
frequency band
quickly
Press and hold one of the arrow but-
tons on the left of the multifunction
steering wheel. After releasing the ar-
row button, the unit automatically
tunes to the next available radio sta-
tion.
OR: Place your finger on the slider in
the frequency range and drag it to
move the button. 18
Page 23 of 84
Audio and Media Mode
is available. This procedure may take some
time, depending on the situation.
Incoming traffic announcement In active Audio mode, an incoming traffic an-
nouncement will play automatically.
During the traffic announcement, a pop-up
window is displayed and the radio changes,
depending on the case, to the traffic news
station (EON).
The media mode is paused and the volume is
adjusted to the preset level
›››
page 72.
The volume of the traffic announcement can
be modified with the volume control . The
adjusted volume setting will be applied to
subsequent announcements.
● Press the Cancel function button to end the
current traffic announcement. The TP function
remains switched on.
● OR: Press the D
e activate function button to
end the traffic announcement and disconnect
the TP function permanently.
Setup (FM, AM, DAB) FM setup
Select the
FM frequency band by pressing
the RADIO Infotainment button. OR: Press function button
››› Fig. 17 1 and
select the FM frequency band.
Pr e
ss the SETUP function button to open the
FM Setup menu.
Function button: effect
Sound: Sound setup ››› page 72.
Scan: Scan function (SCAN function). When the scan
function is active, all available stations on the current
frequency band are played in sequence for approximate-
ly 5 seconds each ››› page 19.
Traffic news station (TP): The TP function (traffic news sta-
tion monitoring) is active ››› page 20.
Delete presets: To delete all or some of the stored sta-
tions.
Delete all entries: All stored stations will be deleted.
To delete the stations one by one, press the preset
button for the desired station.
Station logos: To manually assign or delete the logos of
the stored stations on the preset buttons ››› page 18.
Radio text: Radio Text is active
››› page 15, Radio Text
(RDS).
Advanced setup: Setup of the RDS (radio data system).
Auto-save station logosa)
: Logos can be automatical-
ly assigned to the stations stored on the preset but-
tons if they are available in the Infotainment sys-
tem. Also see ››› page 18.
Function button: effect
Alternative frequency (AF): The automatic station
tracking by RDS is active. When the checkbox is
deactivated, automatic station tracking will be dis-
connected. The regional RDS
function button will be
inactive (grey colour).
Radio data system (RDS)a)
: The Radio Data System
(RDS) is deactivated ››› page 15. If the checkbox
is deactivated, the traffic news station functions
(TP), Radio Text, station name and programme type
will not be available.
Regional RDS: Setting automatic station tracking by
RDS ››› page 15.
Fixed: The unit only switches to alternative fre-
quencies for the selected station if the same
regional service is being broadcast.
Automatic: the unit always switches to the sta-
tion's frequency that currently offers the best
reception. As a result, regional programmes
may be interrupted.
a) This depends on the country and unit in question.
AM Setup
Select the AM
frequency band by pressing
the RADIO Infotainment button.
OR: Press function button
›
›
› Fig. 17 1 and
select the AM frequency band.
Pr e
ss the SETUP function button to open the
AM Setup menu.
»
21
Page 24 of 84
Audio and Media ModeFunction button: effect
Sound: Sound setup
››› page 72.
Scan: Scan function (SCAN function). When the scan
function is active, all available stations on the current
frequency band are played in sequence for approximate-
ly 5 seconds each ››› page 19.
Traffic news station (TP): The TP function (traffic news sta-
tion monitoring) is active ››› page 20.
Delete presets: To delete all or some of the stored sta-
tions.
Delete all entries: All stored stations will be deleted.
To delete the stations one by one, press the preset
button for the desired station.
Station logos: To assign the logos to the stations stored
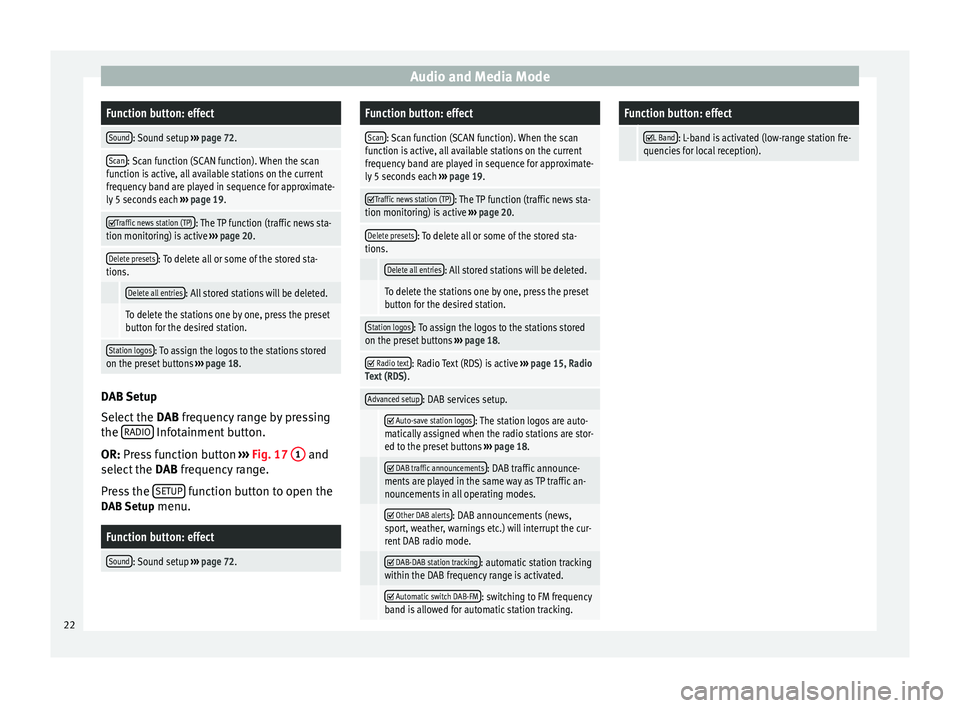
on the preset buttons ››› page 18. DAB Setup
Select the
DAB frequency range by pressing
the RADIO Infotainment button.
OR: Press function button
›
›
› Fig. 17 1 and
select the DAB frequency range.
Pr e
ss the SETUP function button to open the
DAB Setup menu.
Function button: effect
Sound: Sound setup ››› page 72.
Function button: effect
Scan: Scan function (SCAN function). When the scan
function is active, all available stations on the current
frequency band are played in sequence for approximate-
ly 5 seconds each ››› page 19.
Traffic news station (TP): The TP function (traffic news sta-
tion monitoring) is active ››› page 20.
Delete presets: To delete all or some of the stored sta-
tions.
Delete all entries: All stored stations will be deleted.
To delete the stations one by one, press the preset
button for the desired station.
Station logos: To assign the logos to the stations stored
on the preset buttons ››› page 18.
Radio text: Radio Text (RDS) is active
››› page 15, Radio
Text (RDS) .
Advanced setup: DAB services setup.
Auto-save station logos: The station logos are auto-
matically assigned when the radio stations are stor-
ed to the preset buttons ››› page 18.
DAB traffic announcements: DAB traffic announce-
ments are played in the same way as TP traffic an-
nouncements in all operating modes.
Other DAB alerts: DAB announcements (news,
sport, weather, warnings etc.) will interrupt the cur-
rent DAB radio mode.
DAB-DAB station tracking: automatic station tracking
within the DAB frequency range is activated.
Automatic switch DAB-FM: switching to FM frequency
band is allowed for automatic station tracking.
Function button: effect
L Band: L-band is activated (low-range station fre-
quencies for local reception). 22
Page 25 of 84
Audio and Media Mode
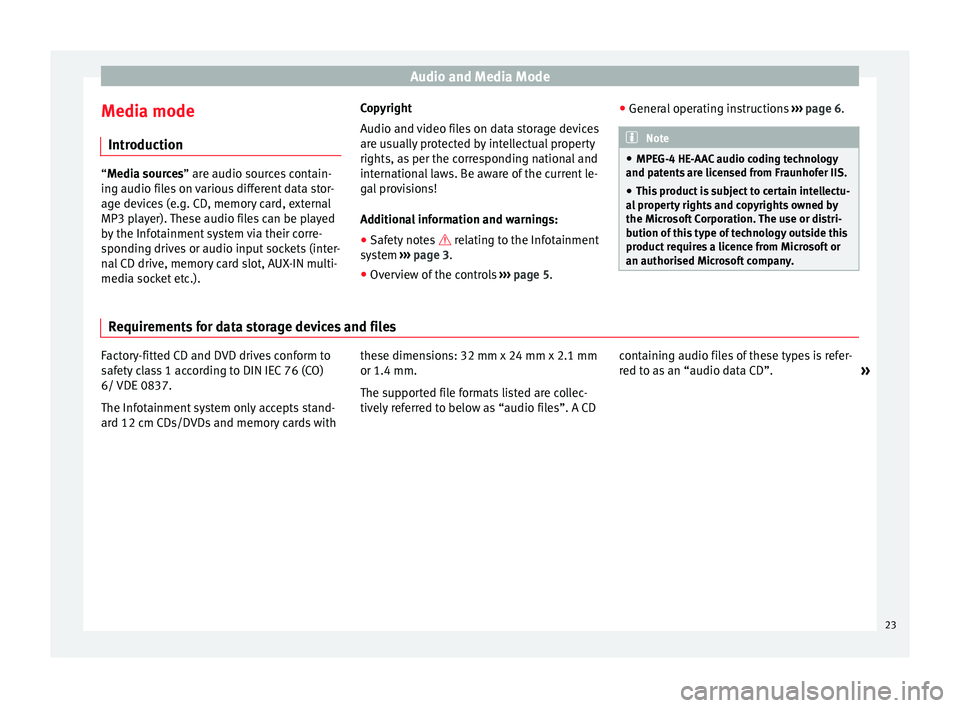
Media mode Introduction “Media sources
” are audio sources contain-
in
g audio files on various different data stor-
age devices (e.g. CD, memory card, external
MP3 player). These audio files can be played
by the Infotainment system via their corre-
sponding drives or audio input sockets (inter-
nal CD drive, memory card slot, AUX-IN multi-
media socket etc.). Copyright
Audio and video files on data storage devices
are usually protected by intellectual property
rights, as per the corresponding national and
international laws. Be aware of the current le-
gal provisions!
Additional information and warnings:
● Safety notes relating to the Infotainment
sy s
tem ››› page 3.
● Overview of the controls ››› page 5. ●
General operating instructions ››› page 6. Note
● MPEG-4 HE-AAC audio coding technology
and patents are licensed from Fraunhofer IIS.
● This product is subject to certain intellectu-
al property rights and copyrights owned by
the Microsoft Corporation. The use or distri-
bution of this type of technology outside this
product requires a licence from Microsoft or
an authorised Microsoft company. Requirements for data storage devices and files
Factory-fitted CD and DVD drives conform to
safety class 1 according to DIN IEC 76 (CO)
6/ VDE 0837.
The Infotainment system only accepts stand-
ard 12 cm CDs/DVDs and memory cards with
these dimensions: 32 mm x 24 mm x 2.1 mm
or 1.4 mm.
The supported file formats listed are collec-
tively referred to below as “audio files”. A CD
containing audio files of these types is refer-
red to as an “audio data CD”.
»
23