2014 Seat Leon 5D infotainment
[x] Cancel search: infotainmentPage 32 of 64
Navigation
Note
● Do not remove the memory card while the
navigation data is in use. This could damage
the memory card!
● The navigation memory card may not be
used as memory for other files. The infotain-
ment system will not recognise the files
saved.
● SEAT recommends only using original SEAT
memory cards to use navigation data. The
use of other memory cards could limit its op-
eration. Main menu of navigation
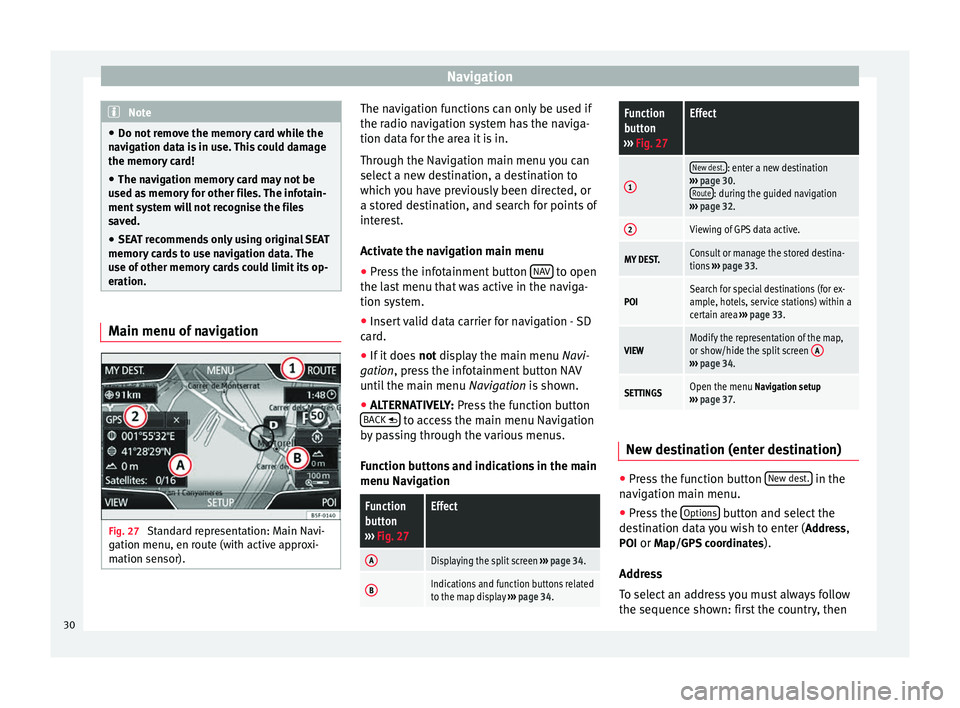
Fig. 27
Standard representation: Main Navi-
gation menu, en route (with active approxi-
mation sensor). The navigation functions can only be used if
the radio navigation system has the naviga-
tion data for the area it is in.
Through the Navigation main menu you can
select a new destination, a destination to
which you have previously been directed, or
a stored destination, and search for points of
interest.
Activate the navigation main menu
● Press the infotainment button NAV to open
the last menu that was active in the naviga-
tion system.
● Insert valid data carrier for navigation - SD
card.
● If it does not display the main menu
Na
vi-
gation, press the infotainment button NAV
until the main menu Navigation is shown.
● ALTERNATIVELY:
Press the function button
BACK to access the main menu Navigation
by passing through the various menus.
Function buttons and indications in the main
menu Navigation
Function
button
››› Fig. 27Effect
ADisplaying the split screen ››› page 34.
BIndications and function buttons related
to the map display ››› page 34.
Function
button
››› Fig. 27Effect
1
New dest.: enter a new destination
››› page 30.
Route
: during the guided navigation
››› page 32.
2Viewing of GPS data active.
MY DEST.Consult or manage the stored destina-
tions ››› page 33.
POISearch for special destinations (for ex-
ample, hotels, service stations) within a
certain area ››› page 33.
VIEWModify the representation of the map,
or show/hide the split screen A
›››
page 34.
SETTINGSOpen the menu Navigation setup
››› page 37. New destination (enter destination)
●
Press the function button New dest. in the
navigation main menu.
● Press the Options button and select the
destination data you wish to enter ( Address,
POI or Map/GPS coordinates ).
Address
To select an address you must always follow
the sequence shown: first the country, then
30
Page 36 of 64
NavigationFunction button: effect
2: one point of interest in the area in question. Press
the icon to view the details of the point of interest. Searching for a point of interest
● In the navigation main menu, press the
function button POI .
● Press the Others function button.
Function button: effect
Search area: select the area in which you wish to search
for points of interest.
Near current location: looks for points of interest in
the area around your current location. Destination area
a) : looks for points of interest in the
area around the destination. Along the route
a) : looks for points of interest in the
area along the route. Near address
: looks for points of interest in the area
around the address entered. Select on map
: looks for points of interest in the
area around the destination selected on the map.
To select a destination on the map, press the func-
tion button Edit
.
Category: select main category (e.g.
Car and travel), cate-
gory (e.g. Airports) and finally the desired entry from the
list.
Save: stores the selected point of interest in the
destination memory. Dial nr.
b) : establishes a telephone connection to
the number assigned to the point of interest. Start
: starts guided navigation at the selected
point of interest.
Function button: effect
Find: search for a point of interest by entering its name.
a) The function button is displayed only when guided navigation
is activated.
b) The function button is only displayed when the point of inter-
est contains a telephone number.
View ●
Press the View function button in the main
navigation menu ›››
Fig. 30 .
Function button: effect
2D : two-dimensional representation of the map,
from above (conventional).
3D : three-dimensional representation of the map,
tilted from above (bird's eye view).
a)
: view the final destination on the map.
a)
: view the whole journey on the map.
Day/Night: alternate between day and night view.
Split screen: press to view the split screen ››› page 34.
The split screen can also be shown or hidden by press-
ing the infotainment button NAV
.
a)
The function button is displayed only when guided navigation
is activated.
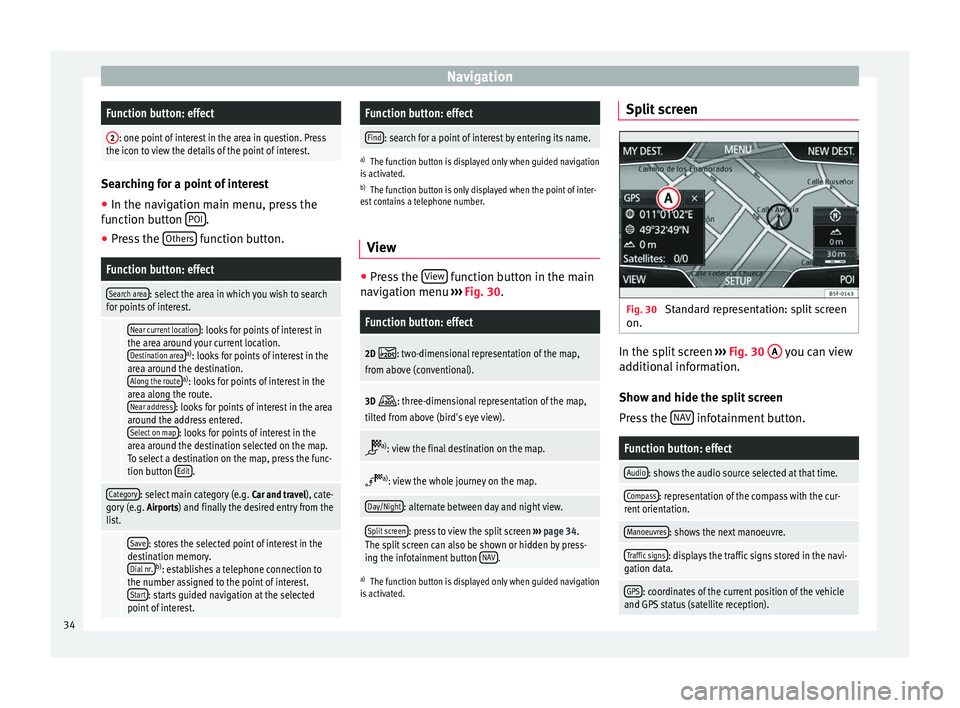
Split screen Fig. 30
Standard representation: split screen
on. In the split screen
›››
Fig. 30 A you can view
additional information.
Show and hide the split screen
Press the NAV infotainment button.
Function button: effect
Audio: shows the audio source selected at that time.
Compass: representation of the compass with the cur-
rent orientation.
Manoeuvres: shows the next manoeuvre.
Traffic signs: displays the traffic signs stored in the navi-
gation data.
GPS: coordinates of the current position of the vehicle
and GPS status (satellite reception). 34
Page 37 of 64
Navigation
To hide the split screen, press the function
button x or the infotainment button
NAV .
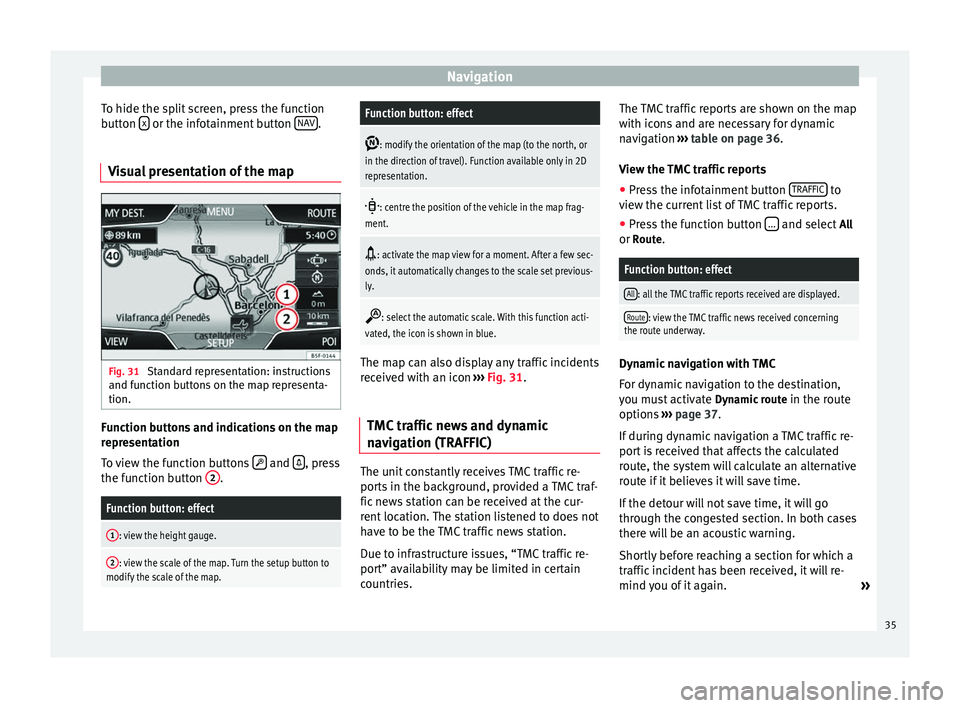
Visual presentation of the map Fig. 31
Standard representation: instructions
and function buttons on the map representa-
tion. Function buttons and indications on the map
representation
To view the function buttons
and
, press
the function button 2 .Function button: effect
1: view the height gauge.
2: view the scale of the map. Turn the setup button to
modify the scale of the map.
Function button: effect
: modify the orientation of the map (to the north, or
in the direction of travel). Function available only in 2D
representation.
: centre the position of the vehicle in the map frag-
ment.
: activate the map view for a moment. After a few sec-
onds, it automatically changes to the scale set previous-
ly.
: select the automatic scale. With this function acti-
vated, the icon is shown in blue. The map can also display any traffic incidents
received with an icon
››› Fig. 31 .
TMC tr
affic news and dynamic
navigation (TRAFFIC) The unit constantly receives TMC traffic re-
ports in the background, provided a TMC traf-
fic news station can be received at the cur-
rent location. The station listened to does not
have to be the TMC traffic news station.
Due to infrastructure issues, “TMC traffic re-
port” availability may be limited in certain
countries.The TMC traffic reports are shown on the map
with icons and are necessary for dynamic
navigation
››› table on page 36 .
V iew the
TMC traffic reports
● Press the infotainment button TRAFFIC to
view the current list of TMC traffic reports.
● Press the function button ... and select
All
or Route.
Function button: effect
All: all the TMC traffic reports received are displayed.
Route: view the TMC traffic news received concerning
the route underway. Dynamic navigation with TMC
For dynamic navigation to the destination,
you must activate
Dynamic route
in the route
options ›››
page 37 .
If durin
g dynamic navigation a TMC traffic re-
port is received that affects the calculated
route, the system will calculate an alternative
route if it believes it will save time.
If the detour will not save time, it will go
through the congested section. In both cases
there will be an acoustic warning.
Shortly before reaching a section for which a
traffic incident has been received, it will re-
mind you of it again. »
35
Page 40 of 64
NavigationFunction button: effect
No voice guidance during call: during a telephone call,
no spoken navigation instructions shall be made.
Advanced setup: Further adjust navigation setup.
Time display: view during guided navigation.
ETA: the scheduled time of arrival at your destina-
tion is shown. Journey duration : the predicted journey time re-
maining until you reach your destination is shown.
Status bar: view during guided navigation.
Destination: the estimated distance to your destina-
tion is shown. Stage: the estimated distance to an intermediate
destination is shown.
Warning: National border crossed: a message will be
shown when you cross a border.
Demo mode: after starting guided navigation, a “vir-
tual” navigation route can be calculated to the desti-
nation entered ››› page 36.
Define the starting point of the demo mode
: when Demo
mode is active and the vehicle is stopped, you can al-
so define a fictitious starting point to carry out the
virtual guided navigation.
Manage memory: To modify saved destinations.
Define home address: assign a private address, or edit
it. ››› page 33.
Delete user data
: delete the information selected by the
user.
Import destinations: import digital business cards (vCards)
to the destination memory.
Function button: effect
Version information: information of the current cartography
version. Import vCards (digital business cards)
GPS data from destinations may be saved in
the form of vCards (digital business cards) in
a data support that is compatible with the
hardware.
Importing vCards to the destination memory
●
Insert the data support with the saved
vCards or connect it to the infotainment
››› page 23 system.
● Pr e
ss the function button in the main navi-
gation menu: Settings.
● In the navigation settings menu, press: Im-
port destinations.
● Select the data carrier with the vCards
saved in the list.
● Press: Import all vCards in the folder.
● Confirm the import message with the OK
function button.
The saved vCards will now be in the destina-
tion memory ›››
page 33 and may be used for
nav
igation. 38
Page 41 of 64
CAR menu
CAR menu Introduction to managing the
CAR menu Car menu By pressing the “CAR” infotainment button
you will access the main menu with the fol-
lowing options:
● VIEW
● MINIPLAYER (Radio and Media function)
● PREVIOUS-NEXT (to change screen)
● SETUP ›››
Booklet Instruction Manual,
chapter System setup (CAR)
With the function button View you can access
the following information:
● DRIVING DATA
● ECO
● VEHICLE STATUS Driving data
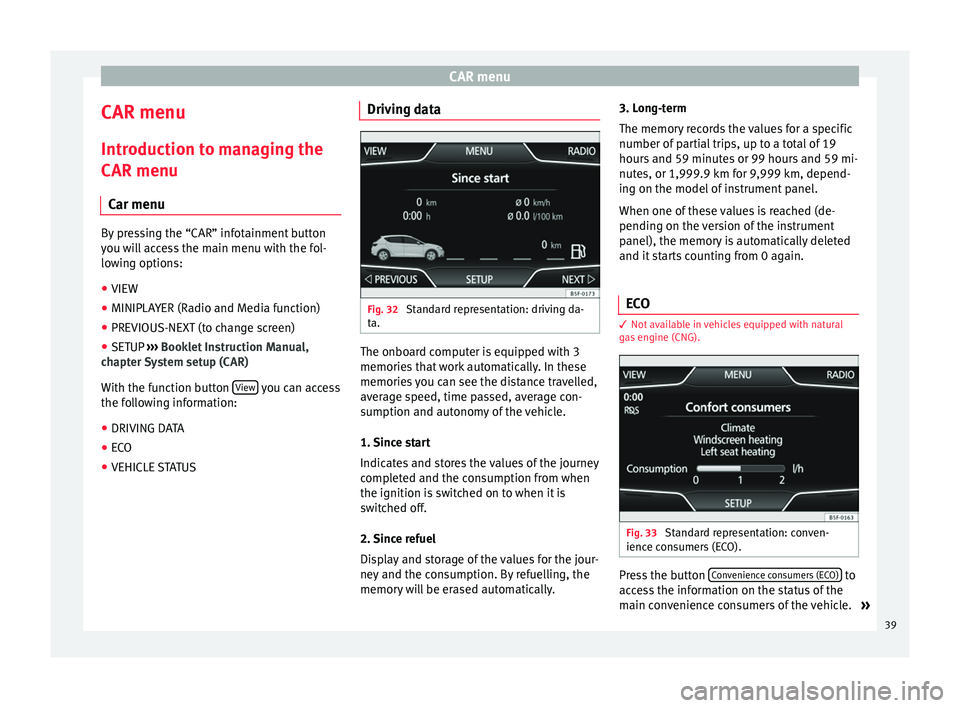
Fig. 32
Standard representation: driving da-
ta. The onboard computer is equipped with 3
memories that work automatically. In these
memories you can see the distance travelled,
average speed, time passed, average con-
sumption and autonomy of the vehicle.
1. Since start
Indicates and stores the values of the journey
completed and the consumption from when
the ignition is switched on to when it is
switched off.
2. Since refuel
Display and storage of the values for the jour-
ney and the consumption. By refuelling, the
memory will be erased automatically.3. Long-term
The memory records the values for a specific
number of partial trips, up to a total of 19
hours and 59 minutes or 99 hours and 59 mi-
nutes, or 1,999.9 km for 9,999 km, depend-
ing on the model of instrument panel.
When one of these values is reached (de-
pending on the version of the instrument
panel), the memory is automatically deleted
and it starts counting from 0 again.
ECO 3
Not available in vehicles equipped with natural
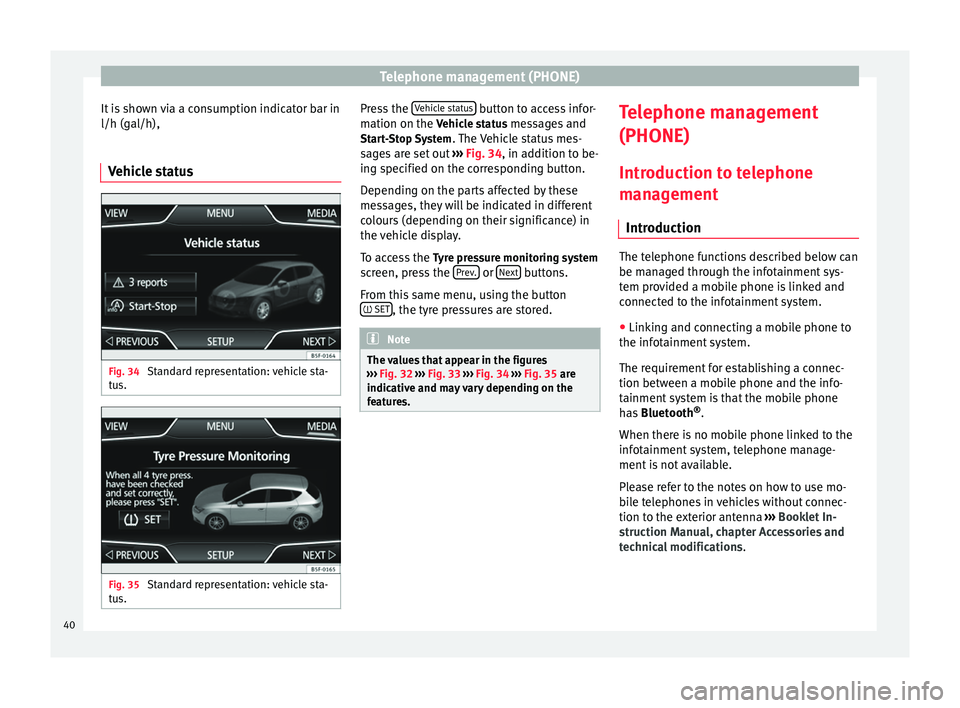
gas engine (CNG). Fig. 33
Standard representation: conven-
ience consumers (ECO). Press the button
Convenience consumers (ECO) to
access the information on the status of the
main convenience consumers of the vehicle. »
39
Page 42 of 64
Telephone management (PHONE)
It is shown via a consumption indicator bar in
l/h (gal/h),
Vehicle status Fig. 34
Standard representation: vehicle sta-
tus. Fig. 35
Standard representation: vehicle sta-
tus. Press the
Vehicle status button to access infor-
mation on the Vehicle status messages and
St ar
t-Stop System . The Vehicle status mes-
sages are set out ››› Fig. 34, in addition to be-
ing s
pecified on the corresponding button.
Depending on the parts affected by these
messages, they will be indicated in different
colours (depending on their significance) in
the vehicle display.
To access the Tyre pressure monitoring system
screen, press the Prev. or
Next buttons.
From this same menu, using the button SET , the tyre pressures are stored.
Note
The values that appear in the figures
››› Fig. 32 ››› Fig. 33
››› Fig. 34 ››› Fig. 35 are
indicativ
e and may vary depending on the
features. Telephone management
(PHONE)
Introduction to telephone
management Introduction The telephone functions described below can
be managed through the infotainment sys-
tem provided a mobile phone is linked and
connected to the infotainment system.
● Linking and connecting a mobile phone to
the infotainment system.
The requirement for establishing a connec-
tion between a mobile phone and the info-
tainment system is that the mobile phone
has Bluetooth ®
.
When there is no mobile phone linked to the
infotainment system, telephone manage-
ment is not available.
Please refer to the notes on how to use mo-
bile telephones in vehicles without connec-
tion to the exterior antenna ›››
Booklet In-
struction Manual, chapter Accessories and
technical modifications .
40
Page 44 of 64
Telephone management (PHONE)
Note
In areas with special requirements and where
the use of mobile phones is prohibited, you
must keep the mobile phone and its prein-
stallation switched off at all times. The radia-
tion emitted by mobile phones when switch-
ed on can cause interference in sensitive
technical and medical equipment, which
could damage this equipment or cause it to
stop working properly. Linking and connecting your mobile
phone to the infotainment system
To operate a mobile phone through the info-
tainment system, you need to link both devi-
ces
one time only .
F or
your safety, we recommend you make the
link when the vehicle is stationary. In some
countries you cannot
make the link with the
vehicle running.
You must guarantee the following setup in
the mobile phone and the infotainment sys-
tem:
● The
Bluetooth ®
function must be active
and visible on the mobile phone and info-
tainment system, respectively.
● The keypad lock of the mobile phone must
be disconnected.
● The
notification and key tones of your mo-
bile phone must be disconnected. In some countries, after switching the igni-
tion on, the
Bluetooth
®
function of the info-
tainment system should be activated or re-
main visible for around 3 minutes.
During the linking process you must enter da-
ta using your mobile phone's keypad. To do
so, you must have your mobile phone to
hand.
Once the link has been made, the schedule
and call lists stored in your mobile phone will
be loaded. The duration of the loading proc-
ess depends on the amount of data stored on
your mobile phone. When the loading proc-
ess is complete, the data will be available to
the infotainment system.
Starting the link from the system
● Make sure the mobile device is active and
visible.
● Press the PHONE unit button.
● Press the Find phone function button.
ALTERNATIVELY:
● Press the PHONE unit button.
● Press the Setup function button.
● Press the function button Select phone and
then Find phone .
ALTERNATIVELY:
● Press the PHONE unit button.
● Press the Setup function button.●
Press the Bluetooth setup function button.
● Press the Find devices function button.
ALTERNATIVELY:
● Make the connection from the mobile de-
vice itself (ensure that the visibility of the in-
fotainment system in the menu Phone setup >
BT setup is active).
The search process can take up to 1 minute.
On the screen the system will dynamically
update the names of the bluetooth devices
found.
● Select the infotainment system or the mo-
bile phone to which you want to connect from
the list of Bluetooth devices found.
The infotainment system and the mobile
phone will now be connected to each other.
In certain circumstances, it is possible that to
finish the connection between the two devi-
ces, you must enter additional data in the
mobile phone and infotainment system.
● If necessary, confirm the link to the mobile
phone.
● Use your mobile phone to enter and con-
firm your PIN code, as indicated in the dis-
play of the infotainment system.
● ALTERNATIVELY: Compare the PIN code
sho wn in the di
splay of the infotainment sys-
tem with the PIN code that appears on the
42
Page 45 of 64
Telephone management (PHONE)
mobile phone. If they coincide, you must
confirm it on both devices.
Onc e the link
is complete, the main menu
PHONE
will be shown.
Linking and connecting mobile telephones
You can link up to 20
mobile telephones to
the infotainment system, but only one mobile
phone can be connected as hands-free, and
only one device as BT audio at any time.
When you turn on the infotainment system
the connection is automatically established
with the mobile phone that was last connec-
ted. If it cannot establish a connection with
that mobile phone, the telephone manager
will automatically try to establish a connec-
tion with the next mobile phone that appears
on the list of linked devices.
The working radius of the Bluetooth connec-
tion is a maximum of 10 metres . If this work-
ing radius is exceeded, the connection estab-
lished through Bluetooth will be interrupted.
The connection is automatically re-establish-
ed as
soon as this device comes back into
the Bluetooth working radius.
If the maximum number of linked devices is
reached and you wish to link another one to
the system, it will automatically replace the
one that has recently been used the least. If you wish to replace it with another one, the
user must erase it beforehand. To do so:
●
Press the unit button Setup within the tele-
phone context.
● Press the function button Bluetooth setup .
● Press the function button My devices .
● In the list of devices linked, press the func-
tion button remove after the mobile phone to
be deleted and then press Delete to confirm
the process. Note
● The behaviour may vary depending on the
device connected.
● For some android mobile devices you must
accept the request to access the PBAP phone-
book after linking, to be able to access the
phonebook. It is recommended to activate
the option “always” so as not to have to ac-
cept it every time you connect. General information
Please refer to the notes on using a mobile
phone in the vehicle without connection to
exterior antenna
›››
Booklet Instruction Man-
ual, chapter Accessories and technical modi-
fications .
On ly
use devices that support Bluetooth. At
your SEAT dealership, or on the Internet, you will find information about products that sup-
port Bluetooth.
Take into account the instruction manual of
the mobile phone and of the manufacturer of
the accessories. In areas with poor coverage
there may be anomalies in the reception and
calls may be interrupted.
Most electronic devices are shielded against
radio frequency signals (high-frequency). On
some occasions, nevertheless, electronic de-
vices cannot be protected against the radio
frequency signals from the telephone manag-
er. This may produce interference.
Note
● There may be restrictions on the use of
Bluetooth devices in some countries. Infor-
mation is available from the local authorities.
● To connect the telephone manager to a de-
vice via Bluetooth technology, read the corre-
sponding instruction manual for the particu-
lar safety instructions. Only use products
that support Bluetooth. Bluetooth
® Bluetooth
®
Bluetooth technology is used to connect a
mobile phone to the vehicle's telephone
manager. To use the telephone manager with
a mobile phone with Bluetooth, the linking
process must be carried out once. »
43