2014 Seat Leon 5D display
[x] Cancel search: displayPage 17 of 64
Audio modeHiding the
frequency
bandBriefly press
the function button Manual.
If you select a station with a stored sta-
tion button, the manual selection of the
frequency is also finalised. If you do not
do anything else, after a certain time the
frequency band will close automatically. Storing stations
Storing the
station that
you are lis-
tening to in
one of the
stored sta-
tion but-
tonsHold down the desired stored station
button
››› Fig. 12 until you hear the sig-
nal. The station that you are listening to
will be stored in this button.
Storing a
station
from the list
of stations
in one of
the stored
station but-
tonsPress the function button Stations›››
Fig. 12 to open the list of stations.
The stations already assigned to stored
station buttons are shown in the list of
stations marked with the symbol
››› Fig. 13.
Select the desired station holding it
down on the display until the screen for
storing stations appears.
Press the stored station button where
you wish to save the station. A signal will
sound and the station will then be saved
in this stored station button. The system
automatically returns to the list.
Deleting a
stored sta-
tionIn the menu Delete presets, available in the menu Radio setup you can delete the
stored stations one by one or all at once
››› page 17. Scan function (SCAN)
When the scan function is running, all availa-
ble stations on the current frequency band
are played in sequence for around 5 seconds
each.
Starting the
scan functionBriefly press the setup button.
OR: Press the function button
Setup
and then select SCAN.
Stopping the
scan functionPress the function button SCAN“crossed out” to stop the scan function
on the station you are listening to.
OR: Briefly press the setup button.
The scan function also ends when you
manually select a station using the
stored station buttons, or when a traffic
report comes in. Autostore (automatic station storing)
Hold the RADIO button down for approxi-
mately 10 seconds to carry out the autostore
function for the stations that can be tuned in
at the time of running the Autostore. The sta-
tions are saved in the stored station buttons.
Note
This function can take several minutes, dur-
ing which time the radio will remain muted. In
addition, any stored stations assigned previ-
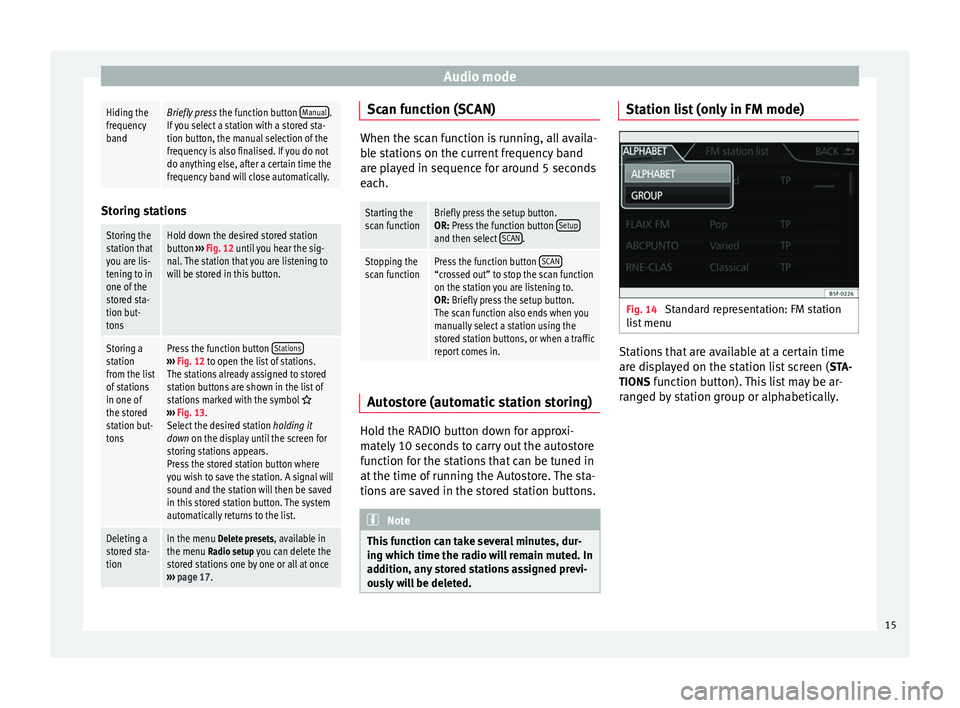
ously will be deleted. Station list (only in FM mode)
Fig. 14
Standard representation: FM station
list menu Stations that are available at a certain time
are displayed on the station list screen (
STA-
TIONS function button). This list may be ar-
ranged by station group or alphabetically.
15
Page 18 of 64
Audio mode
TP (Traffic Program) traffic news
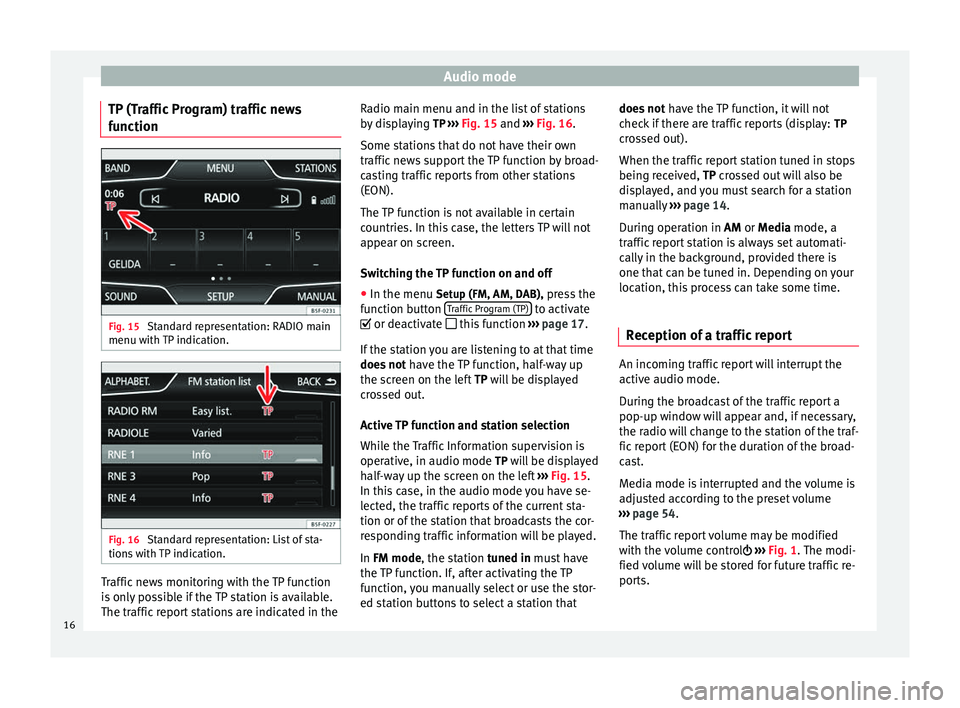
function Fig. 15
Standard representation: RADIO main
menu with TP indication. Fig. 16
Standard representation: List of sta-
tions with TP indication. Traffic news monitoring with the TP function
is only possible if the TP station is available.
The traffic report stations are indicated in the Radio main menu and in the list of stations
by displaying
TP ››› Fig. 15 and
›
›› Fig. 16 .
Some st
ations that do not have their own
traffic news support the TP function by broad-
casting traffic reports from other stations
(EON).
The TP function is not available in certain
countries. In this case, the letters TP will not
appear on screen.
Switching the TP function on and off
● In the menu Setup (FM, AM, DAB), press the
function button Traffic Program (TP) to activate
or deactivate this function ››› page 17.
If the station you are listening to at that time
does not have the TP function, half-way up
the screen on the left TP will be displayed
c r
ossed out.
Active TP function and station selection
While the Traffic Information supervision is
operative, in audio mode TP will be displayed half-way up the screen on the left ››› Fig. 15.
In this
case, in the audio mode you have se-
lected, the traffic reports of the current sta-
tion or of the station that broadcasts the cor-
responding traffic information will be played.
In
FM mode, the station tuned in must have
the TP function. If, after activating the TP
function, you manually select or use the stor-
ed station buttons to select a station that does not
have the TP function, it will not
check if there are traffic reports (display: TP
crossed out).
When the traffic report station tuned in stops
being received, TP crossed out will also be
di
splayed, and you must search for a station
manually ››› page 14.
Durin
g operation in
AM or Media mode, a
traffic report station is always set automati-
cally in the background, provided there is
one that can be tuned in. Depending on your
location, this process can take some time.
Reception of a traffic report An incoming traffic report will interrupt the
active audio mode.
During the broadcast of the traffic report a
pop-up window will appear and, if necessary,
the radio will change to the station of the traf-
fic report (EON) for the duration of the broad-
cast.
Media mode is interrupted and the volume is
adjusted according to the preset volume
››› page 54 .
The tr affic
report volume may be modified
with the volume control ›››
Fig. 1
. The modi-
fied volume will be stored for future traffic re-
ports.
16
Page 23 of 64
Audio mode
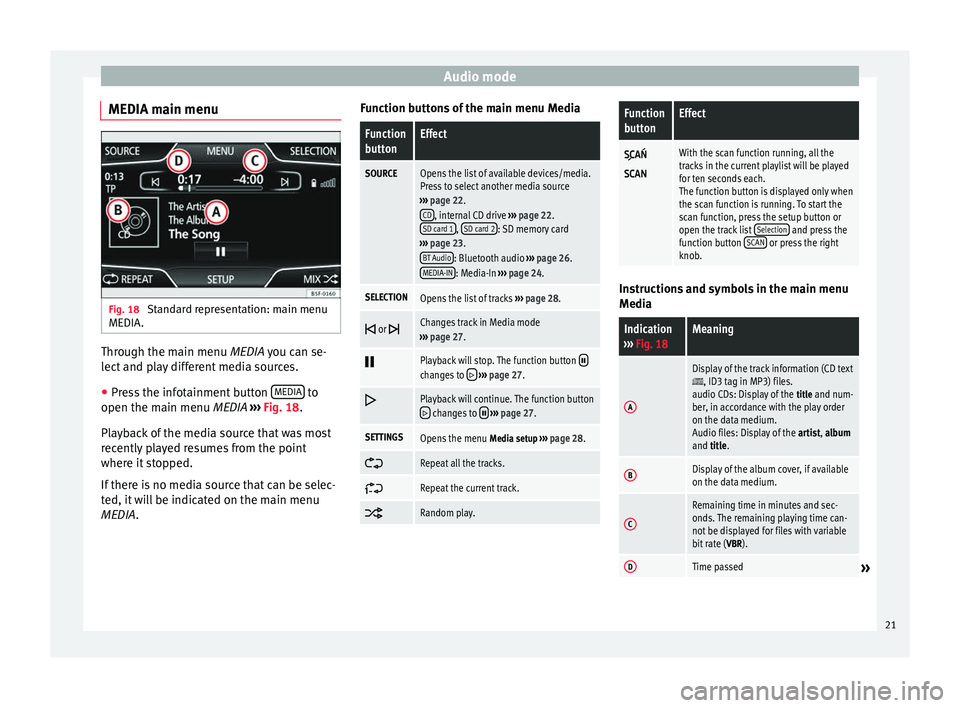
MEDIA main menu Fig. 18
Standard representation: main menu
MEDIA. Through the main menu
MEDIA
you can se-
l
ect and play different media sources.
● Press the infotainment button MEDIA to
open the main menu MEDIA ›››
Fig. 18 .
Pl a
yback of the media source that was most
recently played resumes from the point
where it stopped.
If there is no media source that can be selec-
ted, it will be indicated on the main menu
MEDIA
. Function buttons of the main menu Media
Function
buttonEffect
SOURCEOpens the list of available devices/media.
Press to select another media source
››› page 22.
CD
, internal CD drive ››› page 22.
SD card 1, SD card 2: SD memory card
››› page 23.
BT Audio
: Bluetooth audio ››› page 26.
MEDIA-IN: Media-In ››› page 24.
SELECTIONOpens the list of tracks ››› page 28.
or Changes track in Media mode
››› page 27.
Playback will stop. The function button changes to
››› page 27.
Playback will continue. The function button changes to
››› page 27.
SETTINGSOpens the menu Media setup ››› page 28.
Repeat all the tracks.
Repeat the current track.
Random play.
Function
buttonEffect
With the scan function running, all the
tracks in the current playlist will be played
for ten seconds each.
The function button is displayed only when
the scan function is running. To start the
scan function, press the setup button or
open the track list
Selection
and press the
function button SCAN or press the right
knob. Instructions and symbols in the main menu
Media
Indication
››› Fig. 18Meaning
A
Display of the track information (CD text, ID3 tag in MP3) files.
audio CDs: Display of the title and num-
ber, in accordance with the play order
on the data medium.
Audio files: Display of the artist, album
and title.
BDisplay of the album cover, if available
on the data medium.
C
Remaining time in minutes and sec-
onds. The remaining playing time can-
not be displayed for files with variable
bit rate ( VBR).
DTime passed» 21
Page 27 of 64
Audio mode
Notes and restrictions
The infotainment system enables you to view,
play and manage compatible audio files
through the MEDIA-IN multimedia interface.
In the case of MTP players and depending on
the battery charge and the quantity of data, it
may take a few minutes for them to be ready
for use.
External hard discs with a capacity greater
than 32 GB must, in certain circumstances,
be reformatted to the FAT32 file system. On
the Internet, for example, you will find pro-
grams and instructions for this.
If the data carrier has several partitions, only
the first partition will be recognised (except
with USB, in which the first 2 will be visible).
Take into account all other instructions and
limitations regarding requirements for media
sources.
Connecting and disconnecting an external
data medium
● Connect a suitable adaptor to the MEDIA-IN
multimedia interface.
● Connect the external data medium to the
MEDIA-IN multimedia interface via the adapt-
er.
● If necessary, switch on the external data
medium or select the appropriate data mode.
Regardless of any indications to the contrary
that there may be on the matter, the external data medium can be disconnected from the
MEDIA-IN multimedia interface at any time
without losing the data.
When disconnecting an iPod
®
or iPhone ®
from the adaptor, take care to press the two
unlocking tabs on the narrow sides of the
iPod ®
connector simultaneously.
Operating the infotainment system
An external data medium that is correctly
connected to the MEDIA-IN multimedia inter-
face can be operated using the infotainment
system.
● In the main MEDIA
menu, press the SOURC E ›››
Fig. 21 function button and select USB or
iPod ...
››› page 24 .
Other oper ation
s with the external data medi-
um (changing tracks, selecting tracks and ac-
tivating playback modes) are carried out as
described in the corresponding chapters.
iPod ®
and iPhone ®
If you connect an iPod ®
or iPhone ®
, the top
selection level will display the specific lists of
the iPod ( playlists, artist, album,
title, podcasts etc.). The appearance of
these lists is similar to that of the media cen-
tre , and they are managed as described.
Music management is blocked so it can be
managed with the iPod ®
or iPhone ®
that is
connected. The playback volume
of some iPods®
or
iPhones ®
can adapt to the volume of the oth-
er audio sources ››› page 24.
Files from iPods ®
or iPhones ®
cannot be im-
port
ed.
Possible error messages after connecting an ex-
ternal data medium
Error mes-
sageCauseProcedure
Device not
supportedThe external
data medium
cannot be
played– Consult the list of
supported devices
on the web.
– When possible,
update the software
of the external data
medium.
Unit not op-
erationalCommunication
interrupted.Check the connec-
tion and make sure
the external data
medium is working
correctly.
Due to the large number of different data media availa-
ble, it is not possible to guarantee fault-free operation of
all functions described here. Note
● The connecting adaptor used must not be
crushed or bent sharply. This could damage
the adaptor and cause operational faults.
● To play music, do not simultaneously link
the external media player to the infotainment » 25
Page 28 of 64
Audio mode
system using Bluetooth and the MEDIA-IN
multimedia interface, as this can cause play-
back limitations.
● If a connected device is not recognised, un-
plug all connected devices and reconnect the
device. External data support in MEDIA-IN*
port
Only supported audio files can be displayed
and played. Other files are ignored.
Playback starts automatically if there are
readable audio files stored on the data sup-
port.
End connection
The connected data support
must be pre-
pared for disconnection before it can be re-
moved.
● Press the infotainment button MENU ; then,
press Settings to open the menu System set-
tings ››› page 53 .
● Pr e
ss the Safely remove USB data stick function
button. After removing the data stick correct-
ly from the system, the function button be-
comes inactive (grey).
● The data media may now be disconnected. Illegible data medium
If the data on a connected support device
cannot be read, the warning
No playable files
is displayed. Note
Read and bear in mind the manufacturer's in-
struction manual for the external data medi-
um. Connecting an external media player
via Bluetooth
® Fig. 23
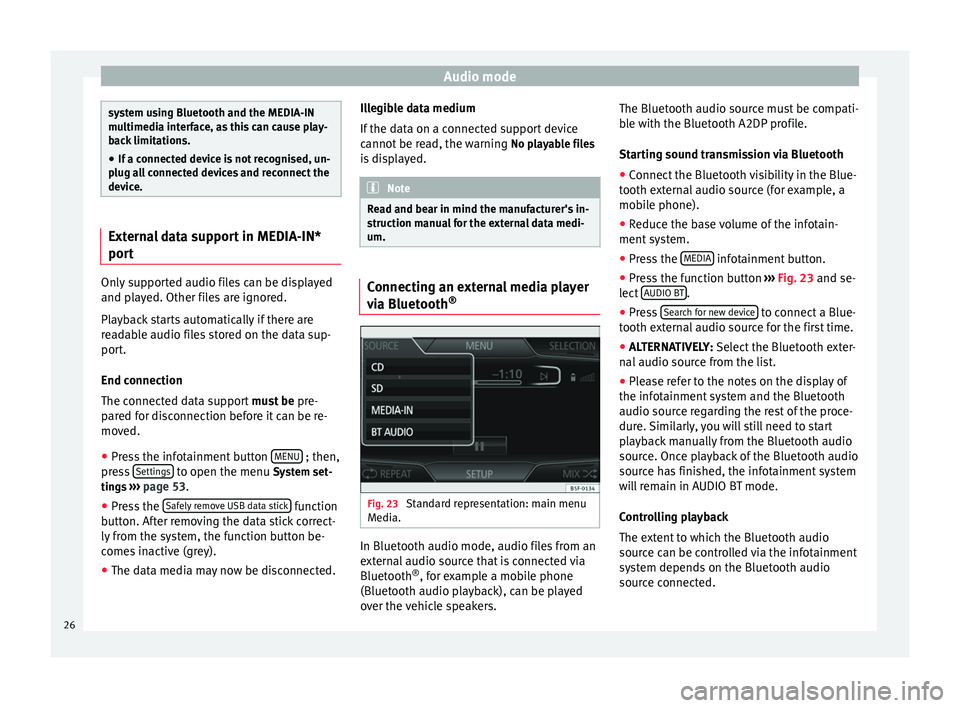
Standard representation: main menu
Media. In Bluetooth audio mode, audio files from an
external audio source that is connected via
Bluetooth
®
, for example a mobile phone
(Bluetooth audio playback), can be played
over the vehicle speakers. The Bluetooth audio source must be compati-
ble with the Bluetooth A2DP profile.
Starting sound transmission via Bluetooth
● Connect the Bluetooth visibility in the Blue-
tooth external audio source (for example, a
mobile phone).
● Reduce the base volume of the infotain-
ment system.
● Press the MEDIA infotainment button.
● Press the function button ››› Fig. 23 and se-
l ect
AUDIO BT .
● Press Search for new device to connect a Blue-
tooth external audio source for the first time.
● ALTERNATIVELY: Select the Bluetooth exter-
n al
audio source from the list.
● Please refer to the notes on the display of
the infotainment system and the Bluetooth
audio source regarding the rest of the proce-
dure. Similarly, you will still need to start
playback manually from the Bluetooth audio
source. Once playback of the Bluetooth audio
source has finished, the infotainment system
will remain in AUDIO BT mode.
Controlling playback
The extent to which the Bluetooth audio
source can be controlled via the infotainment
system depends on the Bluetooth audio
source connected.
26
Page 30 of 64
Audio mode
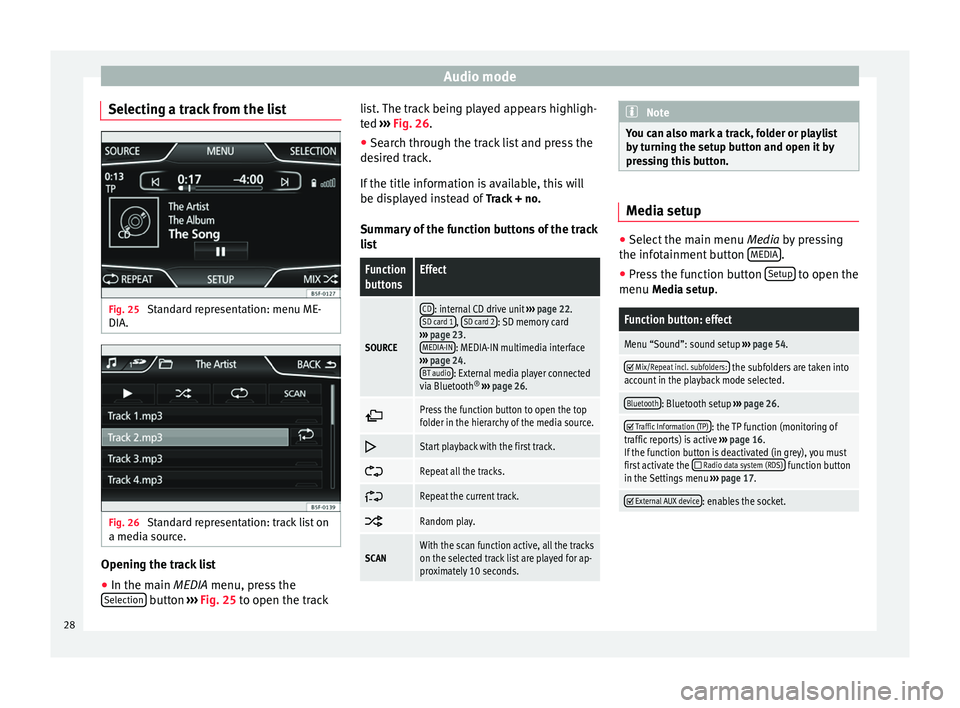
Selecting a track from the list Fig. 25
Standard representation: menu ME-
DIA. Fig. 26
Standard representation: track list on
a media source. Opening the track list
● In the main MEDIA
menu, press the
Sel
ection button
›››
Fig. 25 to open the track li
s t. The track being played appears highligh-
ted ››› Fig. 26
.
● Search through the track list and press the
desired track.
If the title information is available, this will
be displayed instead of Track + no.
Summary of the function buttons of the track
list
Function
buttonsEffect
SOURCE
CD: internal CD drive unit ››› page 22.
SD card 1, SD card 2: SD memory card
››› page 23.
MEDIA-IN
: MEDIA-IN multimedia interface
››› page 24.
BT audio
: External media player connected
via Bluetooth ®
››› page 26.
Press the function button to open the top
folder in the hierarchy of the media source.
Start playback with the first track.
Repeat all the tracks.
Repeat the current track.
Random play.
SCANWith the scan function active, all the tracks
on the selected track list are played for ap-
proximately 10 seconds. Note
You can also mark a track, folder or playlist
by turning the setup button and open it by
pressing this button. Media setup
●
Select the main menu Media by pressing
the inf ot
ainment button MEDIA .
● Press the function button Setup to open the
menu Media setup
.
Function button: effect
Menu “Sound”: sound setup ››› page 54.
Mix/Repeat incl. subfolders: the subfolders are taken into
account in the playback mode selected.
Bluetooth: Bluetooth setup ››› page 26.
Traffic Information (TP): the TP function (monitoring of
traffic reports) is active ››› page 16.
If the function button is deactivated (in grey), you must
first activate the
Radio data system (RDS) function button
in the Settings menu ››› page 17.
External AUX device: enables the socket.
28
Page 32 of 64
Navigation
Note
● Do not remove the memory card while the
navigation data is in use. This could damage
the memory card!
● The navigation memory card may not be
used as memory for other files. The infotain-
ment system will not recognise the files
saved.
● SEAT recommends only using original SEAT
memory cards to use navigation data. The
use of other memory cards could limit its op-
eration. Main menu of navigation
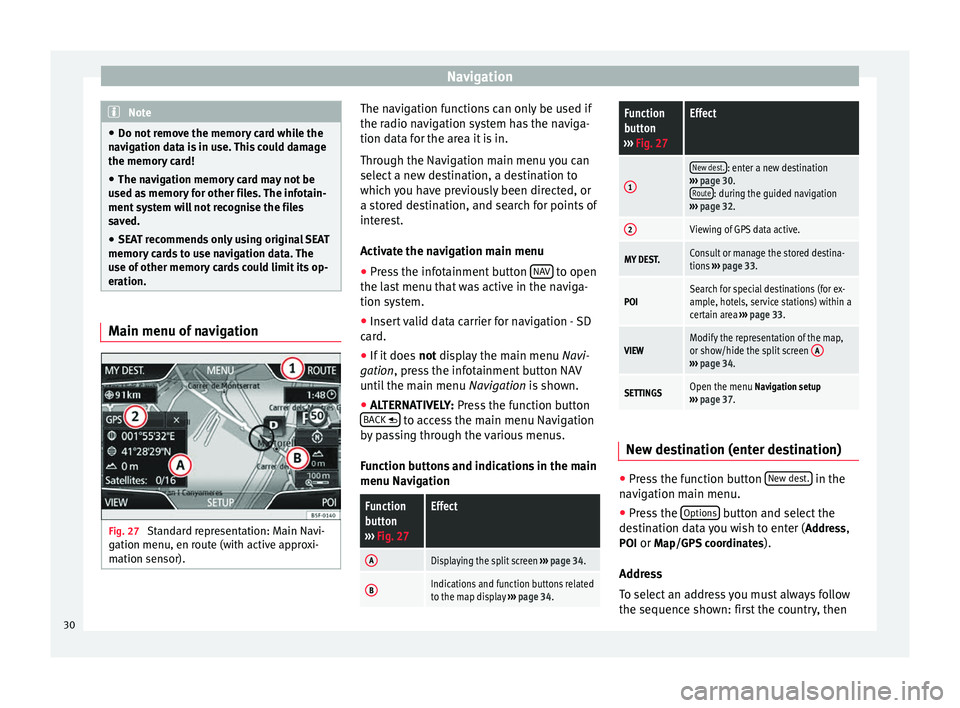
Fig. 27
Standard representation: Main Navi-
gation menu, en route (with active approxi-
mation sensor). The navigation functions can only be used if
the radio navigation system has the naviga-
tion data for the area it is in.
Through the Navigation main menu you can
select a new destination, a destination to
which you have previously been directed, or
a stored destination, and search for points of
interest.
Activate the navigation main menu
● Press the infotainment button NAV to open
the last menu that was active in the naviga-
tion system.
● Insert valid data carrier for navigation - SD
card.
● If it does not display the main menu
Na
vi-
gation, press the infotainment button NAV
until the main menu Navigation is shown.
● ALTERNATIVELY:
Press the function button
BACK to access the main menu Navigation
by passing through the various menus.
Function buttons and indications in the main
menu Navigation
Function
button
››› Fig. 27Effect
ADisplaying the split screen ››› page 34.
BIndications and function buttons related
to the map display ››› page 34.
Function
button
››› Fig. 27Effect
1
New dest.: enter a new destination
››› page 30.
Route
: during the guided navigation
››› page 32.
2Viewing of GPS data active.
MY DEST.Consult or manage the stored destina-
tions ››› page 33.
POISearch for special destinations (for ex-
ample, hotels, service stations) within a
certain area ››› page 33.
VIEWModify the representation of the map,
or show/hide the split screen A
›››
page 34.
SETTINGSOpen the menu Navigation setup
››› page 37. New destination (enter destination)
●
Press the function button New dest. in the
navigation main menu.
● Press the Options button and select the
destination data you wish to enter ( Address,
POI or Map/GPS coordinates ).
Address
To select an address you must always follow
the sequence shown: first the country, then
30
Page 33 of 64
Navigation
the town, and so on. For “town”, you can in-
dicate a town or a postcode.
After inputting the town and pressing the town centre button, the navigation systemwill guide you to the “centre” of the town in
question.
When narrowing down the destination ad-
dress, please note
that every entry restricts
the av
ailable range of subsequent selections.
If, for example, the street sought is not found
in the postcode entered previously, it will not
be in the previous option to select the street
either.
Function button: effect
Country: select the country desired.
Town: enter the town or postcode desired.
Street: enter the street desired.
House number: enter the number of the street desired.
Intersection: select an intersection of streets/roads.
Last destinations: opens the menu My destinations
››› page 33.
Start: starts guided navigation to the selected address. POI (Points of interest)
Starting guided navigation to a point of inter-
est.
Function button: effect
Search area: select the area in which you wish to search
for points of interest.
Near current location: looks for points of interest in
the area around your current location. Destination area
a) : looks for points of interest in the
area around the destination. Along the route
a) : looks for points of interest in the
area along the route. Near address
: looks for points of interest in the area
around the address entered. Select on map
: looks for points of interest in the
area around the destination selected on the map.
To select a destination on the map, press the func-
tion button Edit
.
Find categories: main category (e.g.
Car and travel), Cate-
gories (e.g. Airports) and then select the desired entry
from the list.
Save: stores the point of interest selected in the
destination memory ››› page 33.
Dial nr.
: establishes a telephone connection to the
number assigned to the point of interest. Start
: starts guided navigation at the selected
point of interest.
Find: search for a point of interest by entering its name.
a) The function button is displayed only when guided navigation
is activated.
Map/GPS coordinates
Select a destination on the map or using the
GPS coordinates and confirm by pressing
Accept .
Function button: effect
Save: stores the selected point of interest in the desti-
nation memory ››› page 33.
Edit: edits a destination, or enters another destination.
Start: starts guided navigation at the selected point of
interest. After starting navigation to the
destination
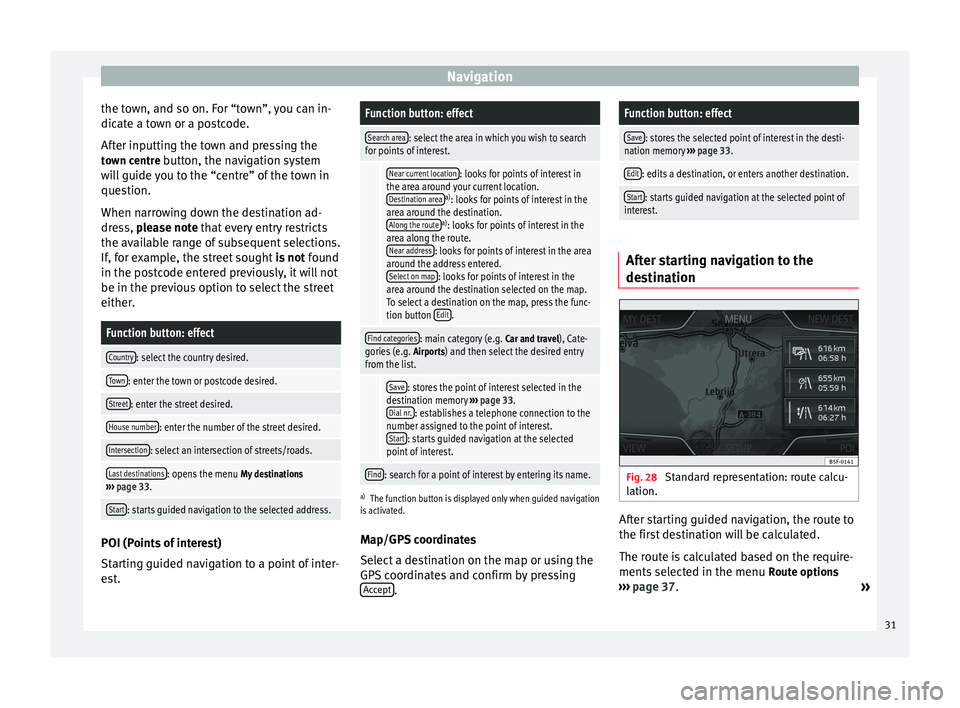
Fig. 28
Standard representation: route calcu-
lation. After starting guided navigation, the route to
the first destination will be calculated.
The route is calculated based on the require-
ments selected in the menu
Route options
››› page 37 .
»
31