2014 Ram 1500 Uconnect
[x] Cancel search: UconnectPage 113 of 252
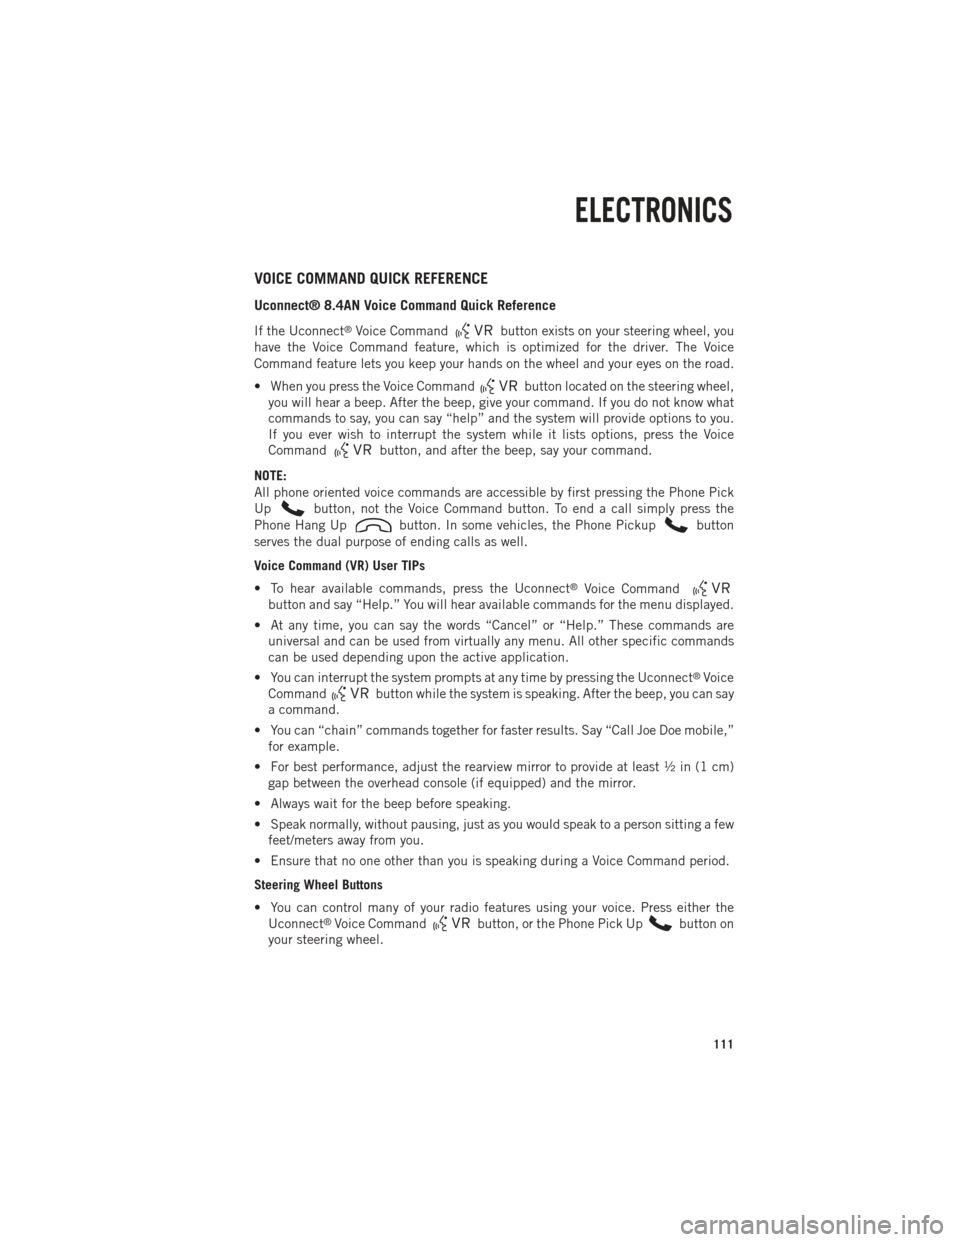
VOICE COMMAND QUICK REFERENCE
Uconnect® 8.4AN Voice Command Quick Reference
If the Uconnect®Voice Commandbutton exists on your steering wheel, you
have the Voice Command feature, which is optimized for the driver. The Voice
Command feature lets you keep your hands on the wheel and your eyes on the road.
• When you press the Voice Command
button located on the steering wheel,
you will hear a beep. After the beep, give your command. If you do not know what
commands to say, you can say “help” and the system will provide options to you.
If you ever wish to interrupt the system while it lists options, press the Voice
Command
button, and after the beep, say your command.
NOTE:
All phone oriented voice commands are accessible by first pressing the Phone Pick
Up
button, not the Voice Command button. To end a call simply press the
Phone Hang Up
button. In some vehicles, the Phone Pickupbutton
serves the dual purpose of ending calls as well.
Voice Command (VR) User TIPs
• To hear available commands, press the Uconnect
®Voice Command
button and say “Help.” You will hear available commands for the menu displayed.
• At any time, you can say the words “Cancel” or “Help.” These commands are universal and can be used from virtually any menu. All other specific commands
can be used depending upon the active application.
• You can interrupt the system prompts at any time by pressing the Uconnect
®Voice
Command
button while the system is speaking. After the beep, you can say
a command.
• You can “chain” commands together for faster results. Say “Call Joe Doe mobile,” for example.
• For best performance, adjust the rearview mirror to provide at least ½ in (1 cm) gap between the overhead console (if equipped) and the mirror.
• Always wait for the beep before speaking.
• Speak normally, without pausing, just as you would speak to a person sitting a few feet/meters away from you.
• Ensure that no one other than you is speaking during a Voice Command period.
Steering Wheel Buttons
• You can control many of your radio features using your voice. Press either the Uconnect
®Voice Commandbutton, or the Phone Pick Upbutton on
your steering wheel.
ELECTRONICS
111
Page 114 of 252

Available Radio Soft-Key Voice Commands
Ty p e s o fVoiceCom-
mands
Available Steering
Wheel
Buttons to Press: (1)
Radio Mode (2)
Media Mode (3)
Climate
Controls (4)
Naviga- tion (5)
Phone Mode (6)
APPS
Uconnect®
Voice
Command (VR)
ButtonAM/FM
& Satel-
lite Band Control Media
Devices Control Tempera-
ture
Control Destina-
tion
Selection and View - Yelp
®
GENERAL
Uconnect®
Phone
Pick Up Button----
Call
Initiation, Call Man- agement, Pre-
defined
Voice Text Reply
-
ELECTRONICS
112
Page 115 of 252
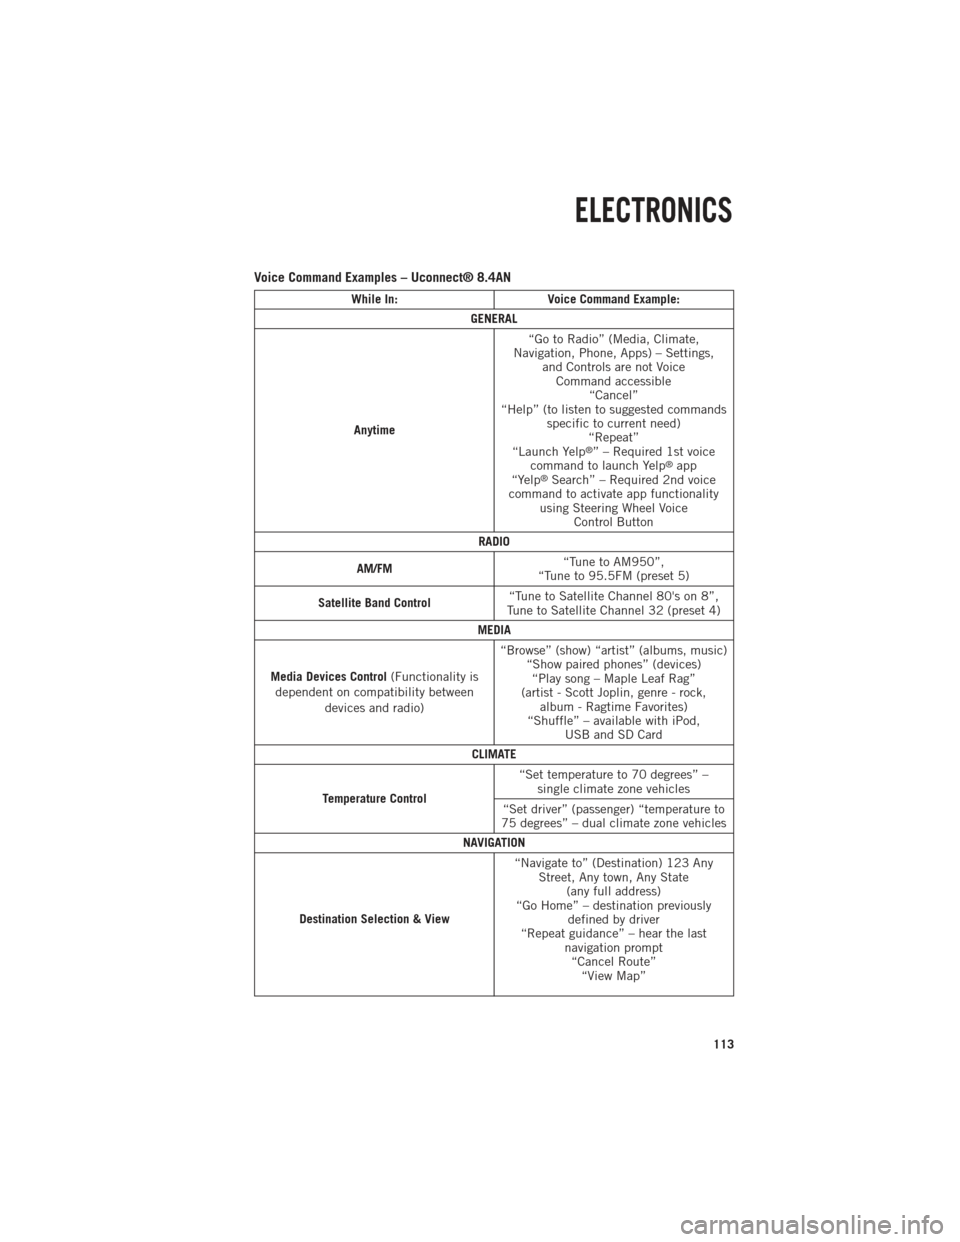
Voice Command Examples – Uconnect® 8.4AN
While In:Voice Command Example:
GENERAL
Anytime “Go to Radio” (Media, Climate,
Navigation, Phone, Apps) – Settings, and Controls are not VoiceCommand accessible “Cancel”
“Help” (to listen to suggested commands specific to current need)“Repeat”
“Launch Yelp
®” – Required 1st voice
command to launch Yelp®app
“Yelp®Search” – Required 2nd voice
command to activate app functionality using Steering Wheel Voice Control Button
RADIO
AM/FM “Tune to AM950”,
“Tune to 95.5FM (preset 5)
Satellite Band Control “Tune to Satellite Channel 80's on 8”,
Tune to Satellite Channel 32 (preset 4)
MEDIA
Media Devices Control (Functionality is
dependent on compatibility between devices and radio) “Browse” (show) “artist” (albums, music)
“Show paired phones” (devices)“Play song – Maple Leaf Rag”
(artist - Scott Joplin, genre - rock, album - Ragtime Favorites)
“Shuffle” – available with iPod, USB and SD Card
CLIMATE
Temperature Control “Set temperature to 70 degrees” –
single climate zone vehicles
“Set driver” (passenger) “temperature to
75 degrees” – dual climate zone vehicles
NAVIGATION
Destination Selection & View “Navigate to” (Destination) 123 Any
Street, Any town, Any State (any full address)
“Go Home” – destination previously defined by driver
“Repeat guidance” – hear the last navigation prompt“Cancel Route” “View Map”
ELECTRONICS
113
Page 116 of 252
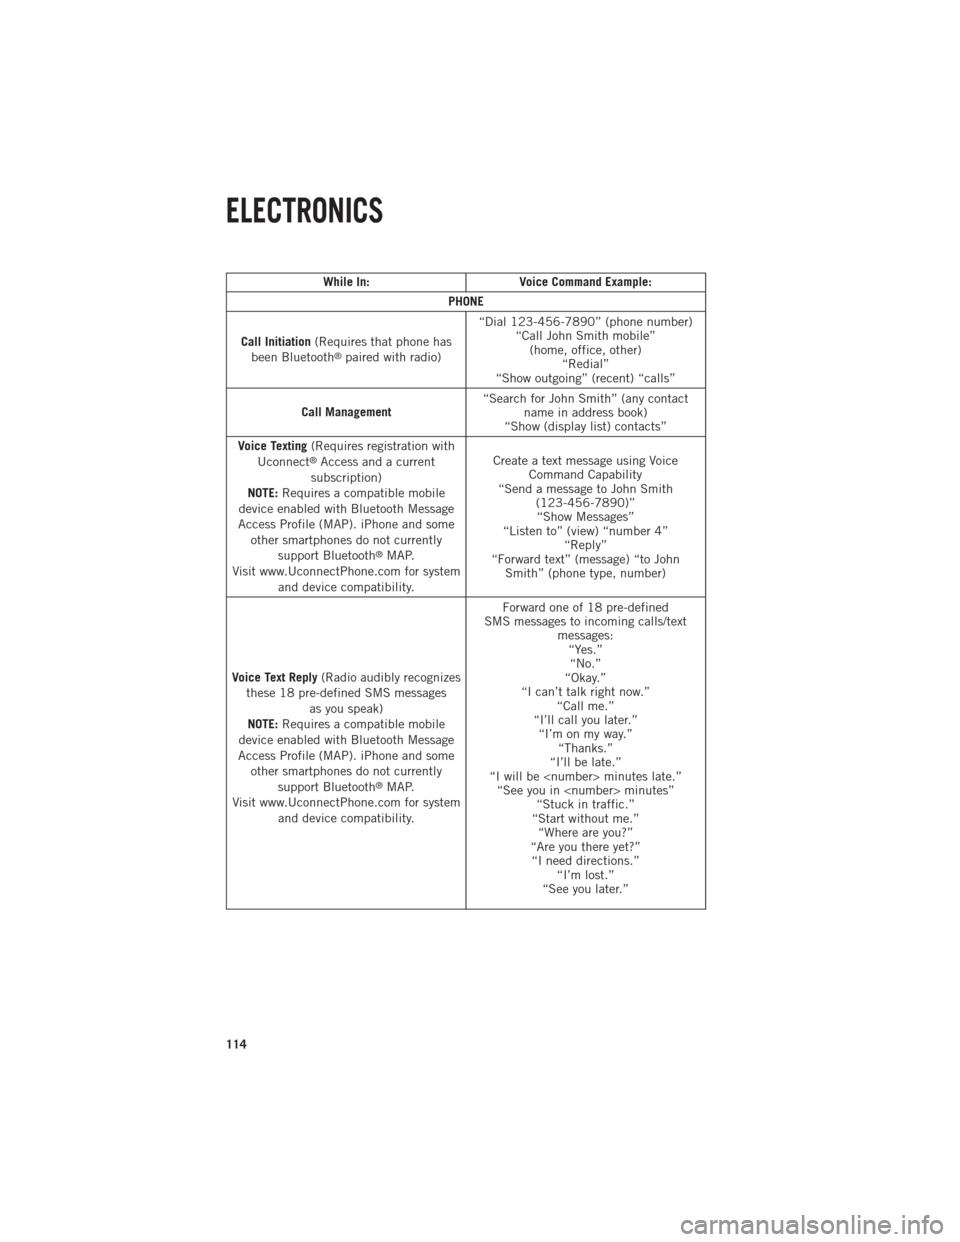
While In:Voice Command Example:
PHONE
Call Initiation (Requires that phone has
been Bluetooth
®paired with radio) “Dial 123-456-7890” (phone number)
“Call John Smith mobile”(home, office, other) “Redial”
“Show outgoing” (recent) “calls”
Call Management “Search for John Smith” (any contact
name in address book)
“Show (display list) contacts”
Voice Texting (Requires registration with
Uconnect
®Access and a current
subscription)
NOTE: Requires a compatible mobile
device enabled with Bluetooth Message
Access Profile (MAP). iPhone and some other smartphones do not currently support Bluetooth
®MAP.
Visit www.UconnectPhone.com for system and device compatibility. Create a text message using Voice
Command Capability
“Send a message to John Smith (123-456-7890)”“Show Messages”
“Listen to” (view) “number 4” “Reply”
“Forward text” (message) “to John Smith” (phone type, number)
Voice Text Reply (Radio audibly recognizes
these 18 pre-defined SMS messages as you speak)
NOTE: Requires a compatible mobile
device enabled with Bluetooth Message
Access Profile (MAP). iPhone and some other smartphones do not currently support Bluetooth
®MAP.
Visit www.UconnectPhone.com for system and device compatibility. Forward one of 18 pre-defined
SMS messages to incoming calls/text messages:“Yes.”“No.”
“Okay.”
“I can’t talk right now.” “Call me.”
“I’ll call you later.” “I’m on my way.” “Thanks.”
“I’ll be late.”
“I will be
“Start without me.” “Where are you?”
“Are you there yet?” “I need directions.” “I’m lost.”
“See you later.”
ELECTRONICS
114
Page 119 of 252
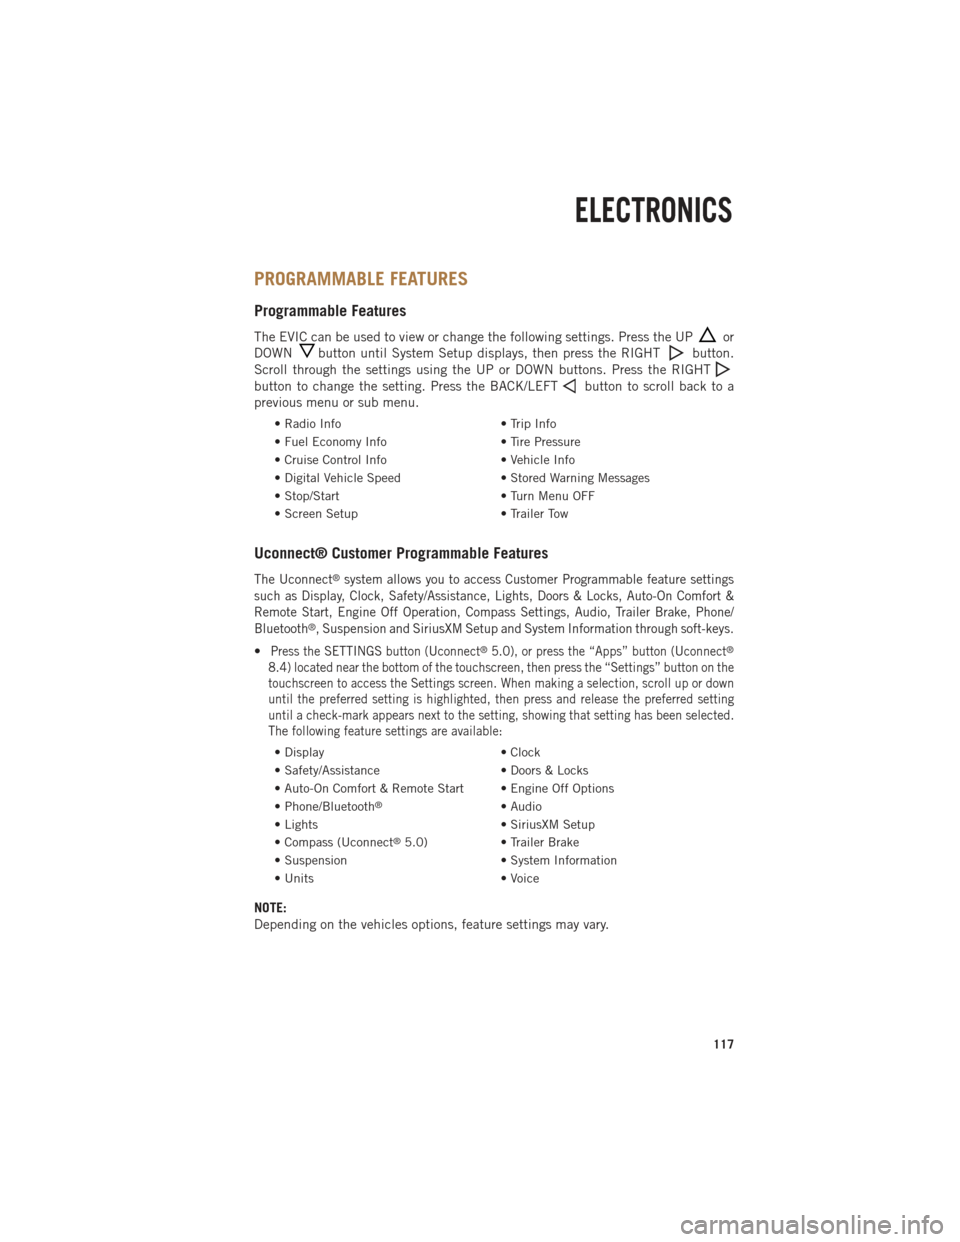
PROGRAMMABLE FEATURES
Programmable Features
The EVIC can be used to view or change the following settings. Press the UPor
DOWN
button until System Setup displays, then press the RIGHTbutton.
Scroll through the settings using the UP or DOWN buttons. Press the RIGHT
button to change the setting. Press the BACK/LEFTbutton to scroll back to a
previous menu or sub menu.
• Radio Info • Trip Info
• Fuel Economy Info • Tire Pressure
• Cruise Control Info • Vehicle Info
• Digital Vehicle Speed • Stored Warning Messages
• Stop/Start • Turn Menu OFF
• Screen Setup • Trailer Tow
Uconnect® Customer Programmable Features
The Uconnect®system allows you to access Customer Programmable feature settings
such as Display, Clock, Safety/Assistance, Lights, Doors & Locks, Auto-On Comfort &
Remote Start, Engine Off Operation, Compass Settings, Audio, Trailer Brake, Phone/
Bluetooth
®, Suspension and SiriusXM Setup and System Information through soft-keys.
•Press the SETTINGS button (Uconnect®5.0), or press the “Apps” button (Uconnect®
8.4) located near the bottom of the touchscreen, then press the “Settings” button on the
touchscreen to access the Settings screen. When making a selection, scroll up or down
until the preferred setting is highlighted, then press and release the preferred setting
until a check-mark appears next to the setting, showing that setting has been selected.
The following feature settings are available:
• Display • Clock
• Safety/Assistance • Doors & Locks
• Auto-On Comfort & Remote Start • Engine Off Options
• Phone/Bluetooth
®• Audio
• Lights • SiriusXM Setup
• Compass (Uconnect
®5.0) • Trailer Brake
• Suspension • System Information
• Units • Voice
NOTE:
Depending on the vehicles options, feature settings may vary.
ELECTRONICS
117
Page 132 of 252

PICKUP BOX
• You can carry wide building materials (sheets of plywood, etc.) by building a raisedload floor. Place lumber across the box in the indentations provided above the
wheel housings and in the bulkhead dividers to form the floor.
• There are stampings in the sheet metal on the inner side bulkheads of the box in front of and behind both wheel housings. Place wooden boards across the box from
side to side to create separate load compartments in the pickup box.
• There are four tie-down cleats bolted to the lower sides of the pickup box that can sustain loads up to 1000 lbs (450 kg) total.
Cargo Camera
•Your vehicle may be equipped with the Cargo Camera that allows you to see a image
of the inside of the pickup box. The image will be displayed in the Uconnect®screen.
• A display timer is initiated when the cargo camera image is displayed. The image will continue to be displayed until the display timer exceeds 10 seconds and the
vehicle speed is above 8 mph (13 km/h) or the image is deactivated by touching
the Uconnect
®display.
NOTE:
If the vehicle speed remains below 8 mph (13 km/h), the cargo camera image will be
displayed continuously until deactivated by touching the Uconnect
®display.
• The Cargo Camera is located in the bottom center area of the center high-mounted stoplamp (CHMSL).
NOTE:
If snow, ice, mud, or any foreign substance builds up on the camera lens, clean the
lens, rinse with water, and dry with a soft cloth. Do not cover the lens.
Turning Cargo Camera On Or Off — With Uconnect® 8.4A/8.4AN
1. Touch the “Controls” soft-key located on the bottom of the Uconnect®display.
2. Touch the “Cargo Camera” soft-key to turn the Cargo Camera system ON.
UTILITY
130
Page 133 of 252

NOTE:
The Cargo Camera image may be deactivated by touching the Uconnect®display. The
previous selected screen will appear.
WARNING!
• The pickup box is intended for load carrying purposes only, not for passengers, who should sit in seats and use seat belts.
• Care should always be exercised when operating a vehicle with unrestrained
cargo. Vehicle speeds may need to be reduced. Severe turns or rough roads
may cause shifting or bouncing of the cargo that may result in vehicle damage.
If wide building materials are to be frequently carried, the installation of a
support is recommended. This will restrain the cargo and transfer the load to
the pickup box floor.
•
If you wish to carry more than 600 lbs (272 kg) of material suspended above the
wheelhouse, supports must be installed to transfer the weight of the load to the
pickup box floor or vehicle damage may result. The use of proper supports will
permit loading up to the rated payload.
• Unrestrained cargo may be thrown forward in an accident causing serious or
fatal injury.
UTILITY
131
Page 141 of 252
Setting with the Uconnect® Touchscreen Radio
• To make the proper selection in the Uconnect
®touchscreen radio, press the More
hard-key (Uconnect®5.0) or the Apps soft-key (Uconnect®8.4), then press the
Settings soft-key to display the menu setting screen and press trailer brake. For
additional information, refer to your Owner’s Manual on the DVD.
Setting with a 3.5” EVIC
• Press the RIGHT arrow on the steering wheel to enter “VEHICLE SETTINGS.”
• Press the UP or DOWN buttons until Trailer Brake Type appears on the screen.
• Press the RIGHT arrow and then press the UP or DOWN buttons until the proper Trailer Brake Type appears on the screen. For additional information, refer to your
Owner’s Manual on the DVD.
GAIN Adjustment Buttons (+/-)
• Pressing the +/- buttons, located onthe left side of the module, will
increase/decrease the brake control
power output to the trailer brakes in
0.5 increments. The GAIN setting
can be increased to a maximum of
10 or decreased to a minimum of 0
(no trailer braking).
Refer to your Owner's Manual on the DVD
for further details.
WARNING!
Connecting a trailer that is not compatible with the ITBM system may result in
reduced or complete loss of trailer braking. There may be a increase in stopping
distance or trailer instability which could result in personal injury.
UTILITY
139