Page 5 of 240
3
Contents
CONTENTS
5. SAFETY 95-1156. ACCESSORIES 116-120
7. CHECKS 121-130
8. QUICK HELP 131-151
9. TECHNICAL DATA 152-164
Parking brake 95Hazard warning lamps 95Horn 96Braking assistance systems 96Trajectory control systems 98Lane departure warning system 101Seat belts 102Airbags 105Deactivating the passenger's front airbag 106Child seats 108ISOFIX seats 112
Towing a trailer 116Roof carrying systems 118Other accessories 119Snow chains 120
Opening the bonnet 122Under the bonnet 123Levels 124Checks 126Fuel 129
Battery 131Changing a fuse 134Changing a bulb 138Changing a wiper blade 144Changing a wheel 145Puncture repair kit 148Towing the vehicle 150
Dimensions 152Engines 159Weights 160Identifi cation markings 163
10. AUDIO EQUIPMENT and TELEMATICS
TOUCH SCREEN AUDIO-TELEMATIC system 10.1AUDIO system 10.51
Child seats in the rear.
Page 8 of 240
6
Location
EXTERIOR
Rear lamps, direction
indicators, 3 rd brake
lamp, foglamps 44, 138, 142-143 Left-hand side:
fuel fi ller cap, fuel tank 129
Fuel cut-off 130
Load space 80-81
Rear doors 21
Number plate lamp 143
Rear parking sensors 91
Spare wheel, jack,
changing a wheel,
tools, puncture repair kit 145-149
Infl ating, pressures 149, 163
Snow chains 120
Towing, lifting 150
Towbar, towball 116-118 Dimensions
152-158
Accessories 119
Roof rack, roof bars 118
Brakes, pads 124, 127
Braking assistance systems 96-97
Trajectory control 98-100
Tyres, pressures 149, 163
Pneumatic suspension 93-94 Key, remote control, battery 14-17
Starting
18, 38-39
Central locking 22
Confi dential card 18
Alarm 19
Wiper blade 144
Door mirror 82
Side repeater 141
Front lamps, direction indicators,
front foglamps 44, 138-141
Headlamp beam height adjustment 46
Headlamp wash 47
Changing bulbs 138-141
Opening/closing doors 20-22
Key 15-16
Opening the bonnet, stay 122
Autoclose 84, 87
Page 11 of 240
1
AT A GLANCE
9
Location
Seat belts 102-103
Airbags 105-107
Deactivating the passenger's
front airbag 106, 109
Parking brake,
handbrake 95 Front seats, adjustments 69-70
Seat with variable damping 70
2-seat bench 71
Tools, jack 75, 145
Child seats
108-111, 114-115 Rear view mirror
82
Lane departure warning
system 101 Cab courtesy lamp 78-79, 141
Changing a courtesy lamp bulb 141
Courtesy lamps 78-79, 141
12 volt socket 77 Battery (+), charging,
starting 131-133
Earth point (-)
123, 131
Fuses in the right hand door pillar 134, 136
INTERIOR
Load space 80-81
● stowing rings,
● load retainer,
● roof box,
● trims,
● 12 volt socket,
● courtesy lamp,
● inspection lamp.
Seats /
rear bench seats
72-73
Rear heating /
air conditioning 64-65
Reversing camera 92
Sliding side door
20
Sliding side windows 81
ISOFIX mountings 112-113
Crew cab 74
Accessories 119
Page 12 of 240
10
Location
Screenwash/headlamp wash, level 125
Bulbs, lighting,
changing bulbs 138-143
Opening the bonnet, stay 122
Under the bonnet 123
Engines 159
Identifi cation markings,
serial number, paint, tyres 163 Changing a wiper blade
144
Levels 124-125
● dipstick,
● power steering fl uid,
● brake fl uid,
● coolant.
Water bleed, Diesel fi lter 126
Particle fi lter 128
Emission control 33
Checks 126-128
● battery,
● air/passenger compartment fi lter,
● oil fi lter,
● manual gearbox,
● parking brake,
● brake discs and pads.
Engine fuses 134, 137
TECHNICAL DATA - MAINTENANCE
Dimensions 152-158
Weights 160-162
Page 26 of 240

24
Instruments and controls
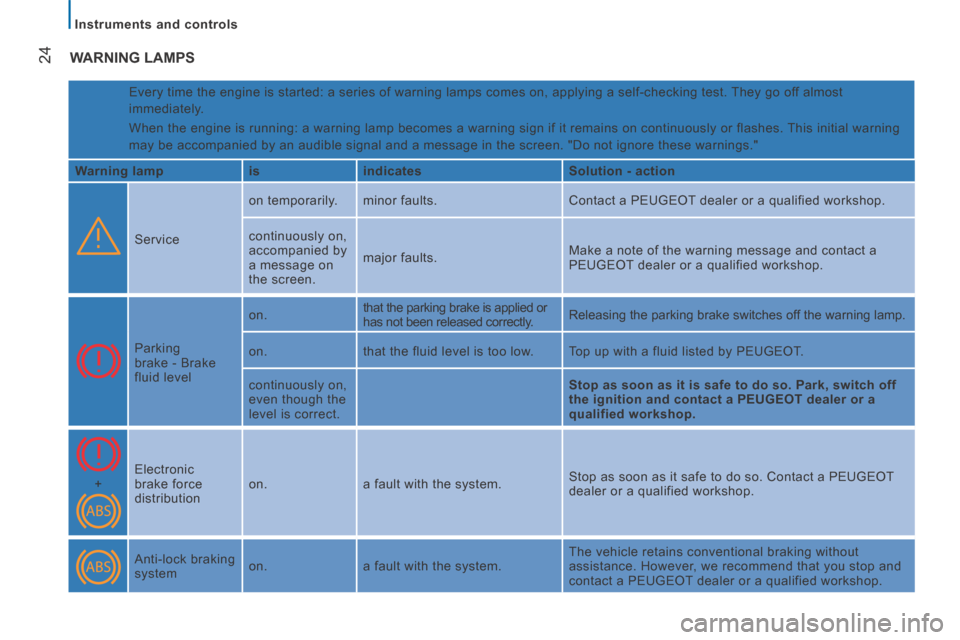
WARNING LAMPS
Every time the engine is started: a series of warning lamps comes on, ap\
plying a self-checking test. They go off almost
immediately.
When the engine is running: a warning lamp becomes a warning sign if it \
remains on continuously or flashes. This initial warning
may be accompanied by an audible signal and a message in the screen. "Do\
not ignore these warnings."
Warning lamp is indicates Solution - action
Service on temporarily.
minor faults. Contact a PEUGEOT dealer or a qualified workshop.
continuously on,
accompanied by
a message on
the screen. major faults.
Make a note of the warning message and contact a
PEUGEOT dealer or a qualified workshop.
Parking
brake - Brake
fluid level on.
that the parking brake is applied or
has not been released correctly. Releasing the parking brake switches off the warning lamp.
on. that the fluid level is too low. Top up with a fluid listed by PEUGEOT.
continuously on,
even though the
level is correct. Stop as soon as it is safe to do so. Park, switch off
the ignition and contact a PEUGEOT dealer or a
qualified workshop.
+ Electronic
brake force
distribution on.
a fault with the system. Stop as soon as it safe to do so. Contact a PEUGEOT
dealer or a qualified workshop.
Anti-lock braking
system on.
a fault with the system. The vehicle retains conventional braking without
assistance. However, we recommend that you stop and
contact a PEUGEOT dealer or a qualified workshop.
Page 40 of 240

38
Starting and stopping
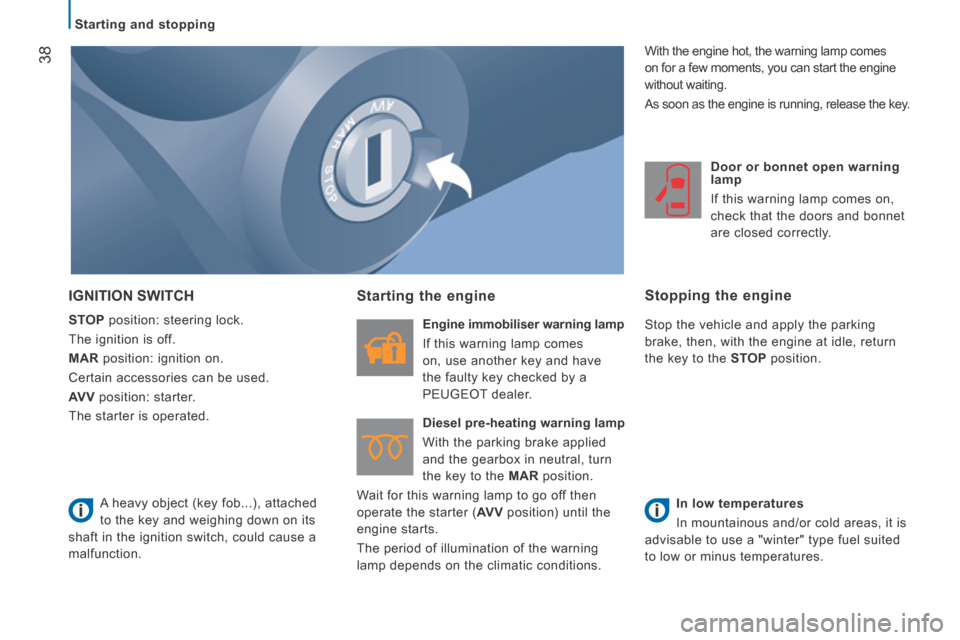
IGNITION SWITCH
STOP position: steering lock.
The ignition is off.
MAR position: ignition on.
Certain accessories can be used.
AV V position: starter.
The starter is operated.
Starting the engine
Engine immobiliser warning lamp
If this warning lamp comes
on, use another key and have
the faulty key checked by a
PEUGEOT dealer.
Diesel pre-heating warning lamp
With the parking brake applied
and the gearbox in neutral, turn
the key to the MAR position.
Wait for this warning lamp to go off then
operate the starter ( AV V position) until the
engine starts.
The period of illumination of the warning
lamp depends on the climatic conditions. Door or bonnet open warning
lamp
If this warning lamp comes on,
check that the doors and bonnet
are closed correctly.
Stopping the engine
Stop the vehicle and apply the parking
brake, then, with the engine at idle, return
the key to the
STOP position.
In low temperatures
In mountainous and/or cold areas, it is
advisable to use a "winter" type fuel suited
to low or minus temperatures.
A heavy object (key fob...), attached
to the key and weighing down on its
shaft in the ignition switch, could cause a
malfunction. With the engine hot, the warning lamp comes
on for a few moments, you can start the engine
without waiting.
As soon as the engine is running, release the key.
Page 41 of 240

39
2
READY TO SET OFF
Starting and stopping
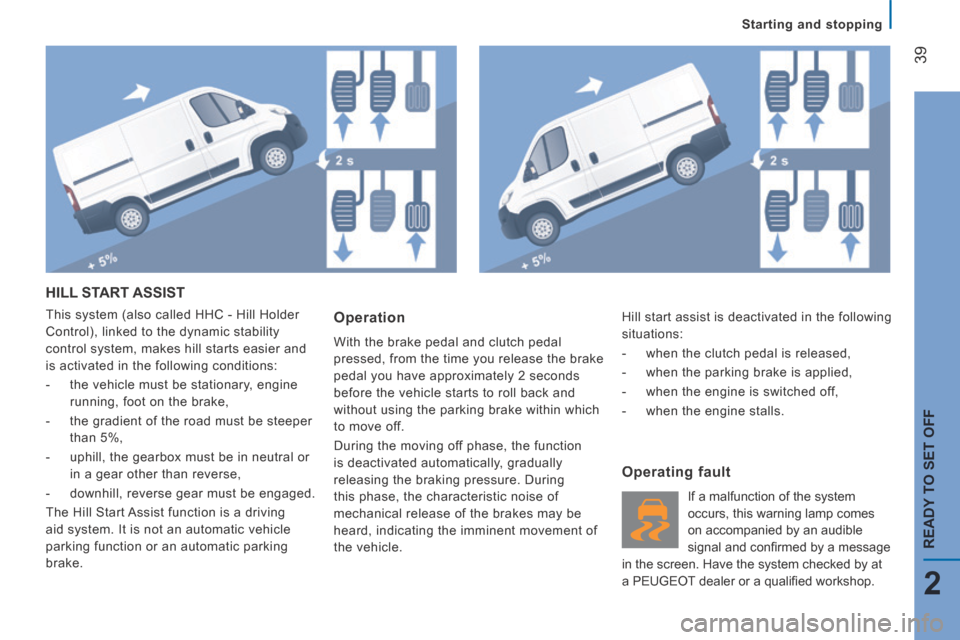
HILL START ASSIST
This system (also called HHC - Hill Holder
Control), linked to the dynamic stability
control system, makes hill starts easier and
is activated in the following conditions:
- the vehicle must be stationary, engine running, foot on the brake,
- the gradient of the road must be steeper than 5%,
- uphill, the gearbox must be in neutral or in a gear other than reverse,
- downhill, reverse gear must be engaged.
The Hill Start Assist function is a driving
aid system. It is not an automatic vehicle
parking function or an automatic parking
brake. Operation
With the brake pedal and clutch pedal
pressed, from the time you release the brake
pedal you have approximately 2 seconds
before the vehicle starts to roll back and
without using the parking brake within which
to move off.
During the moving off phase, the function
is deactivated automatically, gradually
releasing the braking pressure. During
this phase, the characteristic noise of
mechanical release of the brakes may be
heard, indicating the imminent movement of
the vehicle.
Operating fault
If a malfunction of the system
occurs, this warning lamp comes
on accompanied by an audible
signal and confi rmed by a message
in the screen. Have the system checked by at
a PEUGEOT dealer or a qualifi ed workshop. Hill start assist is deactivated in the following
situations:
- when the clutch pedal is released,
- when the parking brake is applied,
- when the engine is switched off,
- when the engine stalls.
Page 94 of 240

92
Parking sensors
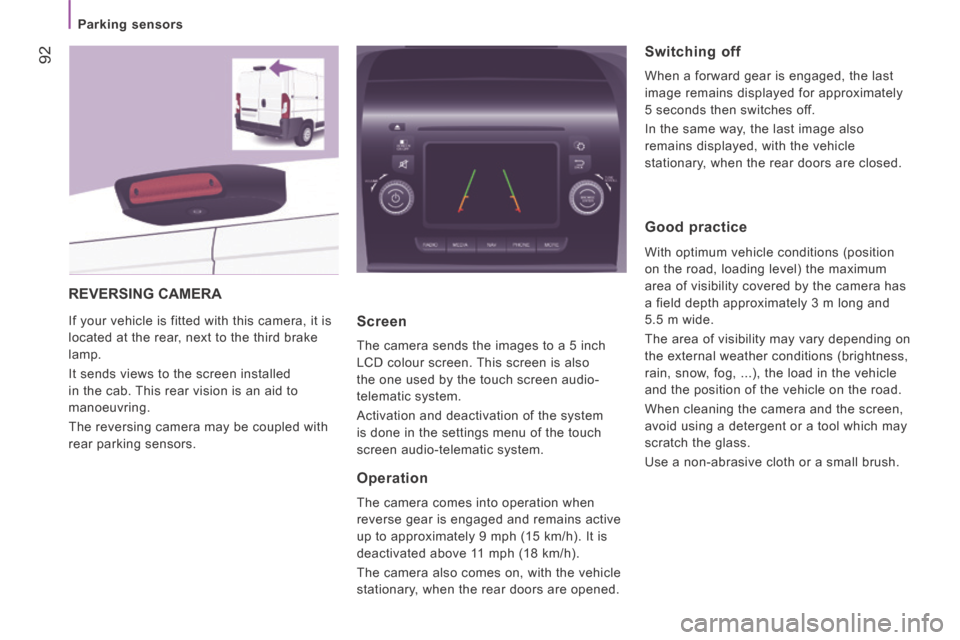
REVERSING CAMERA
If your vehicle is fitted with this camera, it is
located at the rear, next to the third brake
lamp.
It sends views to the screen installed
in the cab. This rear vision is an aid to
manoeuvring.
The reversing camera may be coupled with
rear parking sensors. Screen
The camera sends the images to a 5 inch
LCD colour screen. This screen is also
the one used by the touch screen audio-
telematic system.
Activation and deactivation of the system
is done in the settings menu of the touch
screen audio-telematic system.
Operation
The camera comes into operation when
reverse gear is engaged and remains active
up to approximately 9 mph (15 km/h). It is
deactivated above 11 mph (18 km/h).
The camera also comes on, with the vehicle
stationary, when the rear doors are opened.
Switching off
When a forward gear is engaged, the last
image remains displayed for approximately
5 seconds then switches off.
In the same way, the last image also
remains displayed, with the vehicle
stationary, when the rear doors are closed.
Good practice
With optimum vehicle conditions (position
on the road, loading level) the maximum
area of visibility covered by the camera has
a field depth approximately 3 m long and
5.5 m wide.
The area of visibility may vary depending on
the external weather conditions (brightness,
rain, snow, fog, ...), the load in the vehicle
and the position of the vehicle on the road.
When cleaning the camera and the screen,
avoid using a detergent or a tool which may
scratch the glass.
Use a non-abrasive cloth or a small brush.