Page 173 of 352
7
171
Safety
Activation
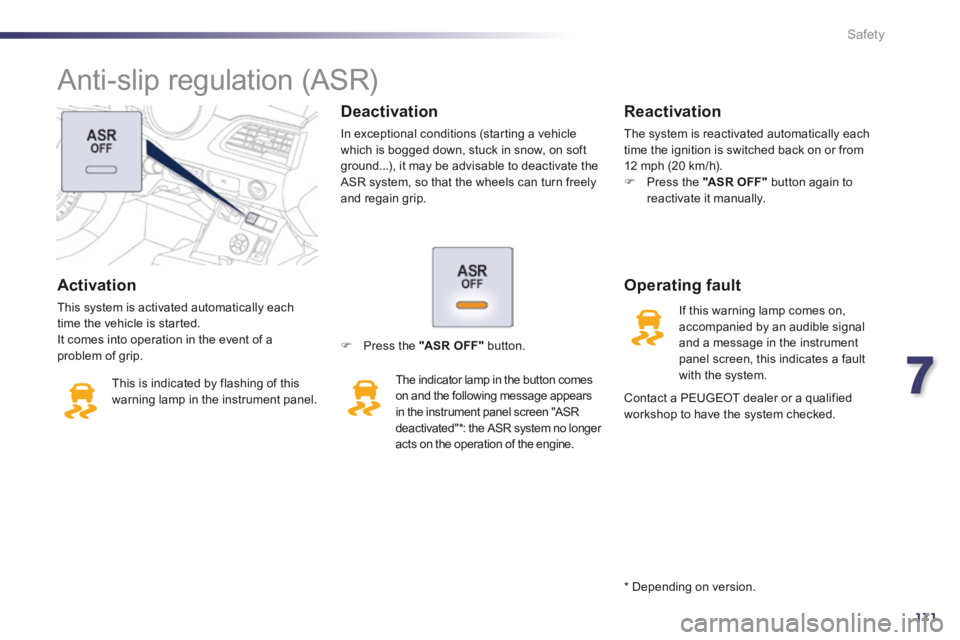
This system is activated automatically each time the vehicle is started. It comes into operation in the event of a problem of grip.
This is indicated by flashing of this warning lamp in the instrument panel.
Deactivation
In exceptional conditions (starting a vehicle which is bogged down, stuck in snow, on soft ground...), it may be advisable to deactivate the ASR system, so that the wheels can turn freely and regain grip.
Operating fault
If this warning lamp comes on, accompanied by an audible signal and a message in the instrument panel screen, this indicates a fault with the system.
Reactivation
The system is reactivated automatically each time the ignition is switched back on or from 12 mph (20 km/h). Press the "AS R O FF " button again to reactivate it manually.
Press the "AS R O FF " button.
The indicator lamp in the button comes on and the following message appears in the instrument panel screen "ASR deactivated" * : the ASR system no longer acts on the operation of the engine.
Anti-slip regulation (ASR)
Contact a PEUGEOT dealer or a qualified workshop to have the system checked.
* Depending on version.
Page 183 of 352
8
181
Practical information
Repair procedure
1. Sealing Uncoil the white pipe G fully. Unscrew the cap from the white pipe. Connect the white pipe to the valve of the tyre to be repaired.
Connect the compressor's electric plug to the vehicle's 12 V socket. Start the vehicle and leave the engine running.
Take care, this product is harmful (e.g. ethylene-glycol, colophony...) if swallowed and causes irritation to the eyes. Keep this product out of the reach of children.
Avoid removing any foreign bodies which have penetrated into the tyre.
Do not start the compressor before connecting the white pipe to the tyre valve: the sealant product would be expelled through the pipe.
Switch off the ignition.
Turn the selector A to the "sealant" position. Check that the switch B is in position "O" .
Page 185 of 352
8
183
Practical information
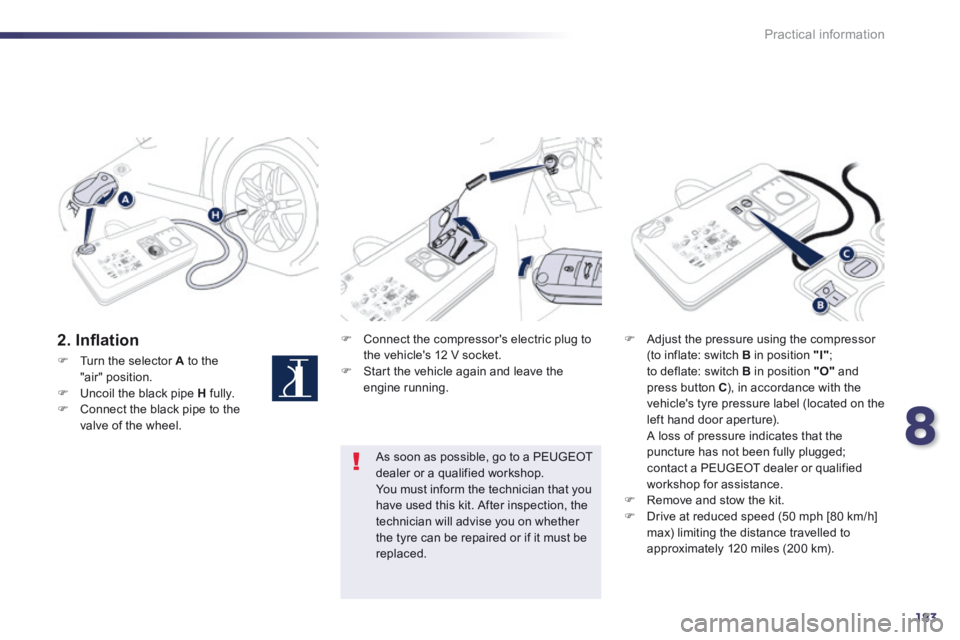
2 . I n fl a t i o n Connect the compressor's electric plug to the vehicle's 12 V socket. Start the vehicle again and leave the engine running.
Adjust the pressure using the compressor (to inflate: switch B in position "I" ; to deflate: switch B in position "O" and press button C ), in accordance with the vehicle's tyre pressure label (located on the left hand door aperture). A loss of pressure indicates that the puncture has not been fully plugged; contact a PEUGEOT dealer or qualified workshop for assistance. Remove and stow the kit. Drive at reduced speed (50 mph [80 km/h] max) limiting the distance travelled to approximately 120 miles (200 km).
As soon as possible, go to a PEUGEOT dealer or a qualified workshop. You must inform the technician that you have used this kit. After inspection, the technician will advise you on whether the tyre can be repaired or if it must be replaced.
Turn the selector A to the "air" position. Uncoil the black pipe H fully. Connect the black pipe to the valve of the wheel.
Page 186 of 352
184
Practical information
Removing the cartridge
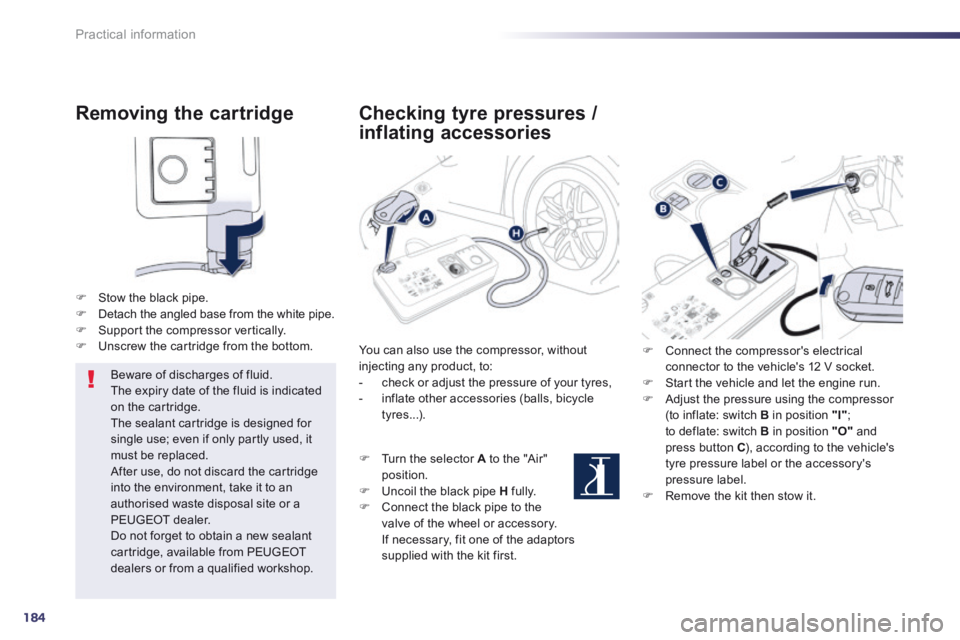
Stow the black pipe. Detach the angled base from the white pipe. Support the compressor vertically. Unscrew the cartridge from the bottom.
Beware of discharges of fluid. The expiry date of the fluid is indicated on the cartridge. The sealant cartridge is designed for single use; even if only partly used, it must be replaced. After use, do not discard the cartridge into the environment, take it to an authorised waste disposal site or a PEUGEOT dealer.
Do not forget to obtain a new sealant cartridge, available from PEUGEOT dealers or from a qualified workshop.
Checking tyre pressures /
inflating accessories
You can also use the compressor, without injecting any product, to: - check or adjust the pressure of your tyres, - inflate other accessories (balls, bicycle tyres...).
Turn the selector A to the "Air" position. Uncoil the black pipe H fully. Connect the black pipe to the valve of the wheel or accessory. If necessary, fit one of the adaptors supplied with the kit first.
Connect the compressor's electrical connector to the vehicle's 12 V socket. Start the vehicle and let the engine run. Adjust the pressure using the compressor (to inflate: switch B in position "I" ; to deflate: switch B in position "O" and press button C ), according to the vehicle's tyre pressure label or the accessory's pressure label. Remove the kit then stow it.
Page 206 of 352
204
Practical information
Engine compartment fuses Fuse N° Rating (A) Functions
F20 15 Front / rear screenwash pump.
F21 20 Headlamp wash pump.
F22 15 Horn.
F23 15 Right-hand main beam headlamp.
F24 15 Left-hand main beam headlamp.
F27 5 Left hand lamp mask.
F28 5 Right hand lamp mask. The fusebox is placed in the engine compartment near the battery.
Access to the fuses
Unclip the cover. Change the fuse (see corresponding paragraph). When you have finished, close the cover carefully to ensure correct sealing of the
fusebox.
Page 207 of 352
8
205
Practical information
12 V battery Procedure for charging your battery when it is flat or for starting the engine using another battery.
The presence of this label indicates the use of a 12 V lead-acid battery with special technology and specification, for which the involvement of a PEUGEOT dealer or qualified workshop is required when replacing or disconnecting the battery. Failure to observe this recommendation may cause premature wear of the battery.
After refitting the battery, the Stop & Start system will only be active after several hours depending on the climatic conditions and the state of charge of the battery (up to about 8 hours).
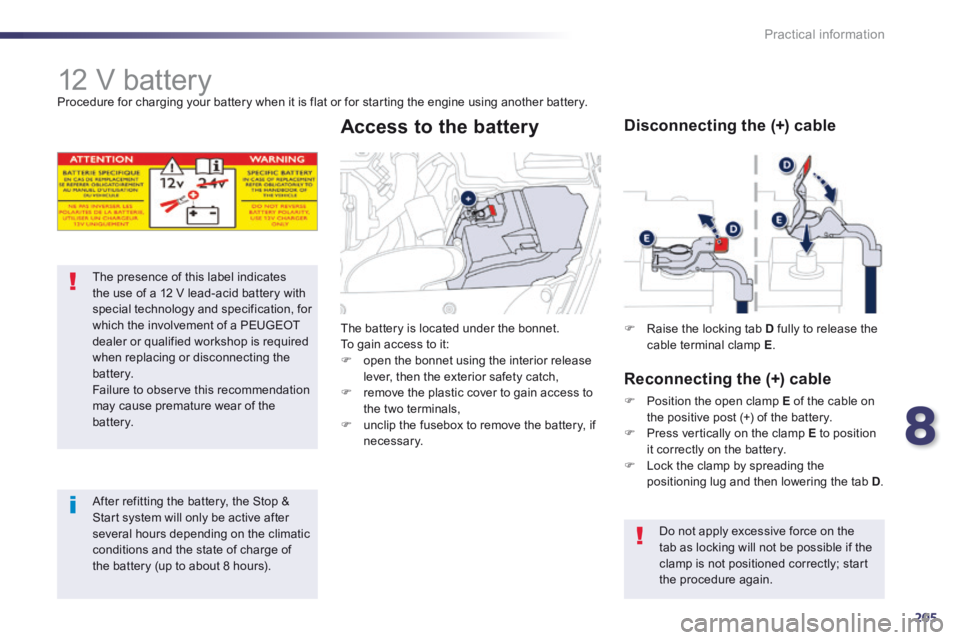
The battery is located under the bonnet. To gain access to it: open the bonnet using the interior release lever, then the exterior safety catch, remove the plastic cover to gain access to the two terminals, unclip the fusebox to remove the battery, if
necessary.
Access to the battery
Raise the locking tab D fully to release the cable terminal clamp E .
Disconnecting the (+) cable
Reconnecting the (+) cable
Position the open clamp E of the cable on the positive post (+) of the battery.
Press vertically on the clamp E to position it correctly on the battery. Lock the clamp by spreading the positioning lug and then lowering the tab D .
Do not apply excessive force on the tab as locking will not be possible if the clamp is not positioned correctly; start the procedure again.
Page 208 of 352
206
Practical information
Connect the red cable to the positive terminal (+) of the flat battery A , then to the positive terminal (+) of the slave battery B .
Starting using another
battery
Disconnect the battery from the vehicle, if necessary. Follow the instructions for use provided by the manufacturer of the charger. Reconnect starting with the negative terminal (-). Check that the terminals and connectors are clean. If they are covered with sulphate (whitish or greenish deposit), remove them and clean them.
Charging the battery using
a battery charger
The Stop & Start battery does not have to be disconnected for charging.
Connect one end of the green or black cable to the negative terminal (-) of the slave battery B . Connect the other end of the green or black cable to the earth point C on your vehicle (engine mounting). Operate the starter, let the engine run. Wait until the engine returns to idle and disconnect the cables.
Page 209 of 352
8
207
Practical information
The batteries contain harmful substances such as sulphuric acid and lead. They must be disposed of in accordance with regulations and must not, in any circumstances, be discarded with household waste. Take used remote control batteries and vehicle batteries to a special collection point.
Do not reverse the polarity and use only a 12 V charger. Do not disconnect the terminals while the engine is running. Do not charge the batteries without disconnecting the terminals first. Do not push the vehicle to start the engine if it is fitted with the 6 -speed electronic gearbox system or an
automatic gearbox.
It is advisable to disconnect the 12 V battery if the vehicle is to be left unused for more than one month.
Before disconnecting the battery
Wait 2 minutes after switching off the ignition before disconnecting the 12 V battery.
Close the windows and the doors before disconnecting the battery.
Following reconnection of the battery
Following reconnection of the 12 V battery, switch on the ignition and wait 1 minute before starting to permit initialisation of the electronic systems. However, if problems remain following this operation, contact a PEUGEOT dealer or a qualified workshop. Referring to the corresponding section, you must yourself reinitialise: - the remote control key, - the panoramic sunroof blind, - the GPS satellite navigation system.
Load reduction mode
System which manages the use of certain functions according to the level of charge remaining in the battery. When the vehicle is being driven, the load reduction function temporarily deactivates certain functions, such as the air conditioning, the heated rear screen... The deactivated functions are reactivated automatically as soon as conditions permit.