2014 Peugeot 308 start stop button
[x] Cancel search: start stop buttonPage 22 of 389
183
Familiarisation
20
Driving safely
Stop & Start
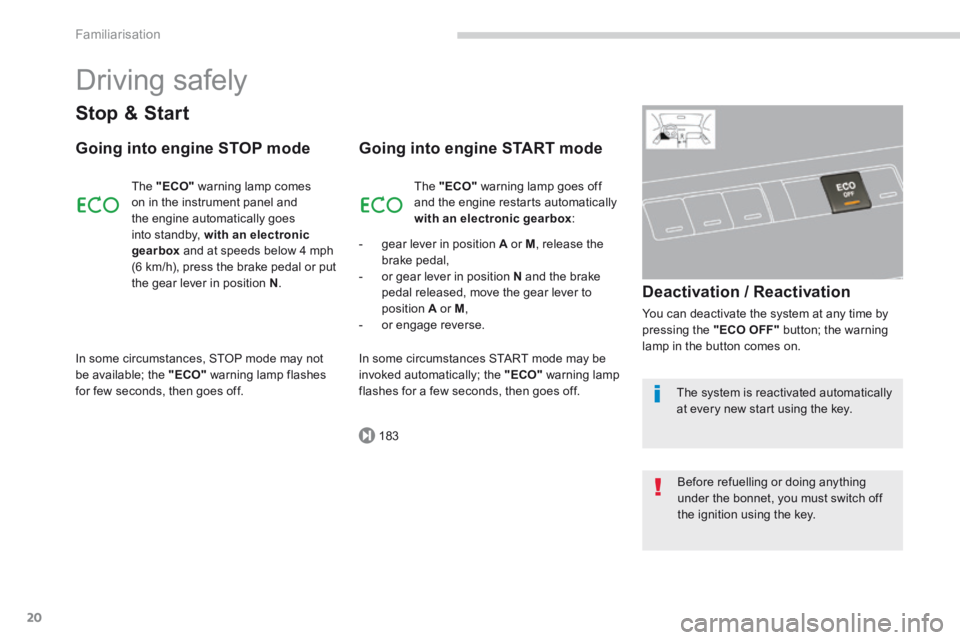
Going into engine STOP mode
The "ECO" warning lamp comes on in the instrument panel and the engine automatically goes
into standby, with an electronic gearbox and at speeds below 4 mph (6 km/h), press the brake pedal or put the gear lever in position N .
Going into engine START mode
Deactivation / Reactivation
You can deactivate the system at any time by pressing the "ECO OFF" button; the warning lamp in the button comes on.
The "ECO" warning lamp goes off and the engine restarts automatically with an electronic gearbox :
- gear lever in position A or M , release the brake pedal, - or gear lever in position N and the brake pedal released, move the gear lever to position A or M , - or engage reverse.
In some circumstances, STOP mode may not be available; the "ECO" warning lamp flashes for few seconds, then goes off.
In some circumstances START mode may be invoked automatically; the "ECO" warning lamp flashes for a few seconds, then goes off. The system is reactivated automatically at every new start using the key.
Before refuelling or doing anything under the bonnet, you must switch off the ignition using the key.
Page 34 of 389
Monitoring
32
Parking space sensors fixed. The parking space sensors function is active. Press the corresponding button to deactivate it.
flashing. The system is measuring the space. Once the measurement has been done, the warning lamp comes on fixed again.
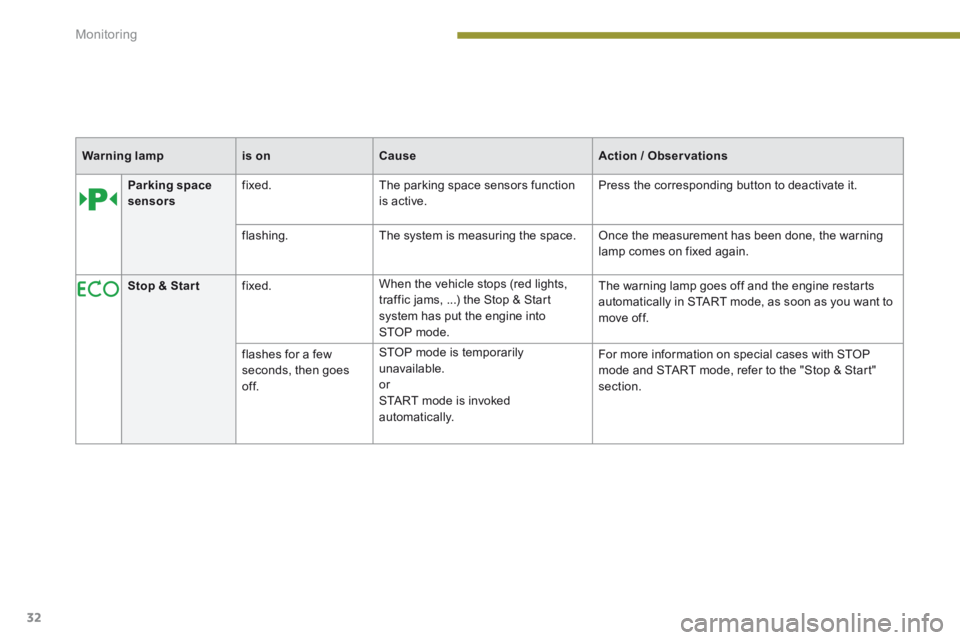
Stop & Star t fixed. When the vehicle stops (red lights, traffic jams, ...) the Stop & Start system has put the engine into STOP mode.
The warning lamp goes off and the engine restarts automatically in START mode, as soon as you want to move off.
flashes for a few seconds, then goes of f.
STOP mode is temporarily unavailable. or START mode is invoked automatically.
For more information on special cases with STOP mode and START mode, refer to the "Stop & Start" section.
Warning lampis onCauseAction / Observations
Page 62 of 389

Comfort
60
Demisting/defrosting
5. Air conditioning On / Off
The air conditioning is designed to operate effectively in all seasons, with the windows closed.
It enables you to: - lower the temperature, in summer, - increase the effectiveness of the demisting in winter, above 3 °C.
Switching off
Press the "A /C " button again, the button's indicator lamp goes off. Switching off may affect comfort levels (humidity, condensation).
Switching on
Press the "A /C " button, the button's indicator lamp comes on. The air conditioning does not operate when the air flow adjustment control 2 is in position " 0 ". To obtain cooled air more quickly, you can use recirculation of interior air for a few moments.
Then return to fresh air intake.
The marking on the control panel indicates the position of the controls to quickly demist or defrost the windscreen and side windows:
place the air intake control 4 in the "Exterior air intake" position (indicator lamp off), place the air distribution dial 3 in the "Windscreen position", place the air flow dial 2 in position 5 (maximum), place the temperature dial 1 in the red position (hot).
With Stop & Start, when demisting has been activated, the STOP mode is not available.
The rear screen demist - defrost can only operate when the engine is running.
Page 65 of 389
3
Comfort63
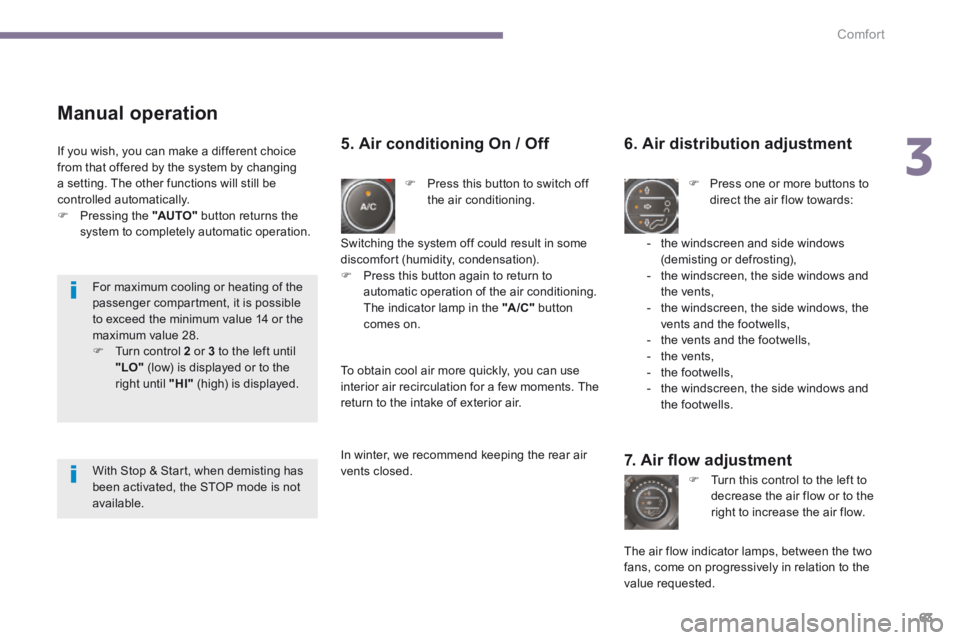
Manual operation
Press this button to switch off the air conditioning.
6. Air distribution adjustment
Press one or more buttons to direct the air flow towards:
7. Air fl ow adjustment
Turn this control to the left to decrease the air flow or to the right to increase the air flow.
5. Air conditioning On / Off
- the windscreen and side windows (demisting or defrosting), - the windscreen, the side windows and the vents, - the windscreen, the side windows, the vents and the footwells, - the vents and the footwells, - the vents, - the footwells, - the windscreen, the side windows and the footwells.
The air flow indicator lamps, between the two fans, come on progressively in relation to the value requested.
Switching the system off could result in some discomfort (humidity, condensation). Press this button again to return to automatic operation of the air conditioning. The indicator lamp in the "A /C " button comes on.
If you wish, you can make a different choice from that offered by the system by changing a setting. The other functions will still be controlled automatically. Pressing the "AUTO" button returns the
system to completely automatic operation.
To obtain cool air more quickly, you can use interior air recirculation for a few moments. The return to the intake of exterior air.
In winter, we recommend keeping the rear air vents closed.
For maximum cooling or heating of the passenger compartment, it is possible to exceed the minimum value 14 or the maximum value 28. Turn control 2 or 3 to the left until "LO" (low) is displayed or to the right until "HI" (high) is displayed.
With Stop & Start, when demisting has been activated, the STOP mode is not available.
Page 82 of 389
Access
80
Lost keys
Go to a PEUGEOT dealer with the vehicle's registration document, your personal identification documents and if possible the key code label. The PEUGEOT dealer will be able to look up the key code and the transponder code required to order a new key.
Do not throw the remote control batteries away, they contain metals which are harmful to the environment. Take them to an approved collection point.
Remote control
The high frequency remote control is a sensitive system; do not operate it while it is in your pocket as there is a possibility that it may unlock the vehicle, without you being aware of it. Do not repeatedly press the buttons of your remote control out of range and out of sight of your vehicle. You run the risk of stopping it from working and the remote control would have to be reinitialised. No remote control can operate when the key is in the ignition switch, even when the ignition is switched off, except for reinitialisation.
Locking the vehicle
Driving with the doors locked may make access to the passenger compartment by the emergency services more difficult in an emergency. As a safety precaution, never leave children alone in the vehicle, except for a very short period. In all cases, it is essential to remove the key from the ignition switch when leaving the vehicle.
Anti-theft protection
Do not make any modifications to the electronic engine immobiliser system; this could cause malfunctions.
When purchasing a second-hand vehicle
Have the pairing of all of the keys in your possession checked by a PEUGEOT dealer, to ensure that only your keys can be used to open and start the vehicle.
Page 258 of 389
256
02
SETUP2ABC3DEF5JKL4GHI6MNO8TUV7PQR S9WXYZ0*#
1NAV TRAFFICADDR
BOOKSETUP
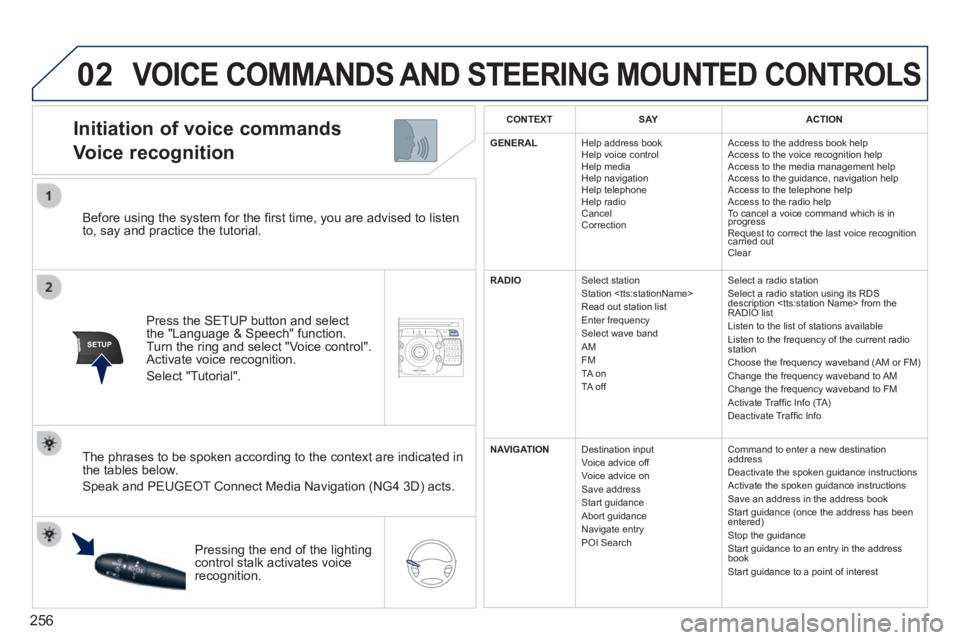
Before using the system for the fi rst time, you are advised to listen to, say and practice the tutorial.
Press the SETUP button and select the "Language & Speech" function. Turn the ring and select "Voice control". Activate voice recognition.
Select "Tutorial".
Initiation of voice commands
Voice recognition
The phrases to be spoken according to the context are indicated in the tables below.
Speak and PEUGEOT Connect Media Navigation (NG4 3D) acts.
Pressing the end of the lighting control stalk activates voice recognition.
CONTEXTS AYACTION
GENERAL Help address book Help voice control Help media Help navigation Help telephone Help radio Cancel Correction
Access to the address book help Access to the voice recognition help Access to the media management help Access to the guidance, navigation help Access to the telephone help Access to the radio help To cancel a voice command which is in progress Request to correct the last voice recognition carried out Request to correct the last voice recognition carried out Request to correct the last voice recognition
Clear
RADIO Select station Station
Select a radio station Select a radio station using its RDS description
NAVIGATION Destination input Voice advice off Voice advice on Save address Start guidance Abort guidance Navigate entry POI Search
Command to enter a new destination address Deactivate the spoken guidance instructions Activate the spoken guidance instructions Save an address in the address book Start guidance (once the address has been entered) Stop the guidance Start guidance to an entry in the address book Start guidance to a point of interest
VOICE COMMANDS AND STEERING MOUNTED CONTROLS
Page 270 of 389
268
04
NAV2AB C3DEF5JKL4GHI6MNO8TUV7PQR S9WXYZ0*#
1RADIO MEDIA NA
V TRAFFIC
SETUPADDR
BOOK
2ABC3DEF5JKL4GHI6MNO8TUV7PQR S9WXYZ0*#
1RADIO MEDIA NA
V TRAFFIC
SETUPADDR
BOOK
2ABC3DEF5JKL4GHI6MNO8TUV7PQR S9WXYZ0*#
1RADIO MEDIA NA
V TRAFFIC
SETUPADDR
BOOK
2ABC3DEF5JKL4GHI6MNO8TUV7PQR S9WXYZ0*#
1RADIO MEDIA NA
V TRAFFIC
SETUPADDR
BOOK
2ABC3DEF5JKL4GHI6MNO8TUV7PQR S9WXYZ0*#
1RADIO MEDIA NA
V TRAFFIC
SETUPADDR
BOOK
2ABC3DEF5JKL4GHI6MNO8TUV7PQR S9WXYZ0*#
1RADIO MEDIA NA
V TRAFFIC
SETUPADDR
BOOK
2ABC3DEF5JKL4GHI6MNO8TUV7PQR S9WXYZ0*#
1RADIO MEDIA NA
V TRAFFIC
SETUPADDR
BOOK
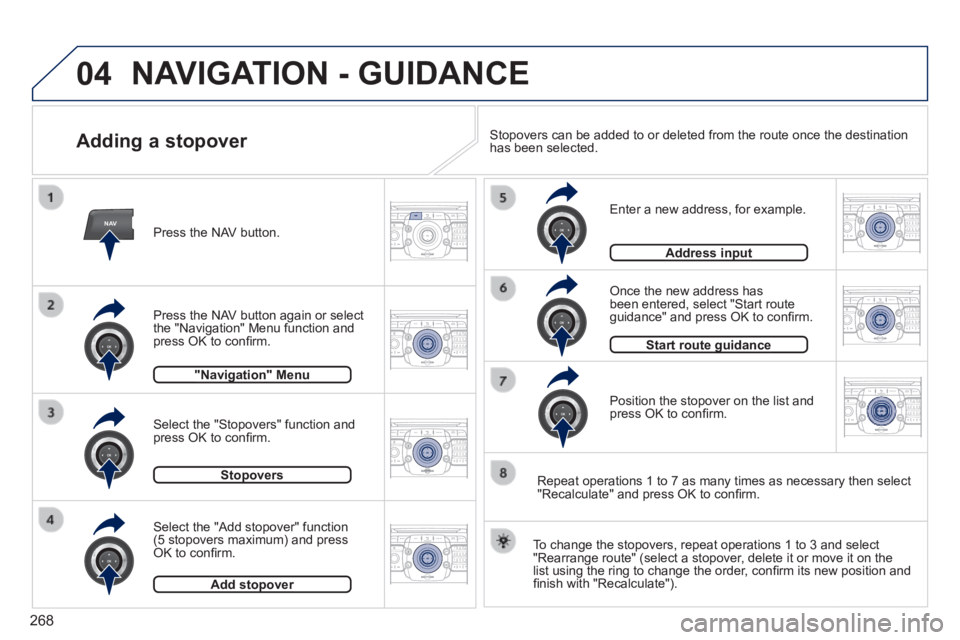
Adding a stopover
Enter a new address, for example.
Once the new address has been entered, select "Start route guidance" and press OK to confi rm.
Position the stopover on the list and press OK to confi rm.
Press the NAV button.
Press the NAV button again or select the "Navigation" Menu function and press OK to confi rm.
Select the "Add stopover" function (5 stopovers maximum) and press OK to confi rm.
Select the "Stopovers" function and press OK to confi rm.
"Navigation" Menu"Navigation" Menu
StopoversStopovers
Add stopoverAdd stopover
Address inputAddress input
To change the stopovers, repeat operations 1 to 3 and select "Rearrange route" (select a stopover, delete it or move it on the list using the ring to change the order, confi rm its new position and fi nish with "Recalculate").
Stopovers can be added to or deleted from the route once the destination\
has been selected.
Repeat operations 1 to 7 as many times as necessary then select "Recalculate" and press OK to confi rm.
Start route guidanceStart route guidance
NAVIGATION - GUIDANCE
Page 295 of 389
293
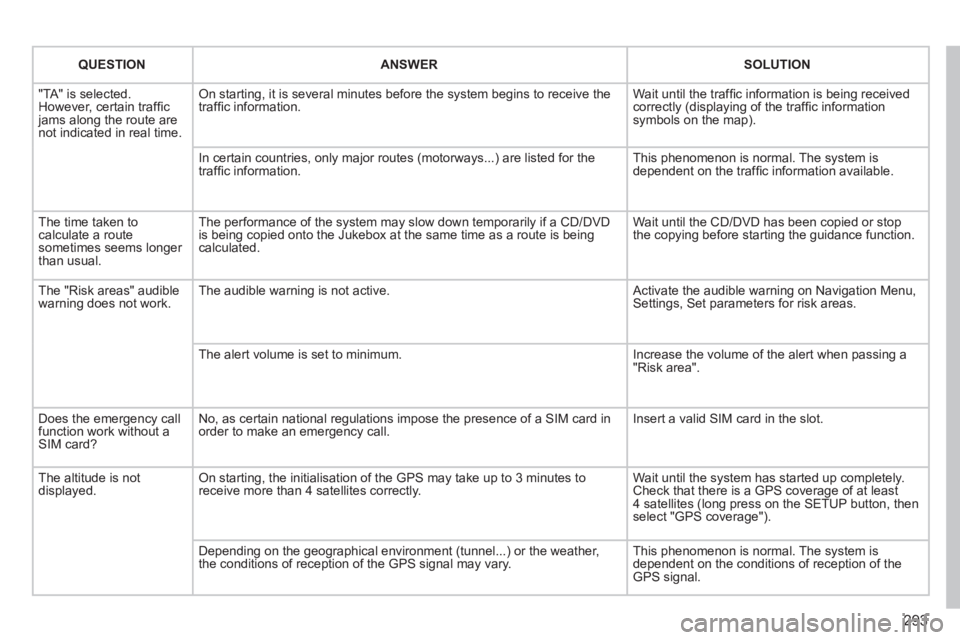
QUESTIONANSWERSOLUTION
"TA" is selected. However, certain traffi c jams along the route are not indicated in real time.
On starting, it is several minutes before the system begins to receive t\
he traffi c information. Wait until the traffi c information is being received correctly (displaying of the traffi c information symbols on the map).
In certain countries, only major routes (motorways...) are listed for \
the traffi c information. This phenomenon is normal. The system is dependent on the traffi c information available.
The time taken to calculate a route sometimes seems longer than usual.
The performance of the system may slow down temporarily if a CD/DVD is being copied onto the Jukebox at the same time as a route is being calculated.
Wait until the CD/DVD has been copied or stop the copying before starting the guidance function.
The "Risk areas" audible warning does not work. The audible warning is not active. Activate the audible warning on Navigation Menu, Settings, Set parameters for risk areas.
The alert volume is set to minimum. Increase the volume of the alert when passing a "Risk area".
Does the emergency call function work without a SIM card?
No, as certain national regulations impose the presence of a SIM card in\
order to make an emergency call. Insert a valid SIM card in the slot.
The altitude is not displayed. On starting, the initialisation of the GPS may take up to 3 minutes to receive more than 4 satellites correctly. Wait until the system has started up completely. Check that there is a GPS coverage of at least 4 satellites (long press on the SETUP button, then select "GPS coverage").
Depending on the geographical environment (tunnel...) or the weather, the conditions of reception of the GPS signal may vary. This phenomenon is normal. The system is dependent on the conditions of reception of the GPS signal.