2014 Peugeot 308 ad blue
[x] Cancel search: ad bluePage 10 of 389

154
161
62
253
297
351
276,
332,
358
281,
319,
361
249
Familiarisation
8
Interior
Electric parking brake
This combines the functions of automatic applicationon switching off the engine and automatic release on acceleration. The driver can intervene at any time to apply or release the parking brake manually by operating the control lever.
Audio and communication systems
These systems benefit from the latest technology: MP3 compatible Peugeot Connect Sound (RD5), Peugeot Connect USB, Bluetooth, Peugeot Connect Media Navigation (NG4 3D) or Peugeot Connect Navigation (RT6) with 16/9 retractable colour screen, JBL audio system, auxiliary sockets.
Head-up display
This system projects certain information into the field of vision of the driver: speed, cruise control/speed limiter and Distance alert.
Dual-zone digital air conditioning
This systems allows different levels of comfort to be set for the driver and front passenger. It then controls these level automatically according to the ambient conditions.
Peugeot Connect Navigation (RT6)
Peugeot Connect Sound (RD5)
Peugeot Connect Media Navigation (NG4 3D) Peugeot Connect USB - USB player
Bluetooth
PEUGEOT Assistance
Page 49 of 389
2
Multifunction screens47
Monochrome screen C (with PEUGEOT Connect Sound (RD5))
Main menu
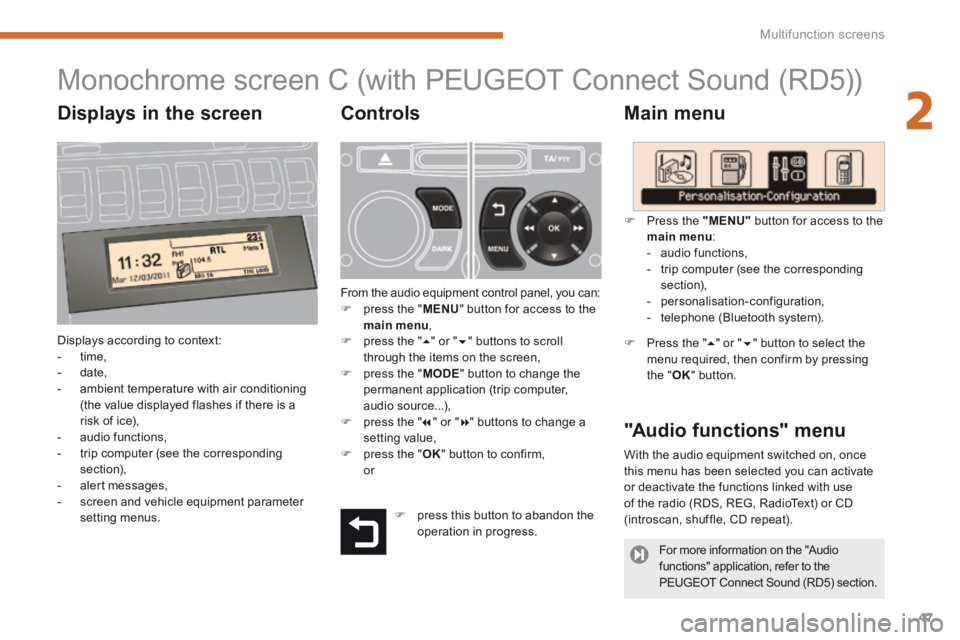
Displays according to context: - time, - date, - ambient temperature with air conditioning (the value displayed flashes if there is a risk of ice), - audio functions, - trip computer (see the corresponding section), - alert messages, - screen and vehicle equipment parameter setting menus.
"Audio functions" menu
Controls
From the audio equipment control panel, you can: press the " MENU " button for access to the main menu , press the " " or " " buttons to scroll through the items on the screen, press the " MODE " button to change the permanent application (trip computer, audio source...), press the " " or " " buttons to change a setting value, press the " OK " button to confirm, or
Press the "MENU" button for access to the
main menu : - audio functions, - trip computer (see the corresponding section), - personalisation-configuration, - telephone (Bluetooth system).
Press the " " or " " button to select the menu required, then confirm by pressing the " OK " button.
With the audio equipment switched on, once this menu has been selected you can activate or deactivate the functions linked with use of the radio (RDS, REG, RadioText) or CD (introscan, shuffle, CD repeat). press this button to abandon the operation in progress.
For more information on the "Audio functions" application, refer to the PEUGEOT Connect Sound (RD5) section.
Displays in the screen
Page 51 of 389
2
Multifunction screens49
Display confi guration
Once this menu has been selected, you have access to the following settings: - brightness-video setting, - date and time setting,
- selection of the units.
Adjusting the date and time Press the " " or " " button to select the "Display configuration" menu, then the "OK" button. Press the " " or " " button, to select the "Adjust date and time" line, then on the "OK" button. Press the " " or " " button to select the setting to modify. Conform by pressing the "OK" button then adjust the setting and confirm again to save the modification.
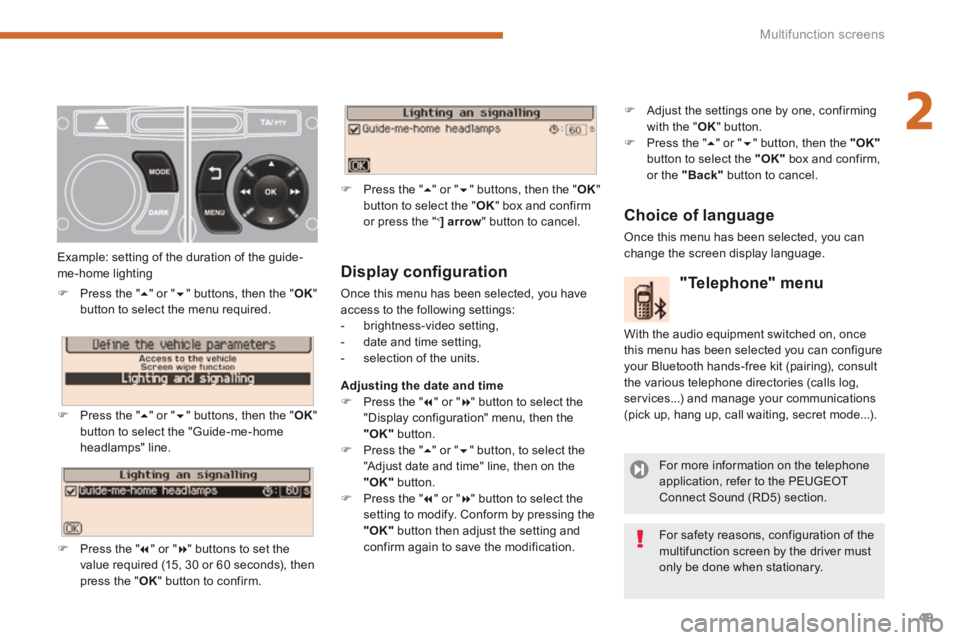
Example: setting of the duration of the guide-me-home lighting
Press the " " or " " buttons, then the " OK " button to select the menu required.
Press the " " or " " buttons, then the " OK " button to select the "Guide-me-home headlamps" line.
Press the " " or " " buttons to set the value required (15, 30 or 60 seconds), then press the " OK " button to confirm.
Press the " " or " " buttons, then the " OK " button to select the " OK " box and confirm or press the " < ] arrow " button to cancel.
"Telephone" menu
With the audio equipment switched on, once this menu has been selected you can configure your Bluetooth hands-free kit (pairing), consult the various telephone directories (calls log, services...) and manage your communications (pick up, hang up, call waiting, secret mode...).
For more information on the telephone application, refer to the PEUGEOT Connect Sound (RD5) section.
For safety reasons, configuration of the multifunction screen by the driver must only be done when stationary.
Choice of language
Once this menu has been selected, you can change the screen display language.
Adjust the settings one by one, confirming with the " OK " button. Press the " " or " " button, then the "OK"button to select the "OK" box and confirm, or the "Back" button to cancel.
Page 61 of 389
3
Comfort59
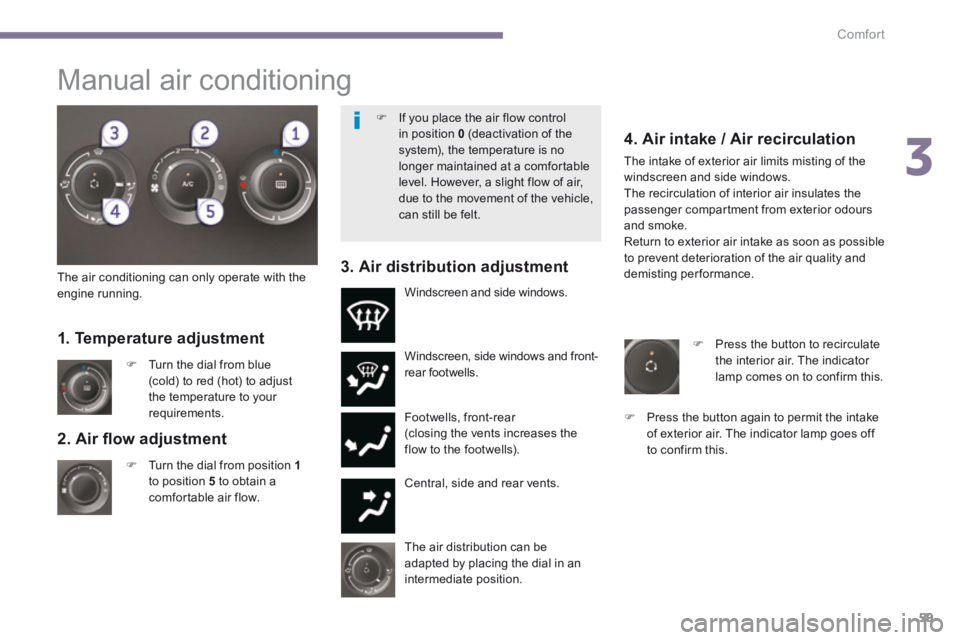
2. Air fl ow adjustment
Turn the dial from position 1to position 5 to obtain a comfortable air flow.
Windscreen, side windows and front-rear footwells.
Footwells, front-rear (closing the vents increases the flow to the footwells).
Central, side and rear vents.
Turn the dial from blue (cold) to red (hot) to adjust the temperature to your requirements.
Windscreen and side windows.
1. Temperature adjustment
The air distribution can be adapted by placing the dial in an intermediate position.
The air conditioning can only operate with the engine running.
4. Air intake / Air recirculation
The intake of exterior air limits misting of the
windscreen and side windows. The recirculation of interior air insulates the passenger compartment from exterior odours and smoke. Return to exterior air intake as soon as possible to prevent deterioration of the air quality and demisting performance. 3. Air distribution adjustment
Press the button to recirculate the interior air. The indicator lamp comes on to confirm this.
Press the button again to permit the intake of exterior air. The indicator lamp goes off to confirm this.
Manual air conditioning
If you place the air flow control in position 0 (deactivation of the system), the temperature is no longer maintained at a comfortable level. However, a slight flow of air, due to the movement of the vehicle, can still be felt.
Page 117 of 389

6
Fittings115
Rear multimedia
This multimedia system allows rear passengers to connect one or two external portable systems (audio or video player, games consoles, DVD player...). The sound is played through two Bluetooth ® wireless headphone ® wireless headphone ®
sets, while the video content is displayed in two 7-inch screens built into the backs of the front seat head restraints.
Description
This system operates only with the engine running.
The pack includes: - the connection and control panel fitted on the rear face of the centre console, - two 7-inch screens built into the front head restraints (with protective covers), - two wireless Bluetooth technology headphone sets with rechargeable batteries, - a 12 V charger with two outlets allowing the simultaneous charging of two headphones. 1. Power switch 2. AV1 video input (yellow RCA socket) 3. Stereo audio input A (red and white RCA s o c ket s) 4. AV2 video input (yellow RCA socket) 5. Stereo audio input B (red and white RCA s o c ket s) 6. Selection of display in the left hand screen (AV1 or AV2)
7. Selection of display in the right hand screen (AV1 or AV2) 8. Connection indicator lamps for the Bluetooth audio headphones (blue)
Page 118 of 389
Fittings
116
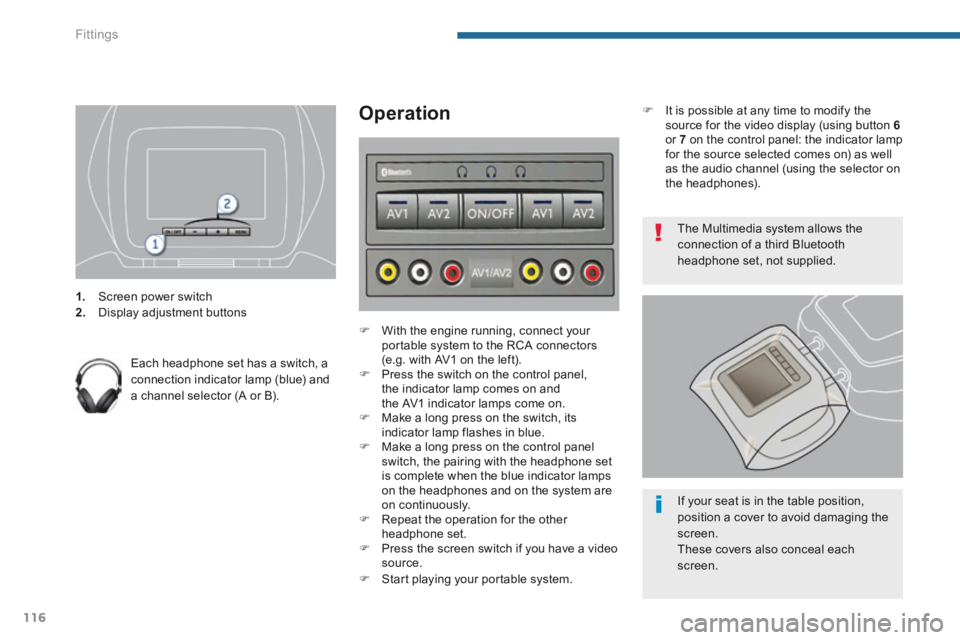
1. Screen power switch 2. Display adjustment buttons
Each headphone set has a switch, a connection indicator lamp (blue) and a channel selector (A or B).
Operation
With the engine running, connect your portable system to the RCA connectors (e.g. with AV1 on the left). Press the switch on the control panel, the indicator lamp comes on and the AV1 indicator lamps come on. Make a long press on the switch, its indicator lamp flashes in blue. Make a long press on the control panel switch, the pairing with the headphone set is complete when the blue indicator lamps on the headphones and on the system are on continuously. Repeat the operation for the other headphone set. Press the screen switch if you have a video source. Start playing your portable system.
The Multimedia system allows the connection of a third Bluetooth headphone set, not supplied.
If your seat is in the table position, position a cover to avoid damaging the
screen. These covers also conceal each screen.
It is possible at any time to modify the source for the video display (using button 6or 7 on the control panel: the indicator lamp for the source selected comes on) as well as the audio channel (using the selector on the headphones).
Page 190 of 389
188Driving
Reversing camera
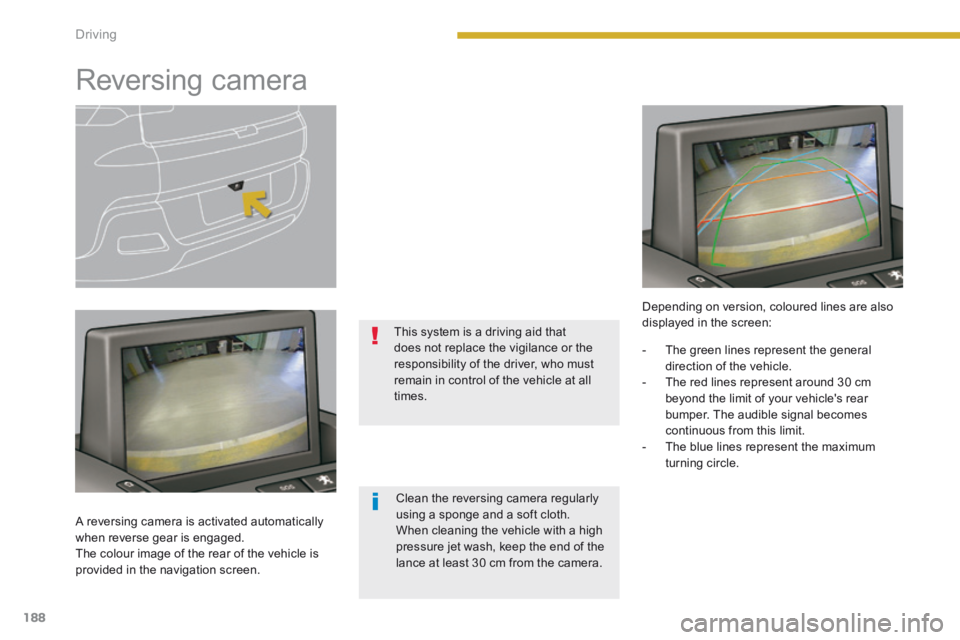
A reversing camera is activated automatically when reverse gear is engaged. The colour image of the rear of the vehicle is provided in the navigation screen.
This system is a driving aid that does not replace the vigilance or the responsibility of the driver, who must remain in control of the vehicle at all times.
Depending on version, coloured lines are also displayed in the screen:
Clean the reversing camera regularly using a sponge and a soft cloth. When cleaning the vehicle with a high pressure jet wash, keep the end of the lance at least 30 cm from the camera.
- The green lines represent the general direction of the vehicle. - The red lines represent around 30 cm beyond the limit of your vehicle's rear bumper. The audible signal becomes continuous from this limit. - The blue lines represent the maximum turning circle.
Page 227 of 389
11
Practical information225
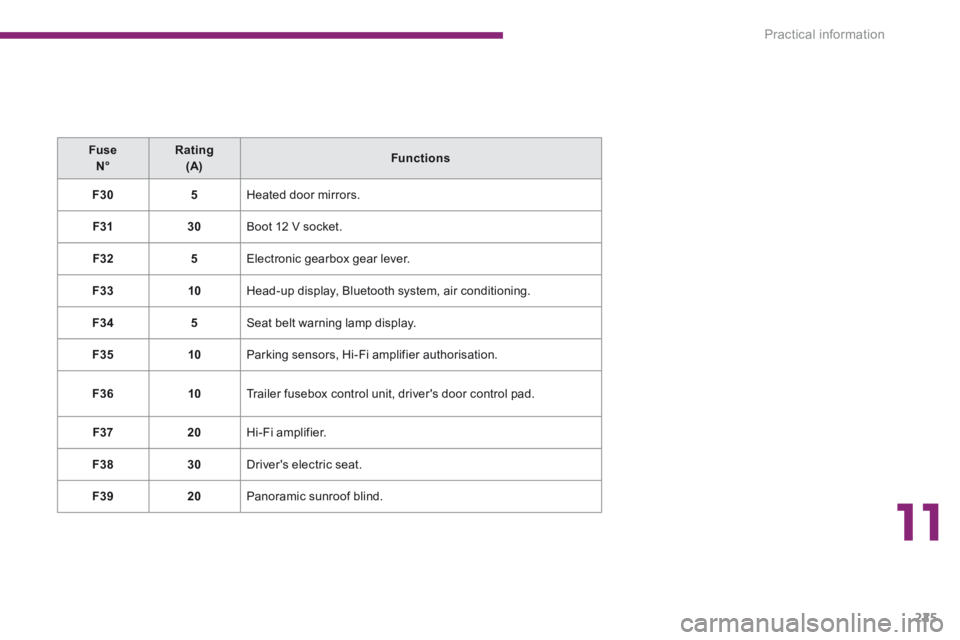
Fuse N°Rating (A)Functions
F305 Heated door mirrors.
F3130 Boot 12 V socket.
F325 Electronic gearbox gear lever.
F3310 Head-up display, Bluetooth system, air conditioning.
F345 Seat belt warning lamp display.
F3510 Parking sensors, Hi-Fi amplifier authorisation.
F3610 Trailer fusebox control unit, driver's door control pad.
F3720 Hi-Fi amplifier.
F3830 Driver's electric seat.
F3920 Panoramic sunroof blind.