Page 58 of 400

56
Access
308_EN_CHAP02_OUVERTURES_ED02-2013
Locking
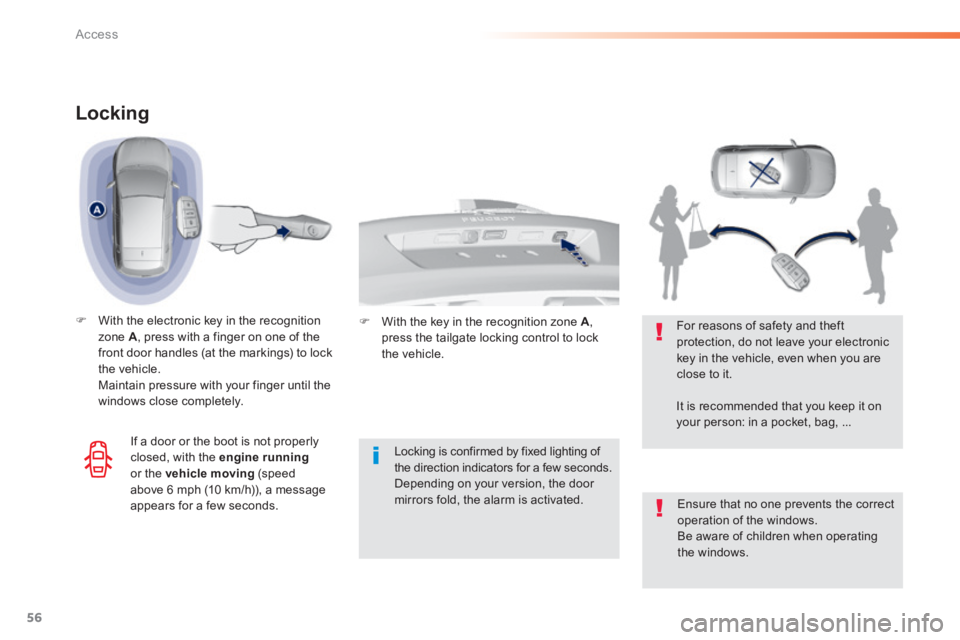
With the electronic key in the recognition zone A , press with a finger on one of the front door handles (at the markings) to lock the vehicle. Maintain pressure with your finger until the windows close completely.
Locking is confirmed by fixed lighting of the direction indicators for a few seconds. Depending on your version, the door mirrors fold, the alarm is activated. Ensure that no one prevents the correct operation of the windows.
Be aware of children when operating the windows.
For reasons of safety and theft protection, do not leave your electronic key in the vehicle, even when you are close to it.
It is recommended that you keep it on your person: in a pocket, bag, ...
If a door or the boot is not properly closed, with the engine runningor the vehicle moving (speed above 6 mph (10 km/h)), a message appears for a few seconds.
With the key in the recognition zone A , press the tailgate locking control to lock the vehicle.
Page 60 of 400
58
Access
308_EN_CHAP02_OUVERTURES_ED02-2013
Boot
After unlocking the vehicle with the remote control, press the opening control and then raise the tailgate.
Opening using the "Keyless
Entry and Starting" remote
control
Press this button, the vehicle is unlocked.
Opening using the key
Complete unlocking is selected by default. This setting is done in the "Driving assistance" menu, then "Vehicle settings"and "Vehicle access" .
Complete unlocking Selective unlocking
Press this button, the boot is unlocked.
Use this button for access to additional information.
Page 61 of 400
59
2
Access
308_EN_CHAP02_OUVERTURES_ED02-2013
Complete unlocking
With the electronic key on your person in the recognition zone A , press the opening control then raise the tailgate.
Opening using the Keyless
Entry and Starting system
By default, complete unlocking is activated. This setting is done in the "Driving assistance" menu, then "Vehicle settings"and "Vehicle access" .
Selective unlocking
When unlocking of the boot only is activated: With the electronic key in the recognition zone A , press the boot unlocking control to unlock just the tailgate, then raise the tailgate. Unlocking is signalled by rapid flashing of the direction indicators for a few seconds.
Use this button for access to additional information.
Closing
Lower the tailgate using one of the interior grab handles. If the boot is not closed correctly (the lock has two positions): with the engine running or when moving (speed above 6 mph (10 km/h)), a message appears for a few seconds.
Page 62 of 400
60
Access
308_EN_CHAP02_OUVERTURES_ED02-2013
Tailgate release
Unlocking
Fold back the rear seats to gain access to the lock from inside the boot.
Insert a small screwdriver into hole A of the lock to unlock the tailgate. Move the latch to the left.
Locking after closing
If the fault persists after closing again, the boot will remain locked.
System allowing the mechanical unlocking of the boot in the event of a battery or central locking system malfunction.
With the electronic key in the recognition zone A , press the boot locking control to lock the vehicle. Locking is signalled by rapid flashing of the direction indicators for a few seconds.
Locking with Keyless Entry
and Starting
Page 163 of 400

161
4
Driving
308_EN_CHAP04_CONDUITE_ED02-2013
Reversing camera
Clean the reversing camera regularly using a soft, dry cloth.
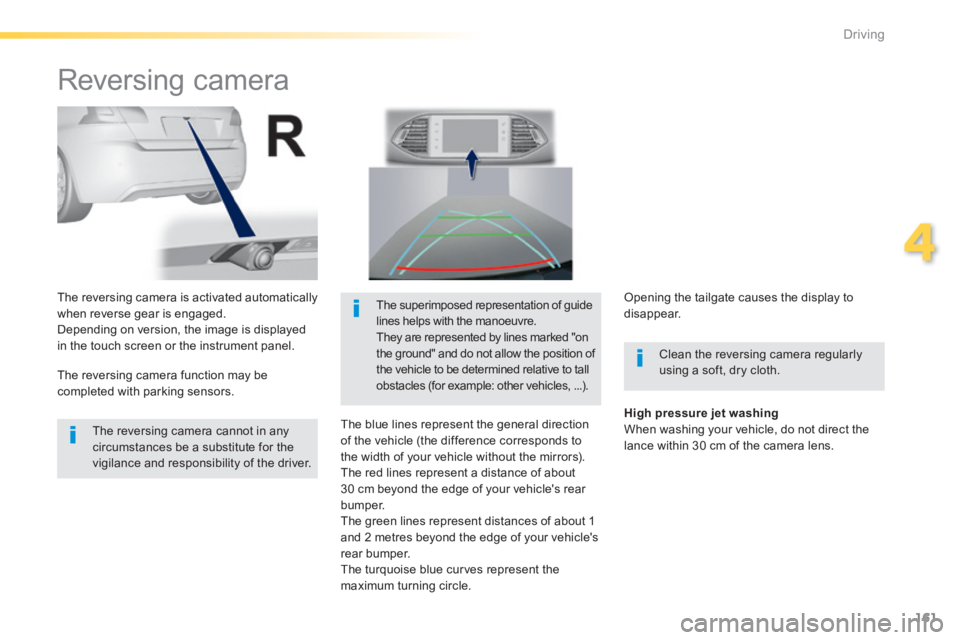
The reversing camera is activated automatically when reverse gear is engaged. Depending on version, the image is displayed in the touch screen or the instrument panel.
The superimposed representation of guide lines helps with the manoeuvre. They are represented by lines marked "on the ground" and do not allow the position of the vehicle to be determined relative to tall obstacles (for example: other vehicles, ...).
The blue lines represent the general direction
of the vehicle (the difference corresponds to the width of your vehicle without the mirrors). The red lines represent a distance of about 30 cm beyond the edge of your vehicle's rear b u m p e r. The green lines represent distances of about 1 and 2 metres beyond the edge of your vehicle's rear bumper. The turquoise blue curves represent the maximum turning circle.
The reversing camera cannot in any circumstances be a substitute for the vigilance and responsibility of the driver.
The reversing camera function may be completed with parking sensors.
Opening the tailgate causes the display to disappear.
High pressure jet washing When washing your vehicle, do not direct the lance within 30 cm of the camera lens.
Page 242 of 400
240
Practical information
308_EN_CHAP07_INFO PR ATIQUES_ED02-2013
1. Sidelamps (light emitting diodes - LEDs).2. Reversing lamps (W16W).3. Direction indicators (PY21W amber).4. Brake lamps (light emitting diodes - LEDs).5. Foglamps (P21W).
Rear lamps (saloon)
Light emitting diodes-LEDs
For replacement, contact a PEUGEOT
dealer or qualified workshop.
Reversing lamps, direction indicators (on the wings)
Disconnect the lamp connector. Remove the lamp fixing nut. Carefully remove the lamp unit from outside. Unscrew the bulb holder (a quarter of a turn) and change the bulb. For reassembly, carry out these operations in reverse order.
Open the tailgate then remove the access cover.
Page 243 of 400
241
7
Practical information
308_EN_CHAP07_INFO PR ATIQUES_ED02-2013
Unclip the left and right access covers. Remove the screws located in each opening. Unclip the boot trim for access to the lamp connector. Disconnect the lamp connector. Remove the lamp fixing nut. Carefully remove the lamp from the outside. Unscrew the bulb holder (a quarter of a turn) and change the bulb. For reassembly, carry out these operations in reverse order.
Foglamp (tailgate)
Open the tailgate and then remove the large plastic cover
Page 244 of 400
242
Practical information
308_EN_CHAP07_INFO PR ATIQUES_ED02-2013
Rear lamps (SW)
Light emitting diodes-LEDs
For replacement, contact a PEUGEOT dealer or qualified workshop.
Direction indicators (on the wings)
Open the tailgate then remove the access cover. Remove the two lamp fixing nut (pipe spanner or socket recommended). Disengage the retaining clip, carefully removing the lamp unit from outside.
Disconnect the lamp connector. Remove the sealing foam. Unclip the bulb holder by pressing on the two tongues. Replace the bulb. For reassembly, carry out these operations in reverse order.
1. Sidelamps (light emitting diodes - LEDs).2. Direction indicators (PY21W amber).3. Brake lamps (light emitting diodes - LEDs).4. Reversing lamps (W16W).5. Foglamps (P21W).