Page 9 of 400
7
.Visual search
Instruments and controls
Courtesy lamps 185 Interior mood lighting, footwell lighting 186 Rear view mirror 170 PEUGEOT Connect SOS, PEUGEOT Connect Assistancel 188, 290
USB port / Auxiliary socket 87, 310, 374 / 314, 376
5/6-speed manual gearbox 122 Gear shift indicator 123 Automatic gearbox 124-127 Dynamic function 128 Stop & Start 129 -131 Hill start assist 121
Dashboard fuses 245 -248
Heating, ventilation 95-98 Manual air conditioning 97-98 Manual air conditioning (Touch screen) 99 -100 Dual-zone air conditioning (Touch screen) 101-104 Air recirculation 105 Front demisting / defrosting 106 Rear screen emist /defrost 107
Manual parking brake 113 Electric parking brake 114-120
Touch screen 36 - 41, 293 -364
Setting the date and time 42- 45
Opening the bonnet 267
PEUGEOT Connect Sound (RD5) 365 -386
Page 26 of 400

24
Monitoring
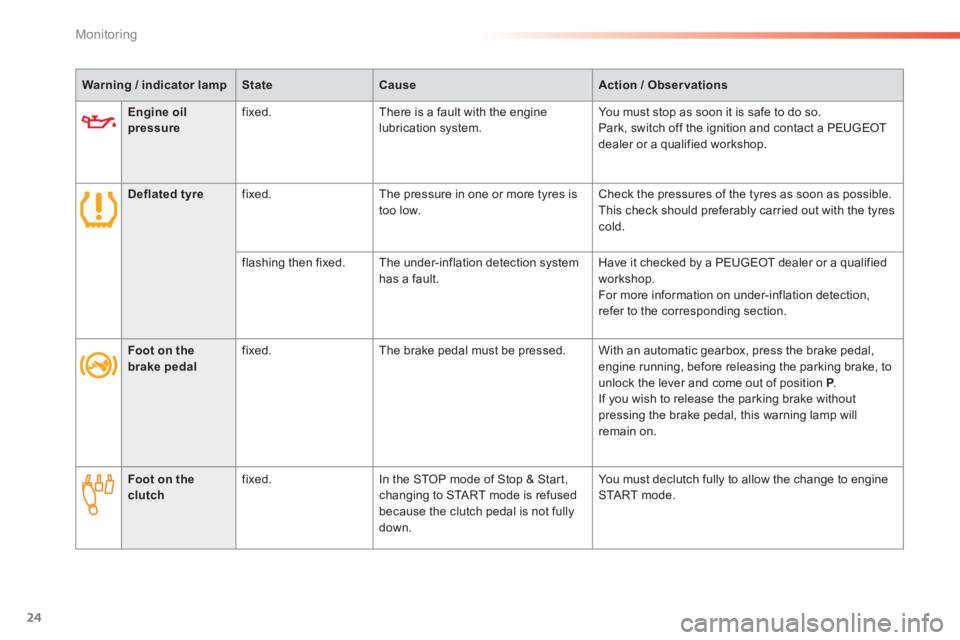
Engine oil pressure fixed. There is a fault with the engine lubrication system. You must stop as soon it is safe to do so. Park, switch off the ignition and contact a PEUGEOT dealer or a qualified workshop.
Deflated tyre fixed. The pressure in one or more tyres is too low. Check the pressures of the tyres as soon as possible. This check should preferably carried out with the tyres cold.
flashing then fixed. The under-inflation detection system has a fault. Have it checked by a PEUGEOT dealer or a qualified workshop. For more information on under-inflation detection, refer to the corresponding section.
Warning / indicator lampStateCauseAction / Observations
Foot on the brake pedal fixed. The brake pedal must be pressed. With an automatic gearbox, press the brake pedal, engine running, before releasing the parking brake, to unlock the lever and come out of position P . P . P If you wish to release the parking brake without pressing the brake pedal, this warning lamp will remain on.
Foot on the clutch fixed. In the STOP mode of Stop & Start, changing to START mode is refused because the clutch pedal is not fully down.
You must declutch fully to allow the change to engine START mode.
Page 247 of 400

245
7
Practical information
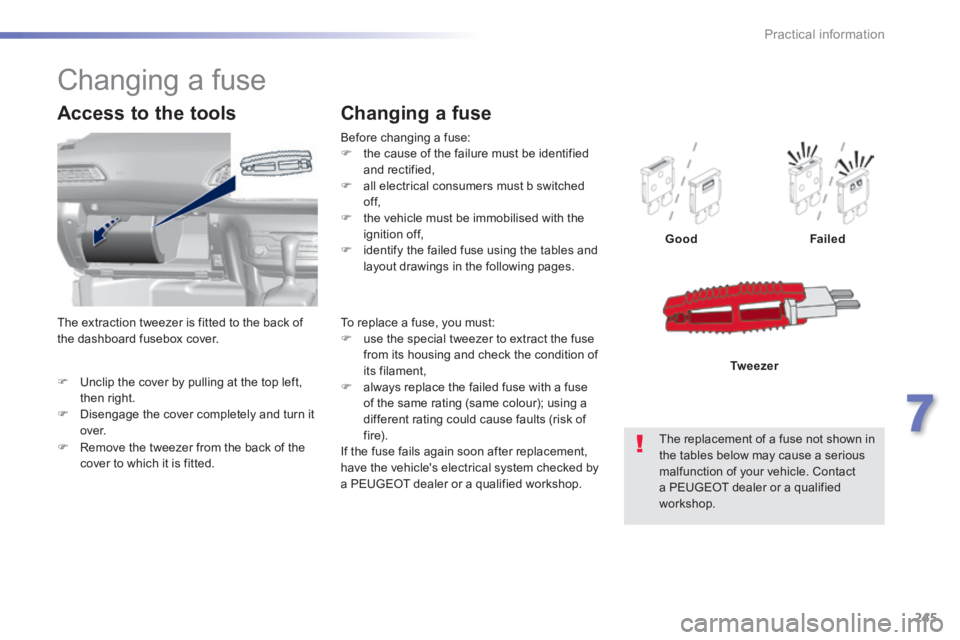
Unclip the cover by pulling at the top left, then right. Disengage the cover completely and turn it over.
Access to the tools
Before changing a fuse: the cause of the failure must be identified and rectified, all electrical consumers must b switched of f, the vehicle must be immobilised with the ignition off, identify the failed fuse using the tables and layout drawings in the following pages.
Changing a fuse
GoodFailed
The replacement of a fuse not shown in the tables below may cause a serious malfunction of your vehicle. Contact a PEUGEOT dealer or a qualified workshop.
Tw e e z e r
Changing a fuse
To replace a fuse, you must: use the special tweezer to extract the fuse from its housing and check the condition of its filament, always replace the failed fuse with a fuse of the same rating (same colour); using a different rating could cause faults (risk of f i r e). If the fuse fails again soon after replacement, have the vehicle's electrical system checked by a PEUGEOT dealer or a qualified workshop.
Remove the tweezer from the back of the cover to which it is fitted.
The extraction tweezer is fitted to the back of the dashboard fusebox cover.
Page 249 of 400
247
7
Practical information
Dashboard fuses
The fusebox is placed in the lower dashboard (left-hand side).
Fuse N° Rating (A)Functions
F1515 12 V accessory socket.
F1615 Cigarette lighter.
F1715 Audio system.
F1820 Audio system (battery +).
Access to the fuses
Unclip the cover by pulling at top left, then
right.
Version 1 (FULL)
Page 251 of 400
249
7
Practical information
Engine compartment fuses
Access to the fuses
Unclip the cover. Change the fuse (see corresponding paragraph). When you have finished, close the cover carefully to ensure correct sealing of the fusebox.
Fuse N° Rating (A)Functions
F1930 Front wiper motor.
F2015 Front and rear screenwash pumps.
F2120 Headlamp wash.
F2215 Horn.
F2315 Right hand main beam headlamp.
F2415 Left hand main beam headlamp.
The fusebox is placed in the engine compartment near the battery.
Version 1 (FULL)
Page 253 of 400

251
7
Practical information
12 V battery
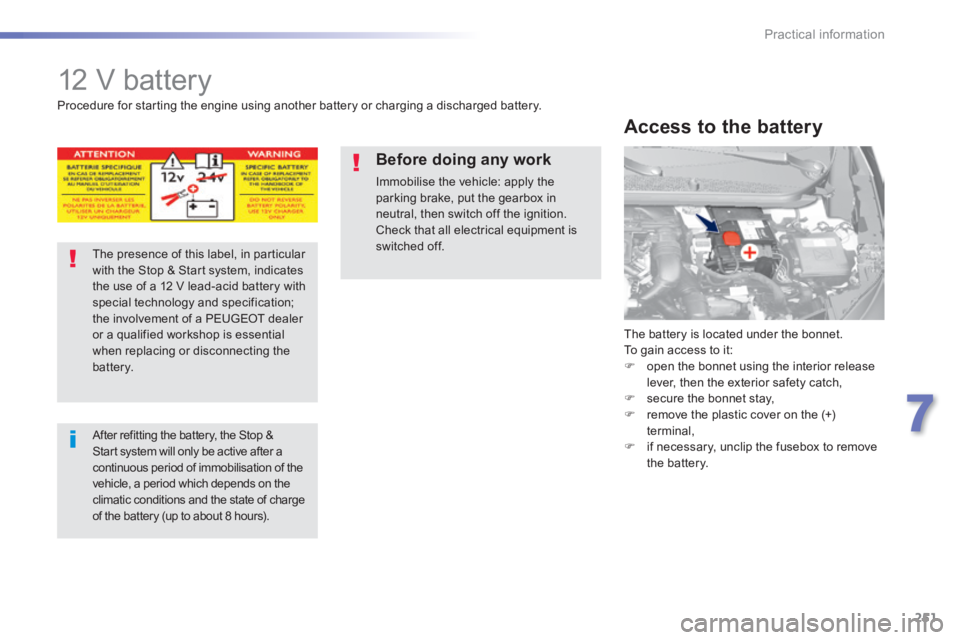
The battery is located under the bonnet. To gain access to it: open the bonnet using the interior release lever, then the exterior safety catch, secure the bonnet stay, remove the plastic cover on the (+) terminal, if necessary, unclip the fusebox to remove the battery.
Access to the battery
Procedure for starting the engine using another battery or charging a discharged battery.
The presence of this label, in particular with the Stop & Start system, indicates the use of a 12 V lead-acid battery with special technology and specification; the involvement of a PEUGEOT dealer or a qualified workshop is essential when replacing or disconnecting the battery.
After refitting the battery, the Stop & Start system will only be active after a continuous period of immobilisation of the vehicle, a period which depends on the climatic conditions and the state of charge of the battery (up to about 8 hours).
Before doing any work
Immobilise the vehicle: apply the parking brake, put the gearbox in neutral, then switch off the ignition.
Check that all electrical equipment is switched off.
Page 270 of 400
268
Checks
The various caps and covers allow access for checking the levels of the various fluids and for replacing certain components.
Petrol engine
1. Screenwash and headlamp wash reservoir. 2. Coolant reservoir. 3. Brake fluid filler. 4. Battery / Fuses.
5. Fusebox. 6. Air filter. 7. Engine oil dipstick. 8. Engine oil filler cap.
This engine is shown as an example. The locations of the engine oil dipstick and filler cap may vary.
Page 271 of 400
269
8
Checks
The various caps and covers allow access for checking the levels of the various fluids, for replacing certain components and for priming the fuel system.
* According to engine.
Diesel engine
1. Screenwash and headlamp wash reservoir. 2. Coolant reservoir. 3. Brake fluid filler. 4. Battery / Fuses. 5. Fusebox. 6. Air filter. 7. Engine oil dipstick. 8. Engine oil filler cap. 9. Priming pump * .
This engine is shown as an example. The locations of the engine oil dipstick and filler cap may vary.