Page 207 of 378

11
Practical information205
Removing a wheel
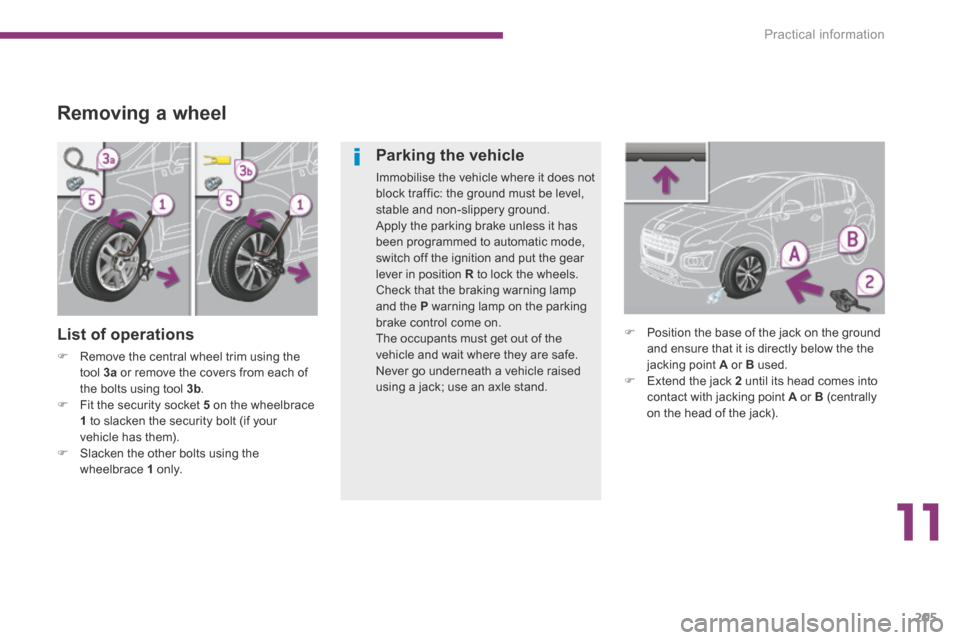
List of operations
Remove the central wheel trim using the tool 3a or remove the covers from each of the bolts using tool 3b . Fit the security socket 5 on the wheelbrace 1 to slacken the security bolt (if your
vehicle has them).
Slacken the other bolts using the wheelbrace 1 o n l y.
Position the base of the jack on the ground and ensure that it is directly below the the jacking point A or B used. Extend the jack 2 until its head comes into contact with jacking point A or B (centrally on the head of the jack).
Parking the vehicle
Immobilise the vehicle where it does not block traffic: the ground must be level, stable and non-slippery ground. Apply the parking brake unless it has been programmed to automatic mode, switch off the ignition and put the gear lever in position R to lock the wheels. Check that the braking warning lamp and the P warning lamp on the parking brake control come on. The occupants must get out of the vehicle and wait where they are safe. Never go underneath a vehicle raised using a jack; use an axle stand.
Page 208 of 378
Practical information
206
Fitting a wheel
Raise the vehicle until there is sufficient space between the wheel and the ground to admit the spare (not punctured) wheel easily.
Remove the bolts and store them in a clean place. Remove the wheel. After changing a wheel
To store the punctured wheel in the boot correctly, first remove the central cover. Have the tightening of the bolts and the pressure of the spare wheel checked by a PEUGEOT dealer without delay. Have the punctured wheel repaired and replace it on the vehicle as soon as possible.
Page 209 of 378
11
Practical information207
List of operations
Put the wheel in place on the hub. Screw in the bolts by hand to the stop. Pre-tighten the security bolt (if your vehicle has them) using the wheelbrace 1 fitted with the security socket 5 . Pre-tighten the other bolts using the wheelbrace 1 o n l y.
Lower the vehicle fully. Fold the jack 2 and detach it. Tighten the security bolt (if your vehicle has them) using the wheelbrace 1 fitted with the security socket 5 . Tighten the other bolts using the wheelbrace 1 o n l y. Refit the central wheel trim then press to clip it in place, or refit the bolt covers to each bolt. Stow the tools.
Page 210 of 378

Practical information
208
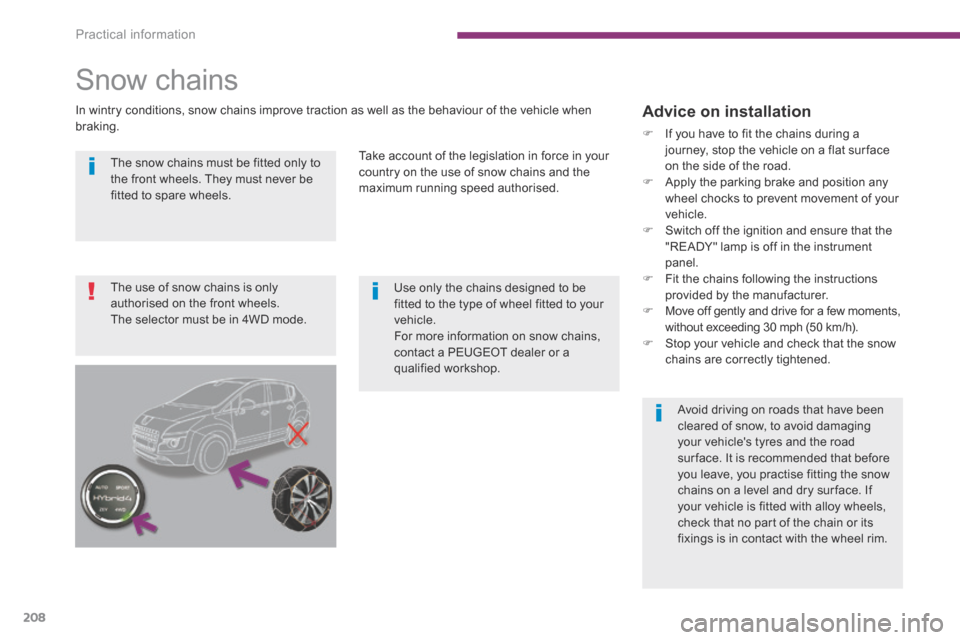
The snow chains must be fitted only to the front wheels. They must never be fitted to spare wheels.
Use only the chains designed to be fitted to the type of wheel fitted to your vehicle. For more information on snow chains, contact a PEUGEOT dealer or a qualified workshop.
Avoid driving on roads that have been cleared of snow, to avoid damaging your vehicle's tyres and the road sur face. It is recommended that before you leave, you practise fitting the snow chains on a level and dry sur face. If your vehicle is fitted with alloy wheels, check that no part of the chain or its fixings is in contact with the wheel rim.
Snow chains
In wintry conditions, snow chains improve traction as well as the behaviour of the vehicle when braking.
Take account of the legislation in force in your country on the use of snow chains and the maximum running speed authorised.
Advice on installation
If you have to fit the chains during a journey, stop the vehicle on a flat sur face on the side of the road. Apply the parking brake and position any wheel chocks to prevent movement of your vehicle. Switch off the ignition and ensure that the "READY" lamp is off in the instrument panel. Fit the chains following the instructions provided by the manufacturer. Move off gently and drive for a few moments, without exceeding 30 mph (50 km/h). Stop your vehicle and check that the snow chains are correctly tightened.
The use of snow chains is only authorised on the front wheels. The selector must be in 4WD mode.
Page 229 of 378
11
Practical information227
From the front Access to the tools
The towing eye is installed in the boot under the floor. To gain access to it: open the boot,
raise the floor, remove the towing eye from the holder.
From the rear
Recovering the vehicle on a fl at-bed
Procedure for having your vehicle recovered on a flat bed lorry or trailer.
On the front bumper, unclip the cover by pressing at the bottom. Screw the towing eye in fully.
On the rear bumper, unclip the cover by pressing at the bottom. Screw the towing eye in fully. Switch on the hazard warning lamps on the recovered vehicle.
Always recover the vehicle on a flat bed lorr y or trailer. Never tow the vehicle with the four wheels on the ground (or the front or rear wheels only), you risk damaging the transmission. Place the gear selector in position N and switch off the engine ( Ready lamp off).
Page 230 of 378
Practical information
228
Vehicle recover y
Before doing any work, with the ignition on, press the brake pedal and put the gear selector to position N , then switch off the hybrid system. If necessary because access to the vehicle is difficult, it can be moved a few dozen metres at a speed not exceeding 6 mph (10 km/h).
The front or rear wheels must not be on the ground, use a flat-bed lorry or trailer to recover the vehicle.
Use the towing eyes only to pull a vehicle out or to pull it onto a flat-bed.
Page 235 of 378

11
Practical information233
Accessories
"Comfort"
Door deflectors, parking sensors, side window blinds, coat-hanger, insulated module...
"Style"
Alloy wheels, door sill trims, chrome-plated door handle shells, spoiler, gear lever knob...
"Transport solutions"
Roof bars, towbars, bicycle carrier on towbar, bicycle carrier on roof bars, ski carrier, rigid and flexible roof boxes... Trailer towbar, which must be fitted by a PEUGEOT dealer.
"Safety and security"
Anti-theft alarm, window etching, wheel security bolts, child seats and booster cushions, first aid kit, breathalyzer, warning triangle, high visibility vest, stolen vehicle tracking system, dog guard, winter equipment
(snow chains, non-slip covers...)...
"Protection"
Mats * , boot liner, luggage net, style mud flaps ** , seat covers, pet range...
A wide range of accessories and genuine parts is available from the PEUGEOT dealer network. These accessories and parts have been tested and approved for reliability and safety. They are all adapted to your vehicle and benefit from PEUGEOT's recommendation and warranty.
* To avoid any risk of jamming of the pedals: - ensure that the mat is positioned and secured correctly, - never fit one mat on top of another.
** The configuration of the vehicle requires that it be fitted with mud flaps at the rear.
Page 241 of 378
12
Technical data239
Identifi cation markings
A.Vehicle Identification Number (VIN) under the bonnet. This number is engraved on the bodywork near the damper support. B. Vehicle identification Number (VIN) on the windscreen lower crossmember. This number is indicated on a self-adhesive label which is visible through the windscreen.
C. Manufacturer's label. The VIN is indicated on a self-destroying label affixed to the door aperture, on the driver's side.
D. Tyre/paint label. This label is fitted to the middle pillar, on the driver's side. It bears the following information: - the tyre inflation pressures with and without load, - the tyre sizes, - the inflation pressure of the spare wheel, - the paint colour code.
Low tyre pressures increase fuel consumption.
Various visible markings for the identification and tracing of your vehicle.
The tyre pressures must be checked when the tyres are cold, at least once a month.