Page 178 of 378
176Driving
Cruise control
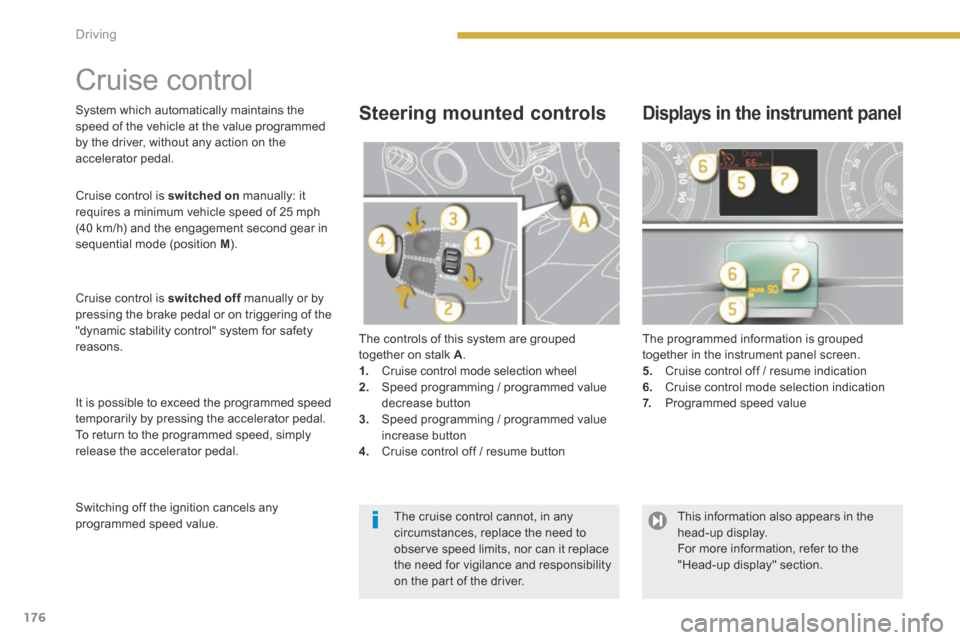
The controls of this system are grouped together on stalk A . 1. Cruise control mode selection wheel 2. Speed programming / programmed value decrease button 3. Speed programming / programmed value increase button 4. Cruise control off / resume button
The programmed information is grouped together in the instrument panel screen. 5. Cruise control off / resume indication 6. Cruise control mode selection indication 7. Programmed speed value
Steering mounted controls Displays in the instrument panel
Cruise control is switched on manually: it requires a minimum vehicle speed of 25 mph (40 km/h) and the engagement second gear in sequential mode (position M ).
Cruise control is switched off manually or by switched off manually or by switched offpressing the brake pedal or on triggering of the "dynamic stability control" system for safety reasons.
It is possible to exceed the programmed speed temporarily by pressing the accelerator pedal. To return to the programmed speed, simply release the accelerator pedal.
Switching off the ignition cancels any programmed speed value.
System which automatically maintains the speed of the vehicle at the value programmed by the driver, without any action on the accelerator pedal.
The cruise control cannot, in any circumstances, replace the need to observe speed limits, nor can it replace the need for vigilance and responsibility on the part of the driver.
This information also appears in the head-up display. For more information, refer to the "Head-up display" section.
Page 181 of 378
9
179
Driving
6-speed electronic gearbox
Gear selector
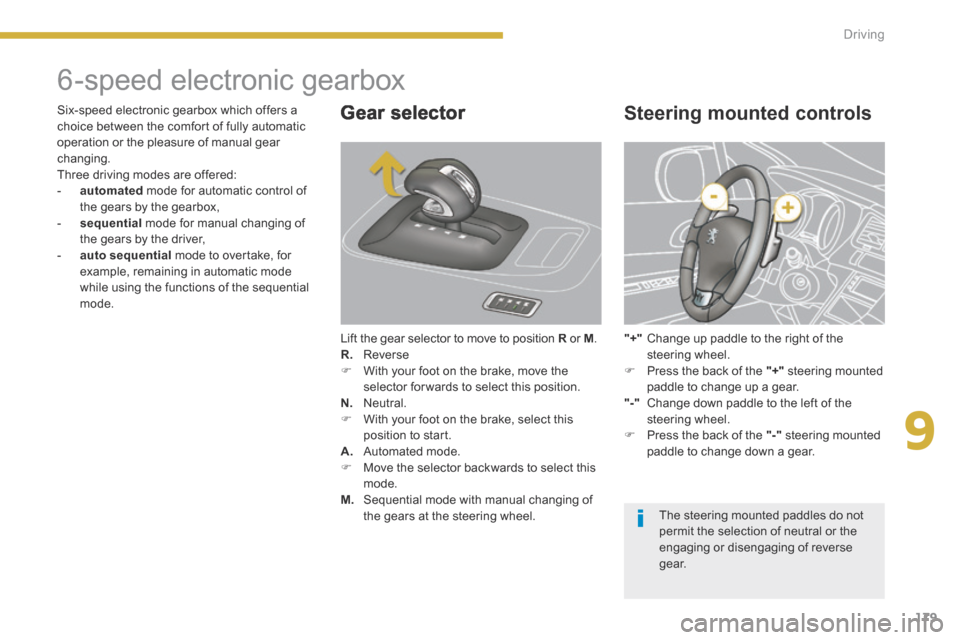
Lift the gear selector to move to position R or R or RM . R. Reverse With your foot on the brake, move the selector for wards to select this position. N. Neutral. With your foot on the brake, select this position to start. A. Automated mode. Move the selector backwards to select this mode. M. Sequential mode with manual changing of the gears at the steering wheel.
Steering mounted controls
"+" Change up paddle to the right of the steering wheel. Press the back of the "+" steering mounted paddle to change up a gear. "-" Change down paddle to the left of the steering wheel. Press the back of the "-" steering mounted paddle to change down a gear.
Six-speed electronic gearbox which offers a choice between the comfort of fully automatic operation or the pleasure of manual gear changing. Three driving modes are offered: - automated mode for automatic control of the gears by the gearbox, - sequential mode for manual changing of the gears by the driver, - auto sequential mode to overtake, for example, remaining in automatic mode while using the functions of the sequential mode.
The steering mounted paddles do not permit the selection of neutral or the engaging or disengaging of reverse g e a r.
Page 183 of 378
9
181
Driving
Sequential mode
When the vehicle has moved off, select position M to change to sequential mode.
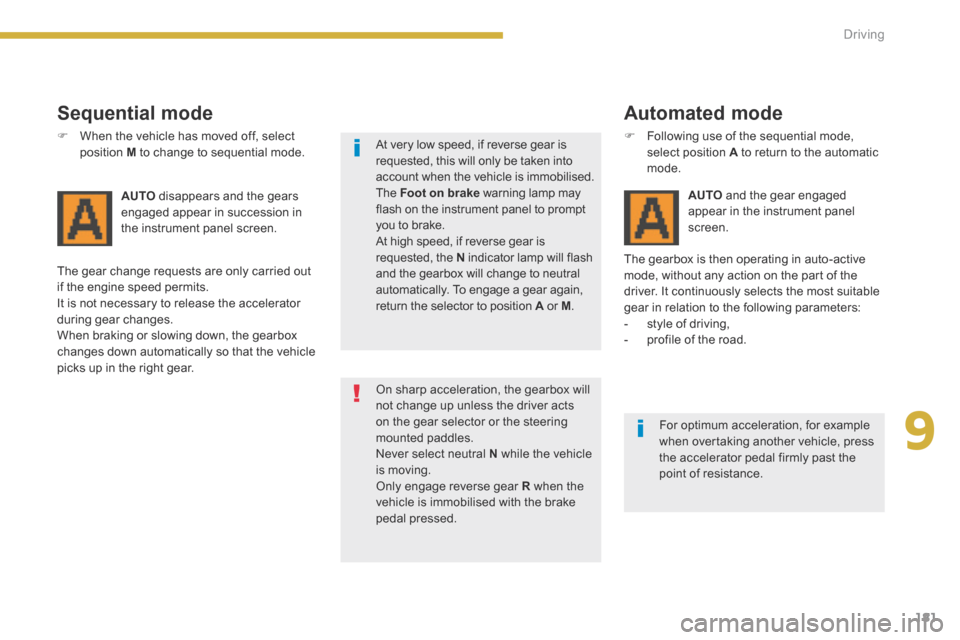
AUTO disappears and the gears engaged appear in succession in the instrument panel screen.
The gear change requests are only carried out if the engine speed permits. It is not necessary to release the accelerator during gear changes. When braking or slowing down, the gearbox changes down automatically so that the vehicle picks up in the right gear.
At very low speed, if reverse gear is requested, this will only be taken into account when the vehicle is immobilised. The Foot on brake warning lamp may flash on the instrument panel to prompt
you to brake. At high speed, if reverse gear is requested, the N indicator lamp will flash and the gearbox will change to neutral automatically. To engage a gear again, return the selector to position A or A or AM .
On sharp acceleration, the gearbox will not change up unless the driver acts on the gear selector or the steering mounted paddles. Never select neutral N while the vehicle is moving. Only engage reverse gear R when the vehicle is immobilised with the brake pedal pressed.
The gearbox is then operating in auto-active mode, without any action on the part of the driver. It continuously selects the most suitable gear in relation to the following parameters: - style of driving, - profile of the road.
AUTO and the gear engaged appear in the instrument panel
screen.
Automated mode
Following use of the sequential mode, select position A to return to the automatic mode.
For optimum acceleration, for example when overtaking another vehicle, press the accelerator pedal firmly past the point of resistance.
Page 184 of 378
182Driving
Stopping the vehicle
Before switching off the hybrid system, you can choose to: - move to position N to engage neutral, - leave the gear engaged; in this case, it will not be possible to move the vehicle.
In both cases, it is essential that you apply the parking brake to immobilise the vehicle.
"Auto sequential" mode
This mode enables you to overtake, for example, remaining in automatic mode while using the functions of the sequential mode. Operate the "+" or "-" steering mounted paddle. The gearbox engages the gear requested if the engine speed permits. AUTO is still displayed in the instrument panel. After a few moments without any action on the controls, the gearbox resumes automatic control of the gears.
When immobilising the vehicle, with the hybrid system active, it is essential to place the gear selector in neutral N . Before doing anything in the engine compartment, check that the gear selector is in neutral N , the parking brake is applied, the ignition is off and the Ready lamp is off.
Move off and drive, without
accelerating
- put the gear lever in position N so as to be in neutral, - press the brake pedal, - place the selector in position A , R or M and release the brake. the vehicle moves off
and runs at about 6 mph (10 km/h) without accelerating.
It is essential to press the brake pedal when starting the hybrid system. When parking, is it essential to apply the parking brake to immobilise the vehicle, whatever the circumstances.
This function does not operate on slopes greater than about 5 %. It is deactivated if the driver's door is opened To reactivate it, close the door and then press the brake pedal or accelerator pedal.
Page 193 of 378
10
Checks191
Diesel engine
The various caps and covers allow access for checking the levels of the various fluids, for replacing certain components and for priming the fuel system.
1. Power steering reservoir. 2. Screenwash and headlamp wash reservoir. 3. Coolant reservoir.
4. Brake fluid reservoir.
5. Battery / Fuses. 6. Fusebox. 7. Air filter.
8. Engine oil dipstick.
9. Engine oil filler cap. 10. Priming pump. 11. Bleed screw.
Page 195 of 378
10
Checks193
Brake fluid level
The brake fluid level should be close to the "MA X" mark. If it is not, check the brake pad wear.
Changing the fl uid
Refer to the warranty and maintenance record for details of the interval for this operation.
Fluid specifi cation
The brake fluid must conform to the manufacturer's recommendations.
Power steering fluid level
The power steering fluid level should be close to the "MA X" mark. With the engine cold, unscrew the cap to check the level.
Topping up the engine oil level
Oil grade The oil must be the correct grade for your engine and conform to the manufacturer's recommendations.
Refer to the "Diesel engine" section for the
location of the oil filler cap in the engine compartment of your vehicle. - Unscrew the oil filler cap to reveal the filler aperture. - Add oil in small quantities, avoiding any spills on engine components (risk of fire). - Wait a few minutes before checking the level again using the dipstick. - Add more oil if necessary. - After checking the level, carefully refit the oil filler cap and the dipstick in its tube.
After topping up the oil, the check when switching on the ignition with the oil level indicator in the instrument panel is not valid during the 30 minutes after topping up.
Engine oil change
Refer to the warranty and maintenance record for details of the interval for this operation. In order to maintain the reliability of the engine and emission control system, the use of additives in the engine oil is prohibited.
Page 200 of 378
Practical information
198
A. "Sealant" or "Air" position selector. B. On "I" / off "O" switch. C. Deflation button. D. Pressure gauge (in bar and p.s.i.). E. Compartment housing: - a cable with adaptor for 12 V socket, - various inflation adaptors for accessories, such as balls, bicycle tyres...
Description of the kit
F. Sealant cartridge. G. White pipe with cap for repair. H. Black pipe for inflation. I. Speed limit sticker.
The speed limit sticker I must be affixed to the vehicle's steering wheel to remind you that a wheel is in temporary use. Do not exceed a speed of 50 mph (80 km/h) when driving with a tyre repaired using this type of kit.
Page 218 of 378
Practical information
216
Access to the fuses
See "Access to the tools". Fuse N° Rating (A) Functions
F820 Audio equipment, audio/telephone, CD changer, multifunction screen, tyre under-inflation detection, alarm siren, alarm control unit, telematic unit.
F930 Front 12 V socket, cigarette lighter, rear 12 V socket.
F1015 Steering mounted controls.
F1115 Low current ignition switch.
F1215 Trailer presence, rain / sunshine sensor, supply for fuses F32, F34, F35.
F135 Engine fusebox, airbag control unit.
F1415 Instrument panel, instrument panel screen, supply for fuse F33.
F1530 Locking and deadlocking.
F1740 Heated rear screen, supply for fuse F30.