Page 97 of 378

4
Access95
Do not throw the remote control batteries away, they contain metals which are harmful to the environment. Take them to an approved collection point.
Lost keys
Go to a PEUGEOT dealer with the vehicle's registration document, your personal identification documents and if possible the key code label. The PEUGEOT dealer will be able to look up the key code and the transponder code required to order a new key.
Remote control
The high frequency remote control is a sensitive system; do not operate it while it is in your pocket as there is a possibility that it may unlock the vehicle, without you being aware of it. Do not repeatedly press the buttons of your remote control out of range and out of sight of your vehicle. You run the risk of stopping it from working and the remote control would have to be reinitialised. No remote control can operate when the key is in the ignition switch, even when the ignition is switched off, except for reinitialisation.
Locking the vehicle
Driving with the doors locked may make access to the passenger compartment by the emergency services more difficult in an emergency. As a safety precaution, never leave children alone in the vehicle, except for a very short period. In all cases, it is essential to remove the key from the ignition switch when leaving the vehicle.
Anti-theft protection
Do not make any modifications to the electronic engine immobiliser system; this could cause malfunctions.
When purchasing a second-hand vehicle
Have the pairing of all of the keys in your possession checked by a PEUGEOT dealer, to ensure that only your keys can be used to open and start the vehicle.
Page 131 of 378

6
Fittings129
1. Screen power switch 2. Display adjustment buttons
Each headphone set has a switch, a connection indicator lamp (blue) and a channel selector (A or B).
Operation
With the engine running, connect your portable system to the RCA connectors (e.g. with AV1 on the left). Press the switch on the control panel, the indicator lamp comes on and the AV1 indicator lamps come on. Make a long press on the switch, its indicator lamp flashes in blue. Make a long press on the control panel switch, the pairing with the headphone set is complete when the blue indicator lamps on the headphones and on the system are on continuously. Repeat the operation for the other headphone set. Press the screen switch if you have a video source. Start playing your portable system.
It is possible at any time to modify the source for the video display (using button 6or 7 on the control panel: the indicator lamp for the source selected comes on) as well as the audio channel (using the selector on the headphones).
The Multimedia system allows the connection of a third Bluetooth headphone set, not supplied.
If your seat is in the table position, position a cover to avoid damaging the screen. These covers also conceal each screen.
Page 173 of 378
9
171
Driving
System which projects various information onto a transparent strip in the field of vision of the driver so that they do not have to take their eyes off the road. This system operates with the ignition on and the Ready lamp on; the settings are stored when the ignition is switched off.
Head-up display
1. Head-up display on / off. 2. Brightness adjustment. 3. Display height adjustment. The strip is activated by pressing one of the buttons.
Once the system has been activated, the following information is grouped together in the head-up display: A. The speed of your vehicle. B. Cruise control/speed limiter information.
Buttons Displays during operation
Page 174 of 378

172Driving
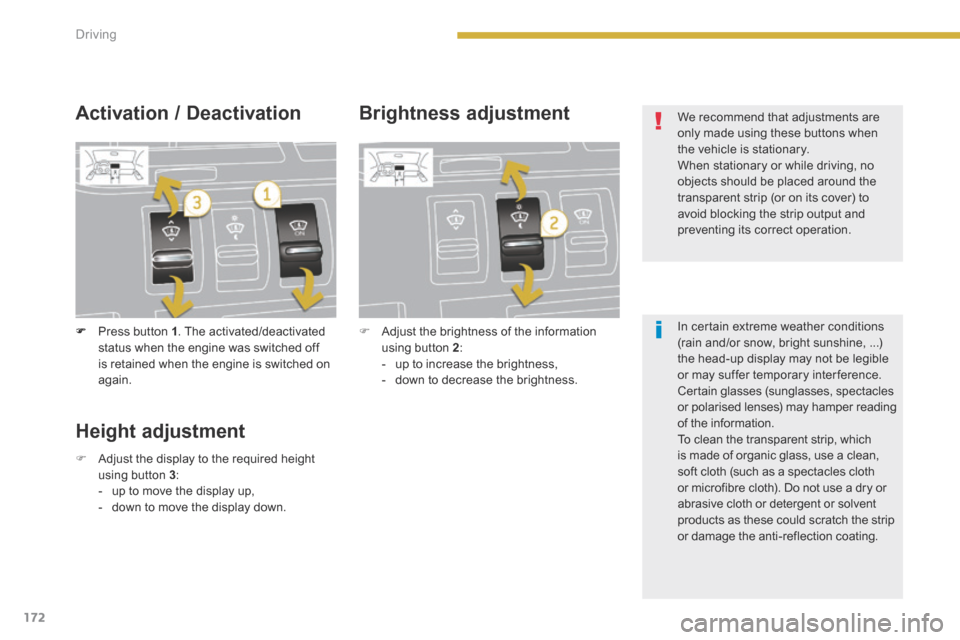
Press button 1 . The activated/deactivated status when the engine was switched off is retained when the engine is switched on again.
Activation / Deactivation Brightness adjustment
Adjust the brightness of the information using button 2 : - up to increase the brightness, - down to decrease the brightness.
Height adjustment
Adjust the display to the required height using button 3 : - up to move the display up, - down to move the display down.
We recommend that adjustments are only made using these buttons when the vehicle is stationary. When stationary or while driving, no objects should be placed around the transparent strip (or on its cover) to avoid blocking the strip output and preventing its correct operation.
In certain extreme weather conditions (rain and/or snow, bright sunshine, ...) the head-up display may not be legible or may suffer temporary interference. Certain glasses (sunglasses, spectacles or polarised lenses) may hamper reading of the information.
To clean the transparent strip, which is made of organic glass, use a clean, soft cloth (such as a spectacles cloth or microfibre cloth). Do not use a dry or abrasive cloth or detergent or solvent products as these could scratch the strip or damage the anti-reflection coating.
Page 176 of 378
174Driving
Programming
Switch the speed limiter off by pressing button 4 : the display confirms that it has been switched off (OFF/Pause).
Switch the speed limiter back on by pressing button 4 again.
Set the speed value by pressing button 2 or 3 (e.g.: 55 mph (90 km/h)). You can then change the programmed speed using buttons 2 and 3 : - by + or - 1 mph (km/h) = short press, - by + or - 5 mph (km/h) = long press, - in steps of + or - 5 mph (km/h) = maintained press. Switch the speed limiter on by pressing button 4 .
Turn dial 1 to the "LIMIT" position: the speed limiter mode is selected but is not switched on (OFF/Pause). You do not have to switch the speed limiter on in order to set the speed.
Page 179 of 378
9
177
Driving
Programming
Set the programmed speed by accelerating to the required speed, then press button 2or 3 (e.g.: 70 mph (110 km/h)).
Switch off the cruise control by pressing button 4 : the display confirms that it has been switched off (OFF/Pause).
Switch the cruise control back on by pressing button 4 again.
You can then change the programmed speed using buttons 2 and 3 . - By + or - 1 mph (km/h) = short press. - By + or - 5 mph (km/h) = long press. - In steps of + or - 5 mph (km/h) = maintained press.
Turn wheel 1 to the "CRUISE" position: the cruise control mode is selected but is not switched on (OFF/Pause).
Page 180 of 378

178Driving
Operating fault
Exceeding the programmed
speed
Return to normal driving
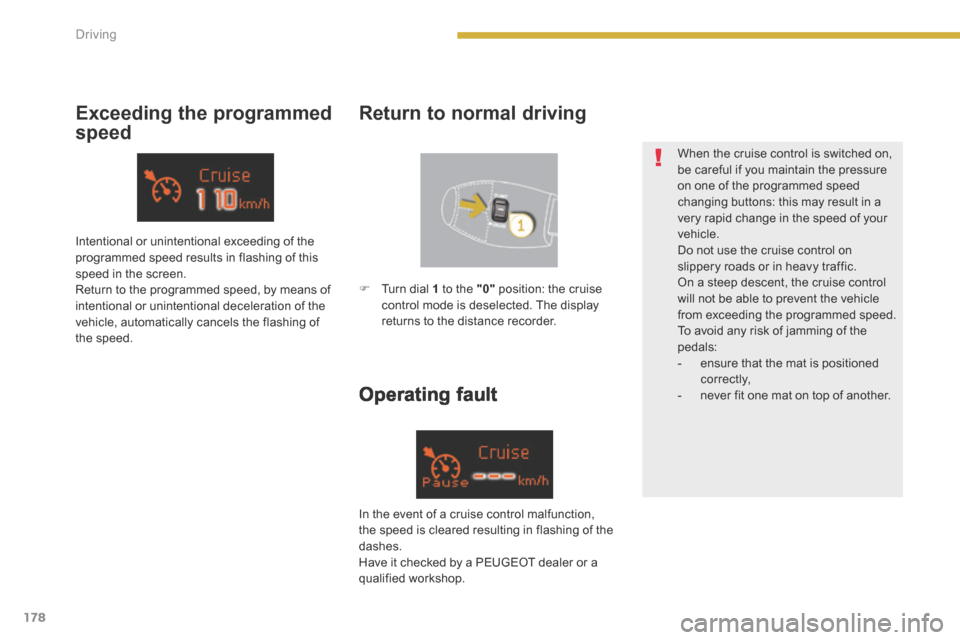
Intentional or unintentional exceeding of the programmed speed results in flashing of this speed in the screen. Return to the programmed speed, by means of intentional or unintentional deceleration of the vehicle, automatically cancels the flashing of the speed.
Turn dial 1 to the "0" position: the cruise control mode is deselected. The display returns to the distance recorder.
In the event of a cruise control malfunction, the speed is cleared resulting in flashing of the
dashes. Have it checked by a PEUGEOT dealer or a qualified workshop.
When the cruise control is switched on, be careful if you maintain the pressure on one of the programmed speed changing buttons: this may result in a very rapid change in the speed of your
vehicle. Do not use the cruise control on slippery roads or in heavy traffic. On a steep descent, the cruise control will not be able to prevent the vehicle from exceeding the programmed speed. To avoid any risk of jamming of the pedals: - ensure that the mat is positioned c o r r e c t l y, - never fit one mat on top of another.
Page 252 of 378

02
250
VOICE COMMANDS AND STEERING MOUNTED CONTROLS
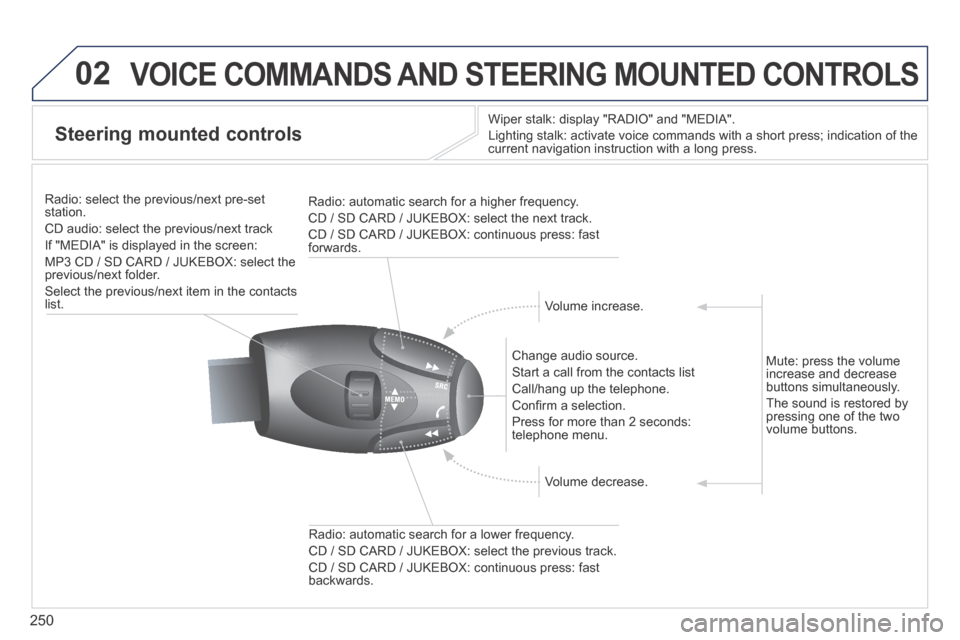
Steering mounted controls
Wiper stalk: display "RADIO" and "MEDIA".
Lighting stalk: activate voice commands with a short press; indication o\
f the current navigation instruction with a long press .
Change audio source.
Start a call from the contacts list
Call/hang up the telephone.
Confi rm a selection.
Press for more than 2 seconds: telephone menu.
Radio: automatic search for a lower frequency.
CD / SD CARD / JUKEBOX: select the previous track.
CD / SD CARD / JUKEBOX: continuous press: fast backwards.
Radio: select the previous/next pre-set station.
CD audio: select the previous/next track
If "MEDIA" is displayed in the screen:
MP3 CD / SD CARD / JUKEBOX: select the previous/next folder.
Select the previous/next item in the contacts list.
Radio: automatic search for a higher frequency.
CD / SD CARD / JUKEBOX: select the next track.
CD / SD CARD / JUKEBOX: continuous press: fast forwards.
Volume increase.
Volume decrease.
Mute: press the volume increase and decrease buttons simultaneously.
The sound is restored by pressing one of the two volume buttons.