Page 50 of 256

48
ensure that no person or object
prevents the seat slide from returning to
its initial position.
Check that the seat belt has reeled in
correctly so as to not impede access for
passengers to the rear seats.
Heated seat controlAccess to the rear seats
(3-door)
F Pull this control toward you to fold the seat
back and move the seat for ward.
When returning the seat to its initial position,
guide it back until the seat and backrest lock
into place.
Wit the engine running, the front seats can be
heated separately.
F
P
ress the control switch.
t
h
e indicator lamp comes on.
F
P
ressing the switch again stops the
heating.
the
temperature is controlled automatically.
the
seat heating function is deactivated about
two minutes after switching off the ignition.
t
o
r
eactivate it, switch the ignition on and press
the control switch again. Switch the seat heating off as soon
as it is no longer needed, as reducing
the vehicle's electrical current demand
reduces fuel consumption.
Comfort
Page 51 of 256
49
Your vehicle is fitted with a fixed one-piece cushion bench rear seat, and depending on version:
- a f olding split (50/50) backrest,
-
a f
olding one-piece backrest.
When not in use, or before folding the seat
backrest(s), stow the rear seat belts by
inserting their tongues in the dedicated holders,
located on the side pillars.
th
e seat backrest is folded from the rear of the
vehicle, with the boot open.
F
P
lace the head restraints in the low
position.
R
efer to the "rear head restraints" section.
F
P
ull the strap(s) A, located behind the seat
backrest(s) to release them, and lay them
on the seat cushion.
Rear seats
Stowing the seat belts Folding the seat backrest
F unfold the backrest to the rear and engage it on the anchorage B .
F
e
n
sure that the seat back has locked in
place correctly.
Returning the backrest of the
bench seat to its initial position
3-door 5-door
3
Comfort
Page 54 of 256
52
Steering wheel adjustment
(with power steering)
F When stationary, hold the steering
wheel then lower the lever to release the
adjustment mechanism.
F
A
djust the steering wheel to the desired
height and then raise the lever to lock the
adjustment mechanism.
For safety reasons, these operations
must not be carried out while driving.
Once these adjustments have been made,
ensure that you can see the instrument
panel clearly from your driving position.
Manual rear view mirror
the rear view mirror has two positions:
- d ay (normal),
-
n
ight (anti-dazzle).
to c
hange from one to the other, push or pull
the lever on the lower edge of the mirror.
Correct driving position
Before taking to the road and to make the most
of the ergonomics of your driving position, carry
out these adjustments in the following order:
-
b
ackrest angle,
-
c
ushion height,
-
l
ongitudinal position of the seat,
-
hei
ght of the steering wheel,
-
t
he interior and door mirrors.
Comfort
Page 73 of 256

71
Starting - stopping the engine with the key
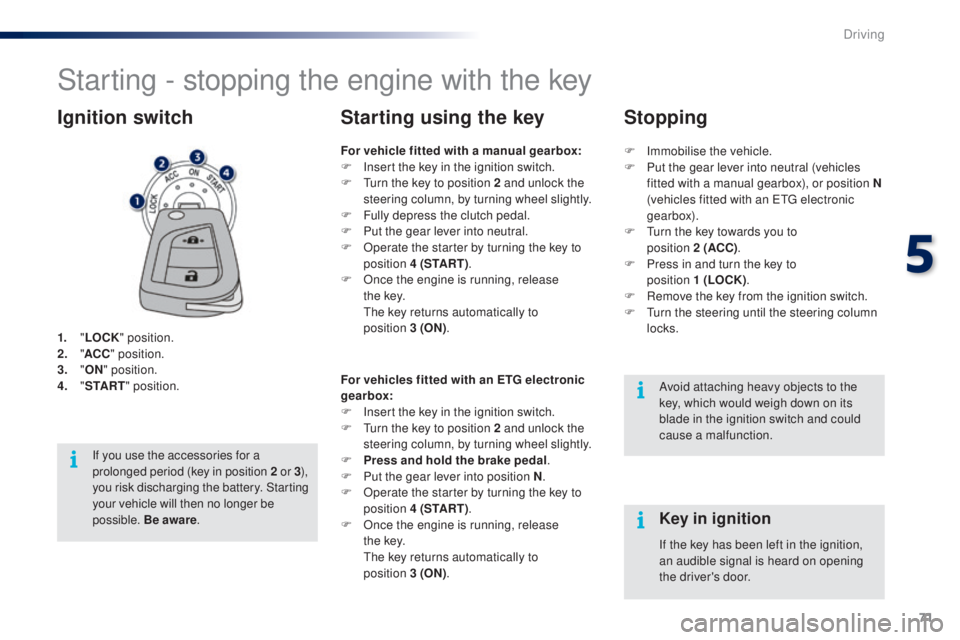
1. "LOCK " position.
2. " AC
C" position.
3.
"ON " position.
4.
" S
TA R T" position.
Ignition switch
Avoid attaching heavy objects to the
key, which would weigh down on its
blade in the ignition switch and could
cause a malfunction.
Key in ignition
For vehicle fitted with a manual gearbox:
F
I nsert the key in the ignition switch.
F
t
u
rn the key to position 2 and unlock the
steering column, by turning wheel slightly.
F
F
ully depress the clutch pedal.
F
P
ut the gear lever into neutral.
F
O
perate the starter by turning the key to
position 4 (S TA R T ) .
F
O
nce the engine is running, release
t h e
key.
t
h
e key returns automatically to
position
3
(ON).
Starting using the key
If the key has been left in the ignition,
an audible signal is heard on opening
the driver's door.
For vehicles fitted with an ETG electronic
gearbox:
F
I
nsert the key in the ignition switch.
F
t
u
rn the key to position 2 and unlock the
steering column, by turning wheel slightly.
F
P
ress and hold the brake pedal
.
F
P
ut the gear lever into position N
.
F
O
perate the starter by turning the key to
position 4 (S TA R T ) .
F
O
nce the engine is running, release
t h e
key.
th
e key returns automatically to
position
3
(ON) .
If you use the accessories for a
prolonged period (key in position 2
or 3),
you risk discharging the battery. Starting
your vehicle will then no longer be
possible. Be aware . F
Imm
obilise the vehicle.
F
P
ut the gear lever into neutral (vehicles
fitted with a manual gearbox), or position N
(vehicles fitted with an etg electronic
gearbox).
F
t
u
rn the key towards you to
position
2
(ACC)
.
F
P
ress in and turn the key to
position
1 (LOCK)
.
F
R
emove the key from the ignition switch.
F
t
u
rn the steering until the steering column
locks.
Stopping
5
Driving
Page 76 of 256

74
there is an audible signal when the driver's
door is opened and the vehicle is not in "OFF"
mode.
If the vehicle is not immobilised, the
engine will not stop.
Switching off using the
electronic key
F Immobilise the vehicle.
F P lace the gear lever in neutral for vehicles
fitted with a manual gearbox, or at N for
vehicles fitted with an
etg electronic
gearbox.
F
W
ith the electronic key inside
the vehicle, press the " S TA R T/
STOP " button.
the
engine stops.
th
e steering locks when a door is opened or on
locking the vehicle. F
P
ress the "START/STOP " button
again to change to " OFF" mode.
Emergency starting
When the electronic key is in the
recognition zone and your vehicle
does not start after pressing the
"START/STOP " button, this warning
lamp flashes in the instrument panel.
F
P
lace the gear lever at N for vehicles with
an
etg electronic gearbox or neutral for
vehicles with a manual gearbox.
F
P
ut the corner of the electronic key, where
the indicator lamp is located, in contact
with the " START/STOP " button.
t
h
ere is an audible signal when the
electronic key is recognised; the vehicle
changes to " ON" mode.
F
P
ress the brake pedal on vehicles with an
e
tg
electronic gearbox, or fully declutch
with a manual gearbox.
F
C
heck that the "Keyless e
n
try and
Starting" indicator lamp comes on in green
in the instrument panel.
F
P
ress the " START/STOP " button.
t
h
e engine starts.
If the engine does not start, contact a
P
e
uge
Ot
dealer or a qualified workshop.
Driving
Page 134 of 256

132
the incorrect installation of a child seat in a
vehicle compromises the child's protection in
the event of an accident.
Check that there is no seat belt or seat belt
buckle under the child seat as this could
destabilise it.
Remember to fasten the seat belts or the
child seat harnesses keeping the slack in
relation to the child's body to a minimum,
even for short journeys.
For the installation of a child seat using a
seat belt, ensure that this is well tensioned
on the child seat and that it is holding the
child seat firmly against the seat of your
vehicle. If your front passenger seat is
adjustable, move it forward if necessary.
At the rear seats, always leave sufficient
space between the front seat and:
-
a r
ear ward facing child seat,
-
t
he feet of a child seated in a for ward
facing child seat.
For this, move the front seat for ward and if
necessary straighten its backrest.
Recommendations on child seats
the chest part of the seat belt must be
positioned on the child's shoulder without
touching the neck.
en
sure that the lap part of the seat belt
passes correctly over the child's thighs.
P
e
uge
Ot
recommends the use of a booster
seat which has a back, fitted with a seat belt
guide at shoulder level.
As a safety precaution, never leave:
-
o
ne or more children alone and
unsupervised in a vehicle,
-
a c
hild or an animal in a vehicle which
is exposed to the sun, with the windows
closed,
-
t
he keys within reach of children inside
the vehicle.
to p
revent accidental opening of the doors,
use the "Child lock".
ta
ke care not to open the rear windows by
more than one third.
to p
rotect young children from the rays of
the sun, fit side blinds on the rear windows.
th
e legislation on carrying a child on the
front passenger seat is specific to each
country. Refer to the legislation in force in
your country.
Deactivate the passenger's front airbag
when a "rear ward facing" child seat is
installed on the front seat. Otherwise, the
child would risk being seriously injured or
killed if the airbag were deployed. For optimum installation of the "forward facing"
child seat, ensure that the back of the child
seat is as close as possible to the backrest of
the vehicle's seat, or in contact if possible.
th
e head restraint must be removed before
installing a child seat with a backrest on the
passenger seat.
en
sure that the head restraint is stowed or
attached securely so that it is not thrown
around the vehicle in the event of sharp
braking.
Refit the head restraint as soon as the child
seat is removed.
Installing a booster
cushion
Children at the front
Child safety
Page 135 of 256
133
Child lock
this prevents the opening of the rear doors
from the inside.
th
e controls are located on the edge of each
rear door.
F
L
ower the control.
Check the status of this safety device before
switching on the ignition.
th
is system is independent of the central
locking.
8
Child safety
Page 239 of 256
237
Keys 30
Remote control 3 1-32
"Keyless
e
n
try and Starting"
system
33 -36
Remote control battery
3
2, 36
Starting
7
1, 73
exterior
Door mirrors 5 1
Lighting control stalk
93
-97
Adjusting the headlamps
9
8
Changing bulbs
1
47-149, 151
-
f
ront lamps
-
d
irection indicator repeaters
Doors
38-40
-
ope
ning / closing
-
c
entral locking
el
ectric windows
4
1
Quarter lights (5 -door)
4
1 W ip e r s
9 9 -10 0
Changing a wiper blade
1
64
Boot 39-40te
mporary puncture
repair kit
1
36-140
Reversing camera
9
2
to
w i n g
16 5
Changing bulbs
1
50-151
-
r
ear lamps
-
3
rd brake lamp
-
n
umber plate lamps
Fuel tank, ref uelling
13 4 -13 5
Fuel gauge
2
5
ele
ctronic stability
programme
107-109
Snow chains
1
46
un
der-inflation detection
1
03-106
ty
re pressures
1
80
Changing a wheel
1
41-145
-
tools
-
r
emoval / fitting
ele
ctric fabric roof
4
2-46
Roof bars
1
66
Accessories
167-168
B3_en_Chap13_recherche-visuelle_ed01-2014
.
Visual search