Page 283 of 372
 . Lower the vehicle comple")
4. Lower the vehicle slowly until the tiretouches the ground. Then, with the wheel
nut wrench, tighten the wheel nuts securely
in the sequence illustrated (
�A,�B,�C,�D,
�E) . Lower the vehicle completely.
WARNING
●Incorrect wheel nuts or improperly
tightened wheel nuts can cause the
wheel to become loose or come off.
This could cause an accident.
● Do not use oil or grease on the wheel
studs or nuts. This could cause the nuts
to become loose.
● Retighten the wheel nuts when the ve-
hicle has been driven for 600 miles
(1,000 km) (also in cases of a flat tire,
etc.) .
As soon as possible, tighten the wheel nuts
to the specified torque with a torque
wrench.
Wheel nut tightening torque: 83 ft-lb (113 N·m)
The wheel nuts must be kept tightened to
specification at all times. It is recom-
mended that wheel nuts be tightened to
specifications at each lubrication interval. Adjust the tire pressure to the COLD pres-
sure.
COLD pressure: After vehicle has been
parked for three hours or more or driven
less than 1 mile (1.6 km) .
COLD tire pressures are shown on the Tire
and Loading Information label affixed to
the driver side center pillar.
After adjusting the tire pressure to the
COLD tire pressure, the display of the tire
pressure information may show higher
pressure than the COLD tire pressure after
the vehicle has been driven more than
1 mile (1.6 km) . This is because the tire
pressure increases as the tire temperature
rises. This does not indicate a system mal-
function.
5. Securely store the flat tire and jacking equip- ment in the vehicle.
WARNING
●Always make sure that the spare tire
and jacking equipment are properly se-
cured after use. Such items can become
dangerous projectiles in an accident or
sudden stop.
● The spare tire is designed for emer-
gency use. See specific instructions un-
der the heading “Wheels and tires” in
the “Maintenance and do-it-yourself”
section of this manual.
Reinstalling the temporary spare tire to
its original position
After the flat tire is repaired, return the temporary
spare to its original position in the tire basket
under the rear of the vehicle.
6-8In case of emergency
Page 284 of 372
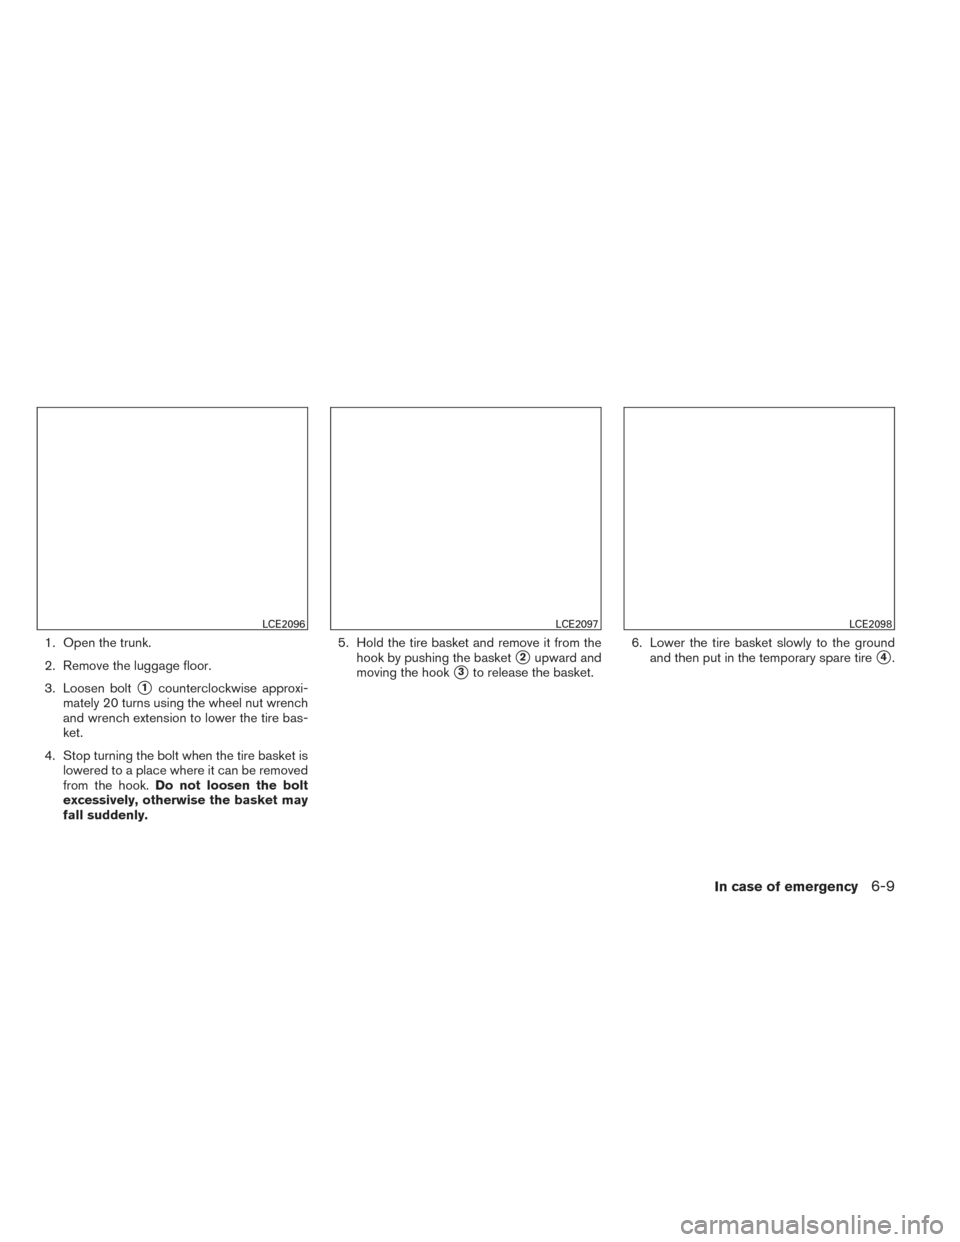
1. Open the trunk.
2. Remove the luggage floor.
3. Loosen bolt
�1counterclockwise approxi-
mately 20 turns using the wheel nut wrench
and wrench extension to lower the tire bas-
ket.
4. Stop turning the bolt when the tire basket is lowered to a place where it can be removed
from the hook. Do not loosen the bolt
excessively, otherwise the basket may
fall suddenly. 5. Hold the tire basket and remove it from the
hook by pushing the basket
�2upward and
moving the hook
�3to release the basket. 6. Lower the tire basket slowly to the ground
and then put in the temporary spare tire�4.
LCE2096LCE2097LCE2098
In case of emergency6-9
Page 285 of 372
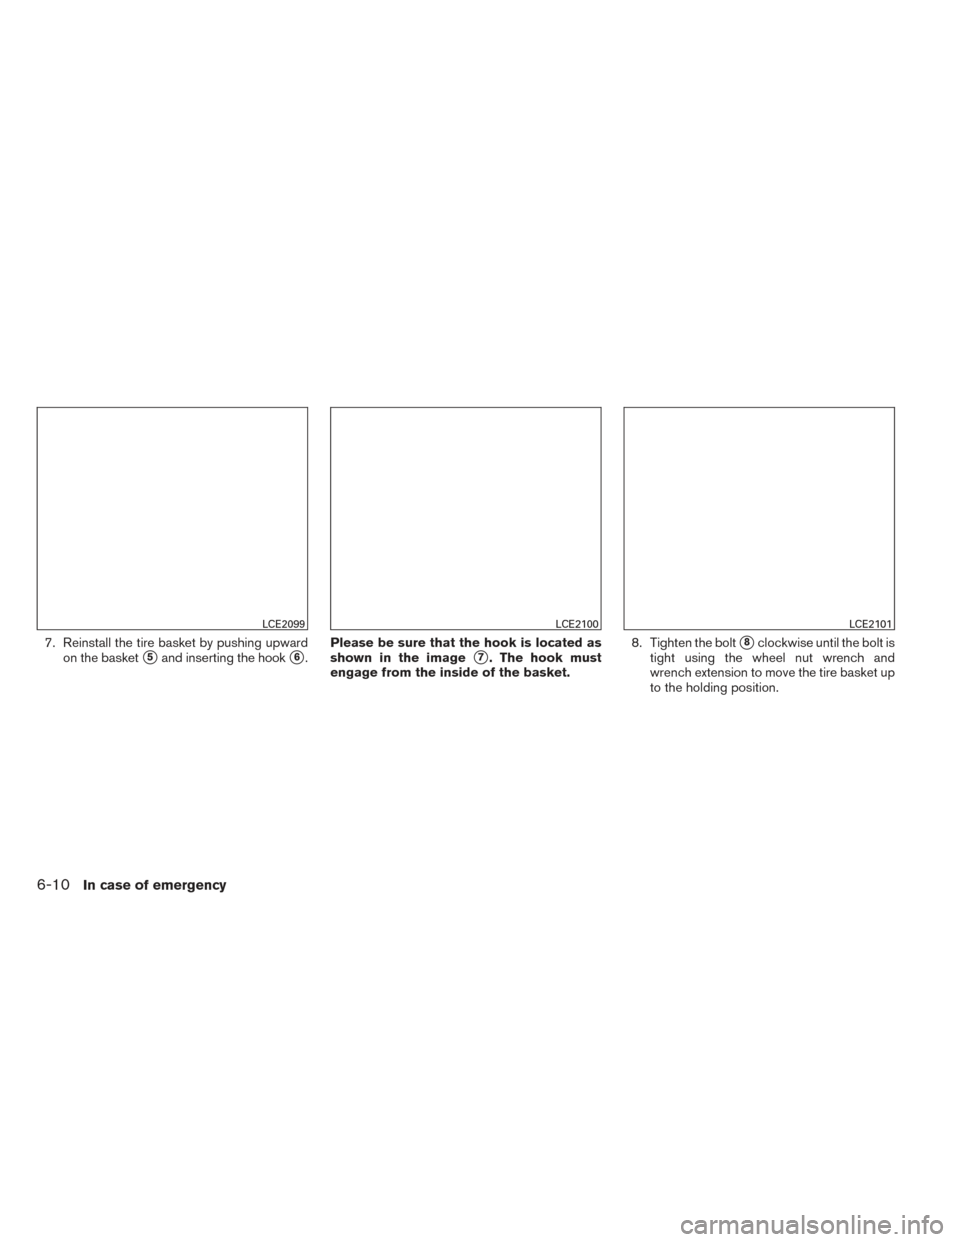
7. Reinstall the tire basket by pushing upwardon the basket
�5and inserting the hook�6. Please be sure that the hook is located as
shown in the image�7. The hook must
engage from the inside of the basket. 8. Tighten the bolt�8clockwise until the bolt is
tight using the wheel nut wrench and
wrench extension to move the tire basket up
to the holding position.
LCE2099LCE2100LCE2101
6-10In case of emergency
Page 286 of 372

WARNING
●Always make sure that the spare tire,
tire basket and jacking equipment are
properly secured after use. Such items
can become dangerous projectiles in an
accident or sudden stop.
● The spare tire is designed for emer-
gency use. See specific instructions un-
der the heading “Wheels and Tires” in
the “Maintenance and do-it yourself”
section of this manual.
● When reinstalling the spare tire basket
under the vehicle after use, be sure that
the hook engages the basket from the
inside. If the spare tire basket hook is
not engaged properly, there is an in-
creased risk of the spare tire separating
from the vehicle in a crash and causing
injury.
Stowing the damaged tire
Securely store the damaged tire in the cargo area
as illustrated.
Securely store the jack and tools in the storage
area.
Return the spare tire basket back to its original
position in the reverse order of removal. See
“Getting the spare tire and tools” in this section. NOTE:
The spare tire basket cannot be used to
store the conventional tire.
WARNING
●
Always make sure that the spare tire
and jacking equipment are properly se-
cured after each use. Such items can
become dangerous projectiles in an ac-
cident or sudden stop.
● Make sure that the spare tire basket is
properly secured in its original position
after removing the spare tire.
● The spare tire and small size spare tire
are designed for emergency use. See
specific instructions under the heading
“Wheels and tires” in the “Maintenance
and do-it-yourself” section of this
manual.
LCE2103
In case of emergency6-11
Page 291 of 372
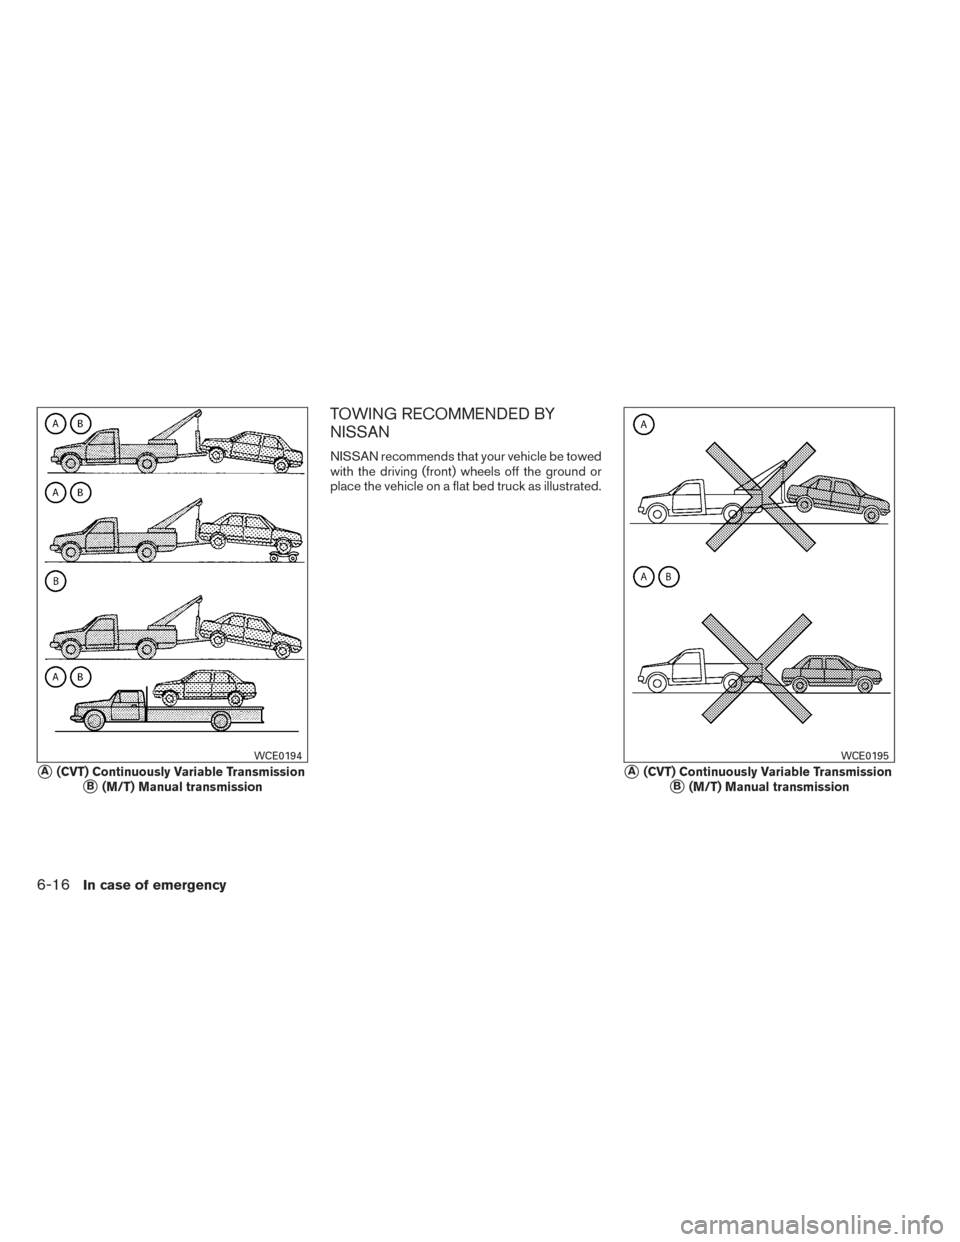
TOWING RECOMMENDED BY
NISSAN
NISSAN recommends that your vehicle be towed
with the driving (front) wheels off the ground or
place the vehicle on a flat bed truck as illustrated.
�A(CVT) Continuously Variable Transmission
�B(M/T) Manual transmission
WCE0194
�A(CVT) Continuously Variable Transmission
�B(M/T) Manual transmission
WCE0195
6-16In case of emergency
Page 292 of 372
 models with the front
wheels on the ground or four wheels on
the ground (forward or backward) , as
this may cause serious and expensive")
CAUTION
●Never tow Continuously Variable Trans-
mission (CVT) models with the front
wheels on the ground or four wheels on
the ground (forward or backward) , as
this may cause serious and expensive
damage to the transmission. If it is nec-
essary to tow the vehicle with the rear
wheels raised always use towing dollies
under the front wheels.
● When towing Continuously Variable
Transmission (CVT) models with the
front wheels on towing dollies, or when
towing manual transmission (M/T)
models with the front wheels on the
ground:
– Turn the ignition switch to the OFF position, and secure the steering
wheel in a straight-ahead position
with a rope or similar device. Never
secure the steering wheel by turning
the ignition switch to the LOCK posi-
tion. This may damage the steering
lock mechanism (for models
equipped with steering lock
mechanism) .
– Move the shift lever to the N (Neutral) position. ●
When towing Continuously Variable
Transmission (CVT) or manual trans-
mission (M/T) models with the rear
wheels on the ground (if you do not use
towing dollies): Always release the
parking brake.
● Observe the following restricted towing
speeds and distances for manual trans-
mission (M/T) models only:
– Speed: Below 50 MPH (80 km/h)
– Distance: Less than 50 miles (80 km)
VEHICLE RECOVERY (freeing a stuck
vehicle)
Do not use the hook to tow the vehicle.
● Remove the cover bumper bracket using a
flat screwdriver or any flat tool.
● To protect the bumper body, place a piece of
cloth between the tool and the vehicle.
● The tool used should be inserted by the
lower portion of the cover.
Front (if so equipped)
LCE2065
In case of emergency6-17
Page 294 of 372

Rocking a stuck vehicle
WARNING
●Stand clear of a stuck vehicle.
● Do not spin your tires at high speed.
This could cause them to explode and
result in serious injury. Parts of your
vehicle could also overheat and be
damaged.
If your vehicle is stuck in sand, snow, mud, etc.,
use the following procedure: 1. Turn off the Vehicle Dynamic Control (VDC) System.
2. Make sure the area in front and behind the vehicle is clear of obstructions.
3. Turn the steering wheel right and left to clear an area around the front tires.
4. Slowly rock the vehicle forward and back- ward.
● Shift back and forth between R (Reverse)
and D (Drive) (CVT models) or 1st (Low)
and R (Reverse) (M/T models) .
● Apply the accelerator as little as possible
to maintain the rocking motion. ●
Release the accelerator pedal before
shifting between R (Reverse) and D
(Drive) (CVT models) or 1st (Low) and R
(Reverse) (M/T models) .
● Do not spin the tires above 35 MPH
(55 km/h).
5. If the vehicle cannot be freed after a few tries, contact a professional towing service
to remove the vehicle.
In case of emergency6-19
Page 296 of 372

7 Appearance and care
Cleaning exterior..................................7-2
Washing ......................................7-2
Waxing ........................................7-2
Removing spots ................................7-3
Underbody ....................................7-3
Glass .........................................7-3
Aluminum alloy wheels (if so equipped) ...........7-3
Chrome parts ..................................7-3
Tire dressings ..................................7-3
Cleaning interior ...................................7-4 Air fresheners
..................................7-4
Floor mats .....................................7-4
Seat belts .....................................7-5
Corrosion protection ...............................7-5
Most common factors contributing to vehicle
corrosion ......................................7-5
Environmental factors influence the rate of
corrosion ......................................7-5
To protect your vehicle from corrosion ............7-6